|
Repairing Light Seals
We have all opened the back of a vintage camera "find"
only to discover the old door seals are either so dry and flaky
they raise dust, or so gummy they look like tar. Chances are, if
the door seals look this bad the mirror damper is also in need of
restoration. It is one of the repairs you most often need to consider
on a vintage camera and, regardless of how daunting it might seem
if you have never done it, it is one of the easiest repairs you
can make.
Reader Jon Goodman has a marvelous, inexpensive repair kit
(see below) available for this restoration,
and was kind enough to share these photos of how it works.

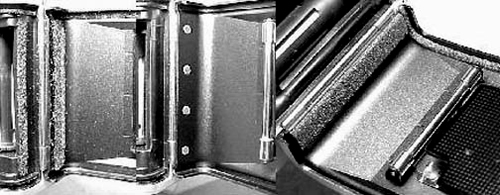
(a) (b) (c)
(d) Follow this sequence, from
left to right.
Mirror Damper or Mirror Brake
The sequence above shows a dry, deteriorated mirror damper
(a).
The first step in the restoration is obvious: remove the old foam!
An Exacto blade is a good tool to begin with. Remove the old foam
strip
(b), being careful to minimize any pieces falling into the
body of the camera. You are going to have to remove them, if they
do, so caution here really pays off. Once the base is clear, use
a pair of tweezers to gently place
(c) a new piece of self-adhesive
foam (I'm going to tell you in a minute where to get it) on the
spot you just cleaned. Once you are certain it is positioned where
you want it, gently press the foam down to make the adhesive seal
(d). You're done with he first part! I told you it was easy!

(a) (b) (c)
(d) Follow this sequence, from
left to right.
Door Seals
Door seals are almost as easy. First, (above) clean out the worst
of the black goo the old seal material has turned into
(a). Next,
use a bit of cloth or paper towel and solvent (I use regular rubbing
alcohol) to remove the remainder of the old residue
(b). When it is
clean, press the new sealing material into the slot
(c), trimming
at the end and avoiding the frame counter reset pin.
The slot (d)
is now sealed perfectly so there will be no light leak!

The hinge seal before (left) and
after (right).
Repeat the process at
the hinge end of the camera door (above).

Before (left), a clean latch end
(center), new seal applied (right).
And again at the latch end (above).

Hinge and door seals before (left)
and after (right).
And finally at the outside edge of the rear door itself (above). That's
it! Now you're really done!
Jon Goodman
Jon is one of the Gentle Readers of this site, and he generously provided
the pictures for this section. He has a great, inexpensive product
and tool available for resealing vintage cameras. His web site is
still in development, but you can find his eBay auctions by looking
for the seller interslice. You can also
email him with a request for more information.
Just put Mamiya Light Seals into the subject line, so Jon knows it
came from here!
You can also get pre-packed restoration material from
Micro-Tools, a good source for a lot
of camera restoration materials and tools.
Other do-it-yourself repair sections are listed below (note - line
items in blue are live page links; items in black are still under
construction):
|

