Return
Home
Return to
Main
How-To
Page
|
Cleaning the Mamiya DSX 1000 View Screen
Photos courtesy Joerg Krueger, Germany
Removing and Cleaning the Viewscreen of the Mamiya DSX 1000
One of the problems often encountered on older cameras (and it's true
of the Mamiya SX-family, too) is dust on the view screen. Over time, dust can move past
the prism and collect on the inner side of the screen, where it can be seen as annoying
dark spots or threads in your viewfinder every time you try to compose or focus. These
spots do not affect photo quality, but they are extremely annoying.
For many SLR cameras, a lot of Mamiya included, cleaning the screen means removing the
top plate and prism, and it is often something that is more work than anyone who is not
tremendously familiar with camera repair would like to do.
However, with the Mamiya MSX 1000, it is possible to remove the view screen without
removing the top plate. It is not very complicated, but some experience in handling some
of the tiny parts encountered in camera repair would certainly be helpful. Of course,
just as I cannot guarantee success when you attempt any self repair, I also cannot be
responsible for any damage you cause to your camera in the effort.
Should you be brave enough to make the attempt anyway, here is the simple procedure:
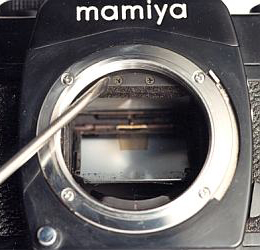
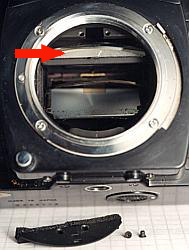
FIGURE A (Left); FIGURE B
(Right)
- Remove the camera lens and look into the camera body
- With a suitable screwdriver, remove the two screws in the top
piece behind the lens mount, that are holding the mirror brake pad (Figure A).
Avoid touching the foam on this pad. On older cameras it can easily collapse to powder
(NOTE: if the pad is crumbly or sticky, this would also a good opportunity to
replace it).
- Also avoid touching the screen and the mirror, since they can be
damaged or scratched very easily.
- Remove the plate with the foam carefully. A metal frame that works
as a spring, and the screen itself, should come loose easily. Again, make sure you don't
touch the mirror.
- Keep the arrangement of the frame and the screen in mind, because you will
have to reassemble it momentarily.
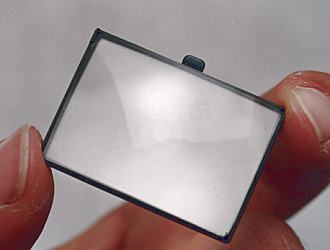
- The red arrow (Figure B) shows the screen. Use tweezers to
pull out first the frame and then the screen.
- To clean the screen use a soft-hair brush and a can of compressed air.
Using water to dampen a soft cloth should not present a problem, as long as it is dried
thoroughly, but I do not recommend cleaning solutions of any kind.
- Calmly reassemble the camera.
This procedure should work on all MSX and DSX cameras, but I have been
told there are Mamiya MSX 500's with non-removable screens. It may be those are earlier
examples with some components similar to the older TL cameras. You should easily be able
to tell if that's true of your camera...it will not have those screws!
It is by no means complete, but the items I am working
on so far are listed below (note: the line items in blue are live
page links; those items in black are still under construction):
|
| © 2000-2009
R.L. Herron Saved for Historical Reference |
| |
|
