Ensign Ranger II
Posted 2-10-'04

This camera manual library is for reference
and historical purposes, all rights reserved.
This page is copyright© by Butkus camera manual site, M. Butkus, NJ.
This page may not be sold or distributed without
the expressed permission of the producer.
I have no connection with any camera company.

On-line camera manual library

If you find this manual useful,
how about a donation of $3 to:


M. Butkus, 29 Lake Ave.,
High Bridge, NJ 08829-1701
and send your e-mail address
so I can thank you. 
Most other places would charge
you $7.50 for a electronic copy
or $18.00 for a hard to read Xerox copy.

This will help me to continue to host this site,
buy new manuals, and pay their shipping costs.

It'll make you feel better, won't it ?

If you use Pay Pal, use the link below.
Use the above address for a check, M.O. or cash.


www.PayPal.me/butkus

Venmo  @mike-butkus-camera  Ph 2083

<<< IF YOU WOULD LIKE THIS OR ANY PDF FILE
PRINTED, BOUND AND MAILED TO YOU,
SEE THIS OUTSIDE COMPANY'S OFFER >>>


Back to main camera manual page


CLICK HERE TO GO TO A Ensign Ranger II PDF
 CREATED FROM THE FILE BELOW

 Picture


FEATURES OF THE ENSIGN RANGER SPECIAL

The instructions contained in the accompanying booklet apply to the Ensign Ranger Special, but the following additional features should be noted.

Masks are provided in the back of the camera so that two sizes of picture may be taken on a 120 or 620 roll film. When both masks are folded back inside the film chambers, the camera will take eight pictures 2 1/4 x 3 1/4, in. and the ruby window marked 8 should be used when winding on after each exposure.

If both masks are moved across the picture frame at the back of the camera, thus reducing the size o the aperture, twelve pictures 2 in square may he taken and the rub window marked 12 should he used

The appropriate field of view to each of these picture sizes is show in the Albada viewfinder. The centre square should be employee when taking 2-,' in. square picture and the larger rectangle when core posing 2 1/4 x 3 1/4, in. views.

The lens on the Ranger_ Special has a maximum aperture of f/4. and it is fitted with a four-speed shutter. The release is built into the body adjacent to the film winding knob.

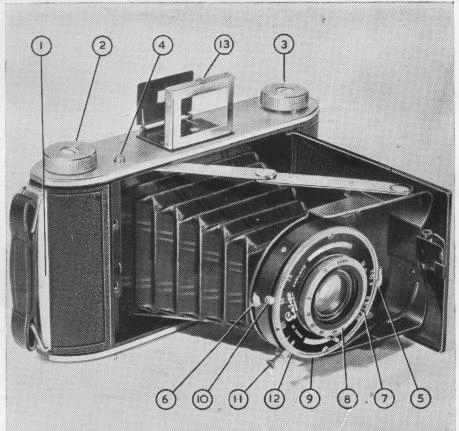
ENSIGN RANGER II CAMERA - click on image to enlarge it.
 
Ensign Ranger II camera

1. Catch holding camera back in position.
2. Spring knob.
3. Film winding knob.
4. Button for opening camera.
5. Pointer for aperture sizes (see Fig. 6).
6. Aperture setting lever.
7. Shutter front plate with speedmarkings and aperture scale.
8. Rotating lens cell.
9. Outer milled ring. 
10. Shutter setting lever.
11. Shutter release.
12. Socket for synchroflash plug (see Fig. 6).
13. View Finder. Picture sizes: 
Eight 34 x 24in. pictures on standard size 20 or 62 roll film.


Recommended films:

ENSIGN ULTRACHROME -fast and highly orthochromatic.

ENSIGN FINE GRAIN PAN-a panchromatic film of very fine grain and medium speed.

LOADING THE CAMERA WITH FILM

Ensign Ranger II camera

Opening the Camera back:
Slide the catch 1 in the direction indicated by the arrow and swing outwards the hinged camera back (Fig. I).

Inserting the Film

Place the full spool of film (size 20 or 62) in the lower chamber, while drawing the spring knob 2 outwards. Release knob when the spool is in its correct position. The tapered end of the paper must point towards the take-up spool chamber containing the empty spool on which the exposed film is wound (Fig. 2).

If an empty take-up spool is not already in position at the winding end of the camera, it should be fitted by pressing the end of the spool with the round hole against the spring stud, at the same time withdrawing the winder knob 3, which is returned to its original position when the spool is in place (care being taken that the winding key engages the slit end of the spool.


Ensign Ranger II cameraPicture

Remove the gummed label which holds the paper leader in place; pull the latter across the rollers and insert the end in the wide slot of the empty spool.


Ensign Ranger II camera Give one or two turns to the film winding knob 3 in a clockwise direction to draw the paper leader taut. In doing this see that the paper leader is nicely centered between the spool flanges. Any tendency to wind crooked must be corrected before proceeding further (Fig. 3).

Close the back of the camera, making sure it is securely fastened by the catch. Open the slide until it is clear of the ruby window and turn the winding knob 3 until first, a warning hand, and then a figure 1, appear in the ruby observation window (Fig. 4).

Close the ruby window by means of the slide. This is most important when using panchromatic film.

MAKING THE EXPOSURE

Ensign Ranger II camera

Opening the Camera Front
Pressure on the button 4 will cause the front of the camera to spring open automatically, bringing the lens and shutter into working position. The camera should be tilted in a slightly downwards position to ensure that the spring mechanism is not retarded by gravity (Fig. 5).


Lens Apertures
The aperture of the lens is controlled by the setting of the aperture pointer 5 on to one or other of the " f " numbers marked on the shutter front plate 7. The pointer is operated by the aperture setting lever 6. A higher number on the scale denotes a smaller aperture, needs a longer exposure time, and increases the depth of focus, e.g., f/ll is smaller than f/6.3 (Fig. 6).
 
Ensign Ranger II camera

Focusing
The scale of focusing distances is given on the rotating front lens cell 8 (Fig. 6). The figure corresponding to the distance at which the subject is estimated to be from the camera should be set against the pin, situated on the shutter front plate. This pin also acts as a stop to prevent the lens being rotated past the infinity position.

The Shutter
The shutter speed numbers on the front of the shutter 7 represent fractions of a second, while the letters B and T stand for " Brief " and "Time" respectively (Fig. 6).

For instantaneous exposures turn the outer milled ring 9 so that the red index mark is brought opposite the required speed. Set the shutter by pulling over the lever 10 until it stops. The shutter is operated by means of the release plunger 11 which must be pressed right down until the shutter operation is completed.

For short-time exposures bring the red index mark opposite the letter B and pull over the setting lever 10. The shutter opens by pressing the release knob 11 and closes as soon as the pressure ceases.

When long-time exposures are required turn the ring 9 until the red index mark is brought opposite the letter T. After the shutter lever 10 has been set by sliding it along in its groove, the shutter is operated as follows:

(a) To open the shutter, press in the head of the release 11, then remove the pressure.

(b) Immediately the required exposure has been given the shutter is closed by a further pressure on the head of the release plunger.

Ensign Ranger II camera

The View Finder

The camera is provided with a direct vision frame finder for eyelevel sighting 
(Fig. 7).

Holding the Camera when Picture Taking

Ensign Ranger II camera

It is impossible to give hard and fast rules for holding the camera when making an exposure. The important point is that it musk be held firmly and without vibration of any kind, as movement will spoil the sharpness of the picture.

The illustrations show the recommended ways of holding the camera for upright and horizontal pictures.

Ensign Ranger II camera

For short-time exposures and exposures of long duration a firm stand or rigid tripod should be used. The camera has two bushes for screwing it to a tripod, and the baseboard is provided with a folding leg for certain time exposure work.

Ensign Ranger II camera

CLOSING THE CAMERA
The camera is closed by pressing on the hinges of the struts with the two thumbs. The thumbs may then be removed to raise and close the baseboard (Fig. 10).


UNLOADING THE FILM

When the last exposure has been made, wind off the whole length of the film. By looking through the ruby observation window it will be seen when the paper is completely wound on to the take-up spool.


Ensign Ranger II camera

Slide the catch and open the camera back.

Pull back the film winder knob 3 and take out the spool (Fig. 11).

Fasten the end of the exposed spool by sticking down the cover paper with the gummed " exposed " label provided.

Transfer the empty spool to the opposite spool chamber. Press the end of the spool with the round hole against the spring stud and allow the other end with the slit to fit the projection of the winder knob 3.

Turn the winder knob 3 until it engages the spool and turns the spool with it. The camera is then ready for reloading.

EXPOSURE TABLE
The following table gives a rough idea of the exposures and stops for various subjects, using the popular medium speed films, such as the Ensign Ultrachrome, from 10 a.m. until 2 p.m. in bright sunshine during April, May, June, July, August and September. For more detailed information, an exposure guide or meter is recommended.

f/6.3 f/8 f/ll f/16 f/22 f/32
Open Seascapes and Cloud Studies 1/100 1/50
Open Landscapes with light foreground Beach Scenes 1/100 1/50 1/25
Average Landscapes with objects in Foreground. Figures in Open. River Scenes 1/100 1/50 1/25 1/10*
Heavy Foreground, buildings or trees occupying greater portion of picture 1/100 1/50  1/25 1/10* 1/5*
Portraits or Groups taken out of doors 1/100 1/50 1/25 1/10* 1/5* 1/2*
Very dark, near objects 1/50 1/25 1/10* 1/5* 1/2* 1*

In other conditions the exposures are multiplied as follows : -

In October, November, December, January, February and March .... 2

Light clouds over whole sky but able to cast visible shadow 2

Heavy clouds over whole sky .... .... . 4

With Super-Speed Film .... .... ....

Note: Bear in mind that modern roll films, while of greater speed, also resist the effect of over exposure. When in doubt, a longer exposure should, therefore, be given.

* Recommended for use with Camera on tripod.

DEPTH OF FOCUS FOR ENSIGN RANGER II CAMERA

Ensign Ranger II camera

Ensign ROLL FILM

Ensign Ranger II camera Ensign roll film is at present available either in Ultrachrome -a fast highly orthochromatic film which adds greatly to the scope and speed of all your picture making-or Fine Grain Panchromatic-a film to give you correct rendering of all subjects in monochrome. Ensign Panchromatic films always give splendid enlargements because of their extremely fine grain. Ensign roll films are made in sizes to fit all the popular roll film cameras.

Ensign Ranger II camera

BAR-GAS contact paper

Printing at home, using BarGas paper, is the easiest method of producing bright professional looking pictures from all your negatives.

Bar-Gas is available in handy packets of 25 and 100 sheets to suit all standard negative sizes. Your dealer can supply.