and historical purposes, all rights reserved.
This page is copyright© by
This page may not be sold or distributed without
the expressed permission of the producer
I have no connection with any camera company.
OPERATING INSTRUCTION
Chinon AF-S280
TTL (through the lens flash)
This manual library is for reference
and historical purposes, all rights reserved.
This page is copyright© by
![]() , M.
Butkus, N.J.
, M.
Butkus, N.J.
This page may not be sold or distributed without
the expressed permission of the producer
I have no connection with any camera company.
If you find this manual useful,
how about a donation of
$3 to:
M. Butkus, 29 Lake Ave.,
High Bridge, NJ 08829-1701
and send your e-mail
address
so I can thank you.
Most other places would charge
you $7.50 for
a electronic copy
or $18.00 for a hard to read Xerox copy.
If you use Pay Pal, use the link below.
Use the above address for a check, M.O. or cash.
CLICK HERE FOR A PDF OF
Chinon AF-S280 Flash
MADE FROM THIS PAGE
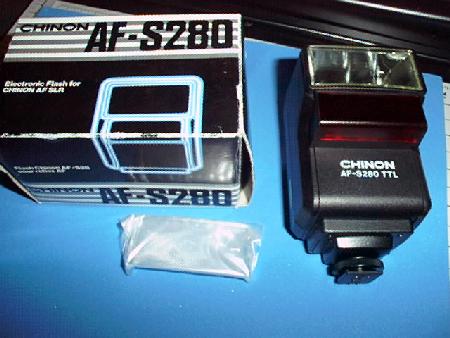
This flash provides AF and "Through The Lens Flash"
with the Chinon CP-9AF camera
other flashes will require you to go to manual mode
and manually set the camera's aperture
-- the small white item is the wide angle flash adaptor
--
NOMENCLATURE
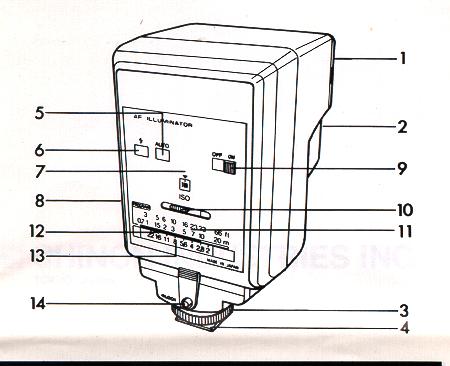 |
1. Flash Window 2. AF Illuminator 3. Locking Wheel 4. Hot Show Contact 5. TTL Auto Check Lamp 6. Ready Lamp 7. Film Speed Window 8. Battery Chamber Cover 9. Main Switch 10. Guide Scale Knob |
11. Distance Scale
12. TTL Distance Indicator
13. Lens Aperture Scale
14. Test Button
SPECIFICATIONS
Guide Number: 28 (ISO 100, M)
Illumination Angle: 60 degrees in horizontal, 45 degrees in vertical
Flash Duration: 1/1000 - 1/30000 Sec.
Recycle Time: 0.2 - 7 Sec., in automatic mode
Flash Output Control: TTL automatic output control system
Flash Ready Lamp: Built-in
Energy Saving: If the flash and camera are left more than 3 minutes without operation, flash unit will be automatically turned 'OFF'.
Power Source: Four 1.5 volt AA alkaline batteries
PREPARATIONS
1. Battery Installation
1) Turn the Main Switch of the flash unit to the OFF position.
2) Slide and pull up the Battery Chamber Cover to open it.
3) Install the batteries with (+) and (-) ends as aligned as indicated in the battery chamber.
2. Attaching the Unit to the Camera
1) Turn the CP-9AF and flash unit to the 'OFF' position before the flash
2) Loose the Locking Wheel on the flash unit. Then slide the Hot Shoe section of the flash unit firmly into the accessory shoe of the camera.
3) Turn the Locking Wheel to fix the flash unit firmly with the accessory shoe on the CP-9AF.
4) Then, turn the Main Switch to the 'ON' position.
3. Flash Testing
It is recommended to test the flash function by the Test Button before taking a flash photography.
2) Then, in order to check the proper flash functions, press the Test Button so that the flash will be fired to confirm the proper flash functions.
2) In order to turn the flash unit 'ON from the Energy Saving mode, press the CP-9AF's shutter release button halfway or press the Test Button on the flash unit, so that the flash unit will be immediately turned ON again. (Pressing the CP-9AF's AF mode button or time mode button will also cancel the Energy Saving mode).
Even in the Energy Saving
mode, a minimal current is always drawing in order
for the flash unit to be ready immediately upon the cancellation of the Energy
Saving mode. Therefore, when the flash is not used for the longer period of
time, it is recommended to manually turn the flash unit to be 'OFF with the
Main Switch.
5. AF Illuminator
The effective range of the AF illuminator depends on the condition of the subject. Therefore, for certain subjects, the CP-9AF may not focus properly even with the aid of the AF illuminator. In such a case, it is recommended to move closer to the subject for picture taking.
6. TTL Auto Check Lamp
1) Upon completion of the flash photography, TL Auto Check Lamp (green) will light up and
confirm that the flash output was properly controlled. (A good check when used with the test button. Light only glows a for 3 seconds.
7. Distance Scale
1) The
TTL automatic flash range changes with the film speed and lens aperture
in use. Set the flash unit for the proper film speed of the film in use
by sliding the Guide Scale Knob on the flash unit.
2) The Distance Indicator (green/blue) right beneath the Distance Scale indicates the effective
flash range.
I. Flash In the Aperture Priority AE
1) Set the CP-9AF to the Aperture priority AE mode and select the desirable lens
Aperture setting with the UP/DOWN switch on the CP-9AF.
2) Slide the Main Switch of the flash unit to the ON position.
3) As soon as the flash is fully charged, Flash Ready Lamp on the flash unit and the flash ready symbol LED (lighting bolt ) in the viewfinder of the CP-9AF will light-up.
4) Press the shutter release button halfway so that the shutter speed will automatically be set anywhere in between 1/60 to 1/100 Sec., depending on the scene brightness.
5) Press the shutter release button on the CP-9AF fully to take a flash
photography.
6) TTL Auto Check Lamp (green) on the flash unit will then light up and confirm the properly controlled flash output for the shot.
II. Flash Photography in the Program AE (P. Pa, Pc Modes)
1 ) Set the CP-9AF in any of the program mode.
2) Slide the Main Switch of the flash unit to the ON position.
3) As soon as the flash is fully charged, Flash Ready Lamp on the flash unit and the flash ready symbol LED (lighting bolt ) in the viewfinder of the CP-9AF will light-up.
4) Press the shutter release button halfway so that the shutter speed will automatically be set anywhere in between 1/60 to 1/100 Sec.. depending on the scene brightness.
5) Press the shutter release button on the CP-9AF fully to take a flash
photography.
6) TTL Auto Check Lamp (green) on the flash unit will then light up and confirm the properly controlled flash output for the shot.
Note:
Taking a flash photography in the Program AE mode is especially useful for the Fill-in flash photography.
III. Auto Fill-in flash Photography
1) Fill-in flash photography is effective for the subject in the back-light condition as it avoids the main subject to be under exposed due to the strong back ground brightness. Auto Fill-in flash can easily be accomplished in the Program AE mode flash operation:
2) Set the camera in any of the Program AE mode without any further setting.
Then just point and shoot against the back-lit subject whenever the flash is fully charged for the perfect fill-in flash photography.
Note:
If the main subject is too bright, using a fill-flash may result in over exposure.
IV. Flash Photography in the Manual Exposure Mode
1) Set the CP-9AF to the Manual exposure mode and select the desirable
Aperture and shutter speed of 1/60 Sec., or faster.
2) Slide the Main Switch of the flash unit to the ON position.
3) When the flash is fully charged, press the shutter release button halfway so that the shutter speed will automatically be set anywhere in between 1/60 to 1/100 Sec. depending on the scene brightness.
4) Press the shutter release button fully to take a flash photography.
V. Slow Shutter Synchronization
This technique enables you to increase the exposure on light backgrounds while
maintaining the proper exposure on the main subject.
1) Set the CP-9AF to the Manual exposure mode and set the desirable Aperture and shutter speed slower than 1/60 Sec.
2) Slide the Main Switch of the flash unit to the ON position
3) When the Flash is fully charged, press the shutter release button halfway so that the manually selected shutter speed will be set.
4) Press the shutter release button fully to take a Slow shutter synchronization flash photography.
Note:
Use of the tripod is recommended for the slow synchronization flash
photography for the best results.
VI. Flash Coverage Angle
The effective flash angle coverage is sufficient to cover the field of view of a 35 mm wide angle teas. Therefore, when using a lens wider than the 35 mm focal length, use of a wide angle adapter is recommended which extends the flash angle coverage down to the field d view of a 28mm lens.
Note:
When the wide angle adapter is attached on the flash unit Guide Number will be reduced to G. No. 20
(ISO 100, M) and the effective flash distance will be reduced accordingly.
VII. Operating Range
Operating range changes with
film speed and the lens Aperture setting as per following tables.
| Lens Aperture | P-mode (F3.5) | Wide angle adaptor |
| Manual F 2 range = 3.3 to 46 ft. | 2.3 - 33 ft. | 2.3 - 19 ft. |
| Film speed | 25 ASA | 50 ASA | 100ASA | 200ASA | 400ASA |
| Ratio | 0.5 | 0.7 | 1 (as per guide) | 1.4 | 2X |
Note: For example, if the maximum operating is 20 feet with ISO 100 film
it will be 40 feet when using ISO 400 film.