and historical purposes, all rights reserved.
This page is copyright© by
This page may not be sold or distributed without
the expressed permission of the producer.
I have no connection with any camera company.
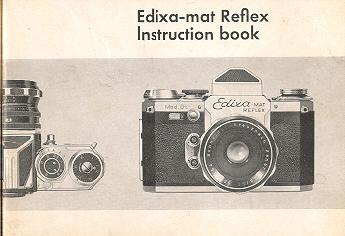
Edixa-mat Reflex
On-line users manual
This camera manual library is for reference
and historical
purposes, all rights reserved.
This page is copyright© by
![]() ,
M. Butkus, NJ.
,
M. Butkus, NJ.
This page may not be sold or distributed without
the expressed
permission of the producer.
I have no connection with any camera company.
On-line camera manual library
Back to main on-line manual page
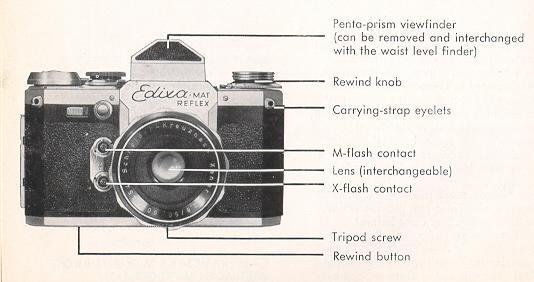
If you find this manual useful,
how about a donation of
$3 to:
M. Butkus, 29 Lake Ave.,
High Bridge, NJ 08829-1701
and send your e-mail
address
so I can thank you.
Most other places would charge
you $7.50 for
a electronic copy
or $18.00 for a hard to read Xerox copy.
This will help me to continue to host this site,
buy new manuals, and pay their shipping costs.
It'll make you feel better, won't it ?
If you use Pay Pal, use the link below.
Use the above address for a
check, M.O. or cash.
 |
|
Contents:
| 2 Introduction
3 For attention 4--6 Description of the camera bode 7--10 Loading the film 11 Rewinding the exposed film 11--12 Setting the shutter speeds 12--13 Setting shutter speeds (2--9 sec.) 14--15 Waist level viewfinder 15 Prism viewfinder 16 To exchange 17 The lenses of the Edixa-mat
|
18--19 How to use lens and
depth-of-field scale
20 The split-image rangefinder 21 Intentional double exposures 22--24 Extension rings 25 Double cable release 26 Edixa bellows extension and cable release 27 Edixa accessory shoe 27--28 Flash synchronization 29 Microscope adapter
|
Introduction
Congratulations! You are now the proud owner of the Edixa-mat Reflex camera. The Edixa-mat is a precision instrument, manufactured in Germany in the finest tradition of German camera craftsmanship. The elegance and beauty of the Edixa-mat design . . . the unique significant features . . . the unusual optical qualities of its optics . . . assure you that you have the ultimate in 35mm single lens reflex cameras.
Your Edixa-mat will give you a lifetime of pleasure, and Edixa-mat pictures will top anything you've ever done before! Edixa-mat owners who read German are invited to ask for the "EDIXA POST", the magazine for Edixa owners. The ,EDIXAPOST" is published in German, approximately four times a year.
Should you, at any time, find that your camera is not operating properly, or if it should require servicing, it is suggested that you send it to us for checking and examination, and for any adjustments that may be required.
You will not be charged for work during the Guarantee period. At other times, all repair and adjustment work will be charged on a nominal basis.
Please read the instructions which follow,
carefully, before attempting to operate your camera.
CAMERAWORKS - WIRGIN BROS. - WIESBADEN, WEST-GERMANY
|
|
|
| 1.
Loading the film Push the latch for the back upwards; open camera back. |
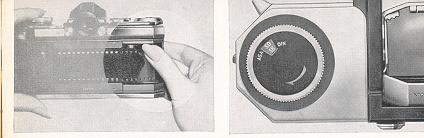
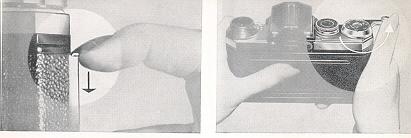
2. Insert the beginning of the film in the slit of the take-up spool; |
|
|
|
| 3.
Rotate spool 1 1/2 turns in the direction of the arrow. The teeth of the film transport sprocket will then engage the perforation holes of the film. Pull up the rewind knob. And set the film-type indicator scale. Then insert the film cartridge and push down rewind knob. The cartridge must lie straight, but move to and fro easily. |
4.
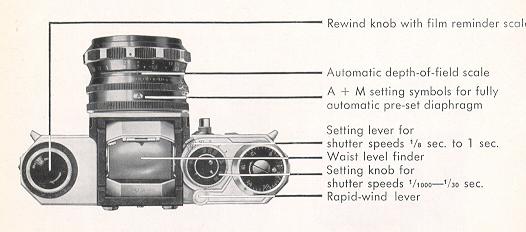
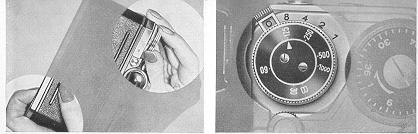
The film-type indicator scale helps to remind you what type of film is in the camera. It can be set for DIN and ASA speeds, daylight or artificial light color film. means: camera not loaded. To set the scale, place your finger under the pulled-out knob: there will be a slight click. Then simply turn the rewind knob until the desired figure, or "Col T" (daylight) or "CoI K" (artificial light) appears in the window. |
|
|
|
| 5.
Close the back and press latch downwards.
|
6.
Turn rapid-wind lever fully. This also wind Important: Observe that at same time the rewind knob must be
turning. If it isn't, your film is not properly engaged in take-up spool.
Therefore repeat film-loading operations.
|
|
|
|
| 7.
Press the shutter release knob. Repeat operations 6 and 7 once again.
|
8.
Turn frame-counter disc to 1 (in direction of arrow). Your EDIXA-MAT is now ready to take your first picture. Note: Along side the release knob you will see "safety catch". This locks the shutter release knob. And now: |
|
|
|
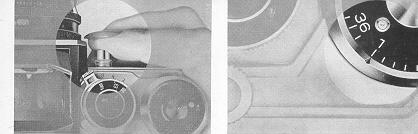
| 9.
Rewinding the exposed film When the frame-counter scale indicates "36" (or "20" with 20-exposure cartridges), you can take one last picture; then the film is completely exposed. Depress the knob in the camera base and at the same time turn the rewind knob until a sudden resistance, followed by a snap and the freeing of the knob indicates that rewinding is completed. The film must then be rewound in the camera, from the take-up spool back into the cassette. Open the camera and take out the film cartridge. |
10.
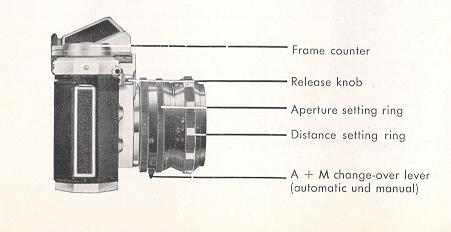
Setting the shutter speeds: Fast speeds from 1, 30 sec. to 1/1000 sec., also "B" (with "B" setting the shutter remains open as long as pressure is maintained on the release knob). With Models Standard, Flex and Kadett from 1/30 sec. to 1/500 sec., and "B". Lift speed-setting knob and set desired shutter speed opposite the index mark; Allow setting knob to click back into position. Window of slow-speed lever must indicate "0". |
 |
|
| 11.
Slow Speeds from 1/8 to 1 sec. Set speed-setting knob to 1/30 sec. Then turn slow-speed lever so that its window is over the desired shutter speed. Illustration shows setting for V4sec. Important! Shutter speeds can be set both before and after operating the rapid-wind lever. The camera can be left tensioned for as long as you like. |
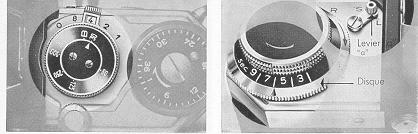
12.
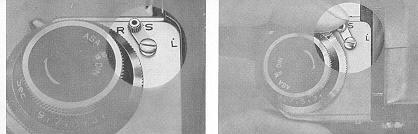
Model "D" has an extended range of shutter speeds from 2 sec. to 9 sec. Set fast shutter-speed knob to "B"; turn slow-speed lever to set window to "0". Set lever "a" to "L" (long exposure mechanism). Turn tensioning disc indirection of arrow until index is opposite desired shutter speed. Illustration shows correct setting for 6 seconds. Always perform operations in this sequence! |
|
|
|
| 13.
Always perform operations in this sequence; then release the suffer. Note: the tensioning disc may -- after winding -- be turned back, either part-way (until the desired time is set) or all the way. To do this, press lever "a" in direction "R" (Return). |
14.
Model D has a built-in self-timer with delay period adjustable between 2 and 9 sec. The delay can be used with shutter speed from 1 sec. to 1/1000 sec. Set the shutter speed. Set lever "a" to "S" (self-timer). Turn tensioning disc in direction of arrow until index points to desired delay-period before release of shutter. |
|
|
|
| 15.
The viewfinders: Waist level finder: For use at chest level, or with 4x magnifier held at eye level. Image appears right way up, but laterally reversed. To open finder hood: press with finger tip. |
16.
To raise magnifier, press with finger tip. To lower magnifier, simply fold it
downwards. To close finder hood, press down on engraved cap.
|
|
|
|
| 17.
Io lift off finder hood: press both locking knobs outwards and lift finder
upwards. To replace, repeat operations in reverse sequence.
Important: small lug on finder must engage in groove on front plate of camera.
|
18.
Prism viewfinder: For use at eye level. Image appears right way up, laterally correct and
magnified 4 times.
Note: never stand finder on glass side, always put it straightaway in its case. We strongly advise you to complement your camera with a prism viewfinder. |
|
|
|
|
19.
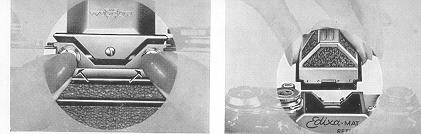
To exchange the ground-glass screen first remove the viewfinder. Then press inwards with your finger-nail the free ends of one or both of the visible retaining springs (see illustration No. 20). The interchangeable frame will then spring up and can be lifted out, together with the screen. Beneath the screen are rectangular spacers, which must be left undisturbed. |
20.
To re-insert the interchangeable frame, proceed in the reverse sequence. The screen frame must be inserted with the side bearing a white mark facing the lens, and then pressed home firmly. The EDIXA-KADETT has no interchangeable frame, but the frame of the KADETT can be removed, and the ground glass screen interchanged by unscrewing the 4 small screws found on the frame, after which the frame should be securely replaced. |
|
|
|
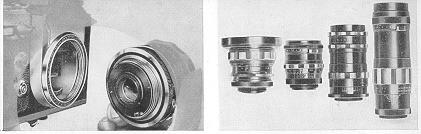
| 21.
The lenses oft the EDIXA-MAT are interchangeable. They are provided with a screw thread and are screwed in by turning them
clockwise and removed by turning in the opposite direction.
The following groups of lenses are obtainable:
|
22.
Focal length Aperture Standard tenses50-- 55 mm f/1.9 ff2.0 f/2.8 Wide-angle lenses24-- 40 mm f/2.8 ff3.5 ff4.0 Portrait lenses80 - 100mm ff1.5 ff3.5 ff4.5 Telephoto and distance lenses135--1000 mm ff2.8 ff3.5 ff4.0 f/4.5 f,5.5 ff6.3 Special lenses: Enna ZOOM lens85--250mmf4 Kilfitt Makro-Kilars40 and 90 mm ff2.8 (Please ask for special brochure) |
|
|
|
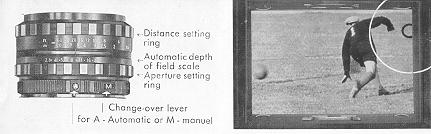
| 23.
The lens Distance-setting and focusing: To focus the lens, turn the distance-setting ring while observing the image formed by the taking lens and reflected on to the ground-glass screen by the reflex mirror. Depth-of-field scale: the lens depicts a sharp image of objects within a zone parallel to the film plane: this zone is deeper the further it is from the camera, and the smaller the lens aperture. This effect can be observed on the focusing screen. |
24.
A warning signal appears in the viewfinder after exposure,
reminding you that the rapid-wind lever must be operated.
If you want to determine or measure the depth-of-field zone, use the depth-of-field scale, which is engraved on every lens. Some new fully-automatic lenses are equipped with an automatic depth-sharpness scale. |
|
|
|
|
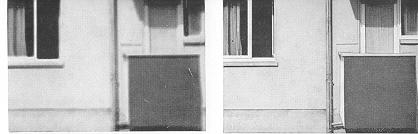
25.
Unfocused image -- diffuse |
26.
Focused image sharp |
|
|
|
| 27.
The split-image rangefinder The normal ground-glass screen can be exchanged for a screen incorporating a split-image rangefinder. This shortens and simplifies focusing of the image. In the centre of the ground-glass screen is a circle, divided into two. When the lens is not focused correctly, the images in the two half-circles are displaced relative to each other; When the lens is focused, the two partial images coincide. |
28.
Note: The split-image rangefinder is designed for use with apertures of f/2.8 or larger (i. e. ff1.9). At smaller apertures (i. e. ff8), the rangefinder sections may become obscured and blackened.
|
|
|
|
|
29.
Intentional double exposures can be made; this facility is also useful if your flashgun misfires. After making one exposure, just turn the shutter-speed setting knob clockwise until it stops. The shutter is then re-wind, without winding on the film.
|
30. NEW! The ever-bright focusing screen of the EDIXA-MAT. The new fully-automatic lenses permit you to view the finder image at full aperture all the time. Only while the shutter is actually running-off is the diaphragm stopped-down to the pre-set stop. You scarcely notice any change in the image! You can also disengage the automatic diaphragm to check depth-of-field visually in the viewfinder (lever set to "A" = Automatic or "M" = Manual setting). You do not have to tension the spring diaphragm before release.21 |
|
|
|
|
31.
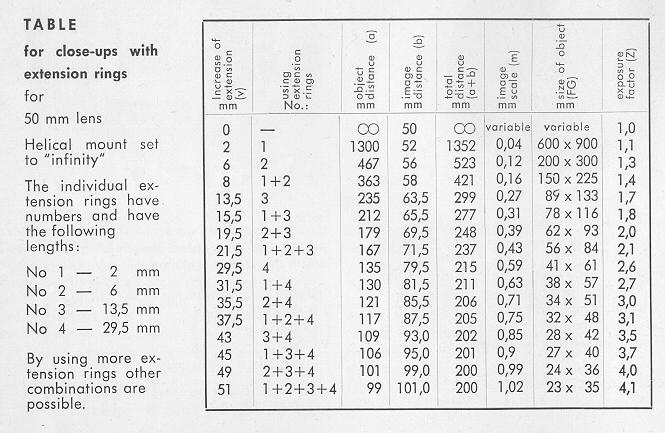
The superiority of the focusing mechanism of the EDIXA-MAT is proved beyond doubt by the ground-glass screen image which shows the exact field of view, definition and available depth of field, even at the shortest camera subject distance. For taking close-ups, it is only necessary to increase the distance between the subject and the focal plane, by using extension rings. A set of extension rings provides you with various possibilities for camera extension. The scope of your photographic ambitions will be widened considerably if you try your hand at taking photographs of small objects. Flowers and small plants, insects and other small animals, postage stamps and innumerable other things are rewarding subjects. Copying from books, news papers or documents are also among the close-up activities which you can master with the aid of extension rings. The lack of |
32.
Depth of field in close-up photography
necessitates highly accurate focusing, which
can be suitably controlled by distance
adjustment. However, the slight loss of light
caused by the increased camera extension,
should be compensated for by increased
exposure, the values of which are computed as
shown in the following equation. Increase of exposure = Example:
(50 + 40)(9o\21,82 \50 /\40)
= 1.8 . 1.8 = 3.24
|
Click here for Table with Close-up Rings
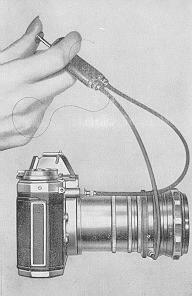 |
33. Double cable release
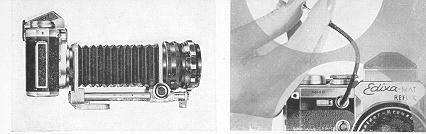
This replaces the internal release mechanism for lenses with semi- or fully-automatic spring diaphragms, which is rendered ineffective when the extension (distance between camera body and lens) is increased by fitting bellows or extension tubes. The double cable release supplies the necessary connection between camera and lens to ensure correct release of the spring-diaphragm mechanism and the camera shutter. (See also special instructions). |
|
|
|
| 34. The EDIXA Bellows |
35. Cable release For use when taking pictures from a tripod or other rigid support. Particularly for slow shutter speeds and time exposures ("B"). The EDIXA special cable release has a clamping nut, which can be screwed over the threaded release knob. A locking disc on the cable release makes it possible to make long time exposures (as on "T" setting). |
|
|
|
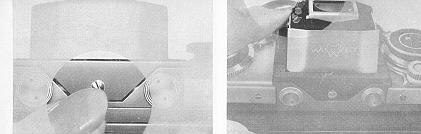
| 36. EDIXA Accessory Shoe for the Prism Viewfinder The EDIXA Accessory Shoe is designed to hold flashguns and other accessories directly above the Prism Viewfinder. The accessory part slips into the track and is positioned directly in the center of the EDIXA. The "Shoe" which attaches to the eye-piece of the Prism Viewfinder, can be removed instantly. This accessory eliminates the need for brackets. |
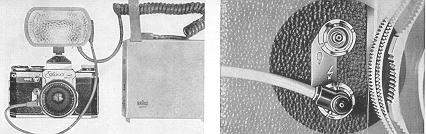
37. Flash contacts are fitted on all EDIXA-MAT cameras for
flashbulbs and electronic flash tubes (speed lamps).
|
|
|
|
|
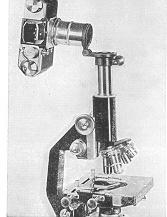
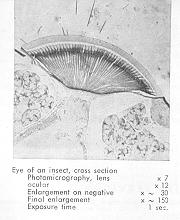
38. The Microscope Adapter is an accessory with a strong hinge by which the camera can be attached to the microscope. Its top part is screwed into the camera as if it were a lens. Then the ocular of the microscope should be removed and the camera/micro-adapter combination slipped over the ocular tube, after which the ocular is replaced. The micro-adapter is then fixed around the ocular tube by tightening the milled screw of the adapter. |
|
What will not agree with your EDIXA-MAT
Your camera will give you maximum performance if you use it properly. Keep your
camera in a leather case when possible. This will protect it from knocks. Avoid
keeping the camera in strong sunlight and above all, keep it protected on the
beach.
Be sure to dust all accessible parts inside as well as outside with a soft
brush. Keep all lens surfaces and glass components clear. Use a soft,
often-washed linen cloth. Buy a copy of the "Edixa-Reflex-Guide" by W. D.
Emanuel; it is obtainable from photo dealers and bookshops. You will find in it
all you need to know about using your camera.


