Ricohmatic 35
posted 3-21-'04
This camera manual library is for reference
and historical
purposes, all rights reserved.
This page is copyright©
by
 ,
M. Butkus, NJ.
,
M. Butkus, NJ.
This page may not be sold or distributed without
the expressed
permission of the producer
I have no connection with any camera company
On-line camera manual library
If you find this manual useful,
how about a donation
of $3 to:
M. Butkus, 29 Lake Ave.,
High Bridge, NJ 08829-1701
and send your e-mail
address
so I can thank you.
Most other places would charge
you
$7.50 for a electronic copy
or $18.00 for a hard to read Xerox copy.
This will help me to continue to host this site,
buy new manuals, and pay
their shipping costs.
It'll make you feel better, won't it ?
If you use Pay Pal, use the link below.
Use the
above address for a check, M.O. or cash.
Back to main camera
manual page
Ricoh Ricohmatic
35 PDF
- direct from manual -
Ricohmatic 35 PDF
VERSION MADE FROM THIS HTML PAGE
OUTSTANDING FEATURES OF RICOHMATIC 35
• ABSOLUTE and AUTOMATIC EXPOSURE CONTROL anywhere and
anytime.
• Split-second TRIGGERMATIC ACTION LEVER
enables rapid photography at the rate of A SHOT PER SECOND.
•
Exclusive NO-CORD FLASH CONTACT. With the RICOH FLASH UNIT BC-605D, there
will be NO DANGLING CORD,
NO BULB FAILURES
DUE TO FAULTY CONNECTIONS.
• The unique FLASH EXPOSURE DIAL and
the FLASH EXPOSURE COLOR CODE system make your flash photography a thing
of pleasure.
• The RICOHMATIC 35 exposure system allows a wide
selection of black & white and color films.
Automatic
exposure control is possible with ASA 10, 25, 32, 50, 80, 100 and 200.
• Automatic Filter Factor Compensation
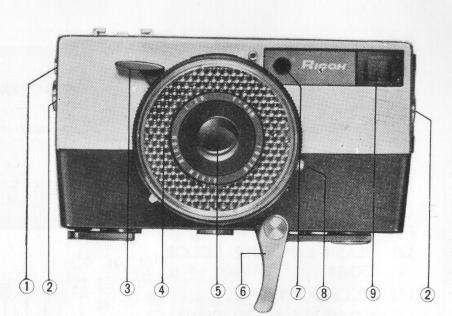 |
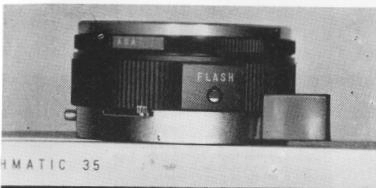
PRINCIPAL
PARTS
1) CABLE RELEASE SOCKET
2) CARRYING STRAP PLUG-IN
SOCKETS
3) SHUTTER RELEASE LEVER
4) CIRCULAR ELECTRIC
EYE WINDOW
5) RICOH KOMINAR F 2.8 LENS (4 ELEMENTS)
6) TRIGGERMATIC
ACTION LEVER
7) RANGEFINDER
8) FLASH SYNCHRO OUTLET
9) BRIGHT FRAME VIEWFINDER
|
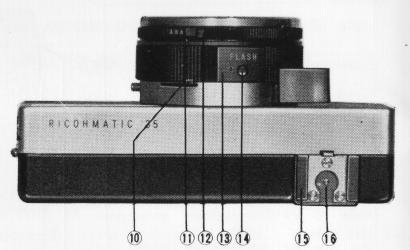 |
10) SELF-TIMER LEVER
11) ASA
NUMBER WINDOW
12) EXPOSURE NUMBER RING
13) FOCUSING
RING
14) FLASH EXPOSURE COLOR CODE
15) ACCESSORY SHOE
16) CORDLESS
FLASH CONTACT
|
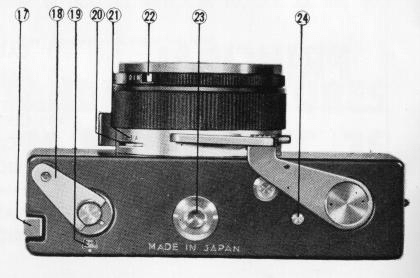 |
17) BACK COVER PULL RELEASE
18) RAPID REWIND CRANK
19) FILM COUNTER
20) FLASH
EXPOSURE LEVER
21) FLASH EXPOSURE SCALE
22) DIN NUMBER
WINDOW
23) TRIPOD SCREW-IN BUSHING
24) REWIND RELEASE BUTTON
25) FILM PRESSURE PLATE
|
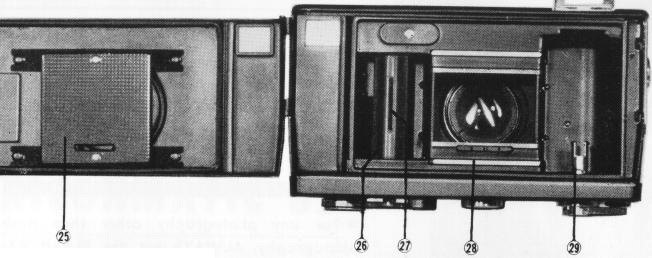
26) TAKE-UP SPOOL
27) TAKE-UP
SPOOL SLOT
28) FILM ADVANCE SPROCKET
29) REWIND SPOOL SPINDLE
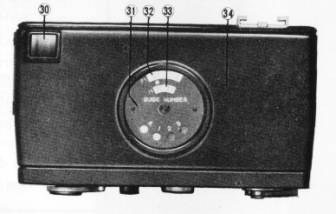
|
30) COUPLED RANGEFINDER AND VIEWFINDER
EYEPIECE
31) FLASH EXPOSURE DIAL
32) GUIDE NUMBER,
FEET
33) GUIDE NUMBER, METER
34) BACK COVER |
CAUTION
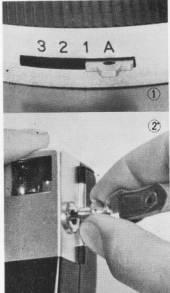 |
• For any photography other than flash photography, ALWAYS set the FLASH
EXPOSURE SCALE at "A" or " AUTOMATIC." (Fig. 1)
• The CARRYING STRAP is attached as follows:
First,
match up the CARRYING STRAP PLUG blue dots with the blue circles on
the CARRYING STRAP PLUG-IN SOCKETS.
Then, merely push in the plugs. To remove the plugs, turn the
CARRYING STRAP PLUG until the blue dots coincide with the red half circles
and then pull out the plugs. (Fig. 2)
|
LOADING RICOHMATIC 35
 |
AVOID DIRECT SUNLIGHT.
ALWAYS LOAD AND UNLOAD
FILM IN SUBDUED LIGHT OR SHADE
Place the camera on your lap or on some soft material to prevent
any damage or shock to any part of the camera mechanism.
1. Pull up the BACK COVER PULL RELEASE to open the
BACK COVER. (Fig. 3)
|
 |
2. Raise the RAPID
REWIND CRANK to vertical position and pull until it stops.
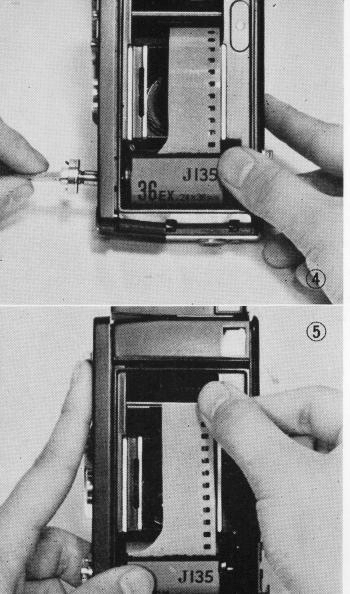
3. Load the film cartridge and push in the RAPID
REWIND CRANK to its original position. (Fig. 4) Make sure both the film
cartridge axle and the REWIND SPINDLE are properly engaged with each
other.
4. Pull down the trigger and move
the TRIGGERMATIC ACTION LEVER until the TAKE-UP SPOOL SLOT appears at
top. Insert the exposed film strip tip firmly into the TAKE-UP SPOOL
SLOT (Fig. 5)
5. If the shutter is wound,
the TRIGGERMATIC ACTION LEVER cannot be moved. Therefore, release the
SHUTTER RELEASE LEVER first. |
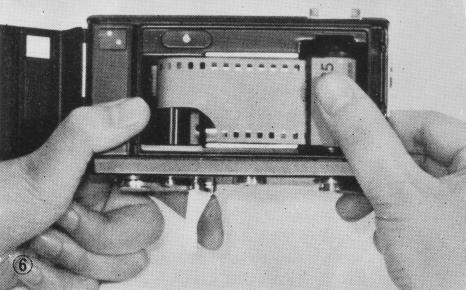 |
As you work the TRIGGERMATIC ACTION
LEVER, make doubly sure the film perforations are firmly and properly
engaged with the FILM ADVANCE SPROCKET teeth. (Fig. 6)
6. Checking once again that the film perforations
are properly engaged, close the BACK COVER GENTLY but FIRMLY.
|
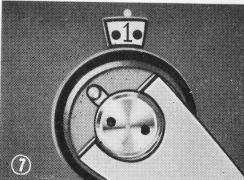 |
7. Pull the TRIGGERMATIC
ACTION LEVER as far as it will move. This winds one frame and automatically
winds the shutter. Release the SHUTTER RELEASE LEVER and repeat this
step two more times. When the number "I" appears in the FILM COUNTER
(Fig. 7) your camera is ready for use. |
UNLOADING RICOHMATIC 35
 |
UNLOAD FILM UNDER SUBDUED LIGHT
OR SHADE.
After 20 or 36 exposures has been completely
exposed, the TRIGGERMATIC ACTION LEVER will stop midway and can be moved
no further. EXCESSIVE PULLING OF THIS LEVER AT THIS POINT MAY TEAR FILM
PERFORATIONS AND EVEN SPOIL THE LAST PART OF THE FILM.
• To rewind the exposed film, flip up the RAPID REWIND CRANK. While
depressing the REWIND RELEASE BUTTON, carefully turn the RAPID REWIND
CRANK in the direction of the black arrow.
• When the film
has been completely wound, the CRANK will suddenly become very loose.
After you feel absolutely sure the film has been completely rewound,
pull up the BACK COVER PULL RELEASE and open the BACK COVER.
• Pull out the FILM REWIND CRANK to disengage the REWIND SPOOL SPINDLE
from the film cartridge axle and remove the film. |
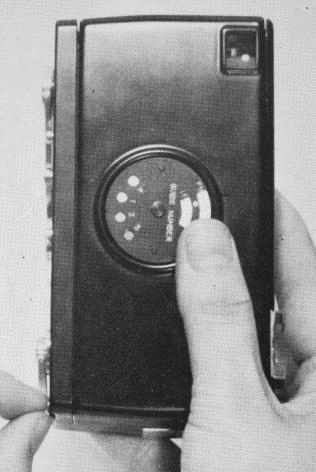
SETTING RICOHMATIC 35
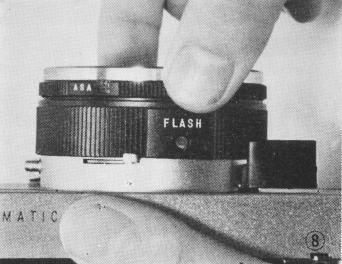 |
Revolve the EXPOSURE NUMBER RING
until the number matches the ASA or DIN exposure index of the film you
are using (Fig. 8) Far daylight photography keep the FLASH EXPOSURE
SCALE at "A" or "AUTOMATIC."
|
TAKING THE PHOTOGRAPH
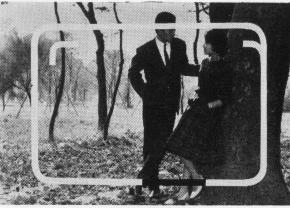 |
1. Point the camera
at the subject to be taken. Look through the COUPLED RANGEFINDER AND
VIEWFINDER EYEPIECE and completely frame your subject material within
the bright-line frame. When taking a photograph at about 5 feet, use
the inside markings just inside the bright-line frame. The markings
are corrected for parallax (Fig. 9)
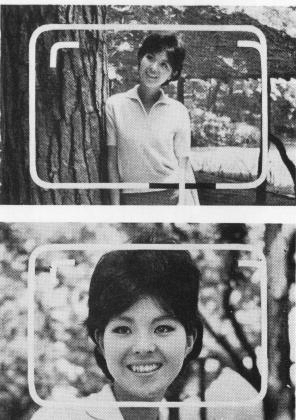
2.
In the EYEPIECE, you will find a red colored line at the bottom of the
bright line frame. That red-colored line indicates underexposure. "
When the vertical needle appears in this zone, light levels are not
suitable for photography and additional light, either natural or artificial,
is required (Fig. 10) When the needle can not be seen inside the red-colored
line, everything is correct for photography (Fig. 11) |
 |
3. Make sure again
the subject is properly aligned in the bright-line frame.
GENTLY
pull down the SHUTTER RELEASE LEVER.
4. The
CABLE RELEASE SOCKET is used for attaching a cable release. |
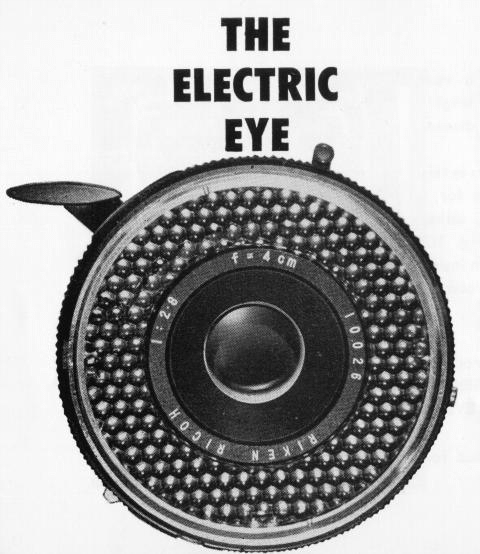 |
• The CIRCULAR ELECTRIC EYE is a
selenium photocell. When light strikes this electric eye, an electric
current is generated accordance with the strength of the light source.
• This current in turn is transmitted to a galvanometer. Then, the
needle in your COUPLED RANGEFINDER AND VIEWFINDER indicates the brightness
of your subject material.
• However, your RICOHMATIC 35
CIRCULAR ELECTRIC EYE does ultimately MORE. Its electronic brain automatically
selects the correct lens opening and shutter speed combination and SETS
THE CAMERA FOR YOU. All this takes place much faster than you can blink
your eyelids. |
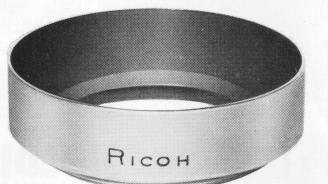
It is advisable to shade the lens in bright sunshine. If the RICOH
HOOD is not available, use hand. |
• In the reflected-light type
of electric eye, the standing rule is to measure light by pointing the
CIRCULAR ELECTRIC EYE WINDOW at the subject material. But, when photographing
people against a bright background, you should try to get close enough
to the subject material so you can get a true reading of only the reflected
light from the subject material. • Also, when photographing a distant
or panoramic scenery, be careful of the bright skylight. The electric
eye, being especially sensitive to the brightest light source, the relatively
dark land area is liable to turn out underexposed.
|
HOLDING RICOHMATIC 35
| • As a considerable amount of photography
will be done with the camera hand-held, always bring the camera close
to you, with your arms supported solidly against your chest or sides
and the camera body pressed firmly against your cheeks. • Any erratic
or sudden movement of the camera will result in blurred photographs.
Therefore, conditions permitting, steady your camera with a tripod or
on some flat surface. |
 |
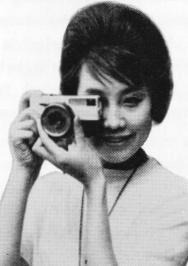 |
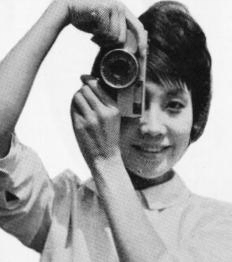
• In holding your camera
in horizontal position, use the COUPLED RANGEFINDER AND VIEWFINDER EYEPIECE
with your LEFT eye. Focus with your thumb and forefinger on the FOCUSING
RING. (Fig. 12) • In vertical position, use the COUPLED RANGEFINDER
AND VIEWFINDER EYEPIECE with your RIGHT eye. Adjust focus with your
middle finger and release the SHUTTER RELEASE LEVER with your thumb.
(Fig. 13) Or, you can use the EYEPIECE with your LEFT eye and adjust
focus with your forefinger. The shutter will be released with the forefinger
of your RIGHT hand. |
The red line zone in the COUPLED RANGEFINDER AND VIEWFINDER
tells you when a flash must be used. So, if
the needle is within this redline zone, use
the RICOH FLASH UNIT BC-605D.
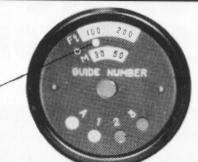
• After you have purchased the flashbulbs best suited for your purposes,
look for the GUIDE NUMBER clearly indicated on the box or instruction sheet.
Match the GUIDE NUMBER (FEET or METER, whatever the case may be) with the flashbulb
guide number.
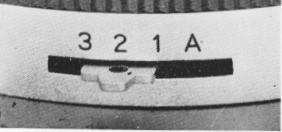
• Now, focus the camera on the subject material with
the FOCUSING RING. Note the color on the FLASH EXPOSURE COLOR CODE. Determine
which letter or number (Al 2 3) on the FLASH EXPOSURE DIAL this particular color
corresponds to.
• If this particular color corresponds
to 2, adjust the FLASH EXPOSURE SCALE to 2. Now you are all ready for flash
photography. As long as you keep the FLASH EXPOSURE SCALE properly adjusted,
your flash photography will provide you with greater photographic enjoyment.
 |
• The RICOHMATIC 35 can be used
with M and electronic flash equipment. However, when using color film
it is advisable to use special flashbulbs. Your neighborhood dealer
will suggest the most suitable flashbulb for your color photography
needs. When you use electronic flash, no filters are required on your
camera in color photography because the electronic flash closely approximates
natural sunlight. |
 |
 |
COLOR PHOTOGRAPHY
• Basically, there are two types of
color film--daylight and tungsten. There are two types because of the difference
in light source and color temperature. *The daylight type film is designed to
render the proper color balance during the brightest hours on a fine day -from
10 a.m. to 3 p.m. The UV filter left on the camera at all times, checks any
bluish effect of ultraviolet rays or skylight on daylight film prevalent in
fine weather.
*On the other hand, the tungsten type film is designed to produce the proper
color balance for shooting subject material such as stage or night scenery under
special photographic lamps.
*If used in daylight, the subject material will be covered with deep blue.
If used under regular home tungsten lamp the film will turn out reddish. In
both of these cases, a color temperature conversion filter is used to correct
this discrepancy in color temperatures. Note : Especially in color photography
it is advisable to have film developed as soon as possible.
TRIGGERMATIC ACTION LEVER IN RAPID SEQUENCE PHOTOGRAPHY
The
unique TRIGGERMATIC ACTION LEVER is especially outstanding when speed and continuous
shots are required. Split-second film winding enables photography at the rate
of 10 shots every 10 seconds.
THE USE OF FILTERS
* Filters are colored glass
which change the amount and quality of light reaching the film through the lens.
Filters are especially effective outdoors on a sunny day but, in cloudy or rainy
weather filters are of very little sense. Snow and beach scenes can be beautifully
interpreted with the proper use of filters.
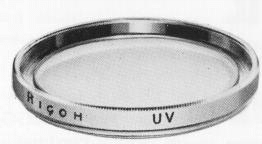 |
UV Filter • The UV filter is a colorless
filter which absorbs invisible ultra-violet rays so that distant views,
and subjects under strong sunlight will turn out clear. It absorbs excessive
blueness so is ideal for average color photography. Make it a practice
to keep the UV filter on the lens at all times to prevent any damage
to the lens |
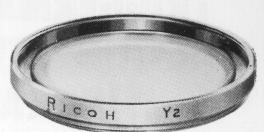 |
Yellow 2 Filter • This filter absorbs
ultra-violet rays, bluish purple and a part of blue but admits red and
yellow. It darkens the sky and makes the white clouds prominent. This
filter is used most often when taking scenery with a blue sky background,
human subjects and in snapshot photography. Without this filter, the
clouds would disappear and the whole sky would become white. |
THE CARE OF THE CAMERA
1. The lens is the heart of the
camera so re quires the best of care. Brush lightly with a lens brush and wipe
fingerprints off with soft chamois, soft bleached cotton or gauze daubed with
a little alcohol applied with a circular motion beginning at the center and
working outward.
2. If a camera is suddenly brought into a warm place
from a cold place, the lens will cloud up. Wait until the lens warm up and the
cloud will gradually disappear.
3. When you have taken photographs
by the seaside or in wet weather, always wipe the camera thoroughly before putting
it away.
4. Never leave the camera shutter wound over long periods of time
as this will weaken the delicate shutter mechanism spring.
5. When putting
away the camera, put it in a box and store in a dry, cool place. A bag of silica
gel, a drying agent, should always be placed in the box with the camera.
6. Always place cap over lens to protect both lens and CIRCULAR ELECTRIC EYE
WINDOW from any damage.
7. Make it a practice to keep your camera in
the case to preserve its finish.
8. Make a note of the camera body
and lens number and keep it in a safe place. This information will be of help
if the camera is stolen or lost.