and historical purposes, all rights reserved.
This page is copyright© by
This page may not be sold or distributed without
the expressed permission of the producer.
I have no connection with any camera company.
This camera manual library is for reference
and historical purposes, all rights reserved.
This page is copyright©
by ![]() ,
M. Butkus, NJ.
,
M. Butkus, NJ.
This page may not be sold or distributed without
the expressed permission of the producer.
I have no connection with any camera company.
On-line camera manual library.
If you find this manual
useful,
how about a donation of $3 to:
M. Butkus, 29 Lake Ave.,
High Bridge, NJ 08829-1701
and send your
e-mail address
so I can thank you.
Most other places would charge
you $7.50 for a electronic copy
or $18.00 for a hard to read Xerox copy.
buy new manuals,
and pay their shipping costs.
It'll make you feel better, won't
it ?
If you use Pay Pal, use the link below.
Use the above address for a check, M.O. or cash.
Back to main camera manual page
CLICK HERE FOR A
Ricoh Singlex II PDF
VERSION MADE FROM HTML PAGE
CLICK HERE FOR AN ENGLISH
RICOH SINGLEX II PDF MANUAL
SCANNED FROM ORIGINAL MANUAL


DESCRIPTION OF PARTS
 |
A) Film Speed Window B) Neck Strap Eyelet C) Self-timer Lever D) Film Rewind Knob/Back Cover Lock Release Knob E) Film Rewind Crank F) Film Reminder Ring G) F-Stop Ring H ) Distance Scale I) Depth of Field Scale |
|
J) Focusing Ring K) Hot Shoe L) Film Advance Lever M) Preview Button/Exposure Meter Button N ) Exposure Counter O) Shutter Release Button P) Cable Release Socket Q) Shutter Speed Dial R) Film Pressure Plate |
S) Film Guide Rail (2) T) Viewfinder Eyepiece U) Film Rewind Shaft V) Film Rewind Release Button W) Tripod Socket X) Sprocket Teeth (2) Y) Film Take-up Spool Z) Film Chamber
|
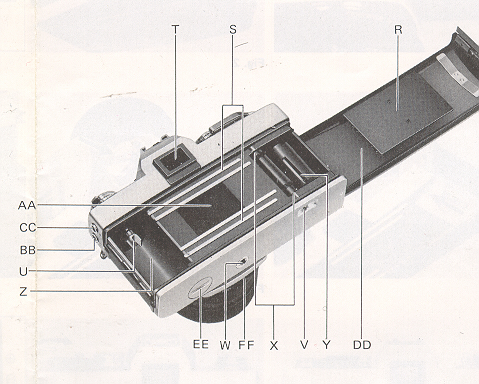 |
AA) Metal Focal Plane Shutter Curtain B B) "X" Flash Terminal CC) "M" Flash Terminal DO) Back Cover EE ) Mercury Battery Compartment Cover FF ) Auto/Manual Switch Lever |
BATTERY LOADING
The built-in through-the-lens CdS exposure metering system of your SINGLEX II operates on power activated by one 1.35V H-D mercury battery. which is supplied together with your camera.
1. Remove Mercury Battery Compartment Cover (EE) by unscrewing it counterclockwise with a coin.
2. Place the mercury battery into the compartment with the plus "+" side up (Fig. 1). For your convenience, the "+" indicator is marked in the back of
Mercury Battery Compartment Cover (EE).
Make sure that the mercury battery is correctly placed. If incorrectly placed, the exposure meter needle in the viewfinder will not move at all.
3. Replace Mercury Battery Compartment Cover (EE) by screwing it clockwise until it stops.
* Before loading, wipe off the surfaces of the mercury battery with a clean and dry cloth to ensure they are free of fingerprints or stains.
* When your camera is not used for a long period. remove the mercury battery and keep it in a dry place.
* The mercury battery will last for about one year in normal use.
* Replace the mercury battery when the exposure meter needle in the viewfinder does not move in direct sunlight or other bright lights with Exposure Meter
Button (M) depressed. For replacement, use Mallory RM625, Eveready EPX625 or equivalent.
* The mercury battery may explode if disposed of in fire.

FILM LOADING
Your SINGLEX II is designed to accept any standard 35 mm color or black and white film roll in cartridge (12, 20. 24 or 36 exposures).
1. First of all. press Shutter Release Button (O) to see that the shutter has been released.
2. Pull up Film Rewind Knob (D) until Back Cover (DD) snaps open (Fig. 2). This will automatically reset Exposure Counter (N) to "S" (Start).
3. Swing open Back Cover (DD) and place a film cartridge into Film Chamber (Z)
(Fig. 3).

4. Push back Film Rewind Knob (D) to its original position by turning Film Rewind Crank (E) clockwise or counterclockwise so that Film Rewind Shaft (U)
engages the film cartridge and that the film cartridge is seated in place (Fig. 4).
5. Draw the film leader across the camera back and insert it into one of the slits of Film Take-up Spool (Y) (Fig. 5). To bring the slit into a more
convenient position, rotate Film Take-up Spool (Y) in the direction of the arrow with your finger.

6. Rotate Film Take-up Spool (Y) by advancing Film Advance Lever (L) to take up any slack in the film and check to see that the film tip is firmly hooked onto
Film Take-up Spool (Y) (Fig. 6) and that both sides of sprocket holes on the film are fully engaged on Sprocket Teeth (X) (Fig. 7).

7. Close and press Back Cover (DD) firmly until it snaps shut.
8. Advance Film Advance Lever (L) two or three times. while depressing Shutter Release Button (O) each time. until the number " 1 " is opposite the black index
line in Exposure Counter (N) (Fig. al. Now it is ready for your first picture.
* Always load your camera in the shade or at a poorly-lit place, never in direct sunlight or other bright lights.
* As you advance Film Advance Lever (L), Film Rewind Knob (D) will simultaneously rotate counterclockwise indicating that the film is properly
advanced. If Film Rewind Knob (D) does not rotate, open Back Cover (DD) and re-load your camera.
Film Reminder Ring
To remind you of the type (color or black and white) of the film you are using, turn Film Reminder Ring (F) and set the corresponding type of your film to the
black index line (Fig. 9). Use the "EMPTY" marking if your camera is not loaded.

SETTING FILM SPEED
Each type of film, color or black and white. has its own sensitivity to light. This sensitivity is assigned ,by a numerical value described as an ASA rating
(U.S.A. Standard) or a DIN rating (Europe and most other countries). In most cases, both ASA and DIN ratings are imprinted on the film package. as well as
the data sheet packed with the film and the film cartridge itself. The higher the film speed rating. the more sensitive the film is to light; that is. less
light is required for a proper exposure. The film speed, therefore, is an important element in ensuring that the through-the-lens metering system of your
camera determines the correct shutter speed and f-stop combinations for a given lighting situation.
1. Lift up the outer ring of Shutter Speed Dial (Q) (Fig. 10) and rotate it until the ASA number of your film is exactly opposite the central part of Film
Speed Window (A). For example, if the film is ASA 100, make the correct setting by showing "100" (Fig. 11 ).
2. Release the outer ring to lock the film speed setting in the camera.

* The scale (Fig. 12)represents the relation between ASA and DIN numbers. Figures in parentheses represent intermediate film speeds.

* Each time a film with a new film speed rating is loaded in your camera. the film speed must be set in Film Speed Window (A) to assure accurately exposed photographs.
CORRECT EXPOSURE
Your SINGLEX II has a built-in through-the-lens CdS exposure meter which measures the light coming through the lens and enables you to set the proper
exposure for a given lighting condition. The correct exposure is obtained by setting the shutter speed and f-stop in the correct combination for the film,
subject and lighting conditions.
1. Set the desired shutter speed opposite the black index line by rotating Shutter Speed Dial (Q) (Fig. 13). (Read "SETTING THE SHUTTER".)
2. Rotate F-Stop Ring (G) and set the f-stop at its full opening (the smallest f-stop) (Fig. 14).
3. Hold your camera, look your subject through Viewfinder Eyepiece (T) and focus the lens. For focusing the lens, refer to "VIEWING AND FOCUSING".

4. Press Exposure Meter Button (M) (Fig. 15) and at the same time, turn F-Stop Ring (G) until the exposure meter needle in the viewfinder centers
between the " + " and " - " exposure warning marks on the exposure index bracket (Fig. 16). If the exposure meter needle is on the "+" area. this means
'overexposure" (Fig. 17); select a faster shutter speed or a smaller lens opening. On the contrary, if on the " - " area. this means "underexposure" (Fig.
18); choose a slower shutter speed or a larger lens opening.

If you want to use a specific f-stop for the depth of field control, you may set the f-stop first and then the shutter speed, while other procedures are same
as above. This setting may be used when you take a portrait or the like, intentionally making your subject attractive with the back ground or the scene
in front of it blurred. How your subject turns out in the picture depends on the f-stop setting. (Refer to "DEPTH OF FIELD".)
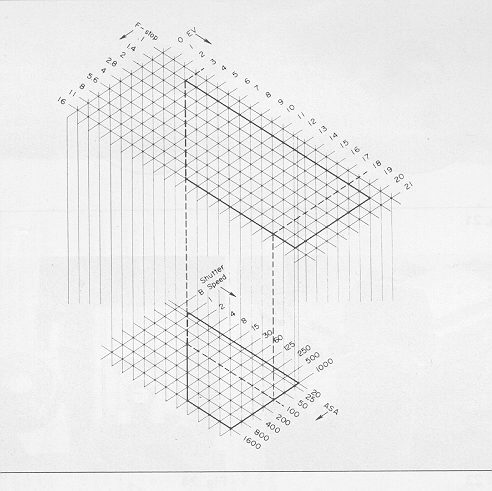
The chart (Fig. 19) shows the exposure value range (shutter speed and f-stop combinations) of your camera's metering system for selected film speeds.
* Be careful that underexposed pictures of your subjects be taken under the back-lit condition.
* Make sure that meter is within EV range after shutter. f-stop and ASA (DIN) range have been set. If meter is out of EV range, it will not operate. See Fig.
19 in your instruction manual.
SETTING SHUTTER SPEED
The shutter controls the length of time the light is allowed to strike the film. The speed at which the shutter opens and closes is measured in fractions
of a second that correspond to the numbers on Shutter Speed Dial (Q). For example. "1000" is 1/1000 sec.. "125" is 1/125 sec.. "4" is 1/4 sec.. "1" is one full second and so on.
1. Simply turn Shutter Speed Dial (Q) until the desired shutter speed is set opposite the black index line (Fig. 13).
Generally speaking. when shooting outdoors in bright or hazy sunlight, "125" (1/125 sec.) is suitable for most pictures. When taking your subjects in motion,
"250" (1/250 sec.) to "1000" (1/1000 sec.) should be used Faster speeds will "freeze" extremely fast-moving subjects (sports, racing cars, etc.). When
indoors in a well-lit room, "60" (1/60 sec.) should be sufficient to take your subjects, depending upon the film you are using. When in poorly-lit places. or
to achieve the maximum depth of field (the area of acceptable sharpness in front of and behind your subject). "30" (1/30 sec.) to "1 " (1 sec.) are available.
When set at "B", the shutter will remain open as long as Shutter Release Button (O) is depressed (preferably by a cable release). The "B" setting is used for
long night exposures using street lights or electric signs as a light source, or under poor lighting conditions when flash cannot be used.
* When using slow speeds, use a tripod or other firm support to prevent the movement of the camera and blurred pictures.
* Do not set Shutter Speed Dial (Q) between marked speeds, but at a click stop in accordance with engraved speeds only.
* Shutter Speed Dial (Q) does not revolve between "1000" and ''B''.
SETTING APERTURE
The lens opening determines the amount of light entering the lens and exposing the film. The smaller the f-stop (f/2.0, f/2.8, etc.), the wider the
lens opening and the greater the amount of light entering the lens. The larger the f-stop (f/16, f/11, etc.). the smaller the lens opening and the smaller the
amount of light entering the lens. As the lens opening is moved from f/16 to f/11, the amount of light entering the lens is doubled. As the lens opening is
moved from f/2.0 to f/2.8. the amount of entering light is cut in half.
1. Rotate F-Stop Ring (G) until the desired f-stop is opposite the aperture index line (Fig. 20). Click stops are provided to prevent accidental movement from the setting made.

* If necessary, you may set F-Stop Ring (G) between two F-stops.
VIEWING AND FOCUSING
Since you are viewing through the lens. there is no parallax problem What you are viewing in the viewfinder will exactly appear in your picture. This enables
you to determine the exact composition of your subjects before pressing Shutter Release Button (0). Even when you shoot close-ups, there is no danger of
accidentally cutting off a portion of your picture. To assure the sharpest possible pictures, your SINGLEX II has a microprism image spot in the center of
the viewfinder which exaggerates in-focus and out-of-focus images.
 |
1. Look into Viewfinder Eyepiece (T) to compose your picture.
2. Rotate Focusing Ring (J) until your subject becomes clear in the microprism image spot (Fig. 21). |
* When taking pictures with ultra telephoto lenses or in close-up photography with bellows units. macro lenses or extension rings, it sometimes becomes
difficult to focus using the microprism image spot. In this case. focus on the ground glass ring surrounding the microprism image spot or use the entire
Fresnel field as a guide to achieve sharpness.
UNLOADING FILM
After the last picture on the rod of film has been taken. rewind the film and unload your camera.
1. Press Film Rewind Release Button (V) (Fig. 22).
2. Lift up Film Rewind Crank (E) and turn it clockwise until you feel the film tension released (Fig. 23). This indicates that the film has been completely rewound into Film Chamber (Z).
3. Open Back Cover (DD) by pulling up Film Rewind Crank (E).
4. Remove the film cartridge and have the film processed as soon as possible.
* Always unload your camera in the shade or at a poorly-lit place. never in direct sunlight or other bright lights.
* When you reach the end of the roll of film, Film Advance Lever (L) will tighten and refuse to advance. If this happens, do not advance Film Advance
Lever (L) by force for "Just one more shot". otherwise the film will be torn out of the cartridge.
* Film Rewind Release Button (V) will remain in place once it is pressed, and return automatically to its original position when Film Advance Lever (L) is advanced.

TAKING FLASH PICTURES
A. Flash Equipment with Connecting Cord.
Your SINGLEX n provides flash terminals for both "X" and "M" synchronization. "X" Flash Terminal (BB) is used when using an electronic flash
unit or No. SM flash bulbs and "M" Flash Terminal (CC) when using flash bulbs Nos. 5, 5B, 25. 25B. M5. M5B, M2. M2B. M3. M3B. AG1, AG1B, 6 and 6B. and flash cubes.
B. Cordless Electronic Flash Unit
If you are using an electronic flash unit with a built-in hot shoe contact. it can be attached directly to Hot Shoe (K) on top of the camera
pentaprism. The camera and flash will then be fully synchronized through the contacts in Hot Shoe (K) with any shutter speed up to 1/125 sec.
* "125" (1/125 sec.) on Shutter Speed Dial (Q) and "X" on Hot Shoe (K) are marked in red as a reminder for electronic flash synchronization (Fig. 24).
* The chart (Fig. 25) shows the combination of the terminal and shutter speeds for various flash situations. Use only these combinations to ensure proper flash synchronization.

* Insert a plastic cover, which is supplied with your camera. into Hot Shoe (K) when not in use to protect the contact point.
C. Exposure for Flash Photography
The exposure is determined by the guide number of the flash bulb or electronic flash unit. The guide number represents a relationship between the
light output of the flash and the speed of the film. Guide numbers for flash bulbs can be found on the package and guide numbers for electronic flash units
are found in the technical specifications. Using the guide number. you can determine the correct f-stop for a given flash situation using the following formula:
F-stop = Guide number / Flash-to-subject distance.
For example. if your flash unit has a guide number of 16 (m) or 52.8 (ft.) for the type of film you are using. and your subject is 2 meters (6.6 ft.) from the
flash unit as indicated on Distance Scale (H) after focusing, divide 16 (52.8) by 2 (6.6). The answer is 8; therefore. set F-Stop Ring (G) to 8 (f/8).
* Most electronic flash units have a built-in dial or exposure table which enables you to quickly compute F- Stops based on flash-to-subject distances.
USING SELF-TIMER
Your SINGLEX II has a built-in Self-timer Lever (C) which delays the shutter release from 7 to 15 seconds. This enables you to include yourself in your own pictures and is also of benefit in taking close-ups or photomicrographs where camera movement must be avoided.
1. First, advance Film Advance Lever (L).
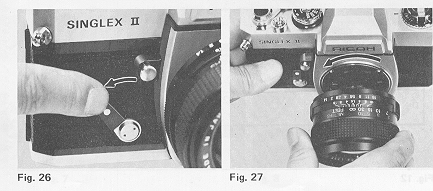
2. Merely move Self-timer Lever (C) counterclockwise (Fig. 26). According to the degree you have moved it down. the shutter will fire within 7 to 15 seconds. For the maximum delay. move it until it stops.
3. Press Shutter Release Button (O) to start the self-timer moving.
* The camera should be placed on a tripod or other sturdy support when using self-timer.
CHANGING LENSES
When changing lenses. please do as follows:
1. To remove the lens. grasp the lens firmly around the lens barrel and continuously turn it counterclockwise until it can be removed (Fig. 27).
2. To attach another lens. turn it clockwise until the lens is firmly seated in position.
* Do not touch the reflex mirror in the camera body when removing or attaching lenses.
DEPTH OF FIELD
When you focus on a specific subject. an area in front of and behind the subject will appear acceptably sharp in your picture. This area of acceptable
sharpness is called "Depth of Field". The depth of field is determined by the f-stop you select and the distance from the in-focus subject to the film plane.
As you get closer to your subject. or as you open your lens (for example. from f/16 to f/2.8). the depth of field becomes shallower. By stopping the lens down
(for example. from f/2.8 to f/16), the depth of field becomes more deep. The depth of field can be pre-determined in the following ways:
A. Depth of Field Preview Button
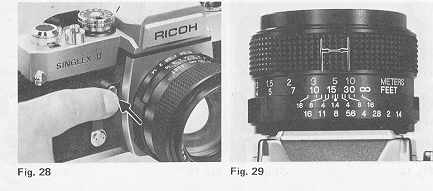
Pressing Preview Button (M) (Fig. 28) will set the lens at the corresponding opening you previously set on F-Stop Ring (G). This will enable
you to preview the area of acceptable sharpness in the picture you take. The viewfinder will become dark corresponding to the f-stop your previously set on
F-Stop Ring (G). Preview Button (M) will automatically return to its original position when you leave your finger off it and the viewfinder will become bright
as before.
B. Depth of Field Scale
After you have set the lens opening and have focused the camera, the area of acceptable sharpness in front of and behind your subject can be also
determined on Depth of Field Scale (I). Locate on Depth of Field Scale (I) the two numbers corresponding to the f-stop you have set on F-Stop Ring (G). The
distance between these two F-Stops on Distance Scale (H) will be an area of acceptable sharpness in your picture. For example. if your lens is focused at 5
meters (16.5 ft.) and you shoot at 8 (f/8). the area of acceptable sharpness will be from 3.5 m (11.5 ft.) to 10 m (33 ft.). by reading Distance Scale (H)
opposite the both sides of the "8" numbers on Depth of Field Scale (I) (Fig.
29).
INFRARED PHOTOGRAPHY
For infrared photography using infrared films. the correction of Distance Scale (H) is necessary because "infrared light rays" focus on a film plane
slightly behind that of "visible light rays".
1. Normally focus on your subject and note the camera-to-subject distance opposite the distance index line on Distance Scale (H).
2. Turn Focusing Ring (J) until this camera-to-subject distance setting is opposite the infrared index line. For example, if Distance Scale (H) reads 5 m
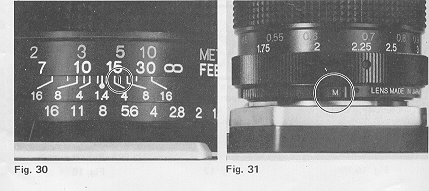
(16.5 ft.) after focusing, merely shift the "5" (16) scale to the "I" (red) position (Fig. 30).
* Infrared radiation varies with the degree of infrared light rays in the atmosphere. Use the infrared focus setting only as an approximation. For best
results, use the smallest f-stop the light allows to provide the sufficient depth of field to include all important elements of the picture in the area of acceptable sharpness. ~
AUTO/MANUAL SWITCH
When using non-automatic accessories (bellows units. etc.), it is sometimes required that you disengage the automatic diaphragm feature of your
lens. Standard lenses for your SINGLEX II and most universal thread mount lenses provide Auto/Manual Switch Lever (FF) for this purpose.
1. To disengage the automatic feature, move Auto/Manual Switch Lever (FF) to "M" (Manual) (Fig. 31).
2. To engage the automatic diaphragm, return Auto/Manual Switch Lever (FF) to "A" (Automatic).
INTERCHANGEABLE LENSES AND ACCESSORIES
A wide range of RIKENON interchangeable lenses including extremely wide angle lenses to telephoto lenses plus zoom lenses, and various accessories are prepared to enable you to expand the pleasure of your picture-taking. RIKENON interchangeable lenses and accessories are made of selected high quality materials under severe quality control to assure you of high performance and full satisfaction. Select RIKENON interchangeable lenses and accessories that will meet your needs.
* The universal thread lens mount of your SINGLEX II affords you the opportunity to select any interchangeable lens of this type available in the market.
PROPER CARE OF YOUR CAMERA
* Always carry your camera with its carrying case and neck strap.
* Put the lens cap to protect the lens when not taking pictures.
* Protect your camera from dust, dirt, water, rain, dampness. salt air and rough handling.
* Never expose your camera to excessively high or low temperatures for an extended period of time. In extremely hot climates. do not leave your camera
inside closed automobiles during the daytime or in direct sunlight. In extremely cold climates. expose your camera to the outer air only when in use When using,
expose your camera gradually to the outer air to prevent the lens from clouding.
* Never touch the surfaces of the lens, Metal Focal Plane Shutter Curtain (AA), the reflex mirror, etc. with your fingers.
* To clean the lens, gently wipe it in a circular motion with a lens cleaning paper or a soft, clean and lintless cloth.
* Do not wipe the camera body with chemicals, such as benzene. thinner. etc., except for ALCOHOL.
* When your camera is not in use for an extended period of time, put the lens cap, remove the mercury battery, place your camera in its carrying case together
with silica gel or other desiccant and store it in a dry and cool place. Never store your camera in places where the temperatures are excessively high or low.
* Do not attempt to disassemble or repair your camera yourself. If service is necessary, get in touch with your dealer or authorized Ricoh service station.
MAJOR SPECIFICATIONS OF SINGLEX
Camera Type: 35 mm Single Lens Reflex with metal focal plane shutter and fully automatic CdS through-the-lens exposure metering system.
Film Size and Capacity: 35 mm perforated film in 12, 20, 24 or 36 exposures cartridge.
Film Format: 24X 36 mm (1 x 1-1/2 in.)
Standard Lenses:
55 mm Auto Rikenon f/1.4, 5 groups 6 elements
50 mm Auto Rikenon f/1.7, 5 groups 6 elements
50 mm Auto Rikenon f/2.0, 5 groups 6 elements
50 mm Auto Rikenon f/2.8, 3 groups 4 elements
Lens Mount:
Universal thread mount
Shutter:
Vertically moving Copal Square metal focal plane shutter with speeds from 1/1000
sec. to 1 sec. plus B (Bulb).
Exposure Meter:
Two sensitive CdS (Cadmium Sulfide) photocells located on either side of
viewfinder eyepiece behind pentaprism reads light coming through the lens and
provides average reading. Coupled to shutter speeds. film speeds and f-stops.
Exposure Control:
Stopped-down. match needle type measuring system. Correct exposure indicated by
centering exposure meter needle within exposure index bracket in the viewfinder.
Exposure Coupling Range:
EV3 - 18 at ASA 100 (DIN 21) with 55 mm Auto Rikenon f/1.4 lens
Film Speed Range:
ASA 20 - 1600 (DIN 14 - 33)
Exposure Meter Power Supply:
One 1.35V H-D mercury battery (equivalent to Mallory RM625. Eveready EPX625, etc.)
Viewfinder:
Fixed eye-level pentaprism type. Exposure meter needle. over ("+'') / under (" -
") exposure warning marks and exposure index bracket visible. Viewing
magnification 0.84X at infinity with 55 mm Auto Rikenon f/1.4 tens. Field of
view covers 92% of actual picture area (in horizontal position).
Focusing:
Microprism image spot surrounded by ground glass ring on Fresnel field for rapid focusing.
Reflex Mirror:
Instant return type. Automatically returns to its original position as soon as the exposure is made.
Flash Synchronization:
X synchronization for electronic flash unit up to 1/125 sec. M synchronization for flash bulbs up to 1/1000 sec.
Flash Terminals: Two flash terminals provided--"X" and "M". X contact on hot shoe for cordless electronic flash unit.
Film Wind: Single stroke film advance lever with 180 degrees winding angle (15 degrees play). Winds the shutter. counts exposures and prevents double exposures.
Film Rewind: Film rewind crank by pressing film rewind button.
Exposure Counter: Additive type from "S" (Start) to 36. Automatically resets to "S" when back cover is opened.
Hot Shoe: Built in. Used for cordless electronic flash unit.
Self-timer: Built-in variable timer with 7 to 15 seconds delay. Activated by shutter release button.
Preview Button: Built in.
Filter Size: Screw-in type: 54 mm for f/1.4 lens and 52 mm for f/1.7. f/2.0 and f/2.8 lenses.
Dimensions: 49.7 (height)X147.1 (width)x96.4 mm (depth) (2.0X 5.8x 3.8 in.) (Body only)
Weight: 780 9 (27.5 oz.) (Body only)
Accessories included:
Neck strap. Triangle rings (2). Mercury battery. Hot shoe plastic cover and Body cap.
Specifications subject to change without notice.