historical purposes, all rights reserved.
This page is copyright© by
This page may not be sold or distributed without the
expressed permission of the producer
I have no connection with any camera company
Mamiya/Sekor
1000DTL / 500DTL
This camera manual library is for reference and
historical
purposes, all rights reserved.
This page is copyright© by
![]() M. Butkus, NJ.
M. Butkus, NJ.
This page may not be sold or distributed without the
expressed
permission of the producer
I have no connection with any camera company
On-line camera manual library
If you find this manual useful,
how about a donation
of $3 to:
M. Butkus, 29 Lake Ave.,
High Bridge, NJ 08829-1701
and send your e-mail
address
so I can thank you.
Most other places would charge
you
$7.50 for a electronic copy
or $18.00 for a hard to read Xerox copy.
If you use Pay Pal, use the link below.
Use the
above address for a check, M.O. or cash.

Back to
main camera manual page
CLICK HERE TO CONTINUE TO A
Venmo is @mike-butkus-camera Ph 2083
MAMIYA 1000DTL PDF DIRECT
FROM MANUAL
The Mamiya Sekor 500 DLT is the same,
it just failed
the high speed shutter test,
so a different dial was installed
that only
goes to 1/500. Problem fixed.
Click here
to Mamiya /Sekor 1000 DTL PDF
version made
from the HTML file
(posted 4-5-02)
This is the exact duplicate for the 500DTL except it's top speed is 1/500 sec.)
TABLE OF CONTENTS
|
Description of Reference Points ..3 Section 1. Specifications ..5 Section 2. Insert the Silver Oxide Battery ..7 Section 3. Film Loading ..8 Section 4. Setting the Film Speed ..11 Section 5. Selecting the Shutter Speed ..12 Section 6. Focusing and Viewing ..13 Section 7. Setting the Exposure ..14 Section 8. Depth of Field ..17 |
Section 9. The Automatic Lens ..19 Section 10. Changing the Lenses ..20 Section 11. Holding the Camera ..21 Section 12. Self Timer ..22 Section 13. Flash Photography ..22 Section 14. Rewinding the Film ..23 Section 15. Helpful Hints ..24 Section 16. Troubleshooting Your Camera ..25 Section 17. Meter Cut Off Points ..27 |
 |
|
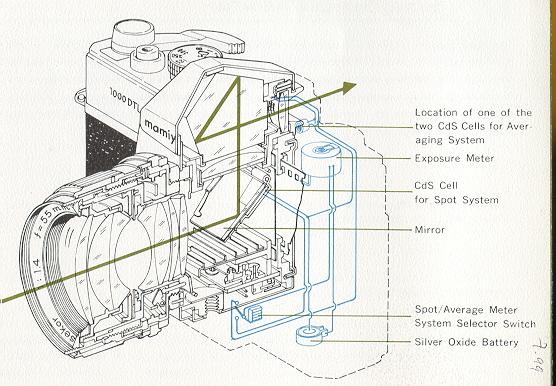
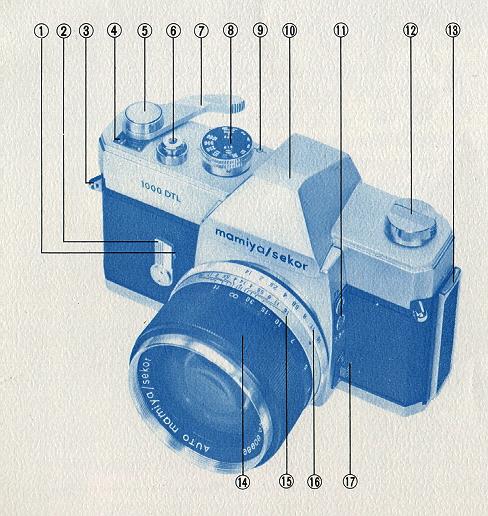
1. Self Timer Activating Button 2. Self Timer Winding Lever 3. Neck Strap Eyelet 4. Automatic Reset Exposure Counter 5. Meter " Off " Locking Button 6. Shutter Release Button with Threaded Cable Release Receptacle |
9. Film Plane Reference Point 10. Penta-Prism Housing 11. FP & X Flash Terminals 12. Rewind Knob with Rewind Crank 13. Film Compartment Door Slide 14. Focusing Ring 15. Depth of Field Scale 16. Aperture Ring 17. Spot/Average Meter System Selector Switch |
 |
|
|
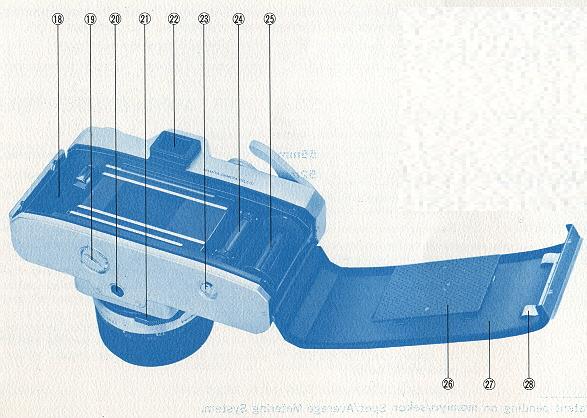
18. Film Chamber 19. Battery Compartment Cover 20. Tripod Socket 21. Automatic/Manual Selector Lever 22. Viewfinder Eyepiece |
23. Rewind Release Button 24. Film Advance Sprockets 25. Film Take Up Spool 26. Film Pressure Plate 27. Hinged Film Compartment Door 28. Film Cartridge Pressure Plate |
 |
The Mamiya/Sekor 1000 DTL is a Single Lens Reflex. This means that you
view the subject through the taking lens. Since the same image is transmitted
to the eye as to the film, parallax is eliminated. The subject is registered
on the film exactly as it is seen by the photographer. |
SETTING THE EXPOSURE:
 |
There are two ways of determining correct exposure with the Mamiya/Sekor
1000 DTL. Whether you use the- Spot or the Average system will depend upon
the type of picture you are taking. In either case, before taking the reading,
set the Automatic/Manual selector lever (21) on the lens barrel to the letter
" A" so that the automatic diaphragm feature of the lens is activated. |
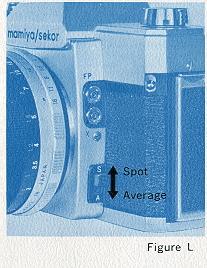
Looking through the viewfinder you will notice
that the small pointer at the bottom of the field is now on the letter " S " between
the meter area brackets. These brackets outline the area of sensitivity, about 6%
of the total picture you are viewing. Focus the lens so that the subject area is
critically sharp. Then aim the camera so that the bracketed area falls upon the
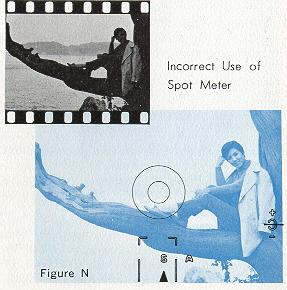
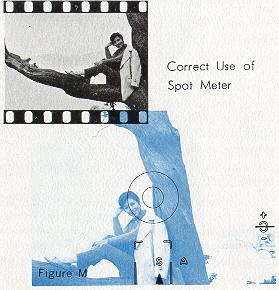
most important part of the picture you are about to take (Refer to Figure M). Make
sure that the brackets do not include any part of the picture that is either lighter
or darker than the section you are reading (Refer to Figure N).
|
|
|
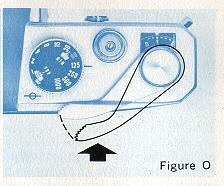 |
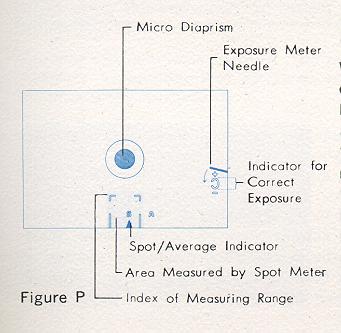
Press the film advance lever (refer to Figure O) toward the camera body as far as it will go. (NOTE: If the film advance lever is in the meter Off-Lock position, move lever away from body until locking button (15) snaps up.) While pressing the film advance lever toward the camera body as far as it will go, rotate the aperture ring (16) Located on the lens) until the needle at the right of the finder is centered between the open ends of the reversed letter " C " (refer to Figure P). The exposure is now set, with the selected area of the picture being correctly exposed. You may now release the pressure on the advance lever and make final composition changes before tripping the shutter. |
"AVERAGE" Reading:
When the scene to be photographed is made up of areas of equal importance,
an overall, average reading will result in the best picture. To accomplish this,
set the desired shutter speed, and push the Spot/Average selector switch toward
the letter " A ". The pointer in the lower section of the viewfinder now for moves
outside the Spot Meter bracketed area to the letter " A ", indicating that the whole
picture is being measured by the meter. Focus on the subject area. Center the needle
on the reversed " C " as above, by rotating the aperture ring while pressing the
film advance lever. When taking an " Average " reading, the picture should be composed
before the exposure is adjusted.
Exposure Setting When Using
Non-Automatic Lenses and Close-Up Accessories:
When using pre-set lenses,
non-automatic extension tubes, bellows, microscopes, or other close-up accessories,
the lens diaphragm must be manually operated until the correct exposure setting
is determined. The 1000 DTL meter requires no special calculations or compensations
to read correctly through extension tubes, bellows or other attachments. The meter
reading must be obtained after final focus, since exposure is influenced by distance
between the lens and the film. Activating the meter and setting the exposure is
accomplished as referenced above.
NOTE: You may reverse
the above procedure if you wish to take a picture at a particular aperture for any
reason. In this case, instead of choosing the shutter speed first, select the lens
opening desired before taking the reading. Then, center the needle in the reversed
" C " by rotating the shutter speed dial.
DEPTH OF FIELD:
When a camera lens is focused to give a sharp image of a particular subject, some
objects slightly behind, as well as some objects slightly ahead of the subject focused
on, will appear to be sharp. The distance between the nearest and farthest objects,
which are in focus, is called Depth of Field.
Depth of Field changes each
time the focusing distance changes, becoming greater as the lens is focused on points
farther from the camera position, while decreasing as the point of focus becomes
closer. Other factors influencing depth of field are the focal length of the lens
and the diaphragm opening at which the picture is taken. The shorter the focal length
and/or the smaller the lens diaphragm opening, the greater the depth of field for
any given focusing distance, and vice versa.
Proper use of depth of field
can enable the photographer to utilize the principles of "selective focus," which
often means the difference between ordinary snapshots and pictures of quality. For
example the proper selection of a "sharp" zone of focus can eliminate an unwanted
object in the background. The same could be true for foreground
objects.
When you wish to view the depth of field before taking a picture
with the 1000 DTL, set the lens diaphragm on " automatic". Focus with the micro
diaprism as explained before. Then press the film advance lever as if taking a meter
reading. This causes the lens diaphragm to close le. g. stopped down). If you have
already taken the meter reading, the lens is now at the diaphragm opening at which
the picture will be taken.
The depth of field now appears in the finder exactly
as it will be in the finished picture. By changing the focus while the lens diaphragm
is stopped down, you can select the area of sharpness in your picture. When using
non-automatic or pre-set lenses, the diaphragm must be closed manually, but the
same results can be achieved.
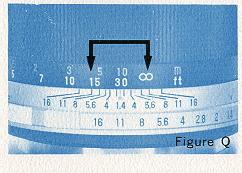 |
You may also determine depth of field by checking
the scale 115) on the lens barrel (Refer to Figure Q). Numbers representing
lens apertures appear at the near and far limits of depth for any given
focus distance and lens opening. |
THE AUTOMATIC LENS:
 |
The standard lens on the Mamiya/Sekor 1000 DTL is equipped with a fully
automatic diaphragm. This means that you may view a scene with all light
passing through a wide open lens, but actually take the picture through
a stopped down aperture as indicated by the meter. |
The automatic feature of your lens does not work when
used on non-automatic bellows or on extension tubes. In order to read the meter
in this case, proceed as explained in the earlier sec CAUTION! PLEASE READ THIS SECTION CAREFULLY BEFORE ATTEMPTING
TO REMOVE OR INSTALL A LENS.
CHANGING THE
LENS
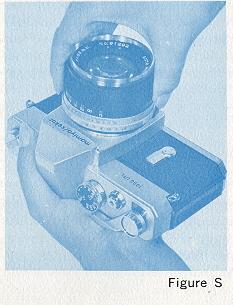
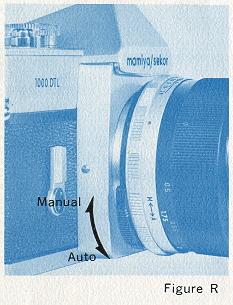
To remove an automatic lens from your camera, first depress the meter "
OFF " locking button. Set the Automatic/Manual selector lever on the lens
to " A ". Support the camera (refer to Figure S) body in the palm of the
left hand with the lens projecting upward. With a firm grip on the camera
body, use the right hand to turn the lens barrel counterclockwise until
all threads have been disengaged.
To mount a lens on the camera,
reverse the above procedure, turning the lens barrel clockwise until it
stops. Always be sure the meter is in the " OFF " locking position, and
that the threads are properly engaged. No resistance should be felt when
mounting a lens. If excessive pressure is necessary, remove the lens completely,
and inspect the threads for dirt or other foreign matter.
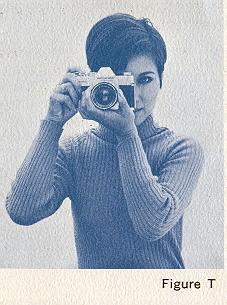
If slight resistance is met when removing a lens,
grasp the lens barrel as close to the camera body as possible to avoid accidental
damage. Support the camera (Refer to Figure T) on the palm of the left hand with
the thumb and forefinger curled lightly but securely around the bottom and
sides of the focusing ring. Place the palm of the right hand against the
end of the camera body. The right forefinger automatically rests near the
release button, and the thumb is on the film advance lever. Bring the camera
up to eye level, and rest it against the forehead with the viewing eye close
enough to the viewfinder to see the complete subject area. The forehead
is now helping to steady the camera. The left elbow should be held as close
to the body as possible.
Do not touch the reflex mirror after removing the lens. Dust particles
may be removed with a blower or a soft camel hair brush
HOLDING
THE CAMERA
You may compose the picture either vertically
or horizontally and the viewfinder shows the exact format of the picture.
As a general rule, the camera should not be held at shutter speeds slower
than 1/60 of a second. This becomes particularly important when using lenses
of longer than normal focal length where it may be necessary to use even
faster speeds to eliminate hand movement. At speeds slower than 1/60, use
a tripod or other support to eliminate camera movement.
The release button should be gently squeezed
when taking a picture. Never use a plunging or pushing motion.
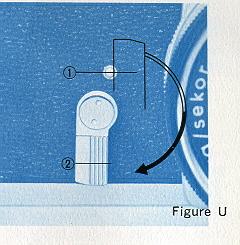
SELF TIMER
|
The self timer (2) provides a method of taking delayed action pictures, thus allowing a photographer to be in his own pictures. When the self timer lever is rotated clockwise (refer to Figure U) ,
8 it full travel of approximately 180 degrees, a delay of ten seconds is
provided before the shutter position is released. Shorter intervals may
be accomplished by rotating the lever for shorter distances anywhere between
90 and 180 degrees. The self timer activating button (1) is located behind
the lever, and is visible only when the p timer is set for use. |
 |
FLASH PHOTOGRAPHY
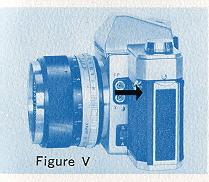 |
The flash terminals, marked FP and X (11) (Refer to Figure V) allows for a choice of flash synchronizations. The selection of a terminal depends upon the type of flash used, as well as shutter speed. The following table shows the correct combinations to be used in various flash situations. These combinations must be rigidly followed to insure correct synchronization. |
Flash synchronization chart is not included since
flash bulbs are no longer available.
REWINDING THE FILM:
When you have
finished taking all the pictures in a cartridge, either 20 or 36, you must rewind
the film back into the cartridge.
To do this, push in the rewind release
button (23) located on to,. bottom of the camera body. (Button will remain inset
without pressure until film advance lever is advanced a couple strokes) Wind the
rewind crank (12) in the direction of the arrow until you feel t tension in the
film lessen. That indicates that the film has left the take-up spool. If for any
reason you are not sure that the film has been totally rewound
back into the cartridge, continue to hold tension on the rewind
crank and at the same time advance the film advance lever a full stroke. Trip the
shutter and advance again. Repeat this at least 3 times. If you do not feel
a tension or pulling on the rewind crank when advancing the film advance lever,
film has been completely rewound. Open the back of the camera and remove the cartridge.
AVOID DIRECT LIGHT WHEN UNLOADING/LOADING THE CAMERA.
HELPFUL HINTS:
STORAGE
When the camera is not to be used for an extended length of time, store
with the shutter un-wound.
This relieves tension on the spring. Lock the exposure
meter "Off." Remove the battery.
Never store in areas where temperatures
exceed 100 degrees F. or go below freezing (32 degrees F).
Protect against
excess moisture by using silica gel or other desiccant.
Never expose the
camera to direct sunlight for extended periods of time.
Avoid areas where
exposure to salt water or salt air occurs.
CARE AND CLEANING
Always use a blower or camel hair brush to clear film
chamber and area around take up spool before loading film into camera.
Clean
lens with lens tissue and regular lens cleaning liquid only. Do not clean lens at
all unless you notice that it needs it. Avoid rubbing the surface of the lens if
there is any loose grit or dirt present. Never rub lens with tissue alone. Always
use a lens cleaning liquid. Never touch the lens with your bare fingers.
Never rub the surface of the reflex mirror. If there are foreign particles of any
kind that cannot be removed by blower or camel hair brush, leave them alone until
a factory approved serviceman is avails able. Dirt on the mirror can have no effect
on the picture.
TROUBLESHOOTING YOUR CAMERA:
The proper operation of a precision instrument like the Mamiya/Sekor 1000 DTL camera
requires strict attention to the correct manipulation of controls. In many cases,
the camera may appear to malfunction simply because some small detail was overlooked,
or not operated in the proper sequence. Before you decide the camera is broken,
there are some things you can look for if you should experience any type of camera
failure. A few of the problems and their probable causes are listed below.
Problem:
NOT ENOUGH LIGHT IN VIEWFINDER.
Possible cause: Diaphragm closed.
Lens Automatic/Manual selector lever set on " M " instead of " A " Correct this
by moving lever to "A " setting.
Problem: EXPOSURE METER NEEDLE WILL
NOT MOVE TO TAKE READING.
Possible cause: Improper shutter speed
for film and light conditions. Try changing shutter speeds until needle moves. Or,
be sure there is a battery in the camera. Use only specified type of battery (silver
oxide. Or silver oxide battery may have been inserted wrong. Check to see that terminals
are in the positions indicated in the instructions.
Problem: FILM
COMPLETELY BLANK WHEN PROCESSED, INDICATING NO EXPOSURE HAS BEEN MADE.
Possible cause: Improper loading. Review the section on film loading and be sure
you are loading the camera correctly, with the film being securely attached to the
take up spool and winding in the CORRECT DIRECTION, that is, UNDER the take-up spool.
Film may not have gone through camera at all.
Problem: SELF TIMER
DOES NOT OPERATE SHUTTER.
Possible cause: Timer not rotated full
90 degrees. Timer must be rotated to some point between 90 and 180 degrees.
Problem: FLASH PICTURES EITHER BLANK OR ONLY PARTIALLY EXPOSED.
Possible cause: Improper shutter speed for the type of bulb used. Or improper cord
receptacle used for the type of bulb or shutter speed. Check Flash Synchronization
tables carefully.
Problem: LENS VERY HARD TO REMOVE FROM CAMERA.
STOP IMMEDIATELY!
Possible cause: Pressure on Film Advance
lever causing automatic diaphragm actuating plate to press against pin on back of
lens. THIS CAN CAUSE SERIOUS DAMAGE TO LENS. Check to be sure that the meter is
turned " OFF." DO NOT USE FORCE. (Webmaster - the lens should screw
on and off very easily. Two other possible problems, dirt on the screw part
of the lens or the lens has been "cross threaded" It was not put on straight
and is ruining the threads of the lens. Check the lens for any "white areas"
around the threads. They are painted black, and white threads can be an indication
that the metal is being cut.)
Problem: SHUTTER WILL
NOT RELEASE.
Possible cause: Film Advance lever not advanced far enough.
A full stroke is necessary for winding the shutter. However, a ratchet incorporated
within the advance mechanism will allow you to accomplish a full wind in a series
of short strokes.
If any problem listed above cannot be solved in the manner
suggested, do not attempt to repair your camera. Take it, or send it, instead, to
your nearest service station. A minor problem could possibly be aggravated by tampering.
METER CUT OFF POINTS
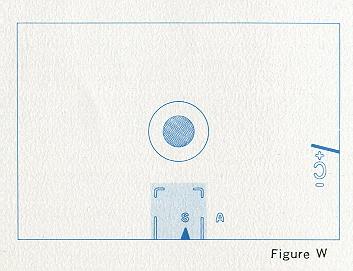
The Mamiya/Sekor 1000 DTL incorporates
automatic disengagement or cut off points for the metering system at varying
ASA/shutter speed settings. When a certain combination of shutter speed
and ASA points is reached, both metering systems (spot system and averaging
system) are disconnected, and in turn the needle immediately moves upward
above the plus (+) reference symbol (refer to Figure W). Changing the shutter
speed or ASA setting will reengage the metering system.
(Webmaster - This means that certain combinations
of film ASA and shutter speeds can not determine a correct exposure.
The
manual gives no reference points for this but as I remember: ASA 400 film would
meter down to 1/8 of a second. ASA 800 to 1/15 a second)