Canon Command Back
70/80/90
Section Two
(4) Setting the 4-digit Frame Counter Number
You can record the frame counter number from Fc 00 01 up to Fc 99 99 on the
film in sequence.
EXAMPLE
|
1. Select the data recording function by pressing the data/timer
selector.
|
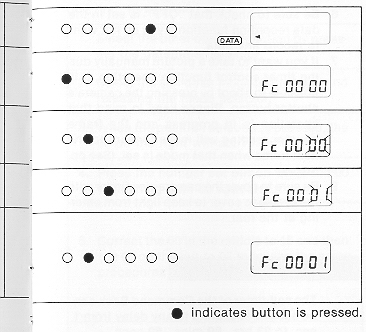 |
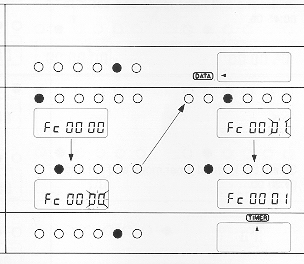
| 2. Select the 4-digit
frame counter number mode (Fc 00 00) by pressing and releasing the mode
selector. |
| 3. When the position
selector is pressed once, the right 2 digits (00) will start flashing. |
|
4. Press the number set button once while the 00 is flashing to set
01.
|
|
5. Press and release the position selector twice to stop the
flashing. The frame counter reading automatically advances with the
frame counter of the camera, as each exposure is made.
|
Notes:
· If you want to start the frame counter reading from Fc 00 01 again on the
second roll of your film, reset to Fc 00 01 again.
· If you want to continue the sequential numbering after your first roll of
film has been finished, there is no need to reset the frame counter reading on
the second roll of film. The sequential number is set automatically since the
frame counter reading on the LCD panel does not advance during automatic film
loading. The frame counter reading from Fc 00 01 to Fc 99 99 can be
automatically set and recorded in this manner.
· When continuous shooting is done in this mode at low temperatures (below
5°C/37°F), the recorded number may not appear clearly.
· With the Command Back 90, recording of the frame counter number cannot
follow continuous shooting.
9. Setting Each Mode of the Timer Control Function.
1. Operation of the timer control function can only be started by pressing the
start/stop/clear button. Pushing the camera's shutter button will not start
timer control function operation.
2. Operation of the timer control function stops automatically after the
specified operations have been completed. However, if you want to manually
stop operation, press the start/stop/clear button once again.
3. Operation of the timer control function is possible only when a mode of the
timer control function is displayed on the LCD panel. If a data recording
function mode is displayed, the timer control function will not operate even
when the start/stop/clear button is pressed.
4. To set the timer control function with the Command Back 90, set the T90 for
continuous shooting.
5. Do not set the self-timer on the camera itself when the timer control
function is used.
6. Be sure to check that "OFF" is set in the data recording function if you do
not want to record any data.
7. If you want to take a picture manually during timer control function
operation, it is possible to shoot by pressing the camera's shutter button.
Please keep in mind that operation is in progress and the frame counter
reading will move forward to the next frame when that mode is set. (See pp.
20-21 )
8. Be sure to cover the camera viewfinder with the eyepiece cover to keep
light from entering at the rear.
(1) Setting the Self-timer
The self-timer of the Command Back can be set in 1-sec. units to any delay
from 1 sec. to 23 hrs., 59 mine., 59 sees.
EXAMPLE
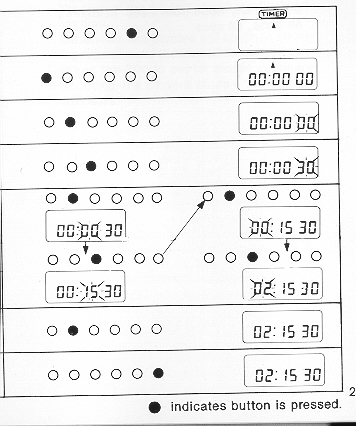
When you want to take a picture after a delay of 2 hrs., 15 mine., 30 secs.
| 1. Select the timer
control function by pressing the data/timer selector. |
 |
|
2. Select the self-timer mode by pressing and releasing the mode
selector.
|
| 3. When the position
selector is pressed, the 00 on the right will start flashing. |
| 4. Press the number set
button while the 00 is flashing until 30 appears. |
|
5. Correct the 00 in the middle to 15 and then the 00 on the left to
02 following the same procedures as In steps 3 and 4.
|
|
6. Press the position selector once again to stop the flashing.
|
| 7. To start the
self-timer, press the start/stop/clear button once. |
(2) Setting the Interval Timer
The interval timer can be set in 1-sec. units to any value from 1 sec. to 23
hrs., 59 mine., 59 sees.
EXAMPLE When you want to release the shutter every 5 mine., 30 sees.
| 1. Select the timer
control function by pressing the data/timer selector. |
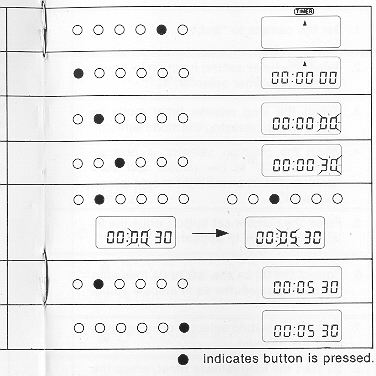 |
| 2. Select the interval
timer mode by pressing and releasing the mode selector. |
| 3. When the position
selector is pressed, the 00 on the right will start flashing. |
| 4. Press the number set
button while the 00 is flashing until 30 appears. |
| 5. Correct the 00 in the
middle to 05 following the same procedures as in steps 3 and 4. (The 00 on
the left should remain the same in this case.) |
| 6. Press the position
selector once again to stop the flashing. |
|
7. To start the interval timer, press the start/stop/clear button
once.
|
Note:
· In the case of the Command Backs, the interval timer mode must be set longer
than the sum of the shutter speed and the winding time. Otherwise, the
camera will continue shooting regardless of the interval timer setting.
When the T90 is set for single exposure shooting, the camera stops after a
single exposure.
(3) Setting the Long Release Timer
The long release timer mode can
be set in 1-sec. units to any value from 1 sec. to 23 hrs., 59 mine., 59 sees.
Bulb must be set on the camera when using the long release timer mode.
When an AC lens is mounted on the T80, the long release timer mode can not be
used, since it is impossible to set the camera to bulb when an AC lens is
mount
EXAMPLE
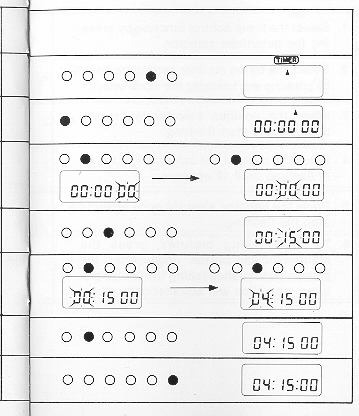
When you want to keep the shutter open for 4 hrs., and 15 min.
| 1. Set the camera to "bulb." |
 |
|
2. Select the timer control function by pressing the data/timer
selector.
|
| 3. Select the long release timer mode
by pressing and releasing the mode selector. |
| 4. When the position selector is
pressed twice, the 00 in the middle will start flashing. (The 00 on the
right should remain the same.) |
|
5. Press the number set button while the 00 is flashing until 15
appears
|
| 6. Correct the 00 on the left to 04
following the same procedures as in steps 4 and 5. |
| 7. Press the position selector once
again to stop the flashing. |
|
8. To start the long release timer, press the start/stop/clear button
once.
|
(4) Setting the Frame Counter
The number of pictures to be taken can be set from 1 to 99.
EXAMPLE
When you want to take twelve pictures in succession.
| 1. Select the timer control function
by pressing the data/timer selector. |
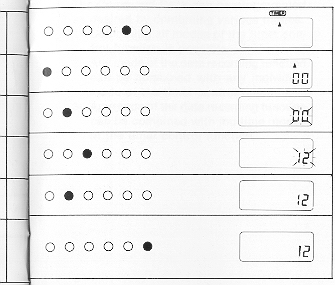 |
| 2. Select the frame counter setting
mode (00) by pressing and releasing the mode selector. |
| 3. When the position selector is
pressed once, 00 will start flashing. |
| 4. Press the number set button while
the 00 is flashing until 12 appears. |
|
5. Press the position selector once again to stop the flashing.
|
|
6. To start taking pictures, press the start/stop/clear button once.
After the camera has finished taking the twelve pictures, operation will
automatically stop.
|
Note: If the frame counter of the Command Back is set to 00, shooting is
impossible even when the start/stop/clear button is pressed.
(5) Multiple Exposure: for the Command Back 90 only
When taking multiple exposures using the timer function, set the number of
frames to "02". In this case, one extra frame will be exposed after shooting.
(6) Automatic Flash photography: for the Command Back 90 only
The interval timer or self-timer can be used for automatic flash photography
with the Speedlite 300TL or Macro Ring Lite ML-2, which are designed
exclusively for the T90.
To prevent unnecessary battery consumption, set the main switch of the
Speedlite 300TL or Macro Ring Lite ML-2 to the "SE" position. If the interval
timer is set for longer than 5 minutes, the power to the flash unit is
automatically cut off, and the signal is transmitted from the Command Back 90
to charge the flash one minute before shooting, so the power is automatically
turned on.
10. Combining Various Modes
General Information and Notes
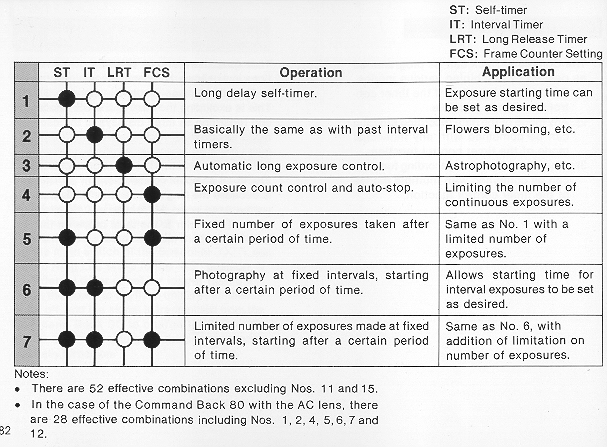
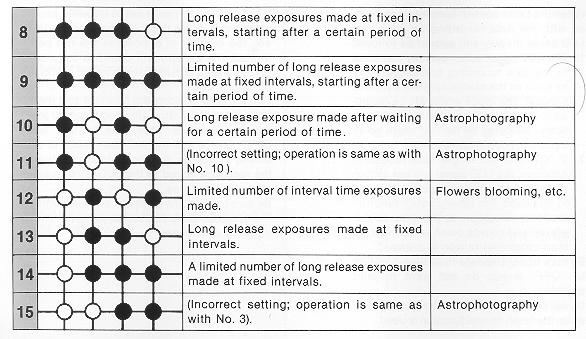
1. The Command Back can be programmed as desired by combining various
modes.
1) Combining all modes of the timer control function is possible.
2) Any mode of the data recording function can be combined with any
individual mode of the timer control function.
3) Any mode of the data recording function can be combined with
multiple modes of the timer control function.
Therefore, there are 11 possible combinations in 1 ) above, 16 possible
combinations in 2) and 44 complex combinations in 3). This is excluding the
case of the OFF mode and regarding all three displays of the date mode as one
mode. In the case of the Command Back 80, however, there are 4 possible
combinations in 1), 12 combinations in 2) and 16 complex combinations in 3).
This is because the long release timer mode can not be used when AC lenses are
mounted on the T80. Refer to the table below on the type of exposure made with
each combination.
Functions 1 - 7
 |
Functions 8 - 15
 |
2. When the timer control function is combined with the data
recording function, the LCD panel display will appear as follows:
1) The LCD panel automatically switches to the data recording function display
as soon as the start/stop/clear button is pressed. The mode which will be
recorded is displayed. The timer control function is indicated by the "***"
mark pointing to the mode in operation.
2) If "OFF" is set in the data recording function, the LCD panel will not
switch to the data recording function display. In this case, the timer control
function mode in operation at the time is displayed and counts down as soon as
the start/stop/clear button is pressed.
3. Be sure to set the data recording function to "OFF" if you do not want to
print anything.
4. Do not set the self-timer on the camera itself when the timer-control
function is used.
5. If the frame counter is set to 00 while any other mode of the timer control
function is set the number of exposures will not be limited, the camera will
continue to take pictures until the end of the roll is reached. (See p. 29)
6. When the data recording function and the timer control function are used
together at low temperatures (less than --1 0°C or 22°F), please use the
self-timer mode at a setting of approx. 5 sees. This is because the response
speed of the LCD is reduced at low temperatures.
7. Be sure to cover the camera viewfinder with the eyepiece cover to keep
stray light from entering at the rear.
EXAMPLE 1
When you want to use the interval timer mode set at 4 hrs., 15 mine., and the
long release timer mode set at 10 sees.
| 1. Set the camera to
"bulb." |
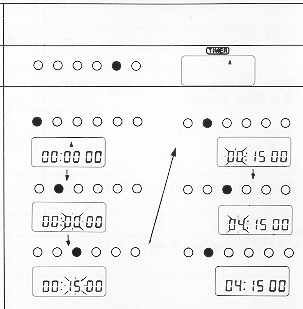 |
| 2. Select the timer control
function by pressing the data/timer selector. |
|
3. Select the interval timer mode and set it to 04:15 00.
|
|
4. Select the long release timer mode and set it to 00:00 10
|
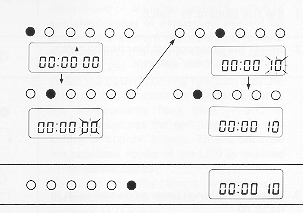 |
| 5. Press the start/stop/clear button
to start operation. |
EXAMPLE 2
When you want to use the self-timer mode set at a delay
of 45 mine., the interval timer mode set at 1 hr., 30 mine., the long release
timer mode set at 20 sees., the frame counter set ting mode set at 7
exposures, and the 4-digit frame counter mode to record sequential numbering
on the pictures.
| 1. Set the camera to "bulb." |
 |
| 2. Select the data recording function
by pressing the data/timer selector. |
| 3. Select the 4-digit frame counter
mode and set it to Fc 00 01. |
| 4. Select the timer control function
by pressing the data/timer selector. |
| 5. Select the self-timer mode and set
it to 00:45 00. |
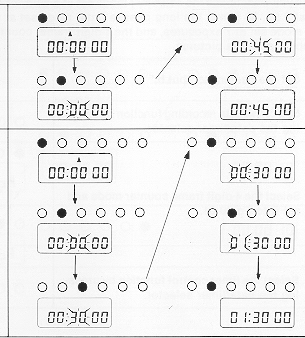 |
6. Select the interval timer mode and
set it to 01:30 00
|
7. Select the long
release timer mode and
set it to 00:00 20 |
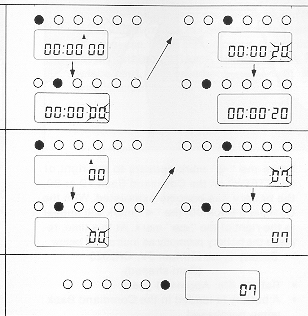 |
| 8. Select the frame
counter setting mode and set it to 07 |
| 9. Press the
start/stop/clear button to start operation. |
Note: Be sure the camera is set to BULB.


