
Sewer repair / problems
Orangeburg pipe
Page created May 2006
See photos below !
As you can see from the other links on my page, www.butkus.org I have done many repairs myself. In 1991 I added an addition(s) to square off the house. While the "professionals" were there digging the foundation to the houses they they cut into the Orangeberg sewer pipe. After a lot of complaining and waiting for more "professionals" to show up to fix it, I replaced that section of the sewer. That pipe was the same type of cheap "plastic layer" pipe that went to a metal pipe some 30 feet away. Little did I know I would pat myself on the back when I replaced (rather then fixed the hole they made) the pipe with typical 4" plastic pipe to the outside of the foundation. Plus the fact that they poured concrete over this 10'X15' section of the addition. So any plugs or falling plastic from the inside (which you will see) could have blocked that pipe for good. I would have needed to go straight out the side of the house where this digging was done and, well that would have been a mess. This is where this story leads to. None of that pipe I replaced in '91 looked like the photos of the interior of the pipe below.
One: the brass main sewer cleanout end in my basement was stuck. I tried so hard to unscrew it, the bolt started to tear away from the plate. I wanted to try my 25 foot snake in my crawl space to fix my clog.. I just drilled out the plate. It is THIN brass and took just 10 min to drill all around it and then bash it out with a hammer and a chisel. Just whacking it with a hammer would do it too but did not want to damage the cast iron pipe it was rusted into. I had purchased a rubber end cap (used for "testing pipes" ) and covered the end of the main sewer pipe. No pressure in sewers, so there should be no problems. I sanded the edge of the cast iron pipe to make a good seal. No leaks five months later.
Two: those rubber connectors and stainless steel clamps. The one I used in 1991 to connect the new plastic (now under the poured foundation) against the old layer plastic pipe. It looked NEW coming out of the ground after 15 years. And I have damp soil, amazing and easy to use connectors. From what I heard they are suppose to last 100 years, the rubber that is. The 50 year old rubber sewer seal that I cut out was still in good shape.
Our sewer drain had started with back-up problems for a few years. After a good forceful plunging, it usually unclogged. This sometimes took 45 minutes of hard plunging. One day in Jan. 2006 it became clogged and no plunging could clear it. I tried a 25 foot snake, but that is not work. After calling my local sewer cleaning company, they quickly cleared the clog and cleaned me of $325. Their "FIX" was an addition $840 high pressure sprayer. They did bring along a video camera to run through the pipe for that $325. They showed me a white section they claim was roots... ROOTS as they walked up and down my tree lined driveway even before the video camera went in.. You got ROOTS... gotta high pressure spray it to rid it of roots for a good number of years they kept saying. The interesting fact was they "the pros" do not use any of the expanding ends on the snake. Nothing but the inch and a half end at the tip of the snake. According to them... if the ends of the expanding snake break off, then they are responsible to get that part out. So they only use High Pressure water sprays anymore.
I declined the $840 high pressure spray as my only access to the main sewer pipe was in my 4 foot crawl space. Besides, I now had a flushing toilet. I told them I would dig up the carport where the pipe ran, insert a "T", and give them a call so they could work from outside. I was ever so thankful it was 40+ degrees the last few days in Jan. 2006, very thankful.
My idea was to go to dig to the center of the driveway, some 4 feet from the new plastic pipe and add plastic and a "T" cleanout pipe. And see the ROOTS they said was in my pipes and cut it out with something. We did have a tree planed in 1990 when we built the pool deck. It was 10 feet from this sewer pipe. Sounded convincing enough. Roots, you got roots!
Dig we must - and I dug for 3 days (with some help) to get this pipe out to 4 feet. Cutting the pipe if find the picture below. This photo was of the plastic layered pipe nearest the new plastic pipe at the footing of the new addition foundation. I did not see this back in '91. None of the plastic layered pipe I removed looked like this.
<<<<< Information received Dec.
26th '06 from someone at www.hydro-physics.com
.
Humm the truth comes out.
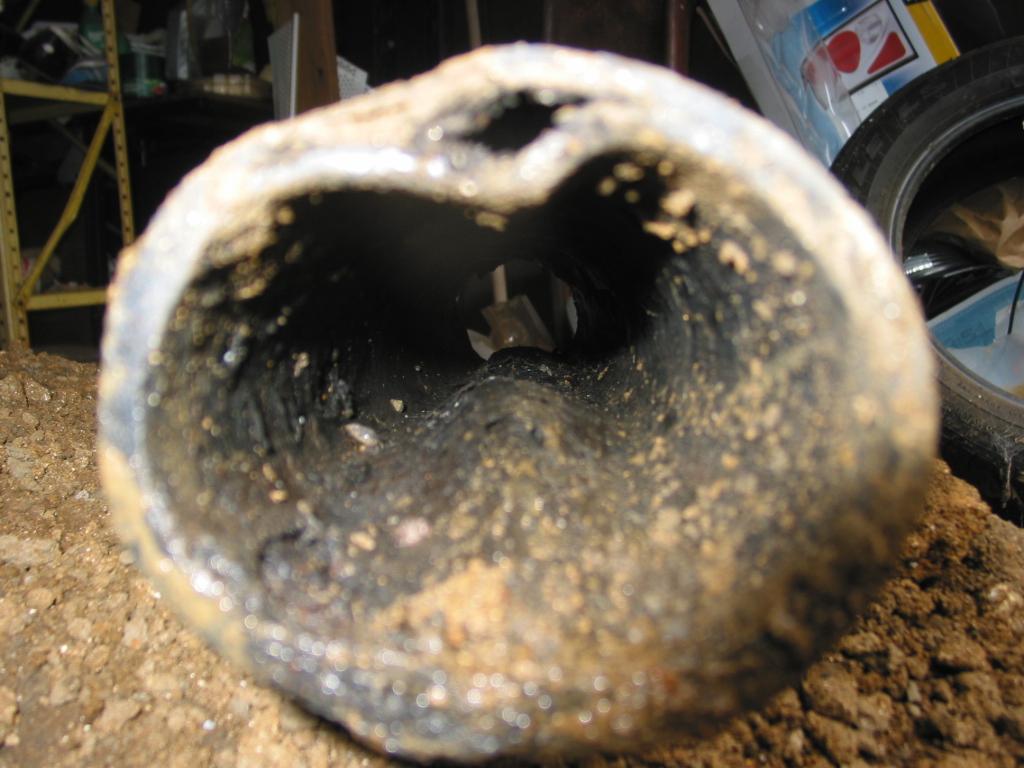
"That type of pipe you have pictures of is called Orangeburg pipe. It was used during WWII a very short time considering clay teracotta pipe has been used since before the Roman Aquaducts and PVC, SDR, and ABS have been in use from around the late 1970's. The reason they stopped using orangeburg is because it is very weak, the weight of the ground on top of it collapses it causing it to ovalize and the layers peel like onions. From the layers peeling it causes debris carried in the line to collect until it has strained enough to cause water to no longer pass through."
So unfortunately the only way to correct the problem is to dig
it up. The cleaning company you hired to do the things they did should have
caught this since they scoped the line. Jetting a Orangeburg line will not fix
it.
>>>>>>>>>>>>
The "plastic layered" pipe, laid in 1956, was collapsing and physically coming apart at the top and bottom ! My wife suggested it was from the car parking over it but it's buried 4 feet down. This "miracle stuff" (back in the '50s) was just decomposing.... This problem the video camera did not show, nor did our "sewer guy experts" state that. The high pressure spray could or would have loosen the fragile bubbled stuff and blocked the sewer for good.
The photos below show the problem... Soooooooooo... Dig We Must... I (and the #1 son helped a bit) dug and continued to dig to the sewer pipe out to a metal 45 degree bend, just before going under a 28" wooden shed ! That section of pipe, most likely ran straight down our driveway to the main sewer line. A pick-ax was a real helper breaking up the soil. Finally on Friday night I had it all dug out and on Saturday I'd just replace it. As usual, 3 stores later, a new Home Depot just opened in Hacketstown, NJ and that was the spot to pick up the needed pipes and adaptors all in one location. Then FINALLY Saturday night at 8:30 I could flush again... it was not difficult getting most of the other pipe in.... this stupid RUBBER bushing to convert plastic to the STEEL pipe (the steel pipe I found in excellent shape, not a bit of rust after some 50 years) the steel sewer had a rubber bushing and the old plastic layer pipe inserted into that bushing. I cut out the old rubber bushing, so I had to do the same to the new plastic pipe. Just lub the bushing and push in the plastic pipe, easy! I hate to say at age 50 I'm no wimp but I finally had to take a 15 lb. metal object, cut a 6 in. section of the plastic sewer pipe and beat the living daylights out of it to get in 3/4 of the way into this stupid rubber bushing..... the instructions look easy. There is NO rubber adaptor to fit OVER the steel pipe and plastic pipe. As this steel pipe has a enlarged end to allow another steel pipe to be inserted into it or the rubber bushing. So this rubber bushing is the only answer (at the time) and boy do I mean BEAT it into that bushing with liquid soap as lub and all. Plus being 4 feet down and a 3 foot wide ditch there is no room to work. I finally got the plastic pipe into the rubber bushing. Another 30 min. and the rest of the plastic was connected to the old plastic at the foundation. A "T" was added in the middle, cut at ground level even with the ground line. One item. I glued the plastic pipe T into the middle. That was easy as I had the top of the T to grab and twist the pipe in before the glue set. The last section of straight pipe was more difficult. Tired and worn out I could not grab the slippery sewer pipe and shove it all the way in to the other end of the T section. I got it only half way in before the glue set. Next time, glue both sides outside the ditch where you have room to work and just cut off what you need to make it fit.
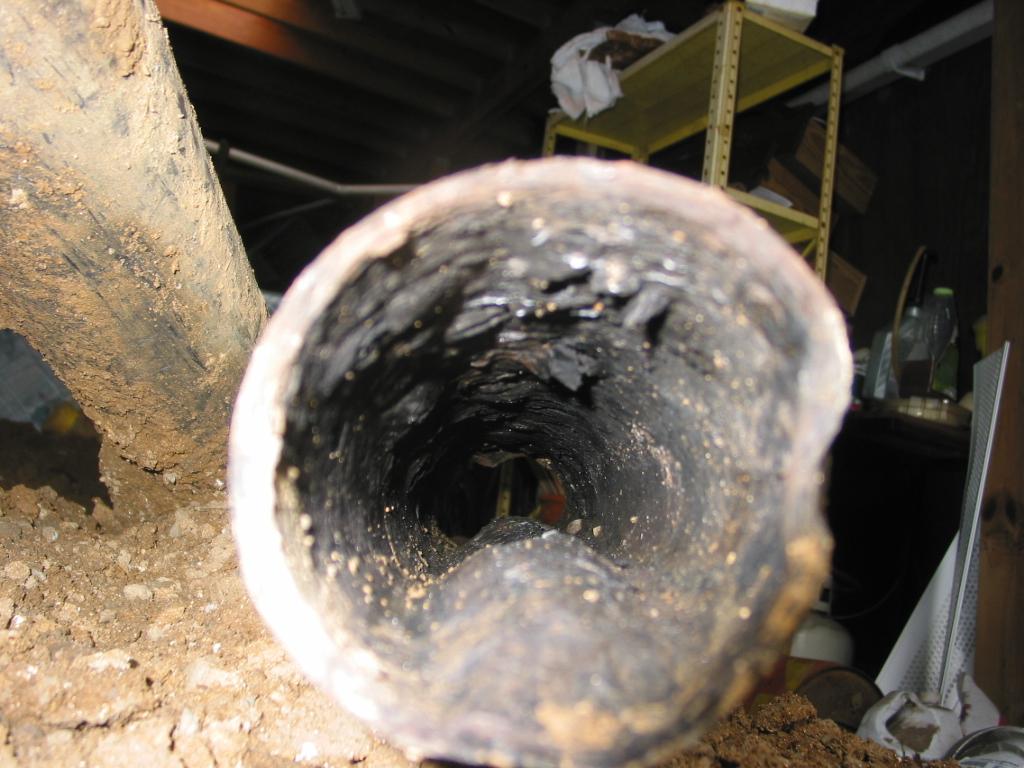
These shots are of the plastic layer pipe. The entire bottom was bulging up.
One warning... these pipes were just joined together with a
plastic layer connector, no sealant or nothing. I just pulled the two
connections apart. If ROOTS were to get near these... they would easily
get in. Yet no ROOTS were ever found in any of the pipe I dug up.
The sewer guys did not have an accurate "measuring" of the pipe but
this "roots" ball was 5 or 10 feet from the end of the plastic
pipe. I dug up past that. This page was created in March 28, 2006 so
two months and no "roots" clogged my sewers. Where that
"white toilet paper attached to roots" went that the sewer guy showed
me on the camera, I don't know. <<<<< Later review: I
found that "roots section" of the sewer in a pile of cut up
pipes. How I missed it, I don't know. As the person from www.hydro-physics.com
wrote, the paper wrapped around "roots" was just paper caught on the
"Orangeberg" pipe as it was unfolding.
A small 1 1/2 hole was
made by the auger in this mess of paper allowing the water to drain
>>>>
I could not see down the metal pipe as it
was at a 45 degree bend and I was not digging any further. Besides that
was some 35 feet from the main sewer drain and the camera did not go that
far according to the sewer guys looking at what was left on the camera reel.
After cutting up the pipe to put it into trash bags, I found a large bundle of
toilet paper. It had a perfect hole cut through it by the "pro"
snake. No roots were attached to it. There must have been a large
something that stopped it in the pipe. I found this months after digging
up the pipe. So something was clogging the pipe but the pipe coming apart
was most of the problem. I would have used some "sewer cleaner"
to dissolve it but the pipe in the condition you see in the photos may not have
lasted too long. It may have given away and clogged the line up good.
Plus I was young enought at that time to still dig this by hand.
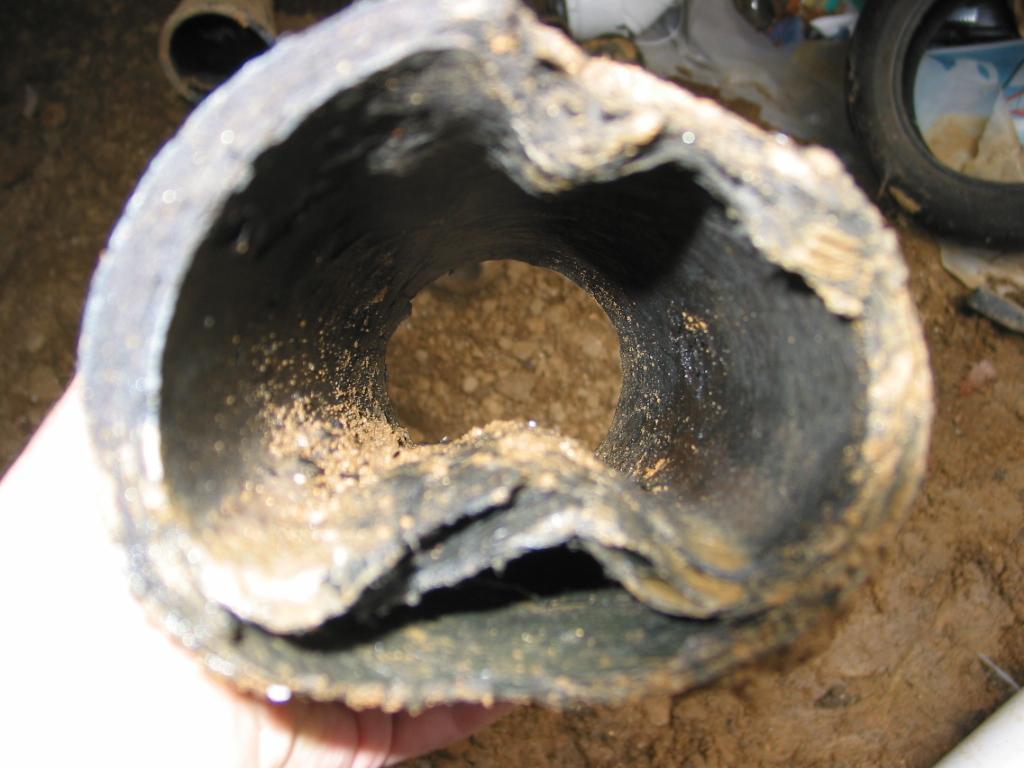
Proof of the pudding - The worst section, all told, just 12 feet or so of pipe was removed until I got to the steel sewer pipe. Note the thin layer at the bottom of the bubble ! High pressure spraying might just take that all away.
<<<<< UPDATE Oct. 2016. No problem with the drain I replaced, except for the bathroom drain. So after a few attempts with a plunger, I went to the basement. Long story short a blockage just above the main 4" drain from a 45 degree cast iron pipe to outside, there was a 2" original cast iron pipe nipple left coming from the shower that I replaced with plastic back in 2006. I did not try to replace the 2 ft cast iron sections as it looked pretty good inside and outside. There were two short 45 degree threaded angles, so I could not see but 3 inches in that pipe. I tried a snake.. can't get though. Try and try again, with the rubber end off the 4" drain (I installed in 2006 and never leaked), I see the snake not getting to the 4" drain from above. So with many, many, many heavy bangs with the small end of the snake, finally. A big glob of stuff drops to the 4" drain. I see two half of a walnut, and globe of hair and stuff stuck to these two halves ! !
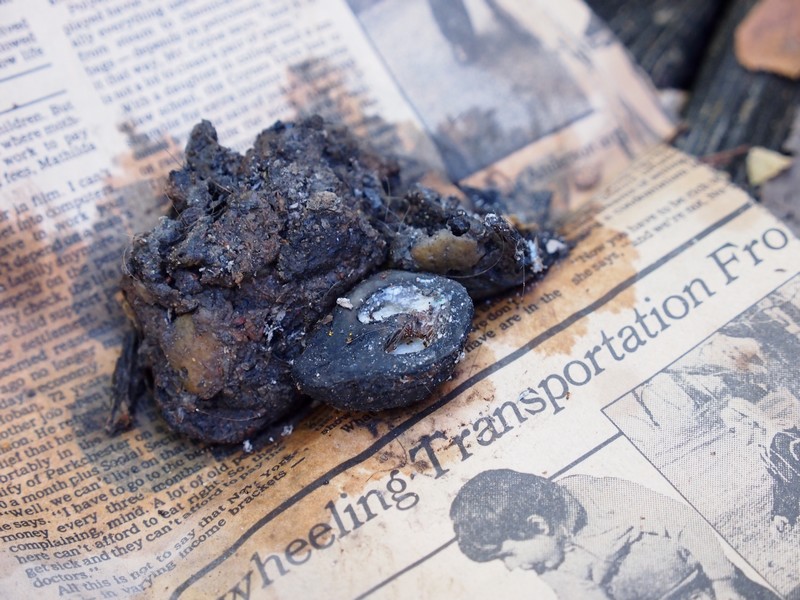 |
So, after using the larger end of the snake, I only get one or two small pieces left. Close everything and drain fixed. I filled the tub a bit by blocking the unprotected drain. It drains in seconds. How the nut got in there I don't know. The only unprotected drain without an X or something to block larger than a small seed is in the bathroom. My son had move out 15 years ago, that's no 15 year old walnut. This bathroom drain was connected to the both kitchen and bathroom sink. But those pipes were so long, and you only used them for a couple of minutes at a time, it collected in the long plastic pipe, until it could slowly drain. The shower used a gallons a minute or so.