and historical purposes, all rights reserved.
This page is copyright© by
This page may not be sold or distributed without
the expressed permission of the producer.
I have no connection with any camera company.
This camera manual library is for reference
and historical purposes, all
rights reserved.
This page is copyright© by
![]() ,
M. Butkus, NJ.
,
M. Butkus, NJ.
This page may not be sold or distributed without
the expressed
permission of the producer.
I have no connection with any camera company.
On-line camera manual library
If you find this manual useful,
how about a donation of $3 to:
M. Butkus, 29 Lake Ave.,
High Bridge, NJ 08829-1701
and send your e-mail address
so I can thank you.
Most other places would charge
you $7.50 for a electronic copy
or $18.00 for a hard to read Xerox copy.
This will help me to continue to host this site,
buy new manuals, and pay their shipping costs.
It'll make you feel better, won't it ?
Back to main camera manual page
CLICK HERE FOR A
Stereoscopic PDF
VERSION OF THIS MANUAL
ATTENTION
When purchasing a stereoscopic cameras be sure to check it for
completeness, be sure that there are shop stamps, seller's signature and date of sale in the
Guarantee Certificate.
Prior to operate the camera, read through enclosed Operating Instruction carefully.
Keeping of all pointed in it rules will ensure the reliable operation of your
camera.
ATTENTION!
To prevent double-exposition of the stereocouples it is necessary to wind
the shutter lever completely until it stops.
CONTENTS
|
1 General . . . . . . . . . . . . .4 2 Specifications 7 3 Delivery set 8
7 Operating procedure 22 7.1. Automatic operation mode 22
|
7.3. Operation of the camera with electronic pulse bulb .28 7.4. Completion of the camera operation . . . . .30 8 Assembly of stereoscopic slides . . . 32
10. Storage 38 11. Troubles and remedies . . .39 12. Acceptance certificate 40 |
1. GENERAL
The stereoscopic photography will discover for you a new world of exciting and creative activity. Three-dimensional color
pictures will produce for you a vivid effect of presence in scene. The stereoscopic camera "FED-stereo" (hereinafter referred to
as camera) is designed to permit the amateurs to take stereoscopic photographs in quantity of 21 stereoscopic couples with the
exposure size of 24x30 mm on a standard 35 mm photographic film.
The camera is manufactured in two models: "FED-stereo M" and "FED B-O-Y
stereo", "FED B-O-Y stereo" differs by the
following:
- more precise operation of the automatics and shutters;
- more precise matching of the pictures of both channels; depth scale of the best stereoscopic view;
- another distance numbers on the distance scale;
- diaphragm number "5,6" with exposition time "B",
- improved design of the film sensitivity setting mechanism.
Cameras may be manufactured with distance scales, expressed in meters or in meters and reef.
Reversal and negative black-and-white or color film can be used when taking stereoscopic photographs.
 |
A photographer may use a developed reversal film to make stereoscopic slides, the purchased or self-made stereoscopic frames being used for this purpose. A negative film can he used to make pictures on photographic paper to use them as photographs of a common type or stereoscopic couples. Speaking a little about a stereoscopic photography. Two identical lenses in the camera permit a photographer to make two discriminated flat images on a film, these two images forming a stereoscopic couple which can be projected on a screen through use of the stereoscopic diascope "ETUDE-stereo" thus producing a three-dimensional image picture. |
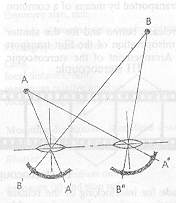
In fact, a man sees the surrounding objects in as much as similar manner due to stereoscopic visual perception of his own (see
the diagram).
Physical nature of a stereoscopic visual perception is as follows. Either eye of a
man projects, through its crystalline lens, a
flat image of the object seen onto its retina. Since the eyes are set apart through a certain distance (basis), the two images of the
object being viewed will be presented in a discriminated form (B'A' = B"A").
Image discrimination is a result of the distance
difference regarding different points of the object being viewed.
This image discrimination is percepted by the optic cells of a man's central nervous system in a form of the shift of different
points scattered in space and viewed in depth. The
camera is provided with a paired shutter-diaphragm unit arranged behind the
camera lenses. The shutter is wound and the film is transported by means of a common
release lever.
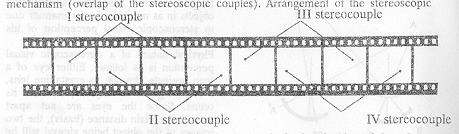 |
The camera is provided with interlocking for the release button and for the shutter winding lever. This provision is made to prevent a mis-operation of the film transport mechanism (overlap of the stereospcopic couples). |
Arrangement of the stereoscopic
couples is shown in the figure. Provision is also made for interlocking of the release button when the camera operates in an
automatic mode under unfavorable illumination condition. To permit fine setting of the exposure of a stereoscopic picture there
is an illuminated exposure-limiting frame within the field of vision of the viewfinder. The camera is provided with a self-resetting counter of the stereoscopic couples.
To facilitate the assembly procedure, one of the exposure frames has a match
mark.
2. SPECIFICATION:
|
Exposure size: mm 24X30 Number or stereoscopic couples obtained: minimum 21 Photograph basis: mm 63.4 Lens: Industar-81 Focal distance: 38mm Maximum relative aperture: 1:2.8 Focusing range, 1m to 00 (infinity) - from 3.3ft to 00 (infinity) Mounting dimensions threadless attachments: 27mm Threaded attachments: mm M25.5 5 x 0 5 Shutter: aperture type |
Automatic operation mode: exposure (s) and stop ratio from 1/30 and 1: 2.8 - to 1/650 and 1:14 Manual operation mode: exposure, s 1/30 and 'B' Lens stop: from 1:2 8 to 1:11 at 1/30 exposure and 1:5.6 at "B" ("FED B-O-Y Stereo")
Power source: SR44 type; 1.5 V Stand seat mounting dimensions: 1/4" Weight of the stereoscopic camera, kg, maximum: 0.8 |
3. DELIVERY SET
|
Camera, pcs . . . . . . . . . . . . i |
Bushing for cell compartment (only for camera "FED-stereo M"), pcs . . 1 |
4. DESIGN OF THE CAMERA
Design of the camera is shown in Figs. 1 through 4.
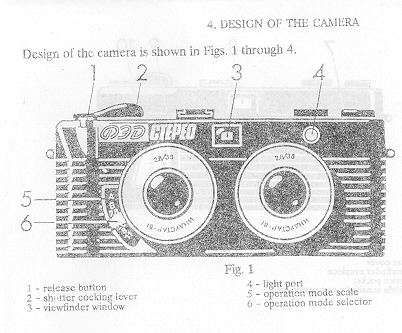 |
1 - release button 2 - shutter winding lever 3 - viewfinder window
5 - operation mode scale 6 -- operation mode selector |
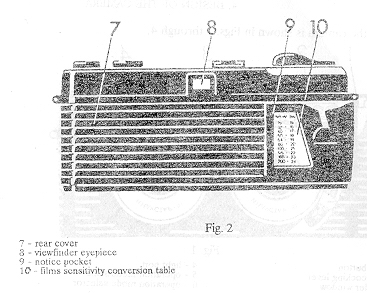 |
7 - rear cover 2 - viewfinder eyepiece 9 - notice pocket 10 - film sensitivity conversion table 11 - rewinding head 12 - film sensitivity setting disk |
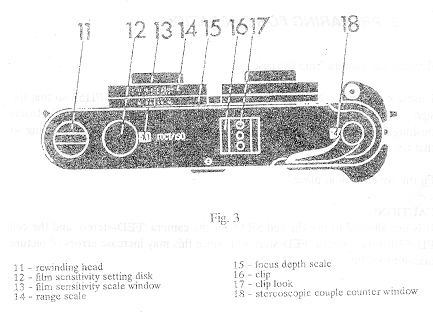 |
13 - film sensitivity scale window 14 - range scale 15 - focus depth scale 16 - clip 17 - clip look 18 - stereoscopic couple counter window |
5. PREPARING FOR OPERATION
Remove the camera from the case.
Unscrew the cover 21 (Fig. 4) and insert in its place the cell PII 53 so that the sign " "+" on its body is oriented outwards (for "FED-stereo" camera). Insert bushing 23 into the cell compartment. Insert the cell SR44 into the bushing so that the sign " + " on its body is oriented outwards (for "FED-stereo M").
Fit the cover back in place.
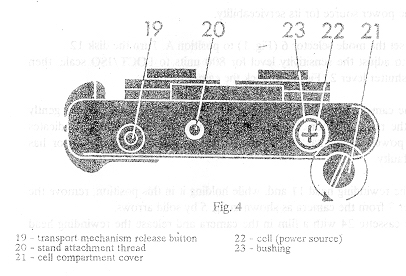 |
19 - transport mechanism release button 20 - stand attachment thread 21 - cell compartment cover
23 - bushing
|
CAUTION!
It is not allowed to use the cell SR44 for the camera "FED-stereo" and the cell PII 53 for the camera "FED-stereo
M" since this may increase errors of picture taking procedure. (webmaster:
can't tell if the battery is PLI 53 or PII 53)
Check the power source for its serviceability.
 |
For this, set the mode selector 6 (Fig. 1) to position A. Turn the disk 12
(Fig. 3) to adjust the sensitivity level for 800 units to ROCT/ISO scale, then turn the shutter lever 2 (Fig.
1) to wind the camera shutter.
Direct the camera at some bright object (such as window or lamp) and gently depress the release button. Interlocking action of the release button indicates that the power source has been fitted in its compartment incorrectly or has become faulty. |
Pull up the rewinding head 11 and, while holding it in this position remove the rear cover 7 from the
camera as shown in fig. 5 by solid arrows. Load the cassette 24 with a film in the camera and release the rewinding head down.
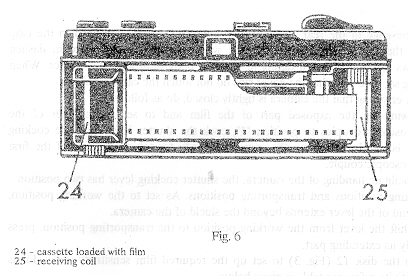 |
Insert the head end of the film under the spring clamp of the receiving coil 25 (Fig. 6) and rotate the receiving
coil by its knurled part or turn the winding lever to pull the film along as far as its perforated edge catches the
teeth of both rims of the transport reel.
24 - cassette loaded with film 25 - receiving coil |
Fit the edge of the rear cover of the camera into a slot provided in the case from the side of the
winding
lever and, while turning it as shown by the dashed arrows in Fig. 5, press it tightly to the case body until it
clicks in place. When doing so, take care that the cover ribs do not touch the camera shields.
After ensuring that the camera is tightly closed, do as follows. To wind up the exposed part of the film and to set the counter of the stereoscopic couples to position "1",
wind the shutter lever until the winding lever is interlocked. Now the camera is ready for taking pictures of
the first stereoscopic couple.
To facilitate handling of the camera, the shutter winding lever has two position working positions and
transporting positions. As set to the working position, the end of the lever extends beyond the shield of the
camera. To shift the lever from the working position to the transporting position, press gently its extending part.
Turn the disk 12 (Fig. 3) to set up the required film sensitivity index. Films sensitivity reference table is
given below.
| ROCT units (before 1987? | ROCT/ISO units (after 1987) |
| 16 | 16 - 20 |
| 22 | 25 |
| 32 | 32 - 40 |
| 45 | 50 |
| 65 | 64 - 80 |
| 90 | 100 |
| 130 | 125 - 160 |
| 180 | 200 |
| 250 | 250 - 320 |
| 350 | 400 |
| 500 | 500 - 640 |
| 700 | 800 |
When- using a film with a sensitivity indicated in DIN system, use the
sensitivity conversion table 10 (Fig. 2) provided on the rear cover of the camera.
6. ATTACHING BELTS TO THE CASE AND TO THE CAMERA
The camera is equipped with a system of carrying belts (one long
belt and two short belts', two clasps, clamps and stiff cover. Link the belts as
show in Fig. 7
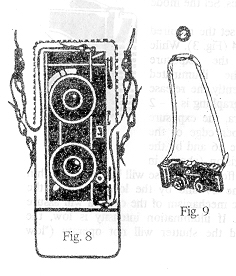 |
By suitably shifting the two clasps along the long belt, adjust the camera for height so that the short belts
are long well enough to permit the camera to be held at the eyes level during photographing. When carrying
the camera in the case, the clasps are pulled down along the long belt so that the short belts do not cause
obstacles to placing the camera in the case (Fig. 8).
Fasten the case with a zipper. As desired, a photographer may adjust the belts in other way to make another combination of belts most convenient to his own taste as shown in Fig. 9.
|
7. OPERATING PROCEDURE
7.1. AUTOMATIC OPERATION MODE
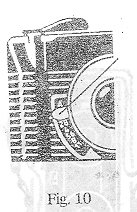 |
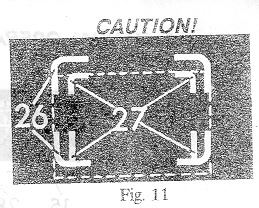
Remove the protective cap from the lenses. Set the mode selector 6
(Fig. 10) to position "A". . Select
an object for photographing and set the required distance range rotating the range scale 14 (Fig. 3). While
observing through the viewfinder the exposure boundaries (those outlined by the illuminated
exposure-limiting frame 26), depress gently the release button. If the object intended for photographing
is l - 2 m (33 -6.6 ft3) away from the camera, the exposure boundaries will be limited by the upper edge of the
frame 27 by the side edges of the frame 26 and by the lower edge of the viewfinder field of vision (shown in
Fig. 11 by a dash line). A stereoscopic effect in this case will be enabled
within the exposure part limited by the frame 27 and by the lower edge of the
viewfinder field of vision. The automatic mechanism of the camera will assure
the required picture taking procedure.
If illumination intensity is low, the release button will be interlocked and the shutter will not operate ("low illumination' interlocking). |
CAUTION
 |
Do not apply force when handling the camera with the release button interlocked, because this may cause damage to the camera. After taking picture of the first stereoscopic couple and any other odd-number stereoscopic couple, push once the winding l ever to a stop. After taking picture of the second stereoscopic couple and any other even-number stereoscopic couple, push the winding lever to a stop thrice, the release button being interlocked during the first and the second winding cycles to prevent accidental overlap of the exposures. |
CAUTION. To ensure a failure-free operation of the camera, remember to check, before releasing the
button, that the shutter is wound to a stop (the winding lever is interlocked) Only then depress the release
button. If the release button remains interlocked in the automatic mode, it means that illumination intensity
is low. The counter of the stereoscopic couples indicates the number of the stereoscopic couples
photographed (black points and numerals) as well as interlocking of the winding lever because of being
under wound (red symbols without numerals).
7.2. MANUAL OPERATION MODE
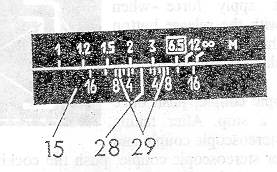 |
28 - range scale index 29 - marks of the best stereo viewing range A photographer may operate the camera in manual mode as desired or when the power source of the camera is not available. In this case, set the mode selector 6 (Fig. 10) to any desired position, except "A". When setting the values "2.8" "4" and so on, the shutter executes the exposure of 1/30s with a lens stop corresponding to the number set. |
When photographing the objects which are well extended in depth or when photographing a series of objects found
afar at various distances, use the focus depth scale 15 ( Fig. 12).
The focus depth scale consists of two diaphragms which are symmetrically
arranged relative to the range scale
index 28 (Fig. 12). When focusing the camera lenses, the focus depth scale indicates on the range scale the
maximum and the minimum distances from the camera within which limits of: the image wilt be of good quality
with any lens stop set during photographing.
For example, in Fig. 12 you may see that with the lens focused at 3m (10 ft ft) distance with the lens stop set to 8,
all the objects found within 2 to 5 m (6.6 -16.5 ft) away from the camera will produce a sharp image on the film as
developed. With the lens stop set to 16, the objects found within 1.5 m (5 ft) to the point of infinity will produce a
sharp image on the film.
White marks 29 on the focus depth scale indicate on the range scale distances from the camera to objects found within
the very close and the most remote shots when focusing the camera lens at the required range. Within this range of
distances, a stereoscopic effect will be the most expressive and the very close to
the natural perception, when viewing the stereoscopic. image. set up the best conditions for the stereoscopic effect
perception, it is desirable that boundaries of this range (boundaries of the best stereoscopic viewing) are to be
within the limits of the focus depth. From this point of view, the most convenient combination of parameters, at
photographing, is 6.5 m (21) ft) distance set with the lens stop set to 5.6 m (or any larger number); in this case,
indicated boundaries will mark the space of objects found within 3 odd m (10 ft) to infinity and will coincide with
boundaries of the sharp pictured space.
A photographer may set the required lens stop number only when the camera is in the manual mode of operation.
However, it does not mean that one should refuse the automatic mode of operation. Long-term practice of
operation with the camera "FED-stereo" demonstrate that at any set of exposure values and distances pictures,
obtained by the camera, produce (when being viewed) the fully perceptible three-dimensional
image pictures of
high quality.
NOTE
It should be noted that afore-said is only true when conditions of viewing of the stereoscopic image imitate
exactly conditions of natural observation of the photographed picture (for example, when viewing stereoscopic
pictures of the a stereoscope which lens focal length is equal to the lens focal length of the camera or when
viewing pictures on a screen through a stereoscope length of the distance be equal to the doubled width of the
image). Otherwise, the really visible limit of the best stereoscopic -viewing may not
coincide with the limit
marked by white mark 29.
7.3 OPERATION OF THE CAMERA WITH ELECTRONIC PULSE FLASH BULB
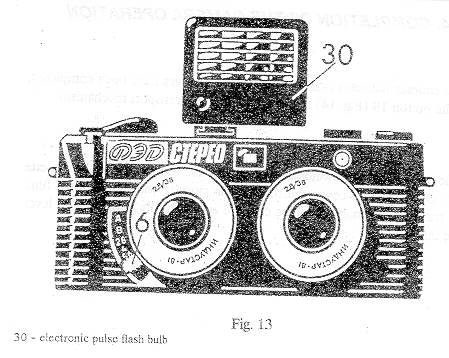 |
Remove the lock 17 from the clip 16 (Fig. 3) and insert there the electronic pulse flash bulb 30 (Fig. 13).
To determine the required lens stop, use a calculator built in the flash bulb. Then use the selector 6 (Fig.
13) to set a lens stop according to the calculated value. Detailed description of the flash bulb operation is
given in the Operating Instructions for the flash bulb.
When using the pulse flash bulbs of old modifications (cable connected types), use a special adapter. |
IMPORTANT!
To obtain a quality stereoscopic image, the lens stops within 2.8 to 8 are recommended to be set.
7.4. COMPLETION OF THE CAMERA OPERATION
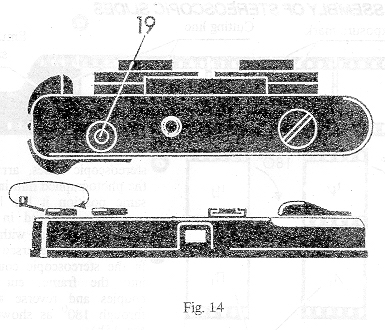 |
When the counter indicates that 21 stereoscopic couples have been completed, depress the button 19 (Fig. 14) to
disengage the film transport mechanism.
|
8. ASSEMBLY OF STEREOSCOPIC SLIDES
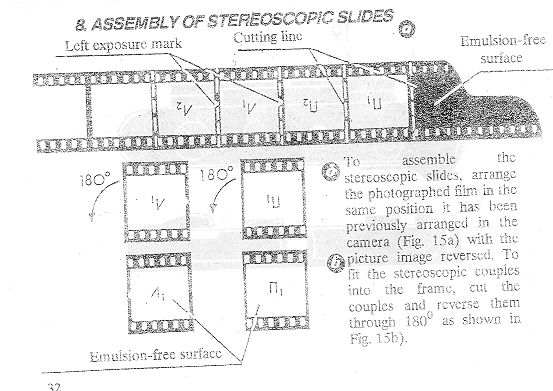
To assemble the stereoscopic slides, arrange the photographed film in the same position it has been previously arranged
in the camera (Fig. 15a)
with the picture image reversed. To fit the stereoscopic couples into the frame, cut the couples and
reverse them through 180 degrees as shown in Fig. 15b)
Fit the right exposure II and the left exposure II of the stereocouple into the plastic frames as follows.
The frame consisting of two half-frames of different colors (Fig. 16) should be split in two pieces.
Insert the stereoscopic couples in one of the half-frames into the slots 3 (Fig. 16) and position them so as shown
in Fig. 15c.
To facilitate the assembly procedure it is recommended that the half-frames
intended for the stereoscopic couples should be of the same color.
Move the stereoscopic couple exposure within the slots 3 (Fig. 16) so as to arrange their edges symmetrically to
the half-frame windows. Then cover the half-frame 1 with the half-frame 2 and then lock them together. To assure
this requirement, before mounting the glasses wipe them with a piece of flannel cloth. To remove fat stains, use a
cotton wad moistened with alcohol or other. The stereoscopic exposures should be also clean. To prevent finger
imprints and/or scratches on the film exposures, do not apply fingers, forceps
or other tools within the zone of the
picture image. It should be borne in mind that the quality of a stereoscopic effect depends largely on the quality of the
stereoscopic couples assembly.
NOTE: The stereoscopic frames are not
included in the camera delivery set. These frames should be either
purchased or made by a photographer using a solid cardboard for this purpose.
9. SOME HELPFUL HINTS
When taking pictures, a photographer should take into to account some specific features typical of the
stereoscopic exposure make-up procedure
It is strongly recommended that the film exposure should include within its field of vision the objects located at
different distances relative to the camera and relative one to another, i.e. the scenes with a deep background.
The least stereoscopic effect is produced by the pictures of a long shot (small-scale pictures). To make such
pictures more vivid, bring some picturesque features into the foreground of the scene such as flowers, bushes,
grass, etc. However, these features should not be located close to the exposure edges (left or right side) they
should be brought possibly close to the exposure center where the stereoscopic effect of close shots is' more
stressed.
The best stereoscopic effect is produced when photographing the objects found within 2 to 10 m (6.6 - 33 ft )
away from the camera
Handle the camera with care, do not apply excessive force to it, protect it from dust.
When preparing the camera for operating, push the shutter winding lever to a stop, otherwise the lever will
not
return to its initial position which is an indication that the shutter has not been
wound.
Do not depress the release button until the film is completely transported. Rotation of the rewinding head, as the
shutter lever is being wound, is an indication that the film is being transported normally.
When taken pictures with use of the light filters, pay a due regard to a ratio power of the filler in use, the correction factor
being introduced by suitably varying the film sensitivity degree.
The procedure for taking pictures in an automatic mode applies to most frequent medium illumination of the
objects (such as those that are seen age against the snowy background, sky or dark green) introduce a correction
factor by changing the degree of the film sensitivity by 1-2 division (decreasing it for the first two cases and
increasing it for the last case).
In order not to forget the actual sensitivity of the film loaded in the camera, it is recommended that the sensitivity
indicated on the film packing box should be cut out and placed in the pocket on the rear cover of the camera
where the sensitivity conversion table 10 is provided (Fig. 2).
Remember the actual value of the film sensitivity.
When taking pictures against a background of a light source, use a lens hood.
To extend the service life of the power cell, when taking pictures outdoors during
freezing weather, hide the
camera under a coat (if temperature is below 0 degrees C) and take it out only when taking pictures. If required, clean the optical surfaces of the lens
and of
the viewfinder by gently wiping them with a piece of flannel cloth or with a
cotton wad slightly moistened with
alcohol. To remove dust, use a brush.
10. STORAGE
The camera is a sophisticated optical mechanical device. It requires a careful handling and should be kept clean. Protect the camera from humidity and sharp temperature variations. Keep the camera in the case - with the protective caps fitted on its lens and shutter release if possible.
If he camera is kept inoperative for a
long time, remove he power compartment and keep it separate from the camera.
11. TROUBLES AND REMEDIES
| Trouble | Cause | Remedy |
| As set to automatic operation mode, the camera shutter fails to operate even though the picture object is brightly illuminated. | The power cell is faulty - polarity is set incorrectly when loading the cell | - remove the power cell from the compartment, rearrange its polarity and load it back (see Fig. 10) |
| - the power cell is exhausted | - replace the power cell with a new one (Fig 10) | |
| - surface of the power cell or contact in the cell compartment has become oxidized | - brush slightly the surface of the power cell or contacts in the cell compartment | |
| As the shutter lever is being wound, the film rewinding head stands still | The film fails to be transported due to its improper loading | - Open the rear cover of the camera and reload the film properly (see Fig. 14) |