and historical purposes, all rights reserved.
This page is copyright© by
This page may not be sold or distributed without
the expressed permission of the producer.
I have no connection with any camera company.
This camera manual library is for reference
and historical
purposes, all rights reserved.
This page is copyright© by ![]() ,
M. Butkus, NJ.
,
M. Butkus, NJ.
This page may not be sold or distributed without
the expressed permission of the producer.
I have no connection with any camera company.
On-line camera manual library
If you find this manual useful,
how about a donation of $3 to:
M. Butkus, 29 Lake Ave.,
High Bridge, NJ 08829-1701
and send your e-mail address
so I can thank you.
Most other places would charge
you $7.50 for a electronic copy
or $18.00 for a hard to read Xerox copy.
This will help me to continue to host this site,
buy new manuals, and pay their shipping costs.
It'll make you feel better, won't it ?
Back to main camera manual page
Click here
for Lubitel-2 PDF
version - better printing

GENERAL FEATURES
 |
1. Flash contact 2- automatic release lever; 3 -diaphragm setting lever; 4-cxposure setting ring guide; 5- cable release threaded socket. 6 - shutter release lever; 7 - taking lens; 8-shutter winding lever; 9-viewing lens; 10-panel: 11-front frame 12-light protective |
The viewing 1ens has an aperture ratio 1
:
2.8, which is considerably higher
than that of the taking lens and therefore is more suitable for accurate
focusing.
Focusing of image on the ground glass
circle and on the film take place
simultaneously, as both lenses are coupled through knurled
wheels. The nearest possible range for focusing is 1.4 cm.
Photographing of objects at closer distance
may be
performed with close-up supplementary lenses.
Focusing is to be made on the ground
glass circle centre. If the object that
is desired to be most sharp should be located at the picture edge, the camera is
to be turned while focusing so that the image of this object would appear in
the centre, and prior to the shutter release the camera
should be turned back to its initial position.
 |
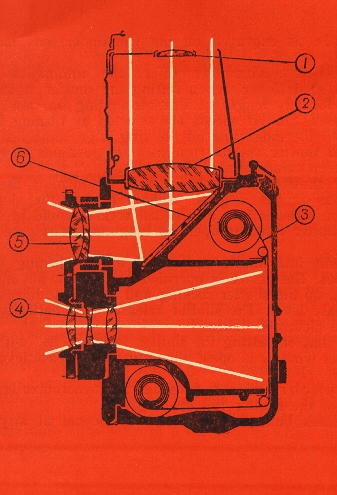
1.-magnifier; 2. collector viewing lens with ground glass circle at the bottom 3. film; 4. taking lens; 5. viewing lens; 6. mirror The magnifier is attached to the reflex viewfinder hood
from inside. The magnifier is set to working position by pulling it up
from the hood.
|
The distance scale is engraved on
the viewfinder lens mount, its divisions indicate meters.
The between-the-lens shutter
offers the automatics exposure speeds 1/250, 1/125, 1/60,
1/30, 1/15 sec. When setting the shutter at index "B",
it is possible to exposure for any length of time depending on how long the
release knob is held depressed. Shutter speeds are selected by turning the exposure
setting ring guide until the index line on the ring edge coincides with the
point indicating the desired shutter speeds (intermediate positions of the index
line do not correspond to mean values of shutter speeds).
Prior to exposing, the shutter should be
wound by turning the shutter winding lever downwards as far as it goes. When
releasing the shutter, the release lever or cable release
screwed into a threaded socket should be smoothly pressed.
Set at "B" the shutter remains open as long as the release lever is pressed.
The self-timer
built into shutter is wound up by turning the lever
downwards as far as it goes. The device is operated as follows: having set the
required shutter speed, wind up the shutter winding and automatic release
levers, then press the shutter release lever. The shutter
releases automatically after a delay of 7-12 sec, and the picture is taken.
One must keep in mind that on setting the
shutter to index "B" with release button being pressed (shutter window is open)
the automatic release lever should never be wound.
The flash bulb synchronizer provides for
synchronization of the bull) flash with a moment of the
shutter full opening.
When using automatic-flash bulbs, the
shutter may be set at any shutter speed.
When using the single flash, the shutter
is to he set to 1/15 sec or "B".
The synchronizer operates automatically
after the shutter has been released.
The diaphragm is provided inside the
shutter mechanism between the elements of the taking
lenses; it controls the lens opening.
The change of the lens opening is effected by turning the lever with indicator
around the scale.
The lens opening is changed in cases when
it is desirable to increase the depth of field or when the amount of light is
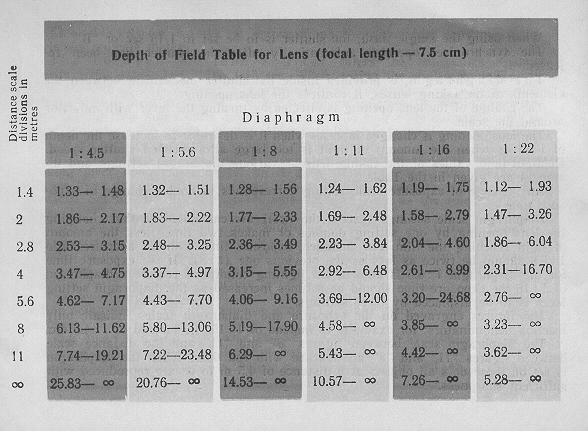
too large at a selected shutter speed. Depth-of-field
values of the taking lens at various diaphragm settings and distances
are given in the Table.
Any change of exposure scale setting
corresponds to double change of exposure time.
Diaphragm scale settings (except the
first) are calculated so that changing the lens opening by
one setting doubles cr makes two times less the amount of light reaching the
film. For instance, exposure time with an aperture ratio
l: 5.6 should be twice as less as the previous one (1:8).
If the exposure time for the diaphragm 1
: 5.6 is known, but lighting conditions require a
diaphragm of I : 16 the exposure
time should be 8 times increased as the diaphragm setting
lever is to be displaced by three settings.
The figures engraved on the exposure and
diaphragm scales indicate only fraction denominators: for
example, 15 instead of I : 15, 4.5
instead of 1 : 4.5 etc.
The diaphragm scale between figures "8"
and "It" and the distance scale between figures "11" and
"8" are marked with red dots. When the diaphragm is set on
these dots all objects at a distance of 4.5 in to
![]() are reproduced with sufficient sharpness.
are reproduced with sufficient sharpness.
LOADING THE CAMERA
1. Open the camera back, raising preliminarily both lock springs in turn.
TAKING PICTURES
The "Lubitel 2" camera requires
careful handling.

2. Brake the seal of the film spool,
insert the end of the film protective paper into a slit of the take-up spool
and fold it; then by turning the film winding knob,
wind up 2-3 layers of the paper on the spool.
3. Having convinced in the proper tension
of the paper, bend the spring down with a finger and insert the film spool
into the film compartment between the spring and
compartment wall, after that release the spring. Shut the cover and
press the lock springs.
4. Turn the window cover knob
counterclockwise and turn the winding knob until first
the warning marks on the protective paper and later figure "1"
appear in the red window; then close the window cover, and the camera is
ready for service.
l. Adjust the lens opening.
2. Set the shutter to the exposure
required and wind it up.
3. Find the shot limits by means of the viewfinder.
4. Focus on the object until the ground
glass image is sharp.
5. Release the shutter lever.
6. Advance the film (just after taking
each picture, lest you should forget).
To do this, open the peep window cover and turn slowly the
winding knob
until the next exposure number appears,
then close the window cover.
UNLOADING THE CAMERA

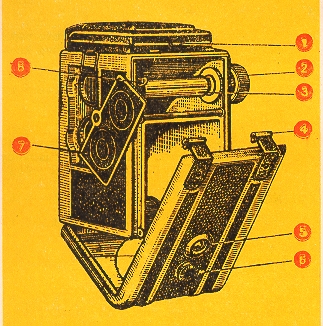
1. view-finder hood
lock;
2 film winding knob;
3- take tip spool:
4- camera back, spring lock:
5- peep window-:
6- peep window cover knob;
7 - cover of filter accommodating receptacle;
8-spool-holder tang
l. After the twelfth exposure has been
made, rewind the film protective paper. Sometimes when the winding is almost
completed, the turning of the knob is detained by the
paper jammed in the take-up spool slit. However, this should
not prevent unloading the camera in daylight.
2. Open the camera back.
3. Pull out and slightly turn the film
winding knob.
4. Let the spool-holder out of the
camera body (by turning the holder tang towards oneself).
5. Carefully take out the spool with the
exposed film, seal the protective paper end and keep the
film safety until it is developed.
6. Take the next spool out of the lower
compartment of the holder and place it so that its slit
end would face the winding knob.
7. Replace the holder and turning the
winding knob clockwise, make sure that the spool is turning.
GENERAL INSTRUCTIONS
Keep the lens surface absolutely clean,
contamination could affect quality of pictures.
Clean the objectives from the outside
only with a clean linen rag or cotton
wool breathing preliminarily on lens
surface. Do not dismantle the camera.