and historical purposes, all rights reserved.
This page is copyright© by
This page may not be sold or distributed without
the expressed permission of the producer.
This camera manual library is for reference
and historical
purposes, all rights reserved.
This page is copyright© by
![]() , M.
Butkus, NJ.
, M.
Butkus, NJ.
This page may not be sold or distributed without
the expressed
permission of the producer.
On-line camera manual library
If you find this manual
useful,
how about a donation of $3 to:
M. Butkus, 29 Lake Ave.,
High Bridge, NJ 08829-1701
and send your
e-mail address
so I can thank you.
Most other places would charge
you $7.50 for a electronic copy
or $18.00 for a hard to read Xerox copy.
Back to main camera manual page
CLICK HERE FOR Rolleiflex Acc. PDF
VERSION
OF THIS PAGE
 |
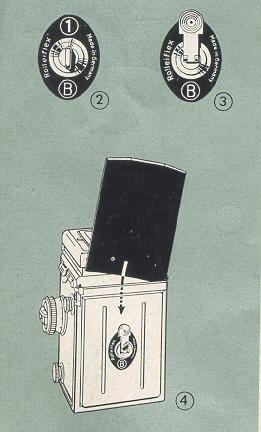
When using several lens accessories:
Taking lens Viewing lens |
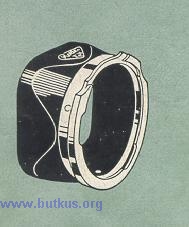 |
Accessories with bayonet fitting, supplied in three sizes.
I. For Tessar, Triotar and Xenar 3.5 Please note proper size when ordering! When ordering other accessories, supply the camera number, lens top. and lens number. |
 |
LENS HOOD To attach: Place the sun shade on the outer bayonet of the taking lens so that the upper edge is horizontal. |
| ROLLEIGRID | 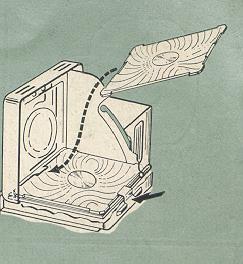 |
| EXTENSION HOOD
|
 |
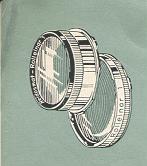 |
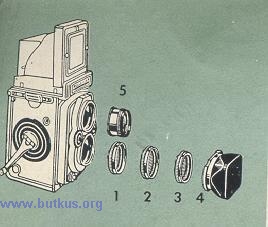
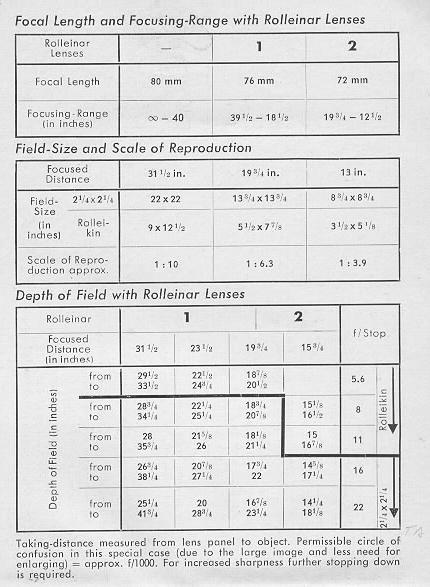
ROLLEINARS 1 and 2 Designed for: Close up shots at distances closer than 1 meter, Use: With the two Rolleinar sets 1 and 2, the Rollei is converted for a focusing range from 39 1/2--17 3/4 (18 1/2) in. and 19 3/4 --12 1/8 (12 1/2) in., see page a. Each set is composed of two optically matched frontal lenses with different mounts. The Rolleinar with the thicker mount is for the viewing lens (Heidasmat) and contains a built-in prism for parallax correction. As a result the field of view in the ground glass coincides with the photograph even at very short distances. A red dot an the mount indicates the uppermost side of the lens for correct positioning in use. |
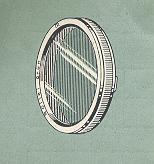 |
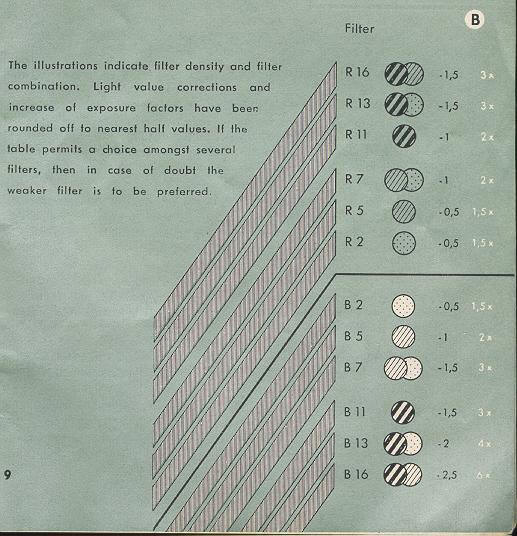
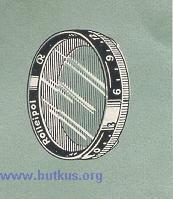
A. Filters for black and white photography Designed for: Enhancing the contrast and separation at colors, correction at film sensitivity to the various colors and, at times, the elimination of certain undesirable portions of the spectrum. Explanation: By elimination or modification of certain portions of the spectrum, the particular complimentary color darker. Colors which show little or no difference in brilliance are thus rendered with a greater black and white contrast or tone separation. Thus with two colors, either can be rendered darker depending on the choice of the filter. |
| Modern color temperature meters will indicate the proper filter
to use, taking into consideration the type of film and the prevailing light
conditions. The most commonly encountered ranges of color temperature are also
covered in the double table A + B (page 7 and 9).
Example: Ektachrome daylight film, overcast sky . . . which filters? Solution: 1. Film: Look up film type (brand) being used. (Ektachrome-daylight = upper part of page), follow appropriate guide line to edge of page (5500' Kelvin), slide page 7 to the left until guide line A (5500 K) and B meet. Hold pages in this position! 2. Lighting: Observe the type of lighting and its color temperature range overcast = 6600 -- 7000 |
 |
3. Filter: The adjacent gray bar of table B indicates the
filter (R 2) with light value correction (--0.5) and the extension of exposure,
1.5 times.
The guide lines hereunder listed require sliding page 7 somewhat further to the
left.
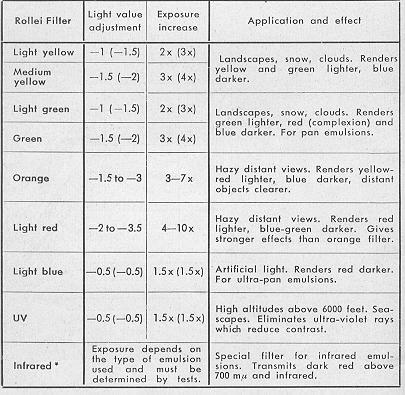
Light value correction = exposure increase factor.
General average values are given for pan emulsions (in parenthesis for ortho
emulsions). These, however, can be modified according to the type and brand of
the photographic material and according to the type of lighting.
·
The infrared filter features special compensation for focusing difference
between visible and infrared portion of the spectrum. Direct ground glass
focusing may be employed with full assurance of
sharp pictures.
Rollei filters provide
maximum effectiveness
By using coating-adjusted fillers with the lenses, the
brilliance of the picture is essentially heightened. This heightening of
contrast is fully effected only when proper lens accessories are used.
Rollei optical lens accessories are supplied with anti-reflection coating
which will not wear off.
The Rollei filters, in particular, have an individual type at coating designed
to enhance the effect of their particular color. They achieve maximum contrast
in their specific range of operation.
ROLLEIPOL
 |
For black and white and for color.
Purpose: Elimination or subduing al disturbing reflections (glare) from shiny, non-metallic objects or surfaces. Under certain conditions, filtering of the blue sky. Especially useful for regulation of the colors (colored reflections) and control of sky tone in color pictures. Explanation: If the direction of movement of a light beam is imagined to be the axle of a wheel, then the spokes of the wheel correspond to the various plans of oscillation of the light waves (i.e., we are looking at the light beam in cross section). Polarization will reduce the many planes of osculation to merely one. |
Polarization takes place when light
waves, striking at a certain angle, are reflected by shiny bodies (with the
exception of metals). This polarized segment of light can be retained in full or
in part by placing the Rolleipol filter across the plane at oscillation: the
reflections disappear. (The filter itself has a polarizing effect an the light
which passes through it.) Further, since there is also polarized light in the
blue sky, this can be eliminated: the use at the Rolleipol filter results in
subdued (darkened) sky portions.
Not all reflected light is
polarized. If reflections are to be eliminated, 1, the filter must be turned (an
its optical axis) in the direction of the vibrations as required, and 2. the
camera position must be changed to gain the best effect. This is attained when
the beam of light striking the reflecting body and the line of camera view farm
an angle at 60--74', (varies according to material at the subject).
Application: 1. For eliminating or subduing disturbing
reflections when photographing reflecting objects (polish, porcelain, painted
and lacquered finishes, etc., -- reproduction of textures and material), when
photographing glass surfaces and the surface of water (the reflecting surfaces
became transparent), 2. for filtering sky when photographing landscapes: the
blue sky is darkened by absorption of the polarized light it captains. The
effect may be observed in advance by looking
through the filter. Light value correction about --1.5 = increase at exposure
about 3 X.
For Use: Fasten the Rolleipol filter on finder lens
(red dot at the top) and rotate the front ring of the Rolleipol until the
desired
effect is obtained an ground glass. Note the white
number marking and transfer to the taking lens.
ROLLEISOFT LENS 0 AND 1
 |
Purpose: Softening of super-critical definition producing
striking fluffy halo-effects, especially with back-lighting.
|
The
Rolleisoft lens consists at a plane parallel glass disc with a few concentric
ground-in grooves. While otherwise the lens permits only sharpness or softness
through adjustment of the focus, the Rolleisoft lens obtains both
simultaneously: Between these grooves the rays of light pass unimpeded to the
film and produce a sharp impression, i. e., the basis of the image. At the
grooves, however, the light rays are diverted with the result that an additional
image of slightly softer definition is superimposed. Both together produce the
soft focus effect: The exposure shows
fluffy softened contours and sunny halo-lights;
distracting fine details recede and the fatal impression of depth definition is
improved. By means of the Rolleisoft the Rollei-lens becomes a soft focus lens.
Application: Best results
are obtained by using the entire surface of Rolleisoft, i. e., with full
aperture. With Rolleisoft 1 (with increased number Of grooves) it is permissible
to stop down to f: 5.6. Smaller apertures tend to decrease the soft focus
effect.
Rolleisoft 0 is used for weak soft faces
effect: primarily for strong contrasts of light
and glittering objects, i. e., chiefly for backlighted subjects. Rolleisoft t is
used for greater soft focus effect: for soft lighting. -- Chief field at
application generally: portraiture. Best suited tar: contrasting, highlighted
subjects. Rolleisoft increases the plastic, sunny character of backlighted
pictures. Speed and focal length remain unchanged. Generous exposures increase
the halo-effect. The ground glass screen shows full focused sharpness when using
Rolleisoft lenses. The Rolleisoft effect can be judged at any time an the ground
glass screen by placing the Rolleisoft in front of the finder lens.
For Use: Fasten Rolleisoft to inner bayonet at the
taking lens.
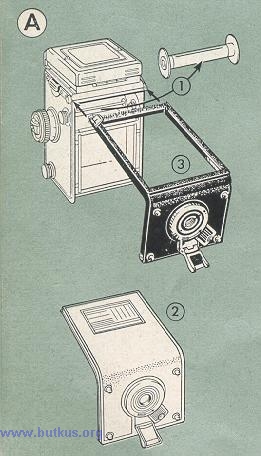
ROLLEIKIN 3.5 and 2.8
 |
Designed for: Taking up to 36 exposures 1 X 1 1/2 inch, on
35-min.-film. Ideal for series of pictures and color photography on miniature
film. |
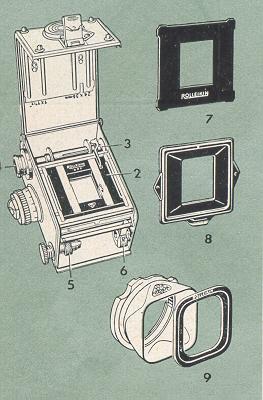 |
The attachment consists of:
5. Extension-Spindle for Rewind Knob (two types, for previous and new Rollei models) |
 |
Applicability of this accessory: Fits Rolleiflex above numbers 1,100,000 and Rolleicord above numbers 1,137,000. (The combination back for two picture sizes was originally not provided with the first camera series, but can be ordered additionally).--Earlier Rollei-models use Rolleikin 1 (with special back). |
 |
 |
 |
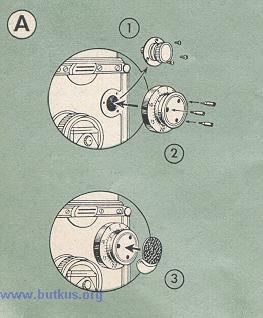
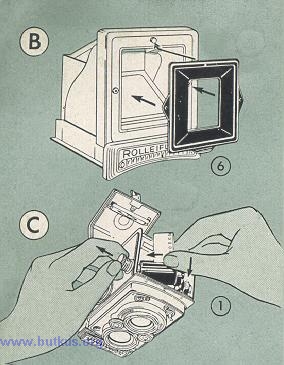
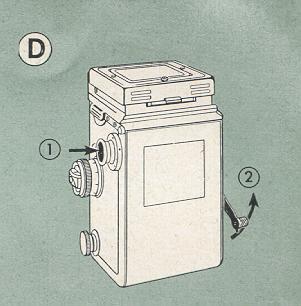
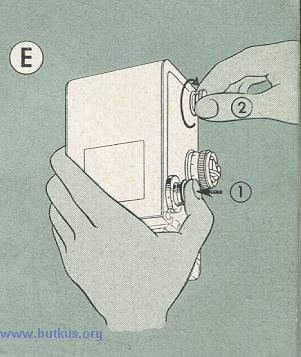
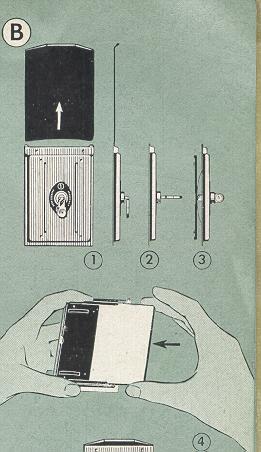
B. Assembling the Rolleikin |
 |
 |
 |
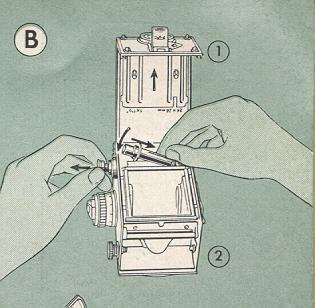
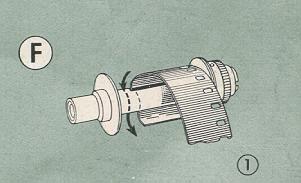
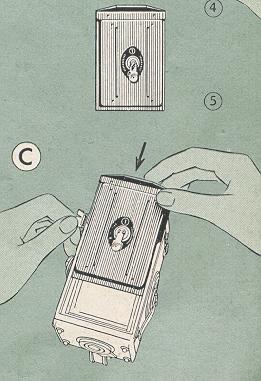
C. Loading
1. Open camera back, pull rewind knob, fit-in film cartridge on the left and then insert fully. 2. Introduce film-lead (which - in the Rolleiflex - first passes through the film-feed rollers) into the double slit of the take-up spool, letting it touch on the right. Tighten up by giving spool a short turn. 3. Make sure the mouth of the cartridge points straight ahead in line with the tightened film lead, then close back. |
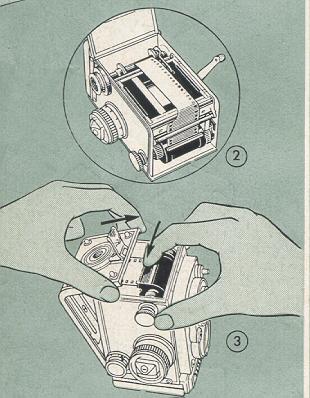
4. Press-and-release counter-knob until the red
dots of the Rolleikin counter face each other.
(Disregard counter for No. 120 [B
2-] film completely.)
5. To set counter for the first exposure: Advance
counter dial to No. l by actuating film transport three times (see page 15).
 |
 |
 |
1. Press-and-release counter-knob before actuating film
transport. The exposure counter advances automatically to the next number. 2. Advance film as usual to the stop. |
PLATE-ADAPTER
| Designed for: Single 2 1/4 X 2 1/4 inch-exposures on 2 1/4 X 3
1/2 inch plates of sheet-film. A desirable facility for the use of special
emulsions, immediate or individual processing and such special tasks as studies
of portraiture, trick photography, reproductions, technical tests etc. |
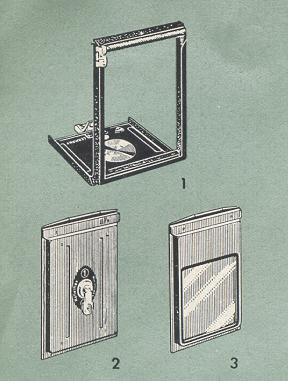 |
| A. Attaching the Adapter Back 1. Remove take-up spool from camera. 2. Take off camera bade. 3. Attach adapter back (without plate holder!). |
 |
 |
B. Loading the Plate-Holder 2. Lift up locking lever on back of holder and 3. let it slip inside after a quarter turn. Spring action pushes out plate-carrier. 4. Slide plate (or cut-film with cut film sheath placed underneath) into carrier. Note: Conserve push-strip by always removing slide from empty holders before storing away. |
 |
C. Inserting the Plate-Holder Swing catch out of way and slide holder down the lateral grooves of the adapter back. The catch locks holder against unintentional removal. |
| Purpose: Panorama pictures, composed of two or more individual
pictures. Complete circle (360°) may be had with 10 exposures. For Use: 1. Screw panorama head at first only lightly into tripod socket. 2. Match pins and sockets of panorama head and camera, then press together.
3. Tighten screw firmly.
|
 |
| 5. Level off horizontally by centering bubble of spirit level. 6. Start exposures at left of proposed view-swing camera one number or click to right for each succeeding exposure. 7. Care should be used when trimming pictures for mounting --sufficient overlap is provided to make matching easy. If moving clouds are included in pictures, exposures must be taken in rapid succession. 8. Make full use of entire negative area and be sure that prints match in contrast and tone. Line the pictures up accurately and cut them. Mount on cardboard with matching edges together and panorama is ready. |
 |
ROLLEIFIX TRIPOD HEAD
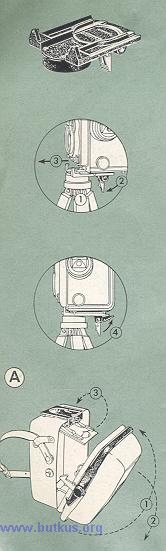 |
Can be used for all Rollei models with grooved edge an the
tripod socket. Designed for: Quick fastening at the Rollei to the tripod or to the bracket of an electronic flash unit.
Operation: METAL EVER READY CASE For use with all Rollei models provided with groove an the edge at the tripod socket. Designed for: Complete protection: Air, dust, water-tight. For storing the camera in a floatable splash-proof, light metal container; unique pivoting bracket provided for fast shooting. |
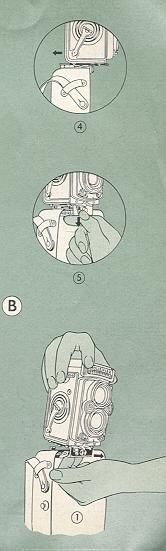
| A. To open: 1. With a circular movement raise the clamp handle. 2. Push the front part of case down. 3. Push the camera case back and press down firmly until it is fully opened. 4. Swing the camera up and back in the retaining grooves until the tripod socket until the catch locks. 5. In order to change film: Press the locking lever on the front of the holder downward and pull the camera forward out of the holder. When taking pictures the case may either remain open (far photography at eye level the two sides serve as handles) or can be almost closed. B. To close: 1. Grip with two fingers behind the pivot of the camera harder, unlatch it by pulling forward and move the camera forward and downward. 2. Raise the lower part, close the case and pull the clamp handle around and down until it locks. Make certain that the two catches close properly. C. Notice:
1. In order to use the Rolleicord in the case, an extra (provided) rubber pad
is glued an the corresponding pad in the case. |
 |
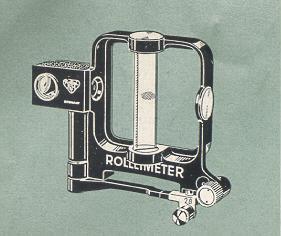
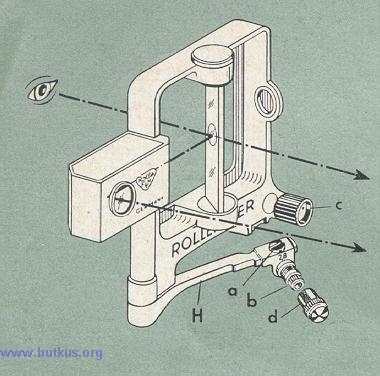
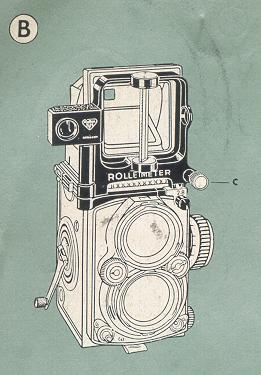
ROLLEIMETER for Rolleiflex
 |
 |
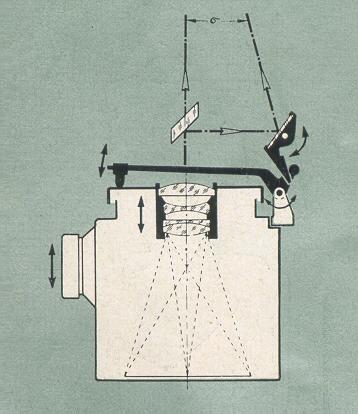 |
Purpose: An optical coupled range finder for use with the direct
view finder of the Rolleiflex particularly suitable when shooting sports or
flash pictures in poor light, Description: The Rolleimeter uses the superimposed image principle and is actuated by and coupled to the moving front panel of the camera. It is attached to the nameplate directly in front of the direct view finder. A vertical glass rod with focusing spot far the two images can be seen when lacking through the tinder. Focusing the camera by superimposing the two images so that the outlines exactly coincide insures sharp focus. Framing and focusing are accomplished while looking through the tinder, without making the eye train one position to another. Before using the Rolleimeter two simple adjustments are required:
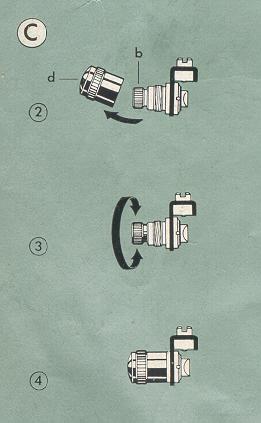
1. A one time adjustment of the actuating lever (screw a) to suit the focal
length of the lens employed. |
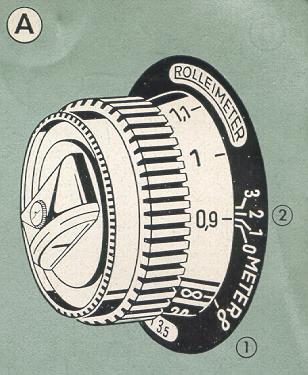 |
A. Adjustment to focal length (This is done before attachment to the camera and is required so that the Rolleimeter and camera will agree even at close distances, such as three to five feet. See note 2.) For this adjustment a special plate is provided, suitable for cameras calibrated in either feet or meters. For the focusing knob with exposure meter, a second 'adjusting' plate of greater diameter is included. By its use the relationship between infinity and the close distance readings of the focusing knob scale may be observed and the Rolleimeter's actuating arm properly adjusted. |
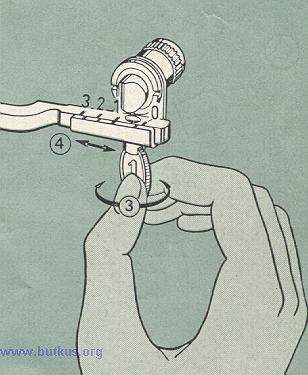 |
1. Place the adjustment plate over the focusing knob and line up the infinity marks, note whether meters or feet. 2. Note the figure on the adjustment plate which is directly opposite the marker for the closest focusing distance at the knob. Rolleiflex will have 3 feet as this distance. 3. Swing actuating lever H outward and loosen the coin-slotted screw a. 4. Move the slide to the previously observed adjustment plate figure and tighten screw a. |
| B. Attaching Rolleimeter to Camera
1. Set camera at infinity (oo).
C. Adjustment to Infinity
(This is done after mounting Rolleimeter)
|
 |
| D. To Use
Locate the abject an the focusing spot of the Rolleimeter's glass rod, as seen through the open direct view tinder, and turn the camera's focusing knob until images coincide. The Rolleiflex will be sharply focused to the exact distance of the abject selected.
E. Note |
 |
 |
ROLLEIMARIN Underwater housing for Rolleiflex f:3.5. Waterproof even at depths Of more than 330 feet. Ground glass viewing and focusing through prism, with magnifier, in normal swimming position. All controls may be adjusted under water. Built-in rotating filter turret for two filters. Total weight: under water 3 lbs., above water 12 lbs. -- Special accessories: carrying case, three filters (light and medium yellow, orange) in leather case, special flash unit (for both type-lamp bases) in sail clash bags. Full information an the use in the booklet "ROLLEIMARIN" |
ROLLE I FLASH Purpose: Synchronized flash exposures with the Rollei. Applicable: Flashbulbs with bayonet base (swan). B-C principle (Battery-capacitor firing). A. "Mounting Rolleiflash 1. Fasten reflector on case by turning it clockwise in bayonet. 2. Fasten holding arm to bayonet of the viewing lens and 3. Secure by turning lack ring a clockwise. -- Before removing: first loosen lock ring by turning counter clockwise. 4. Pull out the cable and plug it into the flash socket an the camera. -- To roll up the cord: use turn-knob (on cover of case). |
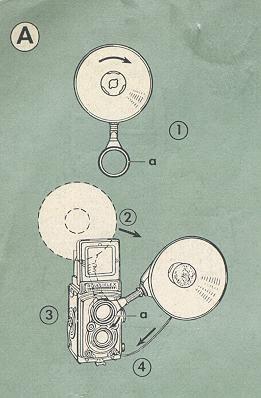 |
| B. Exposure 1. Insert flash lamp as far as necessary to seat in the bayonet socket. 2. Test circuit (before connecting Rolleiflash comb.): Press test key B -- brief flash of the test lamp c indicates positive firing of flash lamp. 3. Synchronized flash-firing: by releasing camera shutter (see directions for using camera). Open-flash method (Firing by hand contact in making time exposures): loosen safety screw ring D, press hand contact E. Always secure hand contact when not in use! |
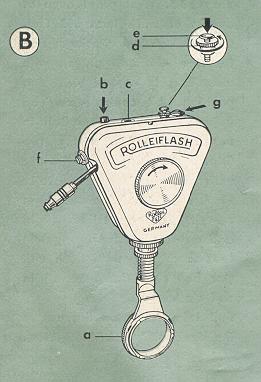 |
 |
The connector F is for use with the
supplementary flash unit Rolleiflash comb.
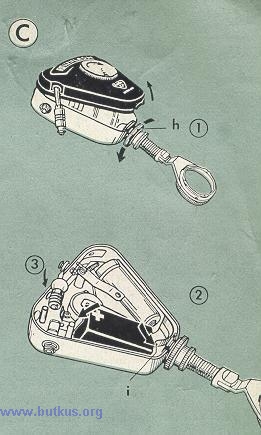
4. Lamp ejection: by pressing ejector button G -- the lamp is forcefully ejected. C. Changing Batteries 1. Loosen screw ring H slightly, open case upwards and remove. -- To close the case: First attach cover with retaining pin on case, close tight, tighten screw ring H. 2. Changing the battery: Important ! The + pole must always point toward the test lamps Wrong insertion of battery would damage the condenser. Insertion of fresh battery (flat cell hearing aid battery 22.5 v.): press back contact spring I with the battery, snap battery in. 3. Changing test bulb: As replacement for detective lamps press same-type 6 v. glow lamp (0.05--0.07 amperes) between contact springs. |
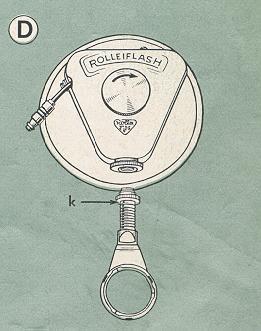 |
D. Flexible Arm The flexible holding arm can be unscrewed from the case when the Rolleiflash attachment is to be fastened directly onto a tripod by the base thread. To replace holding arm: turn back screw ring K an holding arm as far as it will go, screw arm into case (up to correct position at bayonet ring) and secure by turning screw ring K clockwise. |
|
After attaching the cable: Pull flash bulbs in Rolleiflash first and then in Rolleiflash comb. In order to conserve the battery: Insert the flash bulbs a short time before shooting. Detach the cable from Rolleiflash when not using. |
E. Rolleiflash comb.
| Screw the cable end connectors to the Rolleiflash and Rolleiflash comb. The Rolleiflash comb. can either be hand-held or fastened to a tripod by the socket provided. The second connector is for an additional Rolleiflash comb., if used. A total of three lamps may thus be fired simultaneously. Lamp distance can be extended to 33 feet by means of 10 feet extension cords at two types, for Rolleiflash and Rolleiflash comb. |  |
F. To attach Rolleiflash Extension Cords
Unscrew protective cap to limit, insert flash
card plug and tighten cap down over plug.