and historical purposes, all rights reserved.
This page is copyright© by "
This page may not be sold or distributed without
the expressed permission of the producer.
I have no connection with any camera company.
This camera manual library is for reference
and historical
purposes, all rights reserved.
This page is copyright© by "![]() "
M. Butkus, NJ.
"
M. Butkus, NJ.
This page may not be sold or distributed without
the expressed
permission of the producer.
I have no connection with any camera company.
On-line camera manual library If you find this manual
useful, Back to main
camera manual page
CLICK HERE FOR Rolifix PDF VERSION
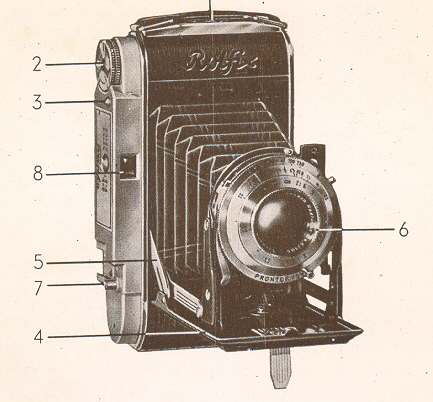
Rolfix Parts
1. Opening Button (back)
2. Film Winding Knob
3. Opening Button (front)
4. Platform
5. Platform Struts
6. Lens
7. Shutter Release
8. Viewfinder 1. Lens
SPREAD OUT THIS DOUBLE PAGE
AND HAVE THE CONTROLS OF YOUR ROLFIX VISIBLE
WHILE YOU READ THIS BOOK
INTRODUCING THE ROLFIX
It is easy to take pictures, day or night, with your ROLFIX folding camera.
Beautifully designed and:-constructed, your ROLFIX has a top. quality coated
lens and a shutter that is internally synchronized for flash exposures. Learn to
operate your ROLFIX so as to get maximum enjoyment: of the precision workmanship
and performance of this fine German camera.
Ansco and Extachrome Color films 8 exposures size 2 1/4''x 3 1/4" ALWAYS LOAD CAMERA IN SUBDUED LIGHT.
To open the ROLFIX, press the opening button (front). The front
platform will spring open. Pull the platform down until both struts catch and
click. (To close, press down on the struts and push platform in until it clicks
shut.)
FOCUSING
The accuracy with which you focus depends upon your ability to judge
distances. It is best to set up a "yardstick", such as one walking step equals
about three feet. When you have judged your camera-to-subject distance in feet, LENS OPENINGS
The size of the lens opening regulates the amount of light which
reaches the film. Set the size of the lens opening by. moving the lens opening
indicator to the desired number on the engraved lens opening scale. NOTE: fi22
or f/32 is the smallest lens opening; fi3.5 or f/4.5 is the largest lens
opening; therefore, the lowest numbers on the lens opening scale allow the
greatest amount of light to. reach the film during exposure.
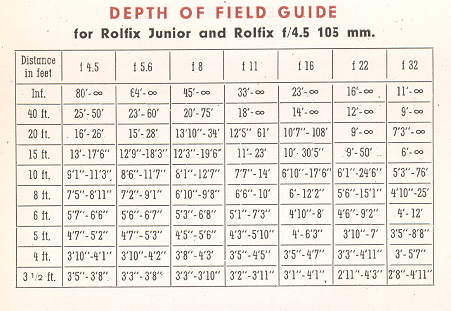
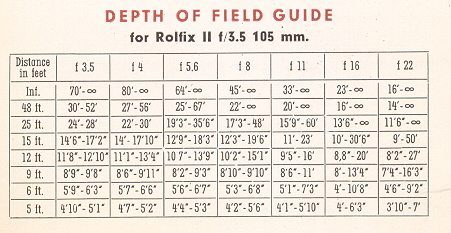
DEPTH OF FIELD
When the footage focus scale is set for a given camera to-subject distance,
the ROLFIX will focus sharply upon any object at that distance. Objects closer
to or farther from the camera are acceptably sharp. The depth of this secondary
zone, that of acceptably sharp focus, is called the Depth of Field. NOTE: The
Depth of Field zone increases as the lens opening becomes smaller, that is, as
the lens opening indicator is moved toward the highest numbers on the scale.
(See Depth of Field Guide, page 19.)
DEPTH OF FOCUS ADJUSTMENT RING
ROLFIX and ROLFIX II. On the front of the shutter there is
the ring for adjusting the depth of focus means of which the effective depth of
focus may be ascertained:
SHUTTER SPEEDS
The shutter speed scales of the ROLFIX cameras
are marked as follows:
Rolfix II .........Bulb, 1, 2, 5, 10, 25, 50, 100, 250, 500
TIME EXPOSURE SHUTTER SETTINGS
Rolfix Junior.... When the shutter is set at
"B" (Bulb), it will remain open as long as the shutter release is being pressed
and will close when pressu're is lifted. Use "B" for any exposure requiring a
longer time (slower shutter speed) than is marked on the shutter speed scale.
Open flash pictures may be taken on "B" setting.
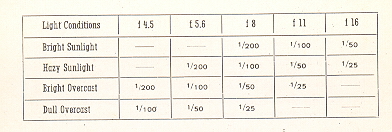
OUTDOOR EXPOSURE GUIDE
FOR VERICHRO ME, PLENACHROME, SENSACH ROME, PLUS X AND SUPREME
FILMS
For color films use the next larger lens opening (next lower number).
For brilliantly lighted subjects use the next smaller lens opening; for
close-ups and pictures in the shade use the next one or two larger lens
openings.
SHUTTER RELEASE
The ROLFIX cameras are equipped with a shutter winding lever
which prevents double exposures. The shutter release will work only if this
lever is pushed to the left, or wound.
SELF TIMER
(DELAYED SHUTTER ACTION)
A self timer release is built into the shutter mechanism of the ROLFIX. This
timer delays shutter action after the release button has been pressed, enabling
the person who is taking the picture to be in the picture also. When using the
self timer, place the camera on a tripod or other firm support. Operate the self
timers as follows:
DOUBLE EXPOSURE PREVENTION
The Rolfix 11 (Deluxe) is furnished with a catch preventing double exposures.
FILM RECORDING DISK
As a means of recording what film is loaded in the camera, there is a film
record disk mounted on the film winding knob.
Kodachrome After the camera is loaded, turn the disk until the index marker points to
the proper film speed. The outer ring is set for DIN ratings and the inner ring
for ASA ratings.
TAKING THE PICTURE
It is best to practice the following picture-taking routine before actually
loading your ROLFIX with film. In this way you can become familiar with the
ROLFIX controls and avoid forgotten details.
CLOSING THE FRONT
It is best to keep the front of the ROLFIX closed at all times except while
actually adjusting the camera-setting or taking pictures. Carrying the
camera with the front platform open endangers the entire working. mechanism and
lens to bumps and scratches.
Learn to operate the camera quickly, so that you will not be tempted to keep
the platform open in order to take a "fast" snapshot.
Before closing your ROLFIX, remember to turn the front lens back to
"Infinity". Do not close the camera while the shutter and self timer are wound.
To close the ROLFIX, press down on the struts and push the platform in until
it clicks shut. REMOVING THE FILM
After the last picture has been taken, wind the film until you
can no longer see the paper through the film window. Then open the back of the
camera and wind the film up tight on the spool. Fold the pointed end of the film
paper under and seal the spool with the "Exposed" sticker. Remove the exposed
roll by pulling out the film winding knob and lifting the roll out of its
chamber.
FLASH PICTURES
The ROLFIX cameras have built-in synchronization for flash; that is, a
special switch in the shutter which automatically fires the flash bulb when the
shutter is released. With built-in flash synchronization a battery holder and
reflector with the proper connecting cord are all that is necessary. Use the
European type (sometimes called the "Prontor S") connecting cord.
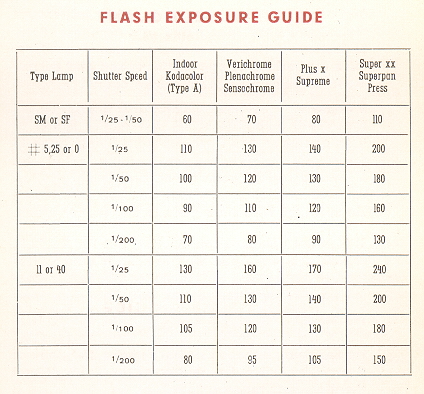
FLASH EXPOSURE GUIDE
How to use the above guide: For example, the guide number for A # 5 bulb using
Verichrome film and '/2sth shutter speed is 130. If the camera-to-subject
distance is 10 feet, divide 130 by 10, which is 13. Use the f stop closest to
13, or in this case f/11. For additional information see the outside of your
flash lamp carton.
HINTS FOR BETTER PICTURES
1. Always keep the camera lens clean. Use only very soft lens tissue when
cleaning to avoid scratching the lens.
CARE OF YOUR ROLFIX
The front and rear elements of your ROLFIX lens should be
carefully cleaned from time to time with soft lens tissue or a camel's hair
brush. If dust particles accumulate inside the camera, blow them out carefully.
Protect your camera from sand, snow and rain.
REPAIR AND REPLACEMENT
To obtain service on your ROLFIX contact your nearest Wards Retail Store,
Mail Order House or Catalog Office. Provide the Model Number of the camera.
how about a donation of $3 to:
M. Butkus, 29 Lake Ave.,
High Bridge, NJ 08829-1701
and send your
e-mail address
so I can thank you.
Most other places would charge
you $7.50 for a electronic copy
or $18.00 for a hard to read Xerox copy.
This will help me to continue to host this site,
buy new manuals,
and pay their shipping costs.
It'll make you feel better, won't
it ?
If you use Pay Pal, use the link below.
Use the above address for a check,
M.O. or cash.
AN D CONTROLS
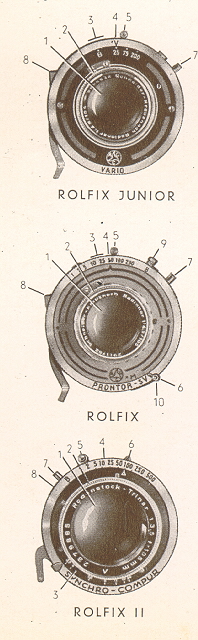
2. Footage Focus Scale
3. Lens Opening Scale
4. Shutter Speed Scale
5. Shutter Winding Lever
7. Flash Connector
8. Cable Release Socket
1. Lens
2. Footage Focus Scale
3. Lens Opening Scale
4. Shutter Speed Scale
5. Shutter Winding Lever
6. Self Timer
7. Flash Connector
8. Cable Release Socket
9. M-X Flash Synchronizer Settings
10. M Flash Exposure Setting (on self timer)
1. Lens
2. Footage Focus Scale
3. Lens Opening Scale
4. Shutter Speed Scale
5. Shutter Winding Lever
6. Self Timer Button
7. Flash Connector
8. M-X Flash Synchronizer
Use only standard black and white or color roll film size No. 120.
The ROLFIX is equipped to take two different sizes of pictures. You will get the
following number of pictures with these No. 120 films: - -
Black and White films
8 exposures, size 2 1/4" x 3 1/4"
12 exposures, size 2'/4" x 2 1/4"
6 exposures, size 2 1/4''x 3 1/4"
9 exposures, size 2 1/4" x 2 1/4"
Kodacolor films
12 exposures size 2 1/4''x-2 1/4"
The directions for loading are included in this part of the text as the first
step in the picture taking routine as a whole. HOWEVER, we recommend that you
read this book through and learn the complete operation of your ROLFIX before
actually loading the camera with film.
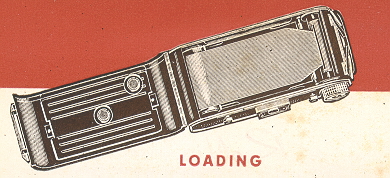
1. Open the back of the camera by pushing the opening button (back) in the
direction of the arrow. Inside you will find a removable metal frame. This is a
picture mask which, if left in place , will give you 12 pictures, size 2 l/4''x
2 1/4''. Use the upper film window for keeping track of exposures: If you want
full size 2 1/4 x 3 1/4" pictures, remove this picture mask-entirely and use the
lower film window for counting exposures. :
2. You will find an empty spool at the winding knob end of the ROLFIX. Leave it
in its chamber. it is on this take-up spool that the film is wound. Insert the
new roll of film into the other film chamber.
3. Break the seal and pull the film across the camera back. toward the empty
spool, making sure that the black side of the paper faces down. Insert the
narrowed end of the paper into the longest slot of the empty take-up spool. Give
the winding knob one turn to securely engage the film, making sure the film is
running straight across the camera back
4. Close the camera back. Push the film window button on the back
of the camera upward to uncover the windows. Now wind the film by turning the
winding knob in the direction of the arrow until the number "1" appears in
whichever film window corresponds with the size picture you are taking. (Upper
window, 2 1/4" x 2 1/4" lower window, 2 1/4" x 3 1/4.). Close the windows again
by sliding the button down. NOTE: To protect the film from light and possible
fogging keep windows covered except when winding film.
OPENING THE FRONT
turn the lens until the indicator- is opposite the desired number on the footage
focus scale. When taking distance pictures (beyond 50 feet) set the lens at
"Infinity" (no) to attain universal focus. NOTE: It is best to set the lens at
"Infinity" before closing the camera. Otherwise the lens wilt protrude and may
be damaged as you close the camera.
To LEFT and RIGHT of the indicator are the diaphragm values in the same order
from 3.5 resp. 4.5 through 22.
Underneath it is the distance-setting ring with numbers in feet. The depth of
focus is thus limited by the indicated feet under the diaphragm value on the
left and the feet indicated under the equal diaphragm value on the right.
Obviously the values of depth of focus will change with any alteration in the
setting of the lens.
Rolfix Junior... Bulb, 25, 50, 200
Rolfix..............Bulb, 1, 2, 5, 10, 25, 50, 100, 250
These markings designate one second or the fractional part of a second the lens
will remain open when the shutter has been released. Set the shutter speed by
turning the large collar on which the speed scale is engraved until the desired
number is opposite the pointer.
Rolfix Use "B" as directed above. When the shutter is set
at "B" (Bulb), it will remain open after release, as long as the release is
being pressed.
Rolfix II Use "B" as directed above. "T" Time Exposures.
For long exposures, when taking pictures at night, of interiors, with
insufficient illumination, or operating with flashlight powder etc., a wire
release with adjusting screw is used, which is mounted in the wire release
socket of the shutters Set shutter on "B", press wire release and tighten
adjusting screw. The shutter will stay open as long as the adjusting-screw is
not loosened again. These long exposures can be made only with a tripod or-some
other firm and steady support.
NOTE: Always use a tripod or other firm support when taking pictures with slower
shutter speeds than 1/25th second.
(Under ordinary light conditions with black and white film, the average camera
setting is f/11 at l/50th second or f/16 at l/25th second.)
For faster films (Super XX, Superpan Press, etc.) use the next smaller lens
opening (next higher number).
Release the shutter by pressing the shutter release button. NOTE: Use a slow
steady pressure on the release button to avoid moving or jerking the camera and
thereby blurring the picture.
The Roltix Junior and Rolfix have a shutter cable release
socket. A cable release is used primarily for remote control release of the
shutter or for extremely long exposures. Any standard cable release with tapered
threads (# 5) will fit the socket.
Rolfix .... Make the proper distance, Shutter and lens
adjustments. Then push the self timer lever down and to the left as- far as it
will go. Wind the shutter, press the shutter release and get into the picture.
You will have approximately 10 seconds in which to get into the picture before
the shutter is actually released and the picture snapped. NOTE: The self timer
can be used for any shutter speed except Bulb.
Rolfix II .... Make the proper distance, shutter and lens
adjustments. Push the shutter winding lever to the right until it winds. Push
the self timer button back, then push the shutter winding lever on over to the
right as far as it will go. Press the shutter release and get into the picture.
You will have approximately 10 seconds. NOTE: The self timer can be used for any
shutter speed except Bulb and 1/500 sec.
After each exposure the shutter release is locked; therefore do not use force.
The catch is opened only by winding the film to the next number. The red signal
beside the shutter release indicates that the catch is removed and the camera
ready for the next picture.
Attention! When handling the camera without a film, mind that
after the appearance of the red signal you must give the film winding knob one
more turn. This is not the case with the film installed, for then you always
wind as far as the next number.
Rating
Example: Super XX Film
100
10
Kodacolor
25

The Rolfix jr (Deluxe) is equipped with a telescop viewfinder. Aim the camera by
looking through the small square of the finder and "framing" your picture in the
large square. If taking 12 pictures size 2 1/4" x 2 1/4'', use the smaller frame
which is limited by the inner straps. On the top of the finder there is a holder
for accessories.
The Rolfix (Deluxe) and Rolfix II (Deluxe) are furnished with a new finder body
with telescope-finder and adjustable window. Aim the camera by looking through
the small square of the finder and "framing" your picture in the large square.
If taking 12 pictures 2 1/4"x2 1/4" push the button on top in direction of arrow
to the indicated size. On the top of the finder there is a holder for
accessories. What you can see through the frame of the viewfinder will be the
picture.
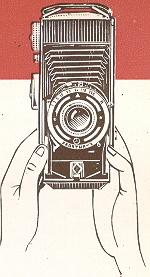
If the subject to be photographed is vertical, hold the ROLFIX upright with the
finder on the right hand side. Hold the camera firmly in both hands, cradling
the platform in the palm of the right hand so that the shutter release can be
pressed with the thumb of the right hand. If the subject is horizontal, hold the
camera on its side with the viewfinder at the top, still cradling the platform
in the palm of the right hand, but so that the shutter release can be pressed
with the index finger.
With the camera in either position, put your eye very close to the viewfinder
and hold the camera straight and steady against your face while aiming through
the finder and pressing shutter release.
1. Select your subject. Carefully estimate the camera-to-subject distance and
focus the camera lens by setting the footage focus indicator.
2. Set the shutter speed and lens opening as indicated by the exposure guide in
this book, a calculator or light meter.
3. WIND THE SHUTTER!
4. Aim the camera accurately, making sure all of your subject is in the
viewfinder. Have your picture well-balanced according to the size and shape of
the finished picture desired. (Vertical, horizontal, amount of background, etc.)
5. Hold the camera as directed previously, keeping it level and steady against
your face. (or waist.)
6. Press the shutter release slowly and steadily, trying not to jerk the camera.
7. Wind the film immediately after taking each picture, being careful to use the
right film window.
Transfer the empty spool from the film supply chamber to the take-up chamber so
as to be ready for the next roll of film.
Specific instructions for flash are as follows:
Rolfix Junior (Vario Shutter) .... Use only midget flash bulbs (SM or
SF). Set shutter speed at 1/50th for all flash exposures. See Flash Exposure
Guide, page 18, for correct distance and lens opening settings.
Rolfix (Prontor M-X Shutter) .... The Rolfix shutter is equipped with
settings for two flash synchronization contacts: M Contact (yellow dot) and X
Contact (red dot).
M Contact .... Set M-X indicator at M. Use any class M (wire-filled)
flash bulb (# 5, 25, 11, 22, 0, 40). Use any shutter speed. SET SELF TIMER AT M.
(This self timer M setting is necessary, as it compensates for the delay between
release of shutter and peak of flash.) See Flash Exposure Guide for correct ·
distance, shutter speed and lens settings. NOTE: M flash synchronization is most
commonly used because it operates at any shutter speed and accommodates bulbs
with greater light output.
X Contact .... Set M-X indicator at X. Use any class F (gas-filled) bulb (SM or
SF). Set shutter speed at 1/50th or slower. See Flash Exposure Guide, page 18
for correct distance and lens settings. NOTE: Use X synchronization when taking
self timing pictures. An electronic strob gun may be used with X
synchronization. With strobe gun use any shutter speed.
Roltix II (Synchro Compur-Rapid Shutter) .... The Rolfix II, like the
Rolfix, is equipped with M-X flash synchronizer contacts. See instructions for
the Rolfix, above, for operation of the M-X synchronizations, with this
exception:
M Contact .... Set M-X indicator at M, but DO NOT WIND THE SELF TIMER. (The
timer that compensates for the delay between shutter release and peak of flash
is built into the shutter of the Rolfix II and therefore sets automatically.)
2. Always load and unload your camera in subdued light NEVER IN DIRECT SUNLIGHT.
3. Learn and adopt the correct picture-taking routine. (See page 14.)
4. Do not take a picture directly into the sun.
5. Focus accurately. Pace off the distance. (One step equals about three feet.)
The minimum camera-to-subject distance for sharp focus is about four feet,
unless you use a special portrait lens
6. Estimate light conditions carefully. Use an exposure table, a meter or
calculator whenever possible. If in doubt, tend to over-expose.
7. For photographing a subject in motion use a faster shutter speed (about
l/100th second) or choose a camera position so that subject movement will be
toward or away from the camera.
8. Hold the camera level and steady when pressing the shutter release. Always
use a tripod or other firm support when taking pictures at a slower shutter
speed than 1/100th second.
9. Wind the film after each picture.
10. Keep the film windows closed except when winding film.
11. Do not use exceptionally old film. It is best to have film developed before
the expiration date.marked on the box.