Ricoh AF-40posted 8-4-'03
This camera
manual library is for reference
and historical purposes, all rights reserved.
This page is copyright©
by
 ,
M. Butkus, NJ.
,
M. Butkus, NJ.
This page may not be sold or distributed without the
expressed permission of the producer.
I have no connection with any camera
company.
On-line camera manual library.
Back to main
camera manual page
If you find this manual
useful,
how about a donation of $3 to:
M. Butkus, 29 Lake Ave.,
High Bridge, NJ 08829-1701
and send your
e-mail address
so I can thank you.
Most other places would charge
you $7.50 for a electronic copy
or $18.00 for a hard to read Xerox copy.
This will help me to continue to host this site,
buy new manuals,
and pay their shipping costs.
It'll make you feel better, won't
it ?
If you use Pay Pal, use the link below.
Use
the above address for a check, M.O. or cash.
CLICK HERE TO GO TO Ricoh AF-40 PDF FILE
MADE FROM HTML FILE
NOMENCLATURE
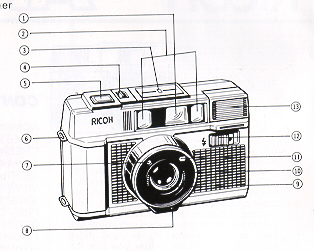 |
1. Viewfinder
2. Distance Measuring Window
3. Film Monitor/Exposure
Counter
4. Film Rewind Switch
5. Shutter Release Button
6.
Strap Eyelet
7. Photocell
8. Shutter Release Lock Button
9.
Lens
10. Film Speed Ring
11. Film Speed Window
12. Flash
Unit Switch
|
 |
13. Built-in Flash Unit
14. Viewfinder Eyepiece
15. Flash
Ready Lamp
16. Film Rewind Shaft
17. Film Chamber
18. Battery
Compartment Cover
19. Film Guides
20. Film Rewind Release Button
21. Tripod Socket
22. Sprocket
23. Film Take-up Spool
24. Film
Check Window
25. Finger Rest
|
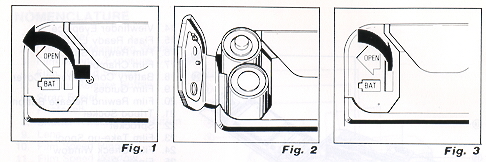
INSERTING THE BATTERIES
This camera will not operate unless the
batteries are inserted. It is important to install the batteries properly.
1. Push the Battery Compartment Cover in the direction of the arrow <OPEN
to open. (Fig 1 )
2. Insert two batteries, checking that the (+) and
( - ) on the batteries are lined up correctly, according to the polarity diagram
inside the battery compartment. (Fig. 2)
3. Close the Battery Compartment
Cover by pushing it in the direction of the arrow. (Fig 3)
Batteries to use
Two Alkaline penlight batteries or
Two Manganese penlight batteries.
· Do not use Nickel Cadmium batteries.
· Please remove the batteries from the camera when you do not use the
camera for a long period of time.
· Use of rechargeable Nicad batteries
is not recommended. Due to higher internal amperage, the electronics in your
Ricoh camera/flash unit may be damaged. If damaged due to use of Nicad batteries
occurs the warranty Will be considered null and void.
CHECKING THE BATTERIES
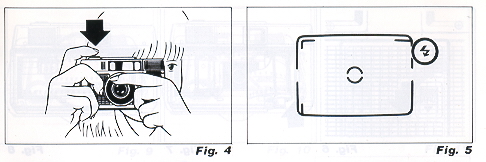
Remove the Lens Cap before you check the batteries. If the lens cap is left
on, a safety device will operate to prevent the Shutter Release Button from
being activated.
* Make sure the Shutter Release Button is not pressed
in when you are removing the lens cap, as a frame may be taken in error.
1. Cover the Photocell (small glass window next lens) with your hand, and
press the Shutter Release Button in halfway. (Fig. 4)
2. If the red
Camera Shake Warning Signal
 in the Viewfinder blinks, then the batteries are in working order. (Fig. 5)
In normal temperatures (at 20°C and with new Alkaline batteries) without using
the Flash Unit, approximately 70 rolls of 36 exposure film can be taken. If
the flash Unit is used for every frame, then 7 rolls of 36 exposure film can
be taken. Please change both batteries to new ones of the same kind in the following
cases:
in the Viewfinder blinks, then the batteries are in working order. (Fig. 5)
In normal temperatures (at 20°C and with new Alkaline batteries) without using
the Flash Unit, approximately 70 rolls of 36 exposure film can be taken. If
the flash Unit is used for every frame, then 7 rolls of 36 exposure film can
be taken. Please change both batteries to new ones of the same kind in the following
cases:
A. The red Camera Shake Warning Signal
does not blink when you have covered the Photocell with your hand and the Shutter
Release Button is pressed in.
B. The shutter cannot be released (remember
to remove the Lens Cap).
C. The Flash Ready Lamp takes more than 30
seconds to light up. I
D. The Film Advance or Film Rewind does not operate.
E. The batteries have been in the camera for more than one year (even
without using the camera, batteries will run down naturally).
· Generally,
in cold conditions, the capacity of the batteries decreases, and in some cases,
the camera may not operate properly. You should either warm the batteries or
keep a spare set in your pocket, inserting them just before you use the camera.
Incidentally, batteries that have lost their capacity in cold temperatures,
will recover in normal temperatures, so do not throw them away.
LOADING THE FILM
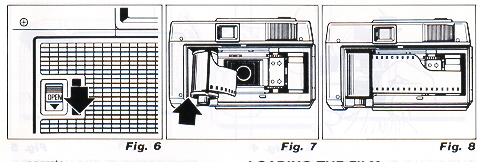
1. Push the back cover lever downwards in the direction of the arrow OPEN
to open. (Fig. 6)
2. Load the film in the Film Chamber. (Fig.
7)
3. Pull out the film leader and place it over the Film Take-up Spool.
Please see that the film is within the Film Guides. (Fig. 8) (Fig. 9) (Fig.
10)
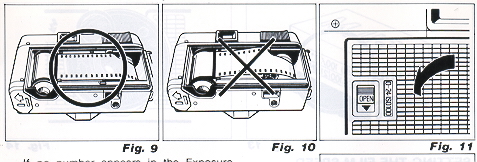
4. Push the back cover shut so that the back cover lever is back to its
original position. (Fig 11 )
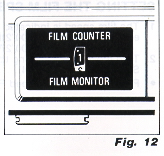
5. Press the Shutter Release Button to
advance the film until the number '1' appears in the Exposure Counter Window.
If no number appears in the Exposure Counter Window, the film is not loaded
correctly. Please reload the film. (Fig. 12)
· The Film Monitor is a mechanism ensures that if the film is not advancing
correctly the Exposure Counter will not move forward.
· Always avoid
direct sunlight when you load the film.
· If the film is removed from
its carton and left in high temperatures or humidity before it is loaded, it
may not advance to the end of the film.
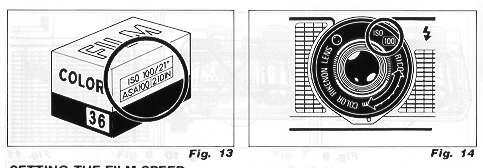
SETTING THE FILM SPEED
1. The film speed is indicated on the outer
packaging of the film: e.g. ASA 100 (ISO 100/21°)
ASA 400 (ISO 400/27°)(Fig.
13)
2. Turn the Film Speed Ring to set the speed of the film you are using in
the center of the Film Speed Window. (Fig. 14)
· Please set the Film
Speed Ring to click stop positions. Do not use mid-way positions.
If no
number appears in the Exposure Counter Window, the film is not loaded correctly.
Please reload the film. Fig. 12)
· The Film Monitor is a mechanism ensures
that if the film is not advancing correctly the Exposure Counter will not move
forward.
· Always avoid direct sunlight when you load the film.
· If the film is removed from its carton and left in high temperatures or
humidity before it is loaded, it may not advance to the end of the film.
SETTING THE FILM SPEED
1. The film speed is indicated on
the outer packaging of the film: e.g. ASA 100 (ISO 100/21°)
ASA 400 (ISO
400/27°)(Fig. 13)
2. Turn the Film Speed Ring to set the speed of the film you are using in
the center of the
Film Speed Window. (Fig. 14)
· Please set the Film Speed Ring to
click stop positions. Do not use mid-way positions.
VIEWFINDER (Fig. 15)
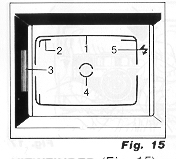
1. Field of View Frame
2. Parallax Correction Marks
3. Flash Ready Lamp
4. Auto-Focus Frame
5. Field of View Frame
The subject such as people or scenery that you wish to take should be set
within this frame.
2. Parallax Correction Marks
When taking a picture
of a subject that is between 1 ~ 1.2m (3 - 4 ft) away from the camera, it should
lie within these marks.
Anything outside the marks will not be included
in the picture even though you can see it through the viewfinder.
3.
Flash Ready Lamp When the flash is fully charged and ready for shooting, this
lamp will light up.
4. Auto-Focus Frame The Auto-Focus Frame focuses
-automatically on the subject that lies within it.
5. Camera Shake Warning
Signal If this lamp blinks when the Shutter Release Button is pressed halfway,
then you should change to flash photography.
SHOOTING ON AUTO-FOCUS
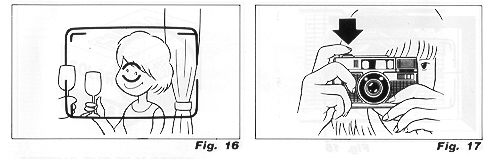
1. Set the subject you wish to take within the Auto-Focus Frame in the center
of the Viewfinder. (Fig. 16)
2. If the Camera Shake Warning Signal does
not light, gently press the shutter Release Button in fully to take the picture.
The film will advance automatically as soon as the shutter has been released.
(Fig. 17)
· Please be careful not to cover the Distance Measuring Window
at the front of the camera accidentally, as the focusing will not be correct.
· Please keep the Distance Measuring Window clean so that the focusing
is accurate. If it gets dirty, please wipe it clean with a soft cloth.
· There may be rare cases where the subject cannot be properly focused.
(For instance subjects that do not reflect light well, glossy subjects,
or subjects taken through glass.)
Shooting Distance
For subjects that are less than 1 m away from
the camera, it is not possible to obtain a sharp focus.
PRE-FOCUS
SHOOTING
When the subject you wish to focus on is outside the Auto-Focus
Frame, or if the subject is difficult to focus on, you should use the "pre-focus"
feature.
When the subject is outside the Auto-Focus Frame

1. If you want to photograph two people, there may be cases where neither
of them can be set within the Auto-Focus Frame in the center of the Viewfinder.
If you release the shutter, the background will be in focus, and the people
which are the main subject will be out-of-focus. (Fig. 18)
2. Move the
camera so that one of the people is within the Auto-Focus Frame. (Fig. 19)
3. Press the Shutter Release Button halfway. Keep your finger pressed
down on the Shutter Release Button. This will automatically lock the focus on
this subject.
4. Return the camera to its former position so that both
people are in the Field of View Frame, then press the Shutter Release Button
fully to take the picture. (Fig. 18)
Then the subject is difficult to
focus on
1. When you take subjects that are difficult to focus on, find
another subject at about the same distance from the camera. Use that subject
in the same way as described above.
· When you remove your finger from
the Shutter Release Button, pre-focusing will be cancelled, so you can then
go on to focus again as many times as you wish.
REWINDING THE FILM

When the end of the film has been reached, an electronic sound will be emitted.
Please rewind the film immediately.
1. Push the Film Rewind Release
Button on the underside of the camera. (Fig. 20)
2. Push the Film Rewind
Switch on the top of the camera in the direction of the arrow. (Fig. 21)
3. As you rewind the film, the Exposure Counter will run backwards. When
the "S" appears in the Exposure Counter window, slide the Film Rewind Switch
back to its former position. Film rewinding is now completed and you can unload
the film. (Fig. 22)
· Do not open the back cover until the "S" has appeared
in the Exposure Counter window.
FLASH PHOTOGRAPHY
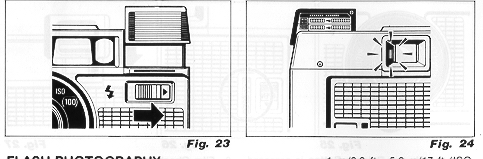
Change to flash photography when the Camera Shake Warning Signal ()
in the Viewfinder blinks when the Shutter Release Button is pressed halfway.
1. Push the Flash Unit Switch in the direction of the arrow ~ and the
Flash Unit will pop up turning the power source on automatically. (Fig. 23)
2. Check that the Flash Ready Lamp in the Viewfinder is lit, then take
the picture. (Fig. 24)
Flash photography distance
Shooting range:
1 m/3.3 ft - 4.3
m/14.1 ft (ISO 1 00)
1 m/3.3 ft - 5.2 m/17 ft (ISO 400)
1.4
m/4.6 ft - 5.5 m/18.2 ft (ISO 1000)
· Always push the Flash Unit back
in when not in use. (If it is left up, the batteries will wear out faster.)
· If the Shutter Release Button is kept pressed halfway with the Flash
Unit on, the Flash Unit will not be charged. Allow the flash to charge by removing
your finger from the shutter release.
· Be careful not to put your finger
in front of the flash window.
· If the Shutter Release Button is pressed
before the Flash Ready Lamp lights up, the picture will be under-exposed.
· You can use the Flash Unit as a fill-in light for daytime photography
too.
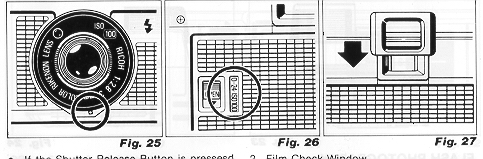
OTHER FEATURES
1. Shutter Release Lock
When the lens cap is
put on, the shutter will be locked. This is a convenient mechanism that prevents
you taking a picture with the lens cap in place, or releasing the shutter by
mistake. (Fig. 25)
2. Film Check Window
You can confirm whether
a film is loaded or not by looking through the Film Check Window. (Fig. 26)
3. Diopter Correction
There is a Diopter Correction Adapter to enable
people who are near or far sighted to see more clearly through the viewfinder.
Please use the Diopter Correction Adapter for the RICOH SLR cameras. It slides
on the Viewfinder Eyepiece. (Fig. 27)
FLASH PHOTOGRAPHY
Change to flash photography when the Camera Shake Warning Signal ()
in the Viewfinder blinks when the Shutter Release Button is pressed halfway.
1. Push the Flash Unit Switch in the direction of the arrow ~ and the
Flash Unit will pop up turning the power source on automatically. (Fig. 23)
2. Check that the Flash Ready Lamp in the Viewfinder is lit, then take
the picture. (Fig. 24)
Flash photography distance
Shooting range:
1 m/3.3 ft -
4.3 m/14.1 ft (ISO 1 00)
1 m/3.3 ft - 5.2 m/17 ft (ISO 400)
1.4 m/4.6 ft - 5.5 m/18.2 ft (ISO 1000)
· Always push the Flash Unit back in when not in use. (If it is left up,
the batteries will wear out faster.)
· If the Shutter Release Button is kept pressed halfway with the Flash Unit
on, the Flash Unit will not be charged. Allow the flash to charge by removing
your finger from the shutter release.
· Be careful not to put your finger in front of the flash window.
· If the Shutter Release Button is pressed before the Flash Ready
Lamp lights up, the picture will be under-exposed.
· You can use the
Flash Unit as a fill-in light for daytime photography too.
OTHER FEATURES
1. Shutter Release Lock
When the lens cap is put on, the shutter will be locked. This is a convenient
mechanism that prevents you taking a picture with the lens cap in place, or
releasing the shutter by mistake. (Fig. 25)
2. Film Check Window
You can confirm whether a film is loaded or not by looking through the Film
Check Window. (Fig. 26)
3. Diopter Correction
There is a Diopter
Correction Adapter to enable people who are near or far sighted to see more
clearly through the viewfinder. Please use the Diopter Correction Adapter for
the RICOH SLR cameras. It slides on the Viewfinder Eyepiece. (Fig. 27)
MAJOR SPECIFICATIONS
Type: 35 mm
lens shutter type with automatic focusing
Lens: 38 mm F2.8 Color Rikenon lens, 4 elements
3 groups filter diameter 46 mm
Focusing: Automatic focusing with pre-focus
facility.
Distance measuring (shooting) range 1 m ~ 00
Shutter: Programmed AE type electronic shutter
Viewfinder: Albada type with bright frame
viewfinder (with parallax correction marks).
Magnification: 0.46 X Field of View 83%,
Diopter Correction Adapter can be attached.
Viewfinder information: Field of View Frame,
Parallax Correction Marks, Auto-Focus frame, Camera Shake Warning Signal, Flash
Ready Lamp.
Exposure Adjustment: With Cds Photocell,
Exposure Coupling Range EV6 ~ EV17 (ISO 100)
Film speed Range: ISO 100 ~ ISO 1000
Film Advance/Rewind: By electric motor with
Film Check Window
Film Loading: RICOH Auto-Load system
Exposure Counter: Additive, reversed when
rewinding
Built-in flash: Flash photography by turning
of Flash Unit Switch
Guide Number: 12 (ISO 100) m. Exposure adjustment
through flash-matic system.
Interval between flashes: About 7 seconds
Number of shots possible: With new Alkaline batteries (under
normal temperatures of 20°C)
Without using flash
unit: more than 70 rolls of 36 exposure film.
When
using the flash unit repeatedly: more than 7 rolls of 36 exposure film.
Power source: 2 penlight Alkaline batteries
or 2 penlight Manganese batteries. (Do not use Nickel Cadmium batteries.
Dimensions: 129 mm (W) x 79 mm (H) x 55
mm (D)
Weight: 330g (without batteries)
Specifications and appearance of this camera are subject to change without
notice.
PROPER CARE OF YOUR CAMERA
* If there is dirt on the lens or Distance Measuring
Window, do not touch directly with your fingers. Use a blower to blow the dust
away, or wipe the surface gently with a soft cloth.
* Camera malfunction
can be caused by shock humidity, salt, etc. After using the camera at the beach
or places where there are chemicals, wipe it particularly carefully.
* Take care not to expose the camera to sudden changes in temperature, as
they may cause malfunction.
* Do not expose the camera for a long period
of time in extremely high temperatures, such as in your car or on the beach,
as this may cause malfunction.
* When using a tripod, do not try to
force a long screw into the socket. (The screw length should be less than 5.7mm,
JIS 5.5mm.)
* Do not place the camera near equipment that has strong
magnetism such as television or radio.
* Remove the batteries before
storing the camera, and keep the camera in a place that is free of dust and
humidity.
* Avoid keeping the camera in a closet, etc. where the camera
may be affected by mothballs, insecticides, etc.