Ricoh 500
On-line owners manual
Webmaster: A number of cameras were called Ricoh 500's,
so there are variations out there.
This camera manual library is for reference
and historical purposes, all rights reserved.
This page is copyright© by  ,
M. Butkus, NJ.
,
M. Butkus, NJ.
This page may not be sold or distributed without the
expressed permission of the producer
On-line camera manual library
If you find this manual
useful,
how about a donation of $3 to:
M. Butkus, 29 Lake Ave.,
High Bridge, NJ 08829-1701
and send your
e-mail address
so I can thank you.
Most other places would charge
you $7.50 for a electronic copy
or $18.00 for a hard to read Xerox copy.
This will help me to continue to host this site,
buy new manuals,
and pay their shipping costs.
It'll make you feel better, won't
it ?
If you use Pay Pal, use the link below.
Use the above address for a
check, M.O. or cash.
Back to my main
Camera manual page
Click here for PDF version of Ricoh 500 manual
made from HTML file below
Click her for different Ricoh 500 PDF
direct from manual

 |
(1) Eyelet
(2) Range-finder window
(3) Bright-frame window
(4) DUO-LEVER focusing controls
(5) Triggermatic-Action lever
(6) View-finder window
|
 |
(7) Flash terminal (European standard)
(8) Rapid rewinding crank
(9) Accessory shoe
(10) Cordless flash contact
(11) Shutter release button
(12) Film counter
|
|
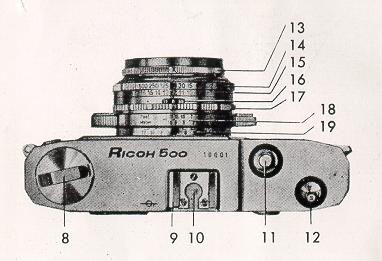
13) Combined synchro setting and self-timer ring
(14) Shutter speed setting ring
(15) Light value figures
(16) Diaphragm setting ring window
(17) Light value adjusting ring
(18) Distance scale
|
(19) Depth-of-field scale
(20) Rewinding spindle
(21) View-rangefinder eyepiece
|
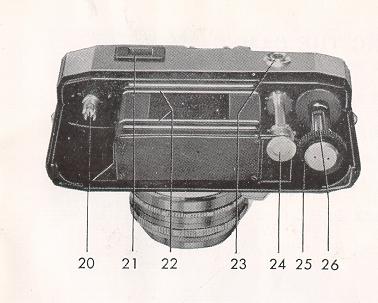 |
(22) Film rail
(23) Rewinding release button
(24) Sprocket
(25) Take-up spool knob
(26) Take-up spool slot
(27) Back cover locking disc
|
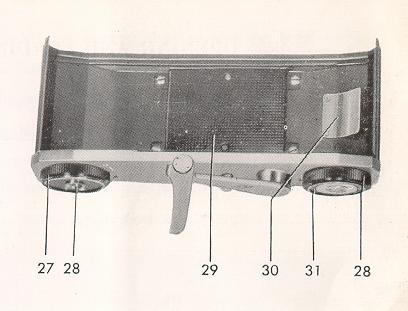 |
(28) Tripod bushing (American standard)
(29) Film pressure plate
(30) Cartridge positioning spring
(31) Film-type indicator
|
OPENING AND LOADING THE CAMERA
Avoid direct sunlight.
Use 35mm film in cartridge (not in magazine), 20 or 36 frames.
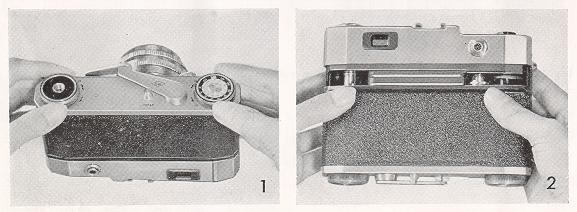
1 ) Turn back cover looking discs so that the black marks come in line with
the red O. (See Figure 1.)
2 ) Place fingers against both sides of the back cover and pull down gently,
holding the camera firmly. When putting on the cover again, follow a reverse
process, making sure it is fully engaged. Be sure the edges are in position and
the film pressure plate does not catch and get scratched.
Turn back cover locking discs so the; the black marks come in line with the
black C. (See Figure 2.)
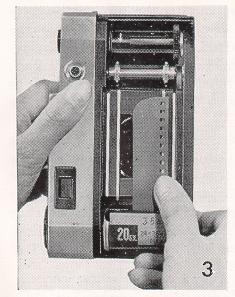
( 3 ) Place your new film cartridge in the chamber below the rewinding
spindle. (See Figure 3.)
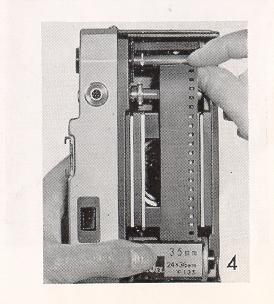
( 4 ) Engage the end of your unexposed film firmly in the inner take-up spool
slot. (See Figure 4.)
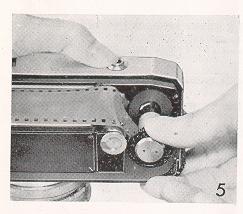
( 5 ) Make sure the perforations on the film are properly engaged on the
teeth of the sprocket, and that the film is properly centered. While pressing
the rewinding release button, turn the take-up spool knob in the direction
indicated by the white arrow to make sure the film is to be wound properly. (See
Figure 5)
( 6 ) Then wipe off any particles of dust or finger marks on the film
pressure plate with a soft brush or piece of gauze. When you have done this, put
on the cover gently and firmly, taking good care that the film pressure plate
does not get caught on the edge of the film, and turn the back cover locking
discs in the direction indicated by black arrow, so that the black marks come in
line with C.
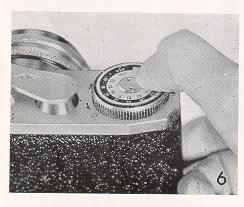
( 7 ) At the bottom of the camera, and on one of the back cover locking
discs, you will find your film type indicator with ASA and DIN numbers. These
numbers stand for degrees of sensitiveness of films to light, so that when the
figure is high, less exposure of faster shutter speeds are required, while in
case of a film with a low sensitivity the figure is also low, so that greater
exposure or slower shutter speeds become necessary. This exposure index is
indicated on the packet in which your film is sold and probably in the
Directions printed and enclosed in the packet. Bring either ASA or DIN number of
your film in line with the black mark by turning the dial with the tip of your
nail on the tiny metal catch. This is done so that you might remember what the
film speed is, a matter of utmost importance when taking pictures. When the
camera is empty, bring the catch (where there is no number) in line with the
black mark. (See Figure 6.)
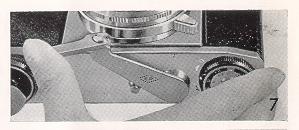
8 ) Bring out the triggermatic-action lever. (See Figure 7 ) You will note
that the film counter shows "S" (Start).
(See Figure 8.) Release the shutter, or at least press the button to ensure
that it is released, and turn the triggermatic-action lever with your left index
or middle finger as far as it will go to the left. This advances the film by one
frame and winds the shutter at the same time. If the lever will not advance
never force it; because it means the shutter has not been released.
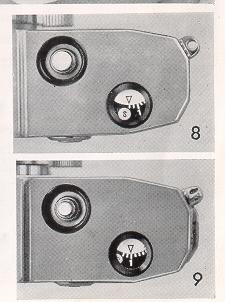
Release the shutter again and advance the film once more, and you will find
that the arrow in the film counter is opposite a point closer to "1" than to
"S". When the film is advanced for the 3rd time, the arrow points at "1". Then
set the LIGHT VALUE required and take your first picture. Anything taken on a
frame before the arrow points at "1" is likely to be on an exposed part of the
film, and therefore to be useless.
EXPOSURE AND LIGHT VALUE
In taking a picture a certain amount of light must pass through the lens and
reach the film. This is what is called an exposure. If the amount of exposure is
too great or too little, the picture will be no good. In the conventional type
of camera one has to set the shutter speed and the required f stop separately.
The LIGHT VALUE device eliminates all this trouble, since any change in the
shutter speed due to any change in the f stop or any change in the f stop due to
any change in the shutter speed is done AUTOMATICALLY. It must of course be
understood that the amount of light is about the same.
(Webmaster: this does not mean you have an Automatic camera or light meter.
It just means if you go by the estimates of the lighting, this camera will allow
you to somewhat get your exposure close. A light meter is suggested)
This is the first Japanese camera which makes AUTOMATIC the giving and
ensuring of the correct exposure by simply setting the LIGHT VALUE indicator.
This is a mechanical brain that computes the correct exposure for you,
provided you know what the LIGHT VALUE is.
LIGHT VALUE TABLE
| ASA/DIN Index |
Snow, mountain, and sea scenery |
Light Subject, Distance scene |
Subject in shade, folks in open |
Dark Subjects, folks in shade, building |
Among trees or in light room |
| 50 (18 DIN) |
14 |
13 |
12 |
11 |
10 |
| 100 (21) |
15 |
14 |
13 |
12 |
11 |
| 200 (24) |
16 |
15 |
14 |
13 |
12 |
a. For mornings and evenings subtract 2 from figures indicated.
b. When slightly cloudy subtract 1, cloudy 2 and rainy 3.
c. For color film you are strongly advised to use an electric exposure
meter.
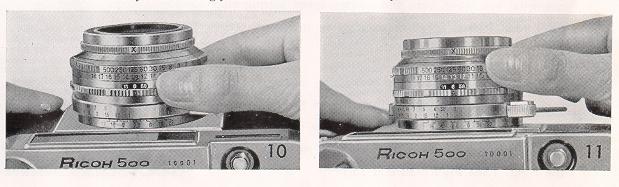
1. Set your light value by referring to the light-value table or by
taking a reading from an electric exposure meter.
2. Turn the light value adjusting ring and bring it into the required
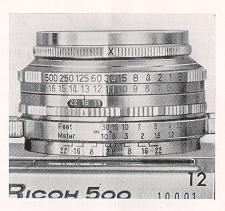
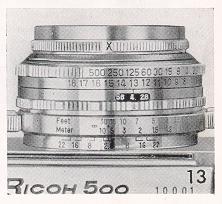
position. (See Figure 10. which shows that the light value is "13"). Disregard
all shutter speeds and the relative openings in setting the light value. Just
shoot.
3. If either shutter speed or opening (which affects depth of field of focus
shown on a chart on another page) is not what you want, turn the shutter speed
setting ring until your desired speed or opening is indicated. (See Figure 11.)
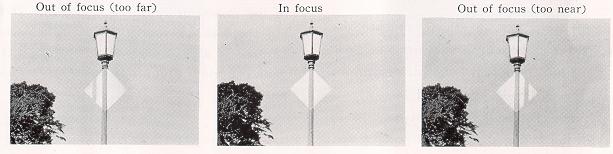
When you want to have everything in sharp focus, turn the shutter speed
setting ring to the left. If On the other hand you wish to have things on
the far and near side of your subject out of focus, turn the ring to the right.
(See Figure 12 and 13.)
The extent to which things are in sharp focus may be found by reading
the depth of field scale.
The f stop must be interpreted on the scale in such reading of depth of field
as being a rough guide.
When the required shutter speed is a fast one, turn the shutter speed setting
ring to the right until the required speed is brought in line with the red mark
arrow V.
When the required shutter speed is a slow one, turn the ring to the left
until the required speed is brought in line with the same red arrow
v.
Make sure that the shutter speeds are brought exactly in line with the click
stops, since no intermediate speeds are obtainable.
So long as there is no change in the light value, the required exposure is
constantly and automatically ensured, whatever the shutter speed or f stop you
set. However, at f/2.8 the f stop window stops moving any farther, so that if
you move the shutter speed setting ring beyond this point, the light value
figure will get out of line, and the result will be underexposure.
Similarly, when a slower shutter speed is required, moving the shutter speed
ring beyond the f/22 point will result in the light value figure getting out of
line, and this will result in overexposure.
Medial points just between the light values may be used, such as 3.5,
4.5...16.5.
When the shutter speed is set to "B" the shutter will remain open so long as
the shutter release button is pressed.
The figures stand for fractions of a second, so that 1 means 1 second, 2
means 1/2 second, 4 means 1/4 second, and 500
means 1/500 second. The aperture or opening is bigger in proportion to the
smallness of the f stop number and is smaller
in proportion to the largeness of the f stop number; and the opening itself
is a 5 sided hole as illustrated in Figure 14.

As illustrated in the following chart (Figure 18), the depth of field of
focus increases in proportion to the smallness of the opening or f stop, and
decreases in proportion to its largeness. It is this range that is commonly
referred to as the depth of field.
Consequently, apart from the fact that you will have to make sure your
subject is in sharp focus, give full consideration to this important factor. For
instance, in taking a picture of a person, the blurring of the background by
using a wide opening will make the person stand out. On the other hand, when
taking a group picture where people are standing in rows a small opening becomes
necessary to ensure
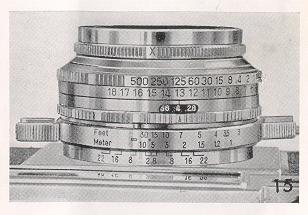
Thus, if you set the opening at f/8 and the distance scale at the red mark,
everything will be in sharp focus from 10 feet to infinity. (See Figure 15.) For
taking sequence shots referred to in a subsequent section this will prove of
immense advantage.
.
LOOKING THROUGH THE VIEWFINDER
Looking through the viewfinder, you see a bright-line frame on the image. The
frame shows the field to be photographed. It automatically compensates parallax,
so that at all distance when the lens is focused what appears within the frame
is exactly what will appear on your negative.

You will find you can easily and exactly select the most favorable limitation
of the subject with this finder.
FOCUSING THE CAMERA
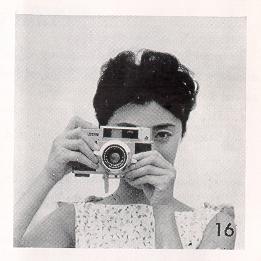
1. As illustrated in Figure 16, place your right index finger lightly on the
shutter release button and with both hands turn the Duo-lever focusing control.
2. Usually the image as seen through the view-and-rangefinder will appear
"double" in the center tinted square, which means that the subject is not in
focus. When this is the case, move the lever so that the two images merge, or in
other words, become superimposed. The subject is now in sharp focus.
TAKING YOUR PICTURES
To muddle means the possibility of missing a shot, so let us do things
systematically so as not to miss our chance.
1. Get your light value set.
2. Decide on your depth of field and shutter speed.
3. Wind your film, which winds the shutter, too.
4. Focus your subject.
5. Release the button and take your picture.
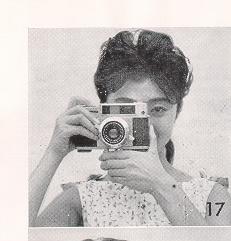
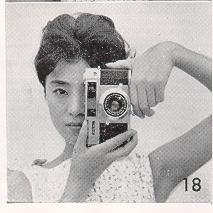
Steady your camera when you shoot by resting the camera against a part of your
face and hold your breath for a moment as you shoot. (See Figures 17 and 18.)
The camera is built in such a way as to prevent the taking of double
exposures and the skipping of a frame. In other words, there is no danger of
DOUBLE EXPOSURES or BLANKS.
Do not advance the film until the shutter has been fully released. This is
particularly important when using the bulb or slow shutter speeds.
After you have advanced your film, which winds your shutter automatically, it
is highly advisable not to change shutter speeds between 1/250 and 1/500.
The only absolute guarantee against taking shots that are spoiled owing to
any jolting of the camera is the use of the tripod. For any speed slower than
1/30 we recommend its use. It always pays to make sure that your
important group and other pictures are not spoiled.
When using a cable release, screw it on to the shutter release button groove,
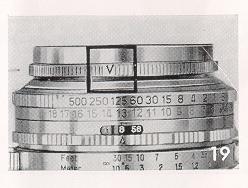
USING THE SELF-TIMER
To use the self-timer, put the camera on a tripod and focus on your group.
Set the light-value and pull the trigger lever. Turn the combined synchro
setting and self-timer ring to the left and set its window at
"V"
position. Pressing down on the shutter release button will start the self timer
and the exposure will be made automatically after about an 8 second delay. Since
it enables you to also get into the picture, prints of your family and friends
will be more delightful to look at when mounted in your album.
(See Figure 19)
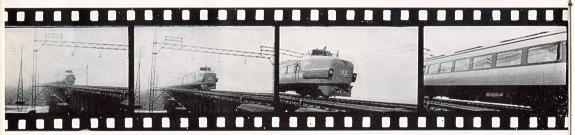
TAKING SEQUENCE SHOTS WITH THE
TRIGGERMATIC-ACTION LEVER
The Triggermatic-action lever is an outstanding feature of this miniature
camera, adding further to the maneuverability of an already maneuverable camera.
Only a full pull On the triggermatic-action lever, which takes but a fraction of
a second, and the film is advanced by a frame and the shutter set.
The LEVER-PULLING AND SHUTTER-RELEASING ACTION is so rapid and smooth as to
be a feature unequaled in other cameras. If you bring the red mark on the
distance scale to the center and set the lens opening f/8, its versatility is
greatly increased, ENABLING THE TAKING OF PICTURES AT THE RATE OF 10 IN 10
SECONDS.
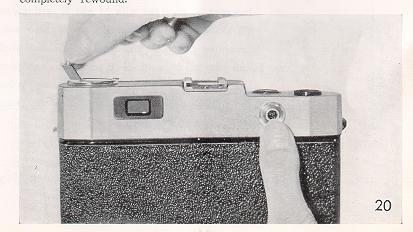
AFTER EXPOSING ALL OF THE FILM
After the film has all been exposed, raise the rapid rewinding crank and
rewind while pressing the rewinding release button. When the film has been
completely rewound the rewinding crank will suddenly become lighter to turn.
Then open the back cover and take out the cartridge carefully.
ALWAYS AVOID DIRECT SUNLIGHT WHEN OPENING THE COVER. Do not open the
cover until the film has been completely rewound.
YOUR RICOH FLASH UNIT
The flash unit is your answer to taking pictures at night, especially of
subjects that are in motion, to taking a portrait against the light, and to
softening the too-sharp contrast in strong sunlight.
We have flash bulbs of various kinds, such as F. M, or electronic flash. On
an ordinary camera there is no course but to choose the kind of bulb for which
the synchro mechanism is made. The RICOH 500, however, is provided with M and X
settings, making it possible to use all kinds of flash bulbs. Set the synchro
setting ring to M or X, according to the kind of flash bulb as indicated on the
wrapper or box, and you will be ensured of your flash light and shutter opening
fully synchronizing from 1 to 1/500, according to the conditions indicated in
the following table, which illustrates the relation between the kind of bulb and
synchro setting.
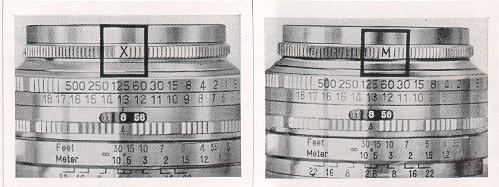
NOTE
Synchro mechanism operates as X setting when using the self timer
There are many kinds of flash unit; but the RICOH 500 is provided with a
CORDLESS FLASH CONTACT on the ACCESSORY SHOE, so that if you slip on your RICOH
FLASH UNIT BC-605, it will save you the trouble of attaching a flash cord on to
the flash terminal. No dangling cord, and no failure in charging the bulb
through faulty connection is your gift that comes to you in your RICOH
FLASH UNIT BC-605.
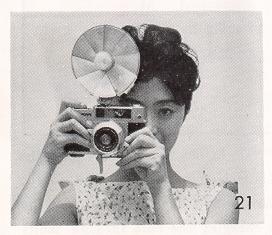
In taking pictures with haste, it is vital that the exposure is correct.
Otherwise, underexposure or overexposure will result, the danger being even
greater in most cases than in day light conditions where the light is even.
Any variation in the distance from the source of flash light to the subject
results in a proportionate and great difference in the amount of light. Thus, it
is extremely important to set the correct f-stop according to the distance from
the subject.
(Webmaster: It looks like you can use any "auto" electronic flash unit.
Set the lens flash choice to "X" and the F-stop to what the flash states
depending on the film used. Since this is a non SLR camera, any shutter speed
above 1/30 will work with the flash unit since the shutter exposes all of the
film at any instant. This is different from SLR cameras where 1/60 or 1/125 is
the top speed due to the fact that the film is exposed as a slit across the
film. All this other stuff is about the old flash bulbs no longer used.)
To put it simply, granting that different types of bulb differ in their
luminosity, the closer the subject the smaller must the
opening be and vice versa.
With any packet of flash bulbs you buy you will find a table of what are
technically referred to as GUIDE NUMBERS. If you divide the number which fits
your case by the distance-in-feet, the figure you get shows the f stop
opening which is required for your shot. For example, if your film has ASA 100
Exposure Index, you look for your GUIDE NUMBER that is given for this Index.
If you wish to find out the distance in feet for a given f stop, divide the
GUIDE NUMBER by the number that stands for the f stop.
ACCESSORIES
A number of accessories for this camera have already been mentioned in the
foregoing pages, besides which we are happy to offer you the following,
manufactured specially by our firm.
RICOH LENS HOOD (43 mm)
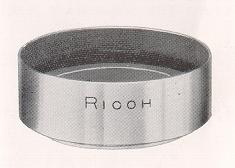
Our lens hood does the important job of cutting off unnecessary light or
glare that may damage a picture. It is for this reason that the inner side of
the hood is coated with black. Our hood is handsomely made and fits snugly into
an equally handsome leather case.
RICOH FILTER (34 mm)
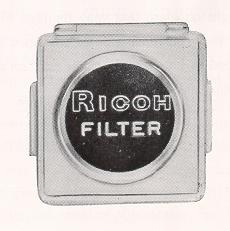
Your Ricoh filters ensure the taking of pictures with the right tone and
texture, and are a NECESSARY PART of your picture taking equipment. The most
greatly used of the various filters are the UV and Y ~ and Y
2 filters. The yellow filters help to bring out red and yellow tints and
to tone down the blues, so that clouds are made to stand out against a filter
darkened sky. The degree to which a sky may be darkened will depend on the
darkness of the filter and amount of exposure. When no filter is used, the sky
is more than likely to come out flat.
THE CARE OF THE CAMERA
The camera is a precision built instrument that requires the greatest care
and attention.
1. The lens is the life of the camera, so that it requires the most
delicate handling. Consequently, do not touch it unless it is dusty or
smudged. In removing dust or grit do not wipe it, but first use a soft lens
brush and, if necessary, wipe gently with a silicone cloth. When a camera is
brought into a warm place from a cold place suddenly, it will get clouded.
So wait until the camera and lens temperature reaches the room temperature,
and the lens will clear up.
2. When you have taken pictures by the seaside or on wet weather, see that it
is clean before putting your camera away, and wipe it, if necessary, with a
piece of soft cloth.
3. Do not leave the camera with the shutter wound over a period of days, as
this will weaken the shutter spring.
4. Place the synchro setting at X except when using M class flash bulb. This
is important in preserving the life of the camera.
5. When putting the camera in the case, set the distance at infinity.
6. In order to keep the camera from getting damaged through exposure to moist
atmosphere, put it in a box and in a dry, cool place. A chemical substance that
will keep the air dry may be obtained.