If you find this manual
useful,
how about a donation of $3 to:
M. Butkus, 29 Lake Ave.,
High Bridge, NJ 08829-1701
and send your
e-mail address
so I can thank you.
Most other places would charge
you $7.50 for a electronic copy
or $18.00 for a hard to read Xerox copy.
This will help me to continue to host this site,
buy new manuals,
and pay their shipping costs.
It'll make you feel better, won't
it ?
If you use PayPal.. use the link below
Venmo
@mike-butkus-camera Ph. 2083
<<<
IF YOU WOULD LIKE THIS OR ANY PDF FILE
PRINTED, BOUND AND MAILED TO YOU,
SEE THIS OUTSIDE COMPANY'S OFFER >>>
CLICK HERE FOR A PRAKTICA BX20 PDF
SCANNED FROM MANUAL
Praktica BX20 English
Praktica BX20 Bedienungsanleitung
Praktica BX20 instrucciones para el uso
CLICK HERE TO GO TO PDF FILE OF
NEWER
PRAKTICA BX20S
CLICK HERE TO CONTINUE TO
Praktica BX20s Gebruiksanwijzing
Praktica BX20s instrucciones para el
uso
Praktica BX20s instrucoes de manuseio

|
Introduction
Technical features
Guide to individual parts
Preparing to take pictures
Inserting the battery
Checking the battery
Opening the back
Inserting the film
Closing the back
Preparing to shoot
Setting the film speed
Taking pictures
Automatic shutter speed control
Preselecting the aperture
Automatic mode, indication
|
Shutter release
Locking the metered value
Exposure compensation
Semi-automatic mod e
Holding the camera
Flash photography
Changing the lens
Focusing
Depth-of-field indication
Infrared photography
Release button
Locking the release button
Self-timer
Changing the film
Care of the camera
|
With the PRAKTICA BX 20 you have bought a high-quality 35 mm SLR camera
that combines ease of operation with a versatility ideal for any kind of
creative work.
The shutter speeds are automatically controlled within the range from 1/1000 s
to 40 s.(seconds)
In addition, the camera's microelectronics permit the use of fixed shutter
speeds between 1/1000s and 1s as well as unlimited shutter speeds with the B
setting. TTL light metering with open aperture and, thus brightest
viewfinder image is made possible by the electronic transfer of the aperture
setting from the lens to the camera.
The PRAKTICA BX 20 is also equipped with a system which, if a dedicated computerized flash unit is used on the camera, measures the light coming in
from the flash unit, makes a split second evaluation, and closes the shutter as soon as the right amount of light has struck the film. It goes without
saying that conventional electronic flash units can be plugged onto the camera as well. Manual corrections of the automatically controlled shutter
speeds are possible for the purpose of deliberate overexposures and underexposures.
LEDs on both sides of the clear and bright viewfinder image indicate the shutter speed to be expected, limits, mode of operation (automatic or
semi-automatic), memory function, exposure compensation and flash readiness including the O.K. signal for dedicated computerized flash units. The
bottom of the finder image provides information on the preselected aperture and whether the shutter is wound or not. The PRAKTICA BX 20 accepts an
auto winder and the wide range of PRAKTICA accessories.
FEATURES
· SRL camera for a frame size of 24mm x 36mm open-aperture TTL metering system with
electronic aperture setting transfer
· automatic electronic shutter speed control (stepless) in the range from 1/1000 s to 40 s
· change-over from automatic to semi-automatic mode possible; fixed speed range from 1/1000 s to 1 s
· electronic TTL metering system for flashes and correct dosage of light for dedicated computerized flash unit,
X synchronization (approx. 1/100s)
· flash readiness indication (and "flash O.K."
signal) in viewfinder image
· LED information on expected shutter speed in viewfinder
· indication of overexposure or underexposure
· aperture setting displayed at bottom of viewfinder image
· shutter "winding" information
· manual exposure compensation of + 2 exposure
factors, indication of compensation by red LED at,, + a
· locking of metered value and indication there of
by green LED at "AEL" - (automatic exposure lock)
· self-timer (approx. 10 s) with starting button
serves also as stop-down lever for depth-of-field checking
· focusing system comprises Fresnel lens with
innovative diagonal triple wedge, microprism ring and ground glass ring
· viewfinder image shows approx. 95 per cent of
picture sides
· PRAKTICA bayonet (flange focal length 44.4mm
internal diameter 48.5 mm)
· connection for motor winder
· film information holder on camera back
· indication of battery condition in viewfinder
· power source: 6V primary battery
(e. g. PX281Mallory)
(Webmaster: a note stuck inside the manual
states 4-LR44, 4-SR44 [Silver Oxide batteries - longer lasting]
or PX28
battery [basically two SR-44 batteries in one cell] also a note about a new
battery holder).
All of these are common batteries available in large
department stores or camera stores.
· silicon photo element as light sensor
· metering and control range: 0-17 EV at 100ASA and
aperture 1.4
· dimensions of body:141mm x 88mm x 49mm
· weight of body without battery: 510 g
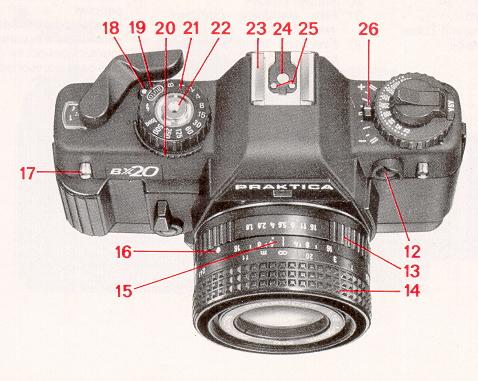
Guide to individual of parts
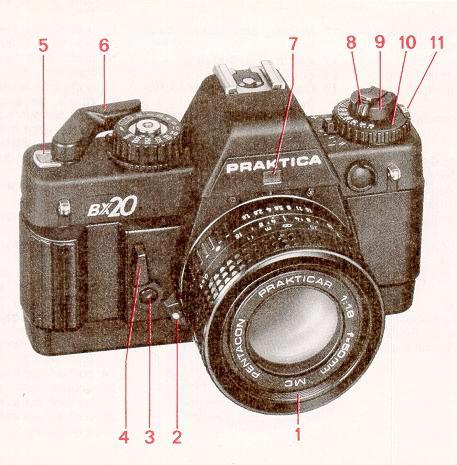 |
1. Filter thread
2. Unlocking key
3. Self-timer release
4. Self-timer setting /ever (anticlockwise) stop-down lever for
depth-of-field checking
5. Frame counter
6. Winding lever
7. Window reflecting aperture setting into viewfinder
8. Rewind crank
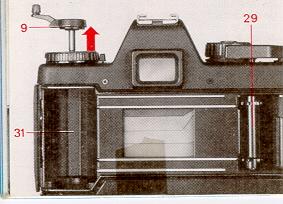
9. Rewind button
10. Film speed dial
11. Unlocking key for film speed dial
|
|
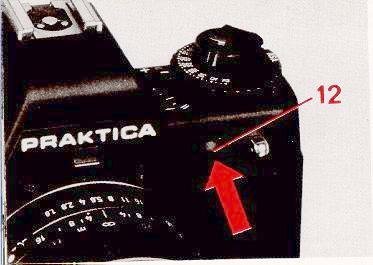
12. Memory and battery check key
13. Aperture setting ring
14. Focusing ring
15. Depth-of-field scale and infrared index
16. Lens positioning mark
17. Lug for carrying strap
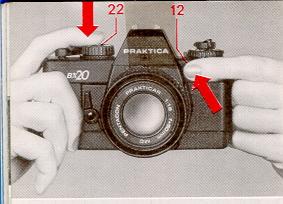
18. Rewind release
19. Index for automatic mode
20. Shutter release lock
21. Shutter speed dial for "auto" and fixed shutter speeds
22. Shutter release with socket for cable release
|
 |
 |
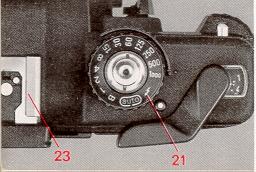
23. Hot shoe with center contact
24. Center contact
25. Coupling point for computerized flash unit
26. Indicator of exposure compensation with index
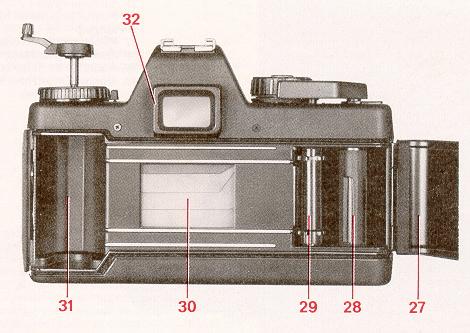
27. Camera back
28. Film take-up spool
29. Film sprocket
30. Shutter blades
31. Film cartridge compartment
32. Eyepiece with accessory holder
|
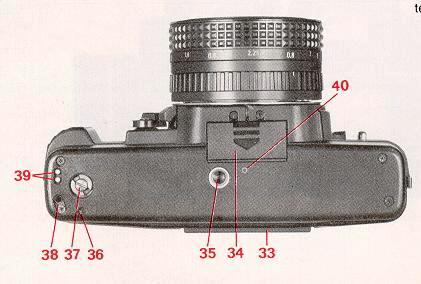 |
33. Memo holder
34. Lid of battery compartment
35. Tripod socket
36. Guide way for motor winder
37. Coupling for motor winder
38. Catch for motor winder
39. Contacts for motor winder
40. Mark (for insertion of battery compartment lid)
|
Inserting the batteries
A 6 V source is required to power the whole electronic system. It may be an
alkali-manganese, silver oxide (SR) or lithium battery.
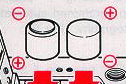 |
Webmaster: On the left is an
example of two PX-28 batteries from a Ricoh manual. This is how the
batteries should go looking down at the camera. Not sure where the
positive marks are on the body so this could be backwards. If using
4-SR44 batteries you should have two bumps going in one direction and two
in the opposite. |
Four button cells (e. g. LR 44) in a battery case (order no. 961 363) will
also do. (the bumps on the batteries are the negative sides, the two bumps
should go in the same direction)
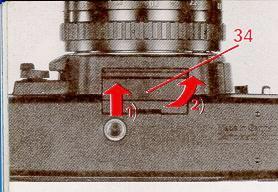
Under normal conditions, a fresh battery lasts for about 2 years. To insert
the battery, push the battery compartment lid (34) in the direction of the
arrow and swivel it out Wipe the contacts in the battery compartment and those
of the fresh battery with a dry cloth. Press the plus pole of the battery
against the spring contact (polarity marks in the battery compartment) and tip
the battery in. Close the lid and let it click in.
The contacts of the battery and in the compartment should be
checked from time to time, and cleaned if necessary. Low temperatures have an
adverse effect on the battery; it should therefore be suitably protected in
cold weather.
If the camera is not used for an extended period, the battery should be
removed.
Checking the battery
The shutter must be wound. Press shutter release (22) and then memory key
(12). If the LED indication is bright the battery still has a sufficient power
reserve. When the battery is spent, the LEDs on the right side of the
viewfinder image will go out. The battery condition can not be checked in the
B and  setting.
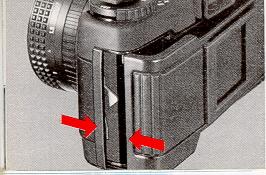
Opening the back
Pull the rewind button (18) up as far as it will go to unlock the back Open
the back completely the frame counter (5) will automatically return to the
starting position.
Inserting the film
Before the film is inserted the shutter speed dial should be set to a fast
fixed shutter as otherwise a slow shutter speed may be formed in the "auto"
mode. The winding lever is blocked until the shutter has completed operation.
Do not use force! An undesired slow shutter speed that may have formed
in the "auto " mode can be cut short by changing from "auto" to B. Such a slow
speed is also obtained in the "auto" mode when the shutter is released without
a lens being connected to the camera.
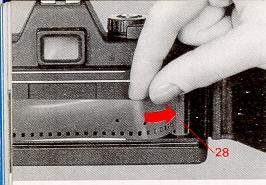
Put the film cartridge into the cartridge compartment (31).
Press the rewind button (9) back in all the way; turning it if necessary.
Insert the film leader at least 1 cm into the slit in the take-up spool (28).
Carefully operate the winding lever until the teeth of the film sprocket (29)
engage in the film perforation.. Swing the winding lever fully out and let it
return. Release the shutter.
Closing the back
Press the
middle of the lock side of the back against the camera body until the lock is
heard to engage.
Preparing to shoot
The winding lever (6) may be swung out a little way without starting the
winding procedure. This readiness position increases the handling reliability
when taking rapid picture sequences. Swing the winding lever as far as it will
go, return and press the shutter release (22). Repeat the procedure and
continue to do so until the automatic frame counter (5) indicates frame 1.
Information on whether the shutter is wound or not is given at the bottom of
the viewfinder image:
* aperture reflected into viewfinder appears red -shutter is not wound
* aperture reflected into viewfinder is colorless -shutter is wound
Proper film advance can be checked by making sure the rewind button (9)
rotates as the winding lever (6) is moved.
If you shoot with a winder attached to the camera refer to the instructions
for use of the PRAKTICA winder made by VEB PENTAGON DRESDEM
We shad not be liable to you for damage caused by using a winder of different
make.
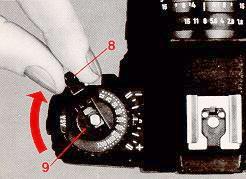
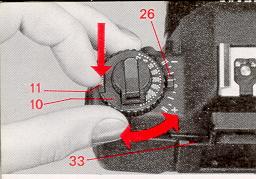
Setting the film speed
Press the unlocking key (11) and turn the film speed dial (10) until the film
speed given on the pack (ASA value) matches the index of the compensation
indicator (26). The flap from the film pack can be put into the memo holder
(33) as an additional aid to the memory.
 |
Automatic shutter speed control
In the "auto" mode, the PRAKTICA BX20cperates automatically in a stepless shutter speed range from 1/1000 s to 40s. The shutter speed is
electronically controlled in consideration of the lighting conditions, the preselected aperture and the film speed.
LEDs at the edge of the viewfinder indicate the controlled shutter speed.
Should the shutter speed range be exceeded, OVER or UNDER is indicated. |
The TTL metering system automatically takes into account all factors influencing the exposure such as focal length of the lens, filters and
extensions.
If lenses with the 42x1 PRAKTICA thread are used with an adapter, light metering is automatic at working aperture.
Preselecting the aperture
The desired aperture is set against the mark on the lens by fuming the aperture setting ring (13). The set aperture is displayed at the bottom of the
viewfinder image.
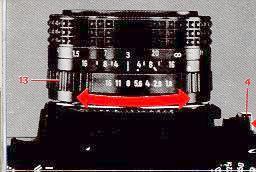 |
If lever (4) is moved in the direction of the arrow, the diaphragm is stopped down to the aperture set, and the
depth of field can be assessed in the viewfinder. |
Automatic mode, indication
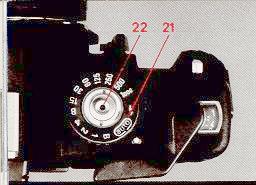 |
Set the shutter speed dial (21) to "auto". The electronics are switched on by slight pressure on the shutter
release (22). In the viewfinder image the shutter speed calculated by the automatic system is shown by an LED display. If it appears unsuitable for
the subject, it can be corrected by selecting another aperture. LEDs are allotted to selected speeds between 1/1000 s and 8 s, with intermediate
values being indicated by the simultaneous lighting of two adjacent diodes. |
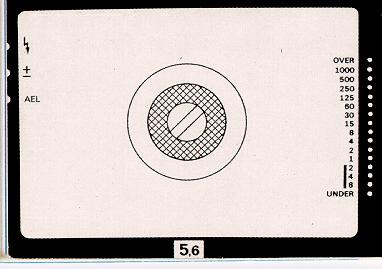 |
Shutter speeds between 8s and 40s are indicated by the permanent lighting of the UNDER LED, while speeds
outside the 1/1000 s to 40 s range are indicated by the flashing of the LED at OVER or UNDER. In this case the shutter is set for 1/1000 s or 40
s. If shutter speeds of 1/15 s and slower are formed, the use of a tripod or other steady surface is recommended. |
Shutter release
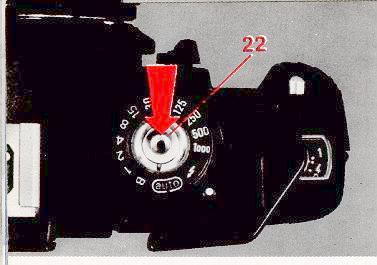 |
After shutter speed has been checked
in the viewfinder the shutter is operated by fully depressing the shutter
release (22). When pressure is removed from the shutter release the
electronics are automatically switched off.
With slow shutter speeds the removal of pressure from the shutter release does not affect the exposure procedure. In this case the electronics are
switched off when the shutter cycle has been completed. |
If the cycle needs to be broken off prematurely with a very long shutter speed (e. g. after an accidental shutter release), the shutter speed dial (21)
should briefly be turned to B.
Locking the metered value (exposure lock - AEL)
 |
If the subject features extreme contrasts (e. g. people wearing dark clothes in sunlit snow or a light-colored object in
front of a dark background), the exposure value can be determined by individual metering of the most important element in the picture from
close up. The value obtained in the close-up measurement is stored, and the image section can then be changed without another shutter speed being set. |
To store the metered value first depress the shutter release (22) slightly (camera is wound) to initiate the metering process, and then briefly press the
memory button (12) to lock in the metered value (LED at "AEL" is lit).
No new measurement is made before the shutter is released, and the shutter speed will correspond to the locked value. The locked value is erased when
pressure is removed from the shutter release and the electronics are switched off.
Exposure compensation
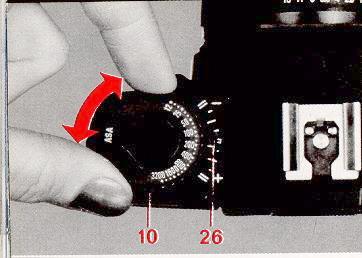 |
Another way of influencing the exposure individually is by using the exposure compensation system (10,
26). Such compensation is necessary when the character of the object varies greatly the norm, e. g. with dark objects in front of a light
background (+1, +2) and with bright objects in front of a very dark background ( - 1, - 2). |
Lift the film speed dial (10) and turn the exposure compensation indicator
(26) to the desired value.
An LED (+/-) on the left side of the viewfinder image indicates that
the shutter speed is overridden. Starting from the initial position the
shutter speed is reduced in the ,,auto" mode by 1 or 2 exposure factors when
the dial is set to + 1 or +2, respectively. The speed is correspondingly
increased when the dial is set to -1 or -2. The dial can be set to half
factors. At the limits of the film speed range - 12 ASA and 3200 ASA
compensation by two factors is also possible.
However, the compensation cannot extend the shutter speed range beyond the
speeds of 111000 s and 40 s. Remember to return the dial to the neutral
initial position after exposure-compensated shots. The LED (+) will then go
out.
Semi-automatic mode
If you want to
shoot at a particular shutter speed, for reproductions or scientific work for
example, set the PRAKTICA BX 20 to semi-automatic mode. Fixed shutter speeds
from 1 s to 1/1 000 s and the B setting for any length of time are available.
Select the speed you want using the shutter speed dial (21) this automatically
changes the camera operation to semi-automat/c mode. As with automatic shutter
speed control, the camera's electronics are switched on by gentle pressure on
the shutter release.
The shutter speed can again be checked using the LEDs in the viewfinder: While
the LED corresponding to the set shutter speed flashes, the shutter speed
required by the lighting conditions, the film speed and the selected aperture
is shown at the same time by a steadily lit LED (two adjacent LEDs light up
for intermediate speeds).
To match the two, alter the aperture or shutter speed until the LED is lit
steadily. There is no LED display for the B setting. The fixed shutter speeds
will not be changed by the described correction procedure.
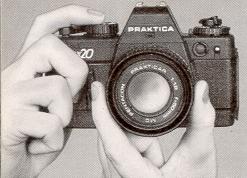
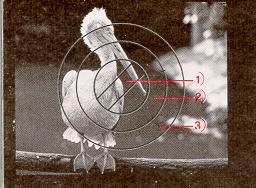
Holding the camera
The illustration shows the
best position in which to hold the camera. It should be held steadily and
tightly, the elbows should be supported against the body. In this way blur
free pictures will be achieved.
Flash photography
If the available light is
insufficient for handheld shots (e. g. indoors) or if the subject has to be
additionally brightened up, flash should be used. All fitting electronic flash
units can be used, computerized or not.
Just push the flash unit onto the hot shoe (23); the electrical connection is
thus made.
For electronic flash without computer control set the shutter speed dial (21)
to  .
The speed will then be 1/100s.
.
The speed will then be 1/100s.
If a dedicated computerized flash unit is pushed onto the hot shoe and the
shutter speed dial (21) set to "auto", an LED at the viewfinder edge ( )
will signal flash readiness, and the "auto" indication will go out. Flash
readiness will also be indicated in the case of a computerized flash unit when
the dial is set to ..
Correct exposure is guaranteed by the camera's TTL light metering system: the
reflected flash light passes through the lens, is evaluated by the camera
computer, and the flash is cut short at the right moment via the cableless hot
shoe connection - genuine automatic TTL metering also for flashes.
The "flash O.K." signal (film is correctly exposed) is derived from
the flash readiness indication. If the LED at lights
up again immediately after exposure, the correct amount of light has struck
the film. The O.K. signal of the flash unit should be observed in cases
deviating from the norm. Flash readiness is retained even if the memory key is
pressed and the green LED at "AEL" signals the locking of the metered value.
Exposure compensation signaled by the LED at (+ / -), is taken into account by
the automatic flash system.
To avoid incorrect exposures with flash when the surrounding light is bright,
check by switching off the computerized flash unit that the shutter speed
corresponding to the surrounding light is slower than 1/125 s. See also the
operating instructions for the flash unit for detailed information.
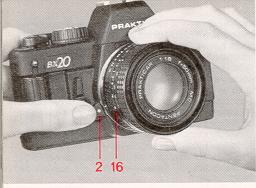
Changing the lens
Press the unlocking key (2)
and turn the lens anticlockwise as far as it will go. Remove the lens from me
camera.
Insert the PRAKTICA lens in such a way that the red marks (16 and 2) on the
camera and lens are opposite each other. Press the lens against the camera
body and turn clockwise until the locking pin is heard to engage.
By using the PRAKTICA adapter all original PRAKTICA lenses with the M 42x 1
thread can be connected. Lenses of other makes with the M 42x 1 thread must be
suitable for PRAKTICA cameras and equipped for metering at working aperture.
The PRAKTICA BX 20 also works automatically with screw-thread lenses, the only
difference being that the light metering is made at working aperture.
Focusing
Focusing is possible with the triple
wedge system, the microprism ring or the ground glass ring.
1. Triple wedge
The wedge
system allows highly accurate focusing. Optimum sharpness is achieved when the
contours and lines flow naturally. Incorrectly aligned edges indicate that the
image is out of focus.
2. Microprism ring
The
image is correctly focused when the image inside the grid is c/ear and flicker
free.
3. Ground glass ring
Especially useful in photomacrography and photomicrography and when using
lenses with a small relative aperture (greater than 4). The image must a p
pear clear and sharp in the ground glass ring.
Depth-of-field indication
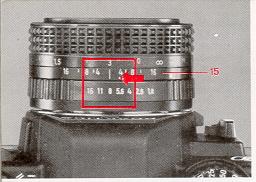 |
The limits of the depth of field for
the selected aperture can be read off from the depth-of-field scale (15)
on me lens. Example: distance 3 m, aperture 8 - depth of field ranges from
around 2 m to 5 m. |
Infrared photography
Infrared photography requires a slight correction to the focusing: match the
distance determined in focusing with the infrared index (see arrow) on the
lens.
Release button
 |
For ease of operation several
functions have been combined in the shutter release (22). When the camera
is wound, gentle depression of the shutter release until pressure is felt
switches on the automatic system and the LEDs for shutter speeds or flash
readiness (with special flash units). Further pressure will release the
shutter. |
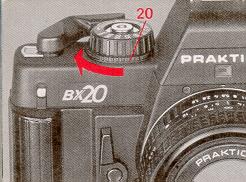
Locking the release button
Accidental
shutter release and unnecessary use of power as a result of unintentional
pressing of the shutter release button when the camera is wound or not can be
avoided by locking the release button.
To this end, the lock (20) below the shutter speed dial is fumed in the
direction of the arrow. To unlock turn in the opposite direction.
Self-timer
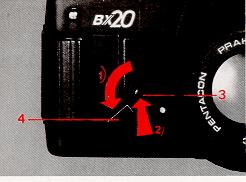 |
Advance the shutter, swing the
self-timer winding lever (4) in the direction of the arrow 1 as far as it
will go, and release by pressing starting button (3) as shown by arrow 2.
The delay period is approximately 10 s. Do not wind the shutter while the
delay mechanism is running.
|
If a motor winder is attached to the camera and switched on, several frames
can be exposed during the delay period with fast shutter speeds. If this is
not desired, the motor winder should be switched off.
To avoid incorrect metering in the automatic mode the eyepiece should be
covered with the eyepiece coyer supplied.
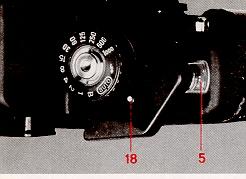
Changing the film
The frame counter (5)
indicates the number of frames which have already been exposed on a film. If
all the frames on a film have been exposed (red mark at 20 or 36), change the
film.
Press in the rewind release (18) until it locks, fold out the rewind crank (8)
and turn in the direction of the arrow until increased resistance followed by
easy movement indicate that the film has been fully rewound. Pull the rewind
button (9) all the way up to unlock the back. The film cartridge can now be
removed. Do not change the film in bright sunlight
Attention! If more frames are exposed than are indicated on the film pack,
it is possible that the winding lever cannot be swung all the way. Do not use
force. Rewind the film as described above, then swing the winding lever fully
out.
CARE OF THE CAMERA
· Protect the camera from impact, dust and moisture.
· Clean the cartridge and spool compartments, the film track and the back from
time to time with a soft brush.
· Do not use organic solvents such as spirit or varnish thinner to clean the
camera.
· Do not expose the camera or lens to aggressive vapors.
· Remove fingerprints from the lens and eyepiece surfaces with lens cleaning
paper.
· Do not touch the mirror, field lens or shutter blades. Such contamination
can only be removed by a service workshop.
· Use an optical brush for dust removal, or blow out
· Do not expose the camera to very high or low temperatures for lengthy
periods. Avoid, for example, placing the camera in a car window in direct
sunlight
· The camera should be suitably protected from extreme cold.
· When using the camera near the sea or on the beach, protect it from salt
water, spray and sand.
· Avoid sudden changes in temperature. These may lead to the formation of
condensation and thus to corrosion damage.
· Never attempt to make your own repairs to the camera. Consult a service
workshop where necessary.
THIS IS NOTED ON AN EXTRA PAGE ADDED TO THE MANUAL
Your PRAKTICA BX 20 has an improved battery compartment lid.
Please note the following when inserting the battery:
Push the lid (34) in the (changed) direction of the arrow and open it.
Close the lid after battery insertion and lock it.
Please note carefully all the instructions contained in this booklet.
Incorrect handling of your camera can lead to damage not covered by our
guarantee.
Further development of the PRAKTICA BX 20 may result in some aspects of the
camera deviating slightly from those given here.