If you find this manual
useful,
how about a donation of $3 to:
M. Butkus, 29 Lake Ave.,
High Bridge, NJ 08829-1701
and send your
e-mail address
so I can thank you.
Most other places would charge
you $7.50 for a electronic copy
or $18.00 for a hard to read Xerox copy.
This will help me to continue to host this site,
buy new manuals,
and pay their shipping costs.
It'll make you feel better, won't
it ?
If you use Pay Pal, use the link below.
se the above address for a
check, M.O. or cash.
Click
here for a PETRI V6 PDF
version made from this HTML file
Revue V6 Bedienungsanleitung
MAJOR SPECIFICATIONS OF PETRI FLEX V6
Type: Single Lens Reflex 35mm camera with fully automatic
diaphragm and quick return mirror.
Film size: 35 mm film 120 or 36 exposures)
Picture size: 24mmX36mm
Standard Lens: " PETRI " 55 mm/f 1.8 ( or f 21 color
corrected lens.
Speeds: B. 1/2, 1/4,1;8, 1/15, 1/30, X, 1/60,1/125 and 1/500
second. Single pivot non-rotating shutter dial
Viewfinder: Penta Prism viewfinder with built-in "
Micromic-Lens Focusing".
Film transport: Rapid, single stroke (180°) lever transport
which advances the film and winds the shutter simultaneously.
Synchronization: FP, M and X automatic setting
Interchangeable Lens: Bayonet type Interchangeable Lenses can
be attached to the camera
Others: Automatic Resetting Film Number Indicator with
crank type film rewind system and built-in self timer
INDEX
MAJOR SPECIFICATIONS OF PETRI FLEX V6 2
DESCRIPTION OF PARTS , 4
FILM LOADING ..... ... .... .. ... ~ 6
VIEWFINDER AND FOCUSING 8
USING THE FULLY AUTOMATIC & MANUAL DIAPHRAGM OF THE LENS 9
USING THE SELFTIMER 10
FLASH PHOTOGRAPHY 10
HOW TO HOLD YOUR PETRI FLEX V6 CAMERA 11
FILM UNLOADING . . ... . . . ......................... 12
INTERCHANGING THE LENS 13
HOW TO USE THE PETRI CdS EXPOSURE METER 14
INFRA-RED PHOTOGRAPHY ............ 17
PETRI FILTERS ...... ..... 17
PETRI INTERCHANGEABLE LENSES 18
ACCESSORIES 1 9
DESCRIPTION OF PARTS
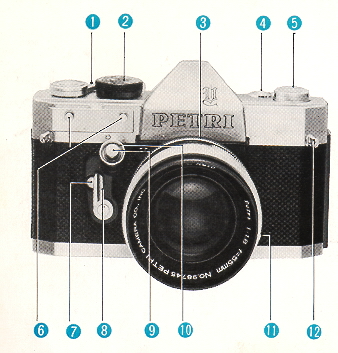 |
(1) Film Advance Lever
(2) Speed Dial
(3) Bayonet Release Ring for Removing Lens
(4) Film Counter
(5) Film Rewind Crank
(6) Shoe Pins for CdS Meter
(7) Self timer Release Button
(8) Self timer Lever
(9) Shutter Release Button
|
 |
(10) thread mount for Cable Release
(11) Flash Socket
(12) Neck Strap Loop(13) Viewfinder
(14) Sprocket
(15) Take-up Spool
(16) Lock for Opening Camera Back
(17) Film Cassette Chamber
(18) Tripod Bush
(19) Film Rewind Button
|
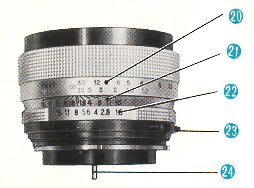 |
(20) Distance Scale
(21) Depth of Field Indicator
(22) Diaphragm Scale
(23) AUTO & MANUAL Diaphragm Switch
(24) Diaphragm Pin |
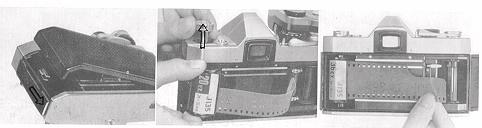
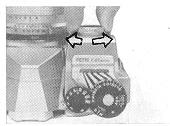
FILM LOADING
 |
|
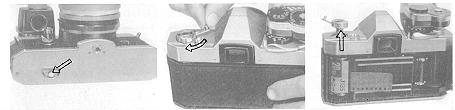
Opening the Camera Back
Pull down the lever with your thumbnail to open the Camera Back. At the same
time, the Film Number Indicator automatically returns to zero.
Pulling out the Knob
Pull out the FILM REWIND KNOB on the top of camera. This is to allow the film
cassette to be put into the cassette chamber. |
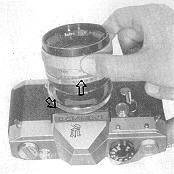
Slip the film end into any slit on the Take-up Spool and slide it
down toward the bottom of the camera body and check that the film perforation is
properly engaged with the tooth of camera sprocket.
Advance the Film Advance Lever
 |
|
Advance the Film Advance Lever a little to see if the film is fastened round
the Take-up Spool, before closing camera back.
Closing the Camera Back
The Camera Back will automatically be closed by light pressure.
Release Shutter Release Button and advance the Film Advance Lever.
Repeat this action twice, and you are ready to take your first picture. |
VIEWFINDER AND FOCUSING
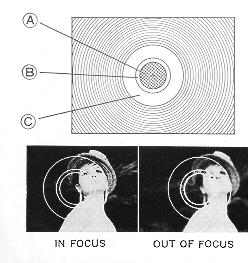 |
The perfect combination of Fresnel Screen and Condenser Lens
used in the viewing system of every Petri Flex V6 is the result of Petri's
highly advanced technical and engineering ability. The precision focusing
elements in the viewing system consist of a group of micro-lenses as shown
in the center of the picture. As you look through the micro-lens area (A) in
the viewfinder, you can see the subject clearly, ONLY w'hen it is correctly
focused.
Rotating the focusing ring you will notice the appearance of
something like a mesh of a net in the center of the viewfinder. This
reticulation is caused by the flickering of reflected light entering the
camera lens. When the subject is correctly focused the flickering grid fades
away from the micro-lens area. In the second inner circle (B) the subject is
always seen sharp and clear, even when the lens is out of focus. When the
lens is correctly focused the image in the micro-lens area will be as sharp
and clear as that seen in the surrounding circle (C). |
USING THE FULLY AUTOMATIC & MANUAL DIAPHRAGM OF THE LENS

This shows: The mirror moving up, the diaphragm closing to the correct
opening, the film being exposed, the diaphragm opening fully for focusing
and the mirror returning. |
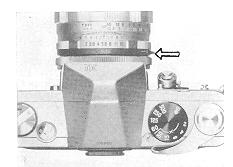 |
*Look at the AUTO & MANUAL Diaphragm Ring. Adjust the ring
until the AUTO mark is on top of the lens barrel--the diaphragm is now set
for FULLY AUTOMATIC operation. This is the normal position for most
circumstances. When you want to release the Automatic Diaphragm, slide the
AUTO & MANUAL Switch in the direction indicated by the arrow on the ring.
|
* When the DIAPHRAGM is set on the AUTO position, it will only stop down to
the set aperture, when the shutter has been released. The AUTO position enables
rapid accurate focusing as the subject in the viewfinder is very bright and the
DEPTH OF FIELD is extremely small. The MANUAL position has the advantage that
you can pre-view the DEPTH OF FIELD and see in the viewfinder the lens zone of
sharpness with any aperture.
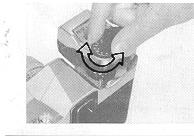
USING THE SELF TIMER
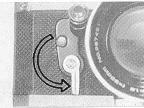 |
Adjust the Self timer Lever in the direction indicated by the arrow in the
illustration (180 degrees) Press the "Self. timer Release Button" and the frame
will be exposed after a delay of approximately 11 seconds.
* Note that the Self timer can be set at in between position so as to shorten
the ret lease time.
* The Self timer can be set either or after advancing the film. |
* All shutter speeds with the exception of the B setting can be used with
Self timer.
* The main use of the Self timer is when the photographer wishes to join a
group, which he is photographing. It can also be useful for Microscopic
photography or when using a long focus length. In all cases the use of tripod is
recommended.
FLASH PHOTOGRAPHY -
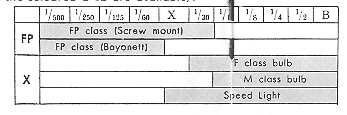
The shutter of the camera is synchronized for use with flash bulbs,
which enables you to take photographs even when the light is extremely poor.
With reference to the picture (see next page) connect the synchronizing cable of
the flash gun to the flash socket on the camera. The flash gun can be attached
to the PETR FLEX V6 by way of the camera accessory shoe. When using F class, M
class and FP class flash bulbs, or Electronic flash shutter speeds must be
selected according to the table shown below. (Speeds within the colored are
available).
HOW TO HOLD YOUR PETRI FLEX V6 CAMERA
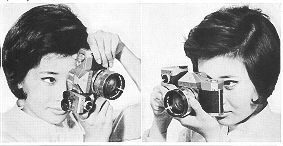 |
Hold the camera body firmly with your right hand and lightly
touch the SHUTTER RELEASE BUTTON with your right index finger. Support the
base of the lens with your left hand and arrange your fingers on the
DISTANCE SCALE so that you can quickly focus. |
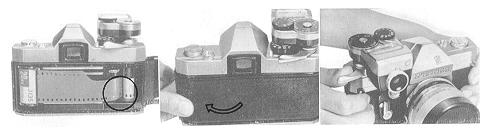
FILM UNLOADING
Rewinding the Film
 |
Pull out the FILM REWIND CRANK.
Press the film REWIND BUTTON located at the bottom of the camera body and
turn the REWIND CRANK in the direction indicated by the arrow. |
Make sure that the film is completely rewound into the cassette before
opening the camera back. This can be checked by advancing the Film Advance Lever
and observing that the Film Rewind Crank does not move in the reverse direction
to that indicated by the arrow.
Removing the Film Pull out the FILM REWIND KNOB and remove the Film
Cassette.
INTERCHANGING THE LENS
 |
Adjust the Lens Mount Ring in an anti clockwise direction
until the red mark appears on top of the lens barrel. The Lens can then be
removed from the camera. When inserting the lens, line up the red dot on the
camera body with the red dot on the lens mount ring and when the lens is in
position firmly, turn the LENS MOUNT RING in a clockwise direction. Before
inserting the lens make sure that the AUTO & MAN UAL control of the lens is
on the " MANUAL" position. A complete range of interchangeable lenses from
35mm wide angle to 400 mm Telephoto is available for your new Petri Flex V6
camera. |
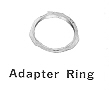 |
A special adapter ring is available for using screw thread
interchangeable lenses. |
PETRI LENS
The standard lens equipped with PETRI FLEX V6 camera is a high speed
PETRI 55 mm four group · six element using Lanthanum flint high refractive index
glass. This PETRI LENS has a high resolving power even at full aperture. It is
equally suitable for black-and-white and color photography.
HOW TO USE THE PETRI CdS EXPOSURE METER
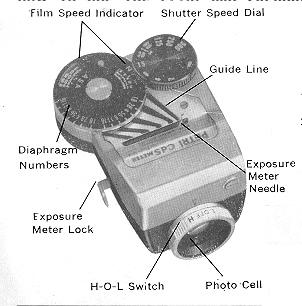 |
Film Speed Indicator Shutter Speed Dial
ASA Exposure Multiples 6,10, 25, · (64), 100, 200, 400, 800, 1600;
3200
DIN Exposure Multiples 9, 11, 15, · (16), 18, ~ (19), 21, 24, 27, 30, 33, 36
Set the Film Speed Dial (ASA or DIN) to the corresponding number of the
film in use.
Slide the Exposure Meter into position between the two-pin holders
located on the right hand side of the camera body while pressing the Meter
Lock by thumb. The metal hooks of the meter engage with the pins. |
Replacing the Mercury Battery
 |
Unscrew the metal cap, which is located at the bottom of the
Meter by turning in an anti-clockwise direction. Replace with a new Mercury
Battery and ensure that the positive (+) is facing the, outside of the
battery compartment.
(webmaster: mercury batteries are not found in the U.S. anymore.
See
this link on a Wein Air replacement battery. |
Mercury Battery suitable for use with this meter is:
Mallory PX-13
Mallory RM625
Eveready E625
National M -1D
Toshiba TH-MC
G.E. 625 (these days you need a Wein Air battery to replace any
mercury battery, they
only last several months, but are pretty cheap)
 |
Rotate the Shutter Speed Dial on the CdS Exposure Meter to
the right or left until a slight click is heard which indicates that it has
engaged with the Shutter peed Dial of the camera. |
 |
Point the camera at the subject. Turn the "H-O-L" Switch to
the " H " position when using under normal daylight conditions. The " L"
position is set when the lighting is poor. (webmaster: The H -
refers to High Light Conditions, O for OFF and L for Low Light Conditions) |
Select the shutter speed, which is indicated by the red line on the left hand
side of the meter. Read off the aperture indicated by the red indicator needle
by following the Guide Lines leading from the indicator needle to the aperture
scale. Transfer this aperture to the diaphragm of the camera lens.
In order to remove the meter, it must be remembered to press in the
lock at the side of the meter.
In order to conserve the life of the Mercury Battery, turn the " H
O-L" switch to the " O" position when the meter is not in use.
DEPTH OF FIELD -
 |
When the lens is correctly focused on a subject, you will notice
that objects closer or farther away become less sharp, until they become
almost completely blurred. However you will observe that there is a
certain distance between the nearest and the farthest away subjects,
which still appear sharp. This zone of sharpness is called the " DEPTH
OF FIELD". |
In order to check the depth of field with the exposure setting in use, observe
the figures engraved on the Depth of Field Indicator on the Lens. These figures
are aperture values and are indicated by black lines spreading out on either
side of the red diamond mark at their center. The black lines point to the
distance scale and indicate the depth of field at different distances according
to the aperture used. For example: When f/16 is selected and the focusing
distance is 6 feet, the depth of field is approximately 4.6 feet to 10 feet. See
the illustration.
INFRARED PHOTOGRAPHY
When taking infra-red pictures, reset the focusing distance to the red line
indicated by the aperture f 1.8 (or f2) on the Depth of Field Scale.
PETRI FILTERS - FILTER FACTOR
* Filters reduce the amount of light entering the lens, and when
using them it is therefore necessary to increase the exposure. This increase is
called the FILTER FACTOR. As shown in the table below, when the Y2 filter is
used, it is necessary to adjust the shutter speed from 1/500 second to 1/250
second, or f/8 to f/5.6.
* The " UV" filter does not have a filter factor and an increase in exposure is
not necessary. This filter therefore also serves a useful purpose in protecting
the lens from dust and damage.
DIAPHRAGM ADJUSTMENT
| Y1 1/2 stop |
UV skylight none |
| Y2 1 stops |
W4 1/2 stop |
| YA3 2 stops |
C4 1/2
stops |
| R1 2 stops |
C8 1 stops |
| POO 1 1/3 stops |
C12 1-1/3 stops |
| P01 2 stops |
85C 1/3 stops |
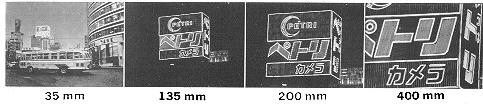
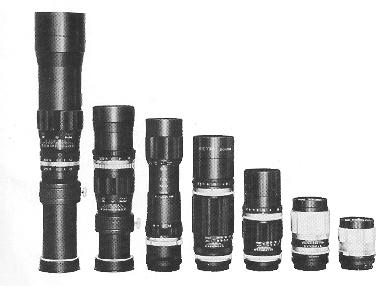
PETRI INTERCHANGEABLE LENSES -
28mm f:3.5 Wide Angle Automatic diaphragm
35mm f :2.8 Wide Angle Automatic diaphragm
135mm f :3.5 Telephoto Automatic diaphragm
135mm f:2.8 Telephoto Pre-set diaphragm
200mm f :3.5 Telephoto Pre-set diaphragm
300mm f: 5.5 Telephoto Pre set diaphragm
400mm f:6.3 Telephoto Preset diaphragm
90mm - 190mm f :5.8 Zoom Lens
80mm - 200mm f:4.5 Zoom Lens
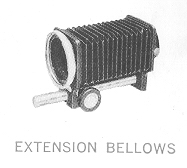
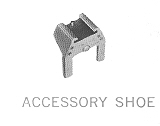
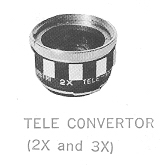
ACCESSORIES