If you find this manual
useful,
how about a donation of $3 to:
M. Butkus, 29 Lake Ave.,
High Bridge, NJ 08829-1701
and send your
e-mail address
so I can thank you.
Most other places would charge
you $7.50 for a electronic copy
or $18.00 for a hard to read Xerox copy.
This will help me to continue to host this site,
buy new manuals,
and pay their shipping costs.
It'll make you feel better, won't
it ?
If you use Pay Pal, use the link below.
Use the above address for a
check, M.O. or cash.
Back to main camera
manual page
CLICK HERE FOR Petri FT EE PDF
MADE DIRECTLY FROM
HTML file below

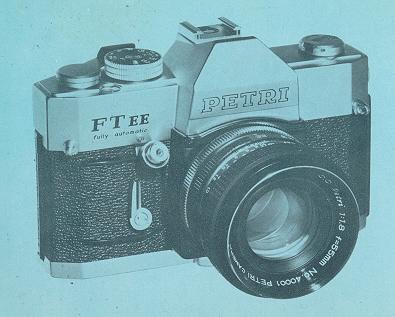
TYPE: Automatic EE camera with Pentaprism
viewfinder and built-in cross coupled CdS exposure meter in open aperture
Through-The-Lens metering system.
Fl LM: 35mm film (20, 36 or 12 exposures)
PICTURE: 24mm x 36mm
LENS: Petri 55mm f/1.8, 6 elements in 4 groups, combination coated, with
fully automatic diaphragm, aperture stops down to f/16.
 |
SHUTTER: Focal plane type with speeds of 1/2, 1/4,
1/8, 1/15, 1/30, 1/60, 1/125,1/250 and 1/500 second and B. Built-in
self-timer.
EXPOSURE SYSTEM: Shutter speed pre-selected system. CdS exposure
meter automatically measures optimum exposure conditions ranging from EV 3 to EV
17 with ASA 100 (DIN 21) film. Geared to the use of the normal lenses. Manual
operation possible.
ASA: 25 to 800 DIN: 15 to 30
|
VIEWFINDER: Pentaprism viewfinder with Micromatic prism focusing
device. The exposure meter needle and diaphragm number visible in the
viewfinder. Under/Over exposure warning marks also visible.
Fl LM TRANSPORT: Single stroke rapid film winding and shutter
winding
LENS MOUNT: Petri bayonet lens mount
SYNCHRONIZATION: FP and X automatic setting
FILTER SIZE: 52mm screw-in type
LENS HOOD SIZE: 54mm slip-on type
DIMENSIONS: 5.5 x 3.5 x 3.4 inches (142 x 93 x 88mm)
WEIGHT: 32 oz. (910 9.)
NOTE: 35mm and 135mm lenses, exclusively designed for the EE
system, available.
INDEX
| MAJOR SPECIFICATION OF PETRI FT EE . . 2
INDEX . . . . . . 3
DESCRIPTION OF PARTS . . . . . . . 4
BATTERY FOR THE CdS EXPOSURE METER . . . . . . . 7
FILM WlND LEVER . . . . . 8
EXPOSURE COUNTER . . . . .8
FILM SPEED (ASA OR DIN) SETTING . . . . . . 9
SHUTTER SPEED DIAL .. . . . . . . . 10
DIAPHRAGM SCALE (APERTURE SETTING) 11
FULLY AUTOMATIC EXPOSURE CONTROL IN THROUGH-THE-LENS SYSTEM . . . . 12
EXPOSURE WARNING MARKS . . . . . 13
MANUAL EXPOSURE CONTROL IN THROUGH-THE-LENS SYSTEM . . . . .15
TO ADJUST THE EXPOSURE CONDITION . . . . . 15
TO CHECK THE DEPTH OF FIELD . . . . . 16
TO TAKE CLOSE-UPS . . . . . 16
TO USE NORMAL LENSES . . . . .16
|
EXPOSURE METER COUPLED RANGE . . . . .17
SHOOTING AGAINST THE LIGHT . . . . . 18
VIEWFINDER AND FOCUSING . . . . . . 19
DEPTH OF FIELD . . . . . . 20
HOW TO READ THE DEPTH OF FIELD SCALE . . . . . . 20
HOW TO HOLD YOUR PETRI FT EE CAMERA . . . . . . .22
Fl LM LOADING . . . . . . .23
FILM UNLOADING . . . . . 25
HOW TO CHANGE YOUR LENS . . . . . . . . 26
F LASH PHOTOGRAPHY . . . . . . . . . 27
HOW TO USE BUILT-IN SELF-TIMER . . . . . . 29
INFRA-R ED PHOTOGRAPHY . . . . . . . 29
MAINTENANCE AND CARE OF YOUR PETRI FT EE . . . . . . 30
PETRI INTERCHANGEABLE LENSES . . . . . . . . 31
PETRI ACCESSORIES . . . . . . . . . . . . . . 33
|
DESCRIPTION OF PARTS
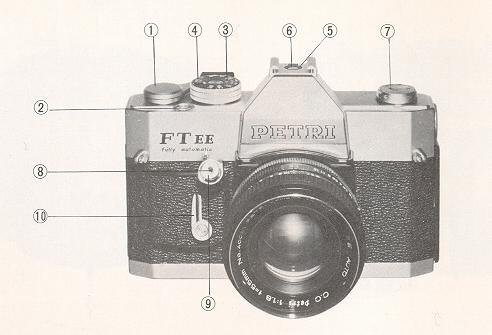 |
(1) Film Advance Lever
(2) Film Counter
(3) Shutter Speed Dial
(4) Film Speed Indicator
(5) Accessory Shoe
(6) Cordless Flash Contact
(7) Film Rewind Crank
(8) Cable Release Socket
(9) Shutter Release Button
(10) Self-timer Lever
|
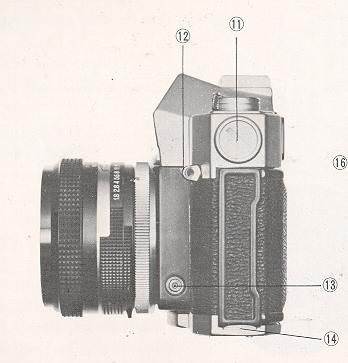 |
(11) Battery Compartment
(12) Neck Strap Loop
(13) Flash Socket
(14) Back Cover Lock
|
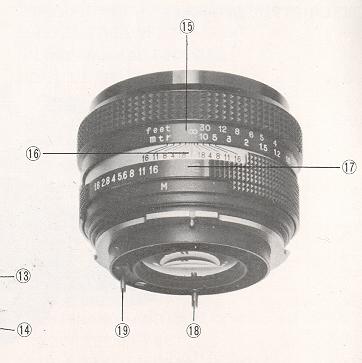 |
(15) Distance Scale
(16) Depth of Field Indicator
(17) Diaphragm Scale
(18) Diaphragm Pin
(19) Aperture Control Pi n
|
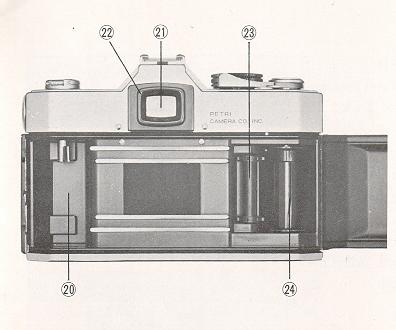 |
(20) Film Cassette Chamber
(21) Viewfinder
(22) Viewfinder Frame
(23) Sprocket
(24) Take-up Spool
|
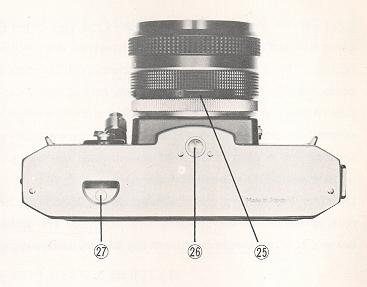 |
(25) Auto and Manual Diaphragm Lever
(26) Tripod Bush
(27) Film Rewind Button
|
BATTERY FOR THE CdS EXPOSURE METER
 |
The built-in CdS exposure meter is powered with a 1.3 volt
mercury battery
(Mallory RM 675R, National M-1C, Toshiba TM-KC or
equivalent). The battery compartment is located on the left-hand side of the
top cover. The exposure meter is switched on by a stroke of the film advance
lever. When the exposure meter needle does not respond to a change of light
conditions, the battery has become exhausted and must be replaced.
Unscrew the battery compartment cover with your finger tips or a coin and
insert a new battery with the plus (+) upward, facing battery compartment
cover, into the battery compartment.
(Mercury batteries are no longer
available. Use Wein Air batteries or adapters that change standard
button batteries to 1.3v.
|
FILM WIND LEVER
 |
When the film wind lever is advanced, the following things happen
simultaneously:
1. The battery switch is turned on and the exposure meter is activated.
2. The film frame is transported to the next unexposed frame.
3. The film counter is advanced.
4. The shutter is wound.
After the shutter is released, the battery circuit is shut off and
unnecessary battery drain is avoided.
|
EXPOSURE COUNTER
The counter is located on top of the camera body. It shows the number of film
frames exposed, and automatically resets to ''S" (for "Start") position when the
back cover is opened. Frames of the 20th and 36th are marked in red to signal
end of the roll, depending on the length of the film used.
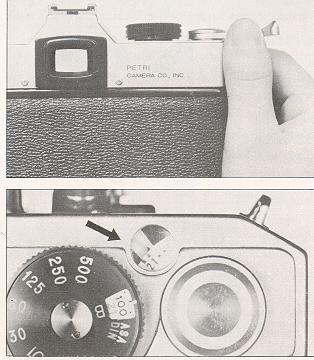
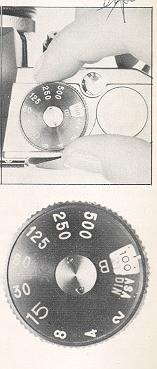
FILM SPEED (ASA OR DIN) SETTING
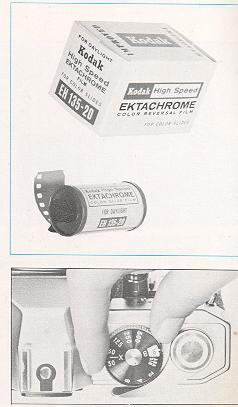 |
After the film has been loaded, be sure to set the ADA or
DIN film speed index specified for the film in use on the film speed scale.
This adjusts the exposure meter for the film being used and an essential
step in getting properly exposed pictures.
To set the film speed, raise the external ring of shutter speed
dial and turn to align the reading equivalent to speed of the film in use
with the index mark. Do not set in between click-stops. If the reading does
not align correctly, the ring will never drop down. The black numbers
represent ADA values and range from ADA 25 to 800, and the red numbers
represent DIN values ranging from DIN 15 to 30. Read the instructions
supplied with the film and set the correct film speed index number. If the
number of the film speed corresponding to that of your film is not available
on the film speed scale, use the closest number and never set between two
settings. For convenience, the positions for intermediate film speeds are
shown only by dots. See the illustration. |
SHUTTER SPEED DIAL
 |
Your camera shutter has a range of speeds covering
sufficiently all the ordinary picture situations. It has the settings of:
1/500, 1/250, 1/125, 1/60, 1/30, 1/15, 1/8, 1/4 and 1/2 second and Bulb.
When the Bulb setting is used, the shutter stays open as long as the shutter
button is being depressed ( f or time exposure).
The settings are represented on the shutter speed dial located right-hand
on top of the camera body. For convenience, only the lower half of the
numbers (250 for 1/250, etc.) and B (for Bulb) are etched on the black
wheel. The shutter speed is set by lining up the appropriate number or B
with the black line on the Pentaprism cover. Do not set the shutter speed
between two click-stops. The shutter speed can be selected either before or
after the shutter has been wound.
For indoor photography, it is recommended to set the shutter at 1/30 or
1/60; for outdoor photography, at 1/125 or 1/250; and for action photography
such as in sports or snap shots it is important to use faster speeds of
1/250 or 1/500 to avoid blurring. The number "15" for 1/15 second is
larger than others and painted in fluorescent. When using the shutter speeds
slower than 1/15 second, it is recommended to use a tripod and a cable
release equipment so as to avoid camera shake. |
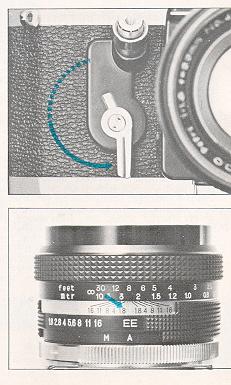
DIAPHRAGM SCALE (APERTURE SETTING)
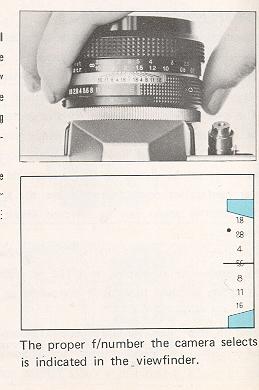 |
The diaphragm scale is located on upper side of the lens barrel and there is
an "EE" mark in red letter on it. When the diaphragm is set at the "EE" mark,
the camera automatically selects the optimum aperture opening corresponding to
the amount of light entering the lens. The proper aperture opening the camera
has selected is indicated by the needle in the viewfinder.
The aperture opening has seven settings, ranging from f/1.8, the maximum
opening, to f/16, the minimum opening. For further information as to the
diaphragm scale, see MANUAL EXPOSURE CONTROL IN THROUGH-THE-LENS SYSTEM (page
15).
|
FULLY AUTOMATIC EXPOSURE CONTROL IN THROUGH-THE-LENS SYSTEM
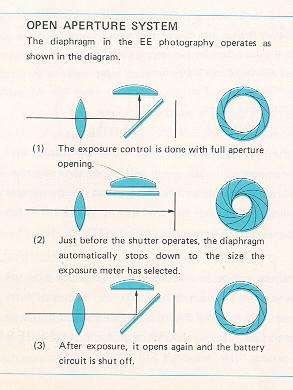 |
Set the aperture at "EE" mark in red letter on the diaphragm scale. This is
all you have to do for exposure control. By setting the aperture at the "EE"
mark, the auto and manual diaphragm lever is automatically switched to the "A"
position (fully automatic operation) even in case it is being set at the "M"
position in green (manual operation). Thus, the exposure control is done with
the full aperture opening and the viewfinder is always seen bright for easy and
accurate focusing. (This is called "Open Aperture System. )
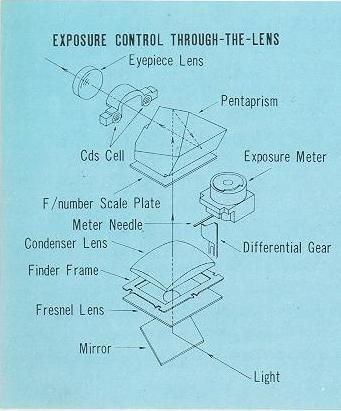
The light entering Through-The-Lens strikes the two CdS cells located on each
side at the base of the Pentaprism (see the diagram) and the CdS cells measure
the average brightness of subjects you frame in the viewfinder. (This is what is
called "Through-The-Lens metering system".)
|
 |
The B (bulb) setting is not usable in the Electric Eye
photography. Switch the diaphragm to the manual operation and set the
diaphragm by turning the diaphragm scale. The stopped-down light
measuring is applicable to the 55mm 1J, standard Electric Eye lens,
but not to other interchangeable Electric Eye lenses.
EXPOSURE WARNING MARKS
In the viewfinder there is a diaphragm scale and on each end of the scale you
will notice the red zone. The red mark above the f/16 is an over-exposure
warning mark, and the one below the f/1.8 is an under-exposure warning mark.
|
 |
(1) OVER-EXPOSURE
When the exposure meter needle swings down to the over-exposure warning mark, it
shows "overexposure". Set the shutter at a faster speed or use an appropriate
filter to absorb the amount of light. (For the proper filter, see page 33.)
(2) UNDER-EXPOSURE
When the exposure meter needle jumps up to the under-exposure warning mark,
it shows "underexposure". Set the shutter at a slower speed. However, at the
slower shutter speed than 1/15 second, it is recommended to use a tripod to
avoid camera shake. When the meter needle won't come down to the diaphragm scale
in the viewfinder, it shows that the amount of light entering the lens is
extremely poor for the normal photography. Use flood illumination or switch to
the flash photography (see FLASH PHOTOGRAPHY at page27). |
IMPORTANT
Make sure that the film speed is set at the correct reading
specified for the film in use. (For further information, see FILM SPEED SETTING
at page 9 .) The automatic exposure control is not applied to the flash
photography.
MANUAL EXPOSURE CONTROL IN THROUGH THE-LENS SYSTEM
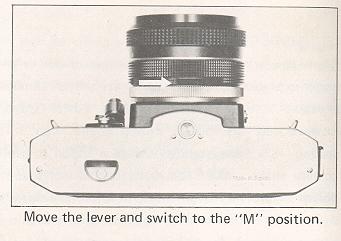 |
There is a "M" (short for Manual) mark in green letter
around the upper side of the lens barrel, and the auto and manual diaphragm
lever (do) which switches the diaphragm to "M" position from "A" (short for
Automatic) position is located on the opposite side of the "M" and "A"
marks. Move the auto and manual diaphragm lever to the left, and you will
see the diaphragm is set at the "M" position. The manual operation is used
in the following photographic situations: |
TO ADJUST THE EXPOSURE CONDITION
When the main subject of the whole picture area you frame in the viewfinder is
extremely dark or bright, it is recommended to adjust the exposure condition so
that the important subject is correctly exposed. Set the exposure at the "EE"
control and read the F number in the viewfinder. Then, swing the auto and manual
diaphragm lever to the left and set the diaphragm on the "M" position. If the
important subject is comparatively dark, set the f/number at a half or one stop
closer to the full aperture than the f/number indicated in the viewfinder when
you have set the exposure at the "EE" control. If the subject is brighter, set
the f/number at a half or one stop closer to the minimum aperture than the
f/number the "EE" control let you know. For example, when you take a portrait
with a back-ground of snow scene or on the beach, you can get a properly exposed
picture by using a half or one stop wider aperture opening than normal.
TO CHECK THE DEPTH OF FIELD
Setting the auto and manual diaphragm lever on the "M" position you can
pre-view the depth of field and see in the viewfinder the lens zone of sharpness
with any aperture.
TO TAKE CLOSE-UPS
When you use a close-up unit such as the extension,
tubes or the extension bellows, the automatic exposure control does not work.
PETRI FT EE, however, has a means of obtaining a proper exposure setting.
Look through the viewfinder, and you will see a small blue dot very close to
the f/2.8 in the diaphragm scale. This is the exposure indication mark.
First, set the diaphragm on the "M" position and select an appropriate shutter
speed.
Then, looking through the viewfinder swing the diaphragm ring as far as the
meter needle comes on to the exposure indication mark in the diaphragm scale.
Through these procedures you can get the optimum exposure setting. If the meter
needle stays above the mark, use a slower shutter speed, and if it stays under
the mark, use a faster speed.
NOTE: In manual exposure control, the diaphragm ring should be swung
between f/1.8, the largest aperture, and f/16, the smallest aperture. If you
have inadvertently swung it to the "EE" mark on the diaphragm scale, the
diaphragm is consequently switched to the position in the automatic exposure
control. So, switch the diaphragm to the "M" position again.
TO USE NORMAL LENS
When you use the normal lenses that are not designed for the "EE"
photography, the automatic exposure control does not work. However, you can
obtain the proper exposure reading 'through the procedures stated in TO TAKE
CLOSE-UPS (Page 16 ). As to the Petri interchangeable lenses designed for the
"EE" photography, see PETRI INTERCHANGEABLE LENSES at page 31.
IMPORTANT: Make sure that the film speed is set at the correct reading
specified for the film in use. (For further information, see FILM SPEED SETTING
at page 9.)
EXPOSURE METER COUPLED RANGE
PETRI FT EE has a fully coupled CdS exposure meter which measures optimum
exposure conditions Through-The-Lens, ranging from EV 3 to EV 17 with ASA 100
(DIN 21) film.
HOW TO READ THE CHART
The word "EV" stands for "Exposure Value" which represents the brightness on the
subject you frame in the viewfinder. The EV is represented by numbers, sure
meter of the PETRI FT EE can measure the brightness on the subject ranging from
EV3 - EV17, when you use the film speeded at ASA 100 (DIN 21).
For example, if the exposure meter needle stays around f/5.6 with shutter speed
of 1/125 second (the film speed dial is set at ASA 100) in the EE photography,
the brightness on the subject is supposed EV 12. If the brightness is at EV 12,
you can use every one of six different shutter speeds and get properly exposed
pictures. If you change shutter speed from 1/125 second to 1/250, owe stop
faster, the diaphragm is automatically altered from f/5.6 to f/4, one stop
smaller aperture. Thus, you can use six different shutter speeds ranging from
1/500 second to 1/15 second (see the chart) when the EV is at 12.
What shutter speed you should use depends on the condition of subject. (Refer to
SHUTTER SPEED DIAL at page 10.) The diaphragm opening should be also decided
according to the purpose of your photography. (Refer to DEPTH OF FIELD at page
20.)
SHOOTING AGAINST THE LIGHT
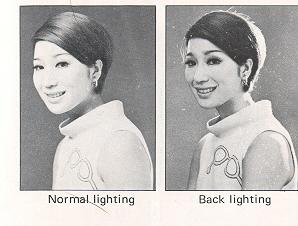 |
When the light is available from the back of the subject and your main
subject is comparatively darker than the back-ground, it is recommended to
adjust the exposure condition. The procedure is same as required when the
important subject is dark. (Refer to TO ADJUST THE EXPOSURE CONDITION at page
15.)
First, set the exposure in the EE photography and read the f/number in the
viewfinder. Then, rotate the diaphragm ring to the right and set the f/number at
a half or one stop closer to the full aperture than the f/number indicated in
the viewfinder when you have set the exposure for the EE photography.
|
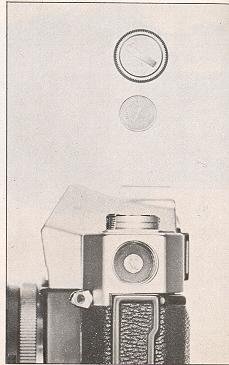
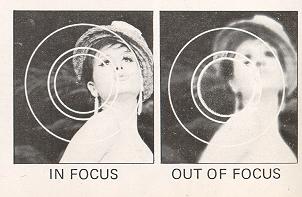
VIEWFINDER AND FOCUSING
 |
PETRI FT EE has the original PETRI Micromatic Focusing system for fast and
accurate focusing. The precision focusing elements in the viewfinder consist of
a group of more than 800 micro-prisms as shown in the center of the picture.
As you look through the micro-prism area (A) in the viewfinder, you can see
the subject clearly, ON LY when it is correctly focused. Rotating the focusing
ring you will notice the appearance of something like a mesh of a net in the
center of the viewfinder. This reticulation is caused by the flickering of
reflected light entering the camera lens. When the subject is correctly focused
the flickering grid fades away from the micro-prism area. In the second inner
circle (B) is the plain glass area where the subject is always seen sharp and
clear, even when the lens is out of focus. When the lens is correctly focused
the image in the micro-prism area will be as sharp and clear as that seen in the
surrounding circle (C)
|
DEPTH OF FIELD
 |
A lens that can be focused lets you accentuate the important
image in a picture, while it can de-emphasize irrelevant objects in front of
and behind the main subject by throwing them out of focus. This involves
what is known as "Depth of Field". The smaller the aperture is the more the
depth-of-field increases. |
HOW TO READ THE DEPTH OF FIELD
The scale is engraved on the lens barrel of your camera and indicated in black
lines spreading out both sides of the index marker at the center. Simply focus
the lens in the normal way, and each pair of black lines which points to the
diaphragm scale indicates the depth-of-field zone corresponding to the diaphragm
you set.
For example, the depth-of-field zone for the standard 55mm lens is indicated as
follows: When the focusing distance is 8 feet and the f/11 is selected, one of
black lines at f/11 points to 6 feet, the nearest point still in focus, and the
other points to approximately 12 feet on the other side, being the furthest
distance in focus.
PETRI F/1.8 55mm DEPTH OF FIELD TABLE
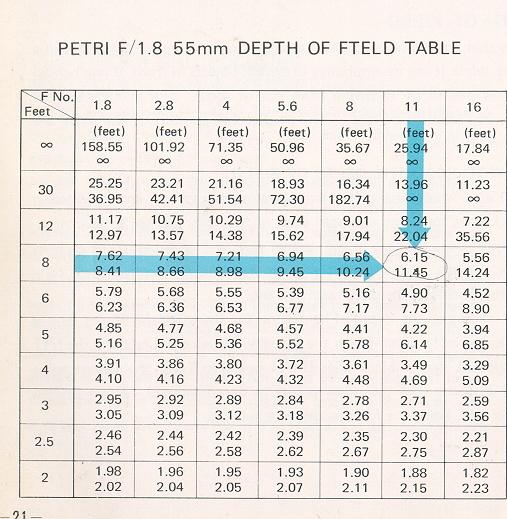
The figures corresponding to 8 feet and f/11 are shown as 6.15 and 11.45, that
is 6.15 feet, the nearest point in focus, and 11.45 feet, the furthest distance
in focus.
HOW TO HOLD YOUR PETRI FT EE CAMERA
 |
The format of your picture is determined by the position in which you hold
the camera. Holding the widest part in a horizontal position will result in a
horizontal format. Holding the widest part in a vertical position will result in
a vertical format. Blurring in a picture often is caused by camera shake at the
moment of exposure. Practice holding the camera and releasing the shutter so you
can take pictures without jarring or shaking it.
Use the following three simple rules for taking a picture to avoid camera
movement:
1. Before releasing the shutter, take a deep breath and hold it until after
the picture has been taken.
2. While taking the picture, hold the camera firmly with both hands and press
the back against your face and forehead as firmly as possible.
3. Squeeze the shutter release button, do not prod or tap it. Practice
squeezing until you can release the shutter without the slightest quiver. |
Fl LM LOAD I NG
PETRI FT EE accepts the standard 35mm cartridges containing 12, 20 or
36-exposure lengths of film. Avoid direct sunlight falling on the film
cartridge.
Load the film in a shade, using your body with your back to the sun as
protection if you have no other method.
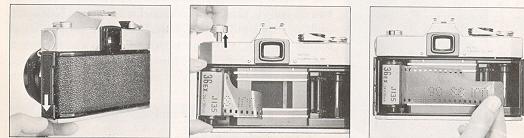
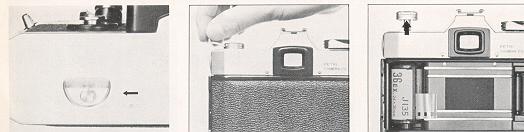
1. TO OPEN THE CAMERA BACK
Pull down the lever with your thumbnail and open the camera back. At the same
time, the exposure counter automatically returns to "S" (which means "Start")
position.
2. TO PULL OUT THE KNOB
Pull out the film rewind knob on top of the camera. This is to allow the film
cassette to be put into the cassette chamber.
3. FILM LOADING
Slip the film end into any slit on the take-up spool and slide it down toward
the bottom of the camera body, and check that the film perforation is properly
engaged with the tooth of camera sprocket.
4. TO ADVANCE THE FI LM
Advance the film advance lever a little and see that the film is fastened round
the take-up spool, before closing the camera back.
5. TO CLOSE THE CAMERA BACK
The camera back will be locked with a snap by a slight pressure.
6. TO RELEASE THE SHUTTER AND ADVANCE THE FILM
Repeat this action twice, and you are ready to take your first
picture.
NOTE: In case the film rewind knob does not turn counterclockwise by
advancing the film advance lever, it shows that the film is not properly
transported. Open the camera back and check the take-up spool.
FILM UNLOADING
After the entire length of film in the cartridge has been
exposed, it must be removed into the film cartridge so it can be removed from
the camera.
1. TO REWIND THE FILM
Depress the film rewind button located on bottom of the camera
body. Raise the film rewind crank and turn it in the direction indicated by the
arrow. You will feel a little tension on the crank while the film is being
rewound. When the tension stops, you know that the rewinding is complete.
2. TO REMOVE THE CARTRIDGE
Pull out the film rewind knob and remove the film cartridge.
Avoid direct sunlight when removing the film cartridge from the camera. Also,
the camera lens should face downward while the cartridge is being removed so as
to prevent it from dropping out.
HOW TO CHANG E YOU R LENS
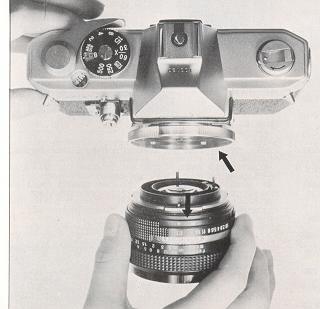 |
( 1 ) REMOVING THE LENS
Turn the Lens Mount Ring in a counterclockwise direction until the
red mark appears on top of the lens barrel. The lens can then be removed
from the camera.
(2) INSERTING THE LENS
Line up the red dot on the camera body with that on the lens mount
ring. Then insert the lens making sure that the protruding lock on the
bayonet mount of the lens is on the top. When the lens is in position, turn
the lens mount ring tightly in a clockwise direction. |
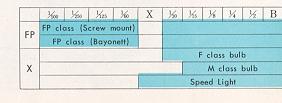
FLASH PHOTOGRAPHY
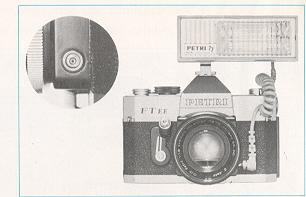 |
When the exposure meter needle in the EE photography jumps up to the
under-exposure warning mark (see page 14) and even a slower shutter speed can
never make it come down to the diaphragm scale area, it shows that the lighting
condition is too poor and that you must switch to flash photography.
Photography with flash not only extends your picture possibilities greatly
but adds excitement and drama to your pictures. The use of flash equipment with
your camera is relatively simple because it has built-in synchronization. It is
equipped with X synchronization. (The shutter speed at "X" is 1/45 second.)
Therefore, both electronic flash and ordinary single exposure flashbulbs can be
used. |
PETRI FT EE is equipped with both a "hot shoe" contact for cordless
unit and a standard PC terminal for one that has a cord. If you use a cordless
unit, merely slip the foot of the unit into the shoe on top of the camera body
and it will automatically make contact with the shutter mechanism. If the unit
has a cord, simply plug the cord into the PC flash outlet. When using F class, M
class and FP class flashbulbs, or an electronic flash unit, shutter speeds must
be selected according to the table. (Speeds within the colored area are
available.)
EXPOSURE CONTROL IN FLASH PHOTOGRAPHY
 |
In flash photography the FE exposure
control can not be used. The exposure depends on the shutter speed, the
aperture opening, the film speed and the distance of the light from the
subject, but if the shutter speed is constant and also the film speed is
assumed to be constant, then the f/number required varies according to the
lamp-to-subject distance. |
In another word, for any given shutter speed and film speed, the product of
the aperture opening and the lamp-to-subject distance becomes a constant, and
this constant is called the Guide Number. Thus, the f/number is calculated by
the following formula:
Guide Number = Distance x f/number OR YOU CAN USE f/number = Guide
Number / Distance
For example, in case a flashbulb of the FP class is used and the guide number
corresponding to the ASA (or DIN) index and to the shutter speed selected is
supposed to be 74, then the f/number, if the lamp-to-subject distance is 10
feet, will be about 8, because 74 / 10=7.4 / 8. No great accuracy is required in
this calculation, and a quick mental division will give an f/number for any
distance. In all cases, the nearest click-stop or 1/2 stop will be close enough
for a practical work. The guide numbers are usually indicated on the packages of
your flashbulbs or in the instruction manual of your strobe.
HOW TO USE BUILT-IN SELF-TIMER
 |
Swing the self-timer lever in the direction indicated by
the arrow as illustrated. Release the shutter button, and the frame will be
exposed after a delay of approximately 9 seconds. The self-timer can be set
at between positions within the range of solid line) so as to shorten the
release time and also be set either before or after advancing the film. All
shutter speeds except B setting can be used with the self-timer.
The self-timer is usually used when the photographer wants to join a
group which he is photographing. It is also useful for photomicrography or
when using a long focal length lens. In all cases the use of a tripod is
recommended. |
INFRA-RED PHOTOGRAPHY
When taking infra-red pictures, reset the
focusing distance to the red line indicated by the aperture f/1.8 on the Depth
of Field Scale.
MAINTENANCE AND CARE OF YOUR PETRI FT EE
A few simple precautions, careful handling and immediate attention in case of
trouble will prolong the life of your camera and keep it operating well in
definitely. Follow these simple rules:
1. When cleaning the outside of the camera, first use a soft brush and then a
soft cloth.
2. Remove dust and sand that enter the camera while it is open immediately,
using a camel-hair brush or a hand-blower.
3. Dust, fingerprints, water drops, etc., on the lens not only affect
picture contrast but, if left for a long time, they will attack the surface.
4. Should your camera fall into water, immediate attention is imperative.
Bring it to a repair shop at once. If it falls into salt water, rinse it
thoroughly in fresh water and then deliver it to the repairman.
5. Your camera, when not in use, should be protected from damp and dust.
Preferably in its case and, as an additional precaution, inserted into a
polythene bag.
6. Be sure that your camera is not kept in abnormally high or low
temperatures--normal room temperature is best.
7. Before storage, release the shutter and relieve a tension of every
apparatus. When you store your camera for a prolonged period, remove a battery
and avoid a risk of deterioration and corrosion.
8. Do not leave your camera without use for along period. Your camera, as
any other me chanical instrument, needs to be exercised regularly to keep it in
good condition. Set the shutter release and fire, turn to a slow shutter speed
and again set the shutter release and fire.
Also, operate the self-timer. Examine the exposure meter for correct operation.
Check film transport. Check the Pentaprism view finder.
These actions will keep the mechanism in good order, retaining the natural
qualities of the lubricant--thus ensuring your camera is ready for an instant
use when required.
PETRI INTERCHAGEABLE LENSES
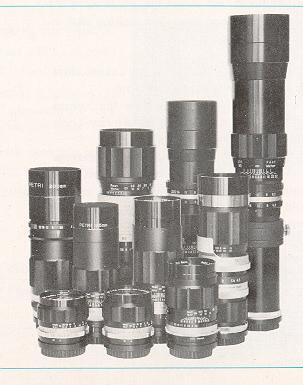 |
PETRI FT EE accepts a wide range of Petri interchangeable
lenses from 28mm wide angle to 1000mm telephoto, unparalleled in quality and
design. The built-in CdS meter is geared to these interchangeable lenses
which include Petri's original Periscope telephoto lens. Petri 35mm f/3.5
and 135mm f/3.8 both with the automatic diaphragm, specially designed for
PETRI FT EE, allow the automatic exposure control and therefore, specify
these lenses when you buy the 35mm and 135mm focal length lenses. Other
interchangeable lenses are not fully coupled to the EE system. (As to the
exposure control for the normal lenses, see TO USE NORMAL LENSES at page
16.) |
 |
28mm ft3.5 wide angle with automatic diaphragm
35mm f/2.8 wide angle with automatic diaphragm, special design for the FT EE
100mm f/4.5 Periscope telephoto with preset diaphragm
135mm f/3.5 telephoto with automatic diaphragm
135mm f/3.8 telephoto with automatic diaphragm, special design for the FT EE
200mm f/4 telephoto with automatic diaphragm
300mm f/5.5 telephoto with preset diaphragm
400mm f/6.3 telephoto with preset diaphragm
500mm f/5.6 telephoto with preset diaphragm
1000mm f/8 telephoto with preset diaphragm
80 ~ 200mm f/4.5 Zoom with automatic diaphragm
85 ~ 210mm f/4.8 Zoom with preset diaphragm |
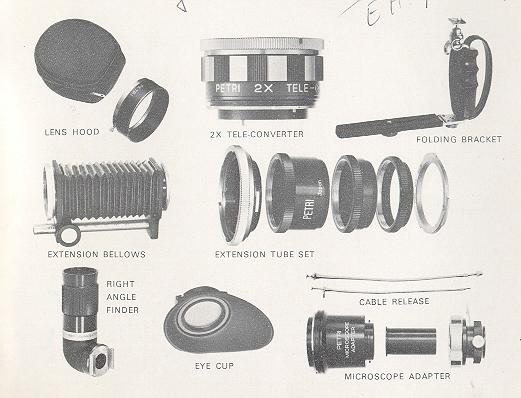
PETR I ACCESSORIES
A complete range of filters, lens hood and other attachments such as extension
tubes, bellows, eye-cups, etc. are available to meet any photographic situation.
Through-The-Lens exposure system equipped in your PETRI FT EE gives the optimum
exposure reading even when using filters, close-up units or in photomicrography.
FILTERS
Essential for first class photographs. Select the proper filters for your
needs.
For Black & White Film:
| FILTER |
TYPE FACTOR |
COLOR |
PURPOSE |
| Y1 |
1.5X |
Light Yellow |
Landscapes, snow, clouds. Renders yellow and
green lighter. |
| Y2 |
2 X |
Medium Yellow |
Gives stronger effect than Y1. |
| YA3 |
4 X |
Orange |
Haze distant views. Renders yellow and red
lighter, blue darker, distant objects clearer. |
| R1 |
8 X |
Red |
Hazy distant views. Renders red lighter, blue
and green darker. Gives stronger effect than orange filter. |
| PO0 |
2.5X |
|
Green Landscapes, snow, clouds. Renders green
lighter. Red (complexion) and blue darker. Recommendable for
portraiture. |
| P01 |
4 X |
Medium Green |
Gives stronger effect than PO0. |
For Color Film:
| FILTER TYPE |
FILTER COLOR |
PURPOSE |
| UV |
no increase |
Clear Absorbs excessive UV. Also suitable for
black-and-white. |
| 1 A |
no increase |
Light Pink To eliminate haze and for use at
altitudes over 3,000 ft. |
| W4 |
1.5X |
Medium Amber Reduces excessive blueness of sky
on a cloudy dad. |
| C4 |
1.5X |
Medium Blue For early morning or evening shots.
|
| C8 |
2 X |
Dark Blue Conversion filter for use when using
'Daylight Type' color reversal film with white flash bulbs.
|
| C12 |
2.5X |
Dark Blue Conversion filter for use when using
'Daylight Type' color film with photoflood lamps. |
| 85C |
no increase |
Dark Amber Conversion filter for use when using
'Artificial Light' film in daylight. |
| NDX4 |
4 X |
Neutral Density Neutral Density for sunny
subjects. Can also be used for black and-white. Allows
slower shutters in daylight to blue images (eg streams or waves) |