Pentax Spotmatic / Spotmatic F / Pentax SP
Pentax Spotmatic Mode d'emploi
On line manual
11-26-'02
This manual can be used as a reference
for many "needle
metered" cameras
This camera manual library is for reference
and historical
purposes, all rights reserved.
This page is copyright
© by

,
M. Butkus, N.J.
This page may not be sold or distributed without
the expressed
permission of the producer
I have no connection with any camera company.
If you find this manual
useful,
how about a donation of $3 to:
M. Butkus, 29 Lake Ave.,
High Bridge, NJ 08829-1701
and send your
e-mail address
so I can thank you.
Most other places would charge
you $7.50 for a electronic copy
or $18.00 for a hard to read Xerox copy.
This will help me to continue to host this site,
buy new manuals,
and pay their shipping costs.
It'll make you feel better, won't
it ?
If you use Pay Pal, use the link below.
Use the above address for a
check, M.O. or cash.
<<<
IF YOU WOULD LIKE THIS OR ANY PDF FILE
PRINTED, BOUND AND MAILED TO YOU,
SEE THIS OUTSIDE COMPANY'S OFFER
>>>
Back to my main
Camera Manual page

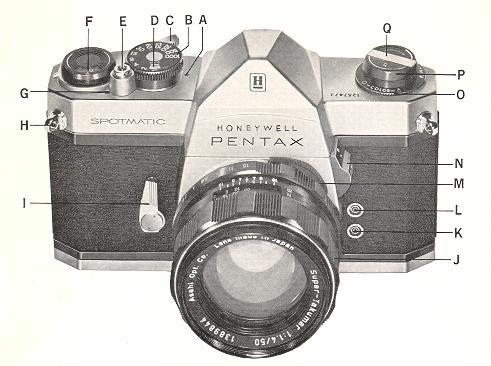
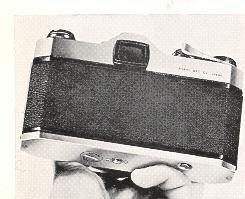
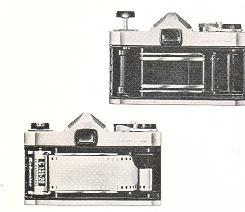
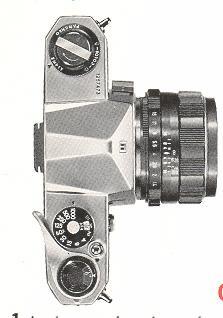
A-Shutter speed index B-Shutter speed dial
C-Rapid wind lever D-ASA film speed setting
E-Shutter release F--Automatic reset exposure counter
G--Wound shutter indicator
H-D ring lug I -Self-timer winding lever
J-Focusing.
|
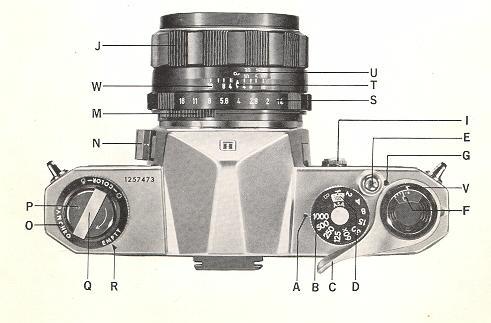
K-X flash terminal L-FP flash terminal M-Preview
lever
N-Exposure meter switch 0--Film
type reminder dial
P--Rewind knob Q-Rewind
crank
R-Film type index mark S-Diaphragm
ring T-Diaphragm and distance index mark
U-Distance
scale V-Exposure counter index mark W -
Depth-of- field guide
|
| Honeywell Pentax Spotmatic
When the Pentax Spotmatic was introduced to the public at the 1960 Photokina,
the photographic world's fair in Cologne, Germany, it attracted immediate and
keen attention. Not available for purchase at that time, it was a model of the
advanced features and design would be incorporated into cameras of the future.
Four years of extensive research, exhaustive experiments and intensive
testing followed before it became available to serious amateur and professional
photographers in late 1964.
With its unique behind-the-lens exposure meter of entirely new design, the
Honeywell Pentax Spotmatic is now more than just another camera . . . it is a
new concept in photography.
Hidden within the camera body, its through-the-lens meter utilizes two highly
sensitive Cadmium Sulfide sensors to accurately measure light seen by the
camera's lens as it is reflected from the subject being photographed. Therefore,
by measuring the light as it passes through the lens and matching the exposure
needle as seen through the viewfinder, you can be assured of properly exposed
pictures under all but the most impossible lighting conditions. Macro or
microphotography, pictures with telephoto lenses or with filters . . . the
Honeywell Pentax
|
|
Spotmatic will give you correctly exposed photographs
without the use of external meters or the need for cumbersome, time-consuming
calculations!
The Spotmatic may also be set manually the same as any
other quality 35mm camera if special lighting or selective focus effects are
desired. Just leave the exposure meter switch in its OFF position and select the
f/stop and speed settings for the required effect.
The traditional classic design and simple elegance
associated with earlier models of the famous Pentax have been retained in the
Spotmatic despite the incorporation of many highly advanced features.
Meticulously constructed by master craftsmen, the Pentax cameras remain the
standard of excellence and precision in the world of 35mm single-lens reflex
cameras.
You will find the Honeywell Pentax Spotmatic even more
versatile than the famous Pentax H3v. Its new 50mm f/1.4 and 55mm f/1.8 Super
Takumar lenses with completely automatic diaphragm will satisfy the demands of
even the most critical professional. Like the H1a and H3v, the Honeywell Pentax
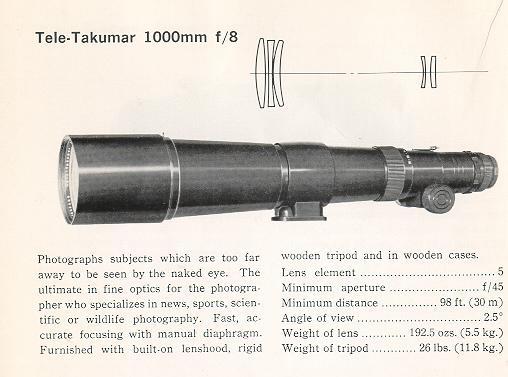
Spotmatic has a 42mm threaded lens mount that accepts any of the superb Takumar
lenses from the ultra-wide-angle 18mm Takumar to the super-telephoto 1000mm
Takumar.
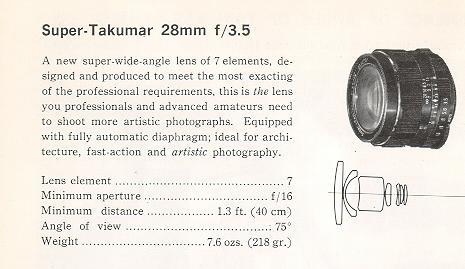
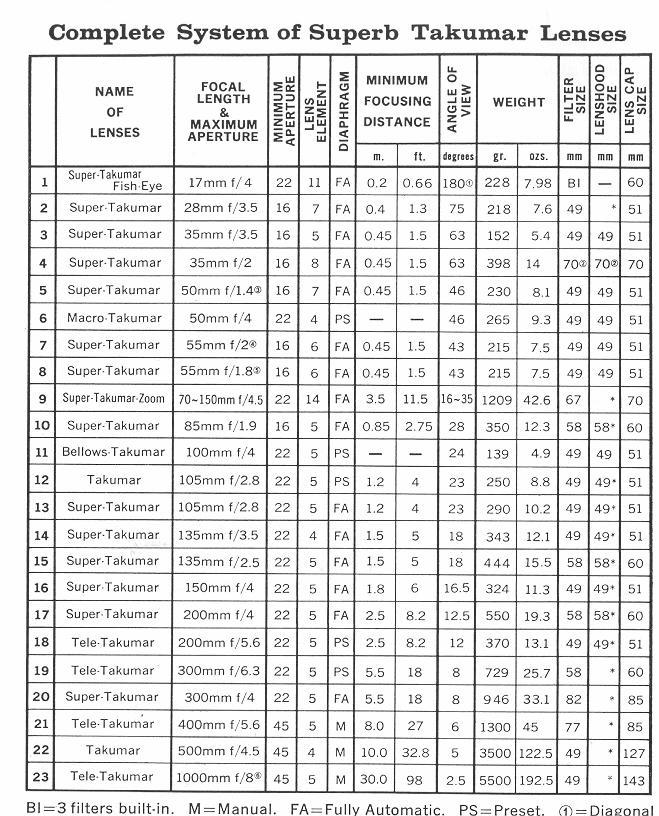
Specifications
Type
35mm single-lens reflex with built-in
light meter.
Film and Picture Size
35mm film (20 or 36exposures).
24mm x 36mm.
Standard Lenses
Super -Takumar 50mm f/1.4 or 55mm f/l.8
with fully automatic diaphragm. Filters and lens hood size: 49mm. Equipped with
diaphragm preview lever which affords visual check of depth of field. Distance
scale: 45cm (18") to infinity.
Shutter
Focal plane shutter, with single non-rotating
dial. Speeds: B, 1-1/1000 sec. Film speed (ASA) setting dial and window on
shutter speed dial. Built-in self-timer releases shutter in 5-13 seconds.
Shutter curtains of special rubberized silk.
Warning Signal
The index of shutter speeds turns to
red when the shutter and film speed settings are off the meters measurability
range. Refer to page 15.
|

|
Finder
Pentaprism finder with
microprism Fresnel lens for instant focusing; 0.88x magnification with 50mm lens
and approximately life-size with 55mm lens
Focusing
Turn the distance scale
ring until the subject image on the ground glass comes into focus.
Reflex Mirror
Instant return type
with special shock absorbers for minimum vibration.
Film Advance
Ratchet-type rapid wind lever
(for film advance and shutter winding). 10° pre-advancing and 160 degrees
advancing angle.
"Wound" Indicator
A red disk appears in a small window
alongside the shutter release button when the shutter is wound, and blacks out
when it is released.
Film Exposure Counter
Automatic re-set type
Lens Mount
42mm threaded lens mount.
Flash Synchronization
Equipped with FP and X flash
terminals. Electronic synchronization at 1/60 sec.
|

|
Exposure Meter
Built-in meter
measures the brightness of the ground glass, and couples directly to shutter and
film speed settings. Film speed (ASA) setting ranges from 20 to 1600 (LV1-18 for
ASA-100 film with standard lens.) Meter is powered with a
mercury battery.
Film Rewind
Rapid rewind crank for
speedy film take-up. Film rewind release button on bottom of camera body rotates
while film is being rewound.
Loaded Film Indicator
Loaded film
reminder dial underneath film rewind knob is marked "PANCHRO" (black and-white),
"COLOR" and "EMPTY."
Dimension
Width 5.6" (143mm) x
height 3.6" (92mm) x thickness 3.4" 88mm).
Weight
868 grams (1 lb. 14 oz.)
with standard lens, Body alone: 621 grams (1 lb. 6 oz.)
| Short-course operating manual
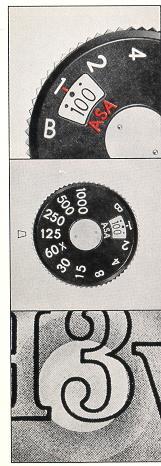
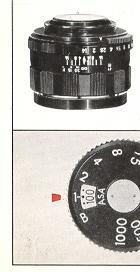
1.SET FILM SPEED.
Lift the outer ring of the shutter
speed dial, turn it around and set the same number as the ASA number of the
loaded film to the small red index
which appears alongside the figure 1. Then wind the rapid wind lever.
2.SET SHUTTER SPEED.
Turn the shutter speed dial and
set the speed you wish to use to the index. When outdoors, set the speed at 1
/125 Sec. or faster, depending upon the lighting. When indoors, set it at 1 30,
or in its neighborhood. Change the shutter speed later, when necessary. Refer to
item 5, page 19.)
3.COMPOSE AND FOCUS.
While viewing through the
viewfinder, turn the distance scale ring with your thumb and index finger until
you get the sharpest image of your subject at the microprism center of the
finder.
|
|
|
|
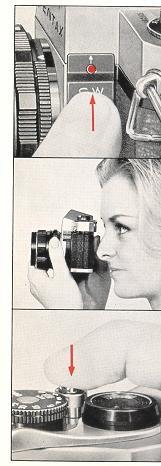
4.TURN ON LIGHT METER SWITCH.
Push up the switch button with your thumb, and the small window on the switch
button will turn to red indicating that the meter is switched on. Through the
viewfinder, you will observe the movement of the meters needle on the right side
of the ground glass. Be sure to turn off the meters switch when not actually
taking readings.
5. ROTATE DIAPHRAGM RING.
The needle moves up and down with the turn of the diaphragm ring. When the
needle rests at the center, you will get correct exposure, If the needle does
not come to the center no matter how far you turn the diaphragm ring, change the
shutter speed. When the needle is off center and close to the (+) mark, you will
get over-exposure:
change the shutter speed to a faster setting. If the needle is closer to the
(-- mark, you will get under-exposure: change the shutter speed to a
slower setting.
6.RELEASE SHUTTER.
Hold your camera firmly and trip the shutter. When the
shutter is released, the meter switch will automatically turn off, and the
needle will remain fixed off and underneath the center. The diaphragm will
reopen to its full aperture and the overall image will look brighter. Wind the
rapid wind lever for the next picture. (When taking a series of pictures under
the same lighting conditions, it is not necessary to repeat instructions 4 and
5.)
|
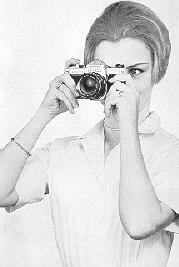
How to hold your camera
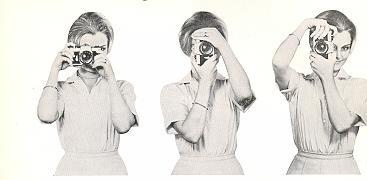
| In horizontal position A.
Hold the camera firmly with your left hand, and draw your arm close to your
body. |
In vertical position B.
Hold your camera tightly to your forehead with your left hand, and draw your
right arm close to your body. |
In vertical position C.
Hold your camera tightly to your forehead with your left hand, raise your arm
and draw your left arm to your body. |
 |
As a general rule, your camera should be held more firmly by the
left hand which does not release the shutter. If you hold your camera with the
right hand--the hand which releases the shutter--it may cause camera movement.
Very often, pictures which are not sharp are due to movement of the camera. When
you focus with the camera held horizontally (Position A), hold the lens barrel
as illustrated in photograph. |
Put the camera on your
left hand thumb and little finger. Turn the distance scale ring with your thumb
and index finger. When holding the camera vertically, some people release the
shutter with the thumb (Position B), while others release it with the index
finger (Position C). Position C is more desirable for fast focusing and
shooting. With the Honeywell Pentax, whether held vertically or horizontally,
you see your subject image through the taking lens, enabling you to compose,
focus and shoot with a minimum of time and effort. |
Film loading
Avoid direct sunlight when loading your film.
1. Open the back by pulling out the rewind knob until back cover snaps open.
2. Place the film cassette into the cassette chamber, and push back the rewind
knob. Draw out the film leader and crease across one or two perforations back
from the end of the leader. Insert the creased portion into slot of the take-up
spool.
3. Advance the film by alternately turning the rapid wind
lever and releasing the shutter until both sprockets have properly engaged the
film perforations. Close the back by pressing it firmly.
4. If the film is properly loaded, the rewind knob will turn counter-clockwise
when you advance the film by turning the rapid wind lever. |
| Film Type Reminder dial |
Setting ASA film speed |
|
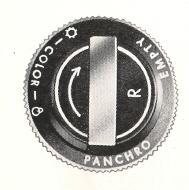
| Use the film type dial to show what type of film
is in your camera. Simply turn the dial so that the type of film in the camera
is opposite the A mark. To check whether the camera is loaded, turn the film
rewind knob clockwise. If it turns freely, the camera is not loaded. |
|
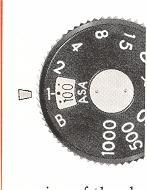
| The ASA film speed rating of all 35mm films is given in the
data sheet packed with each roll of film. The higher the ASA number, the more
sensitive the film. Lift the outer ring of the shutter speed dial and rotate it
until the ASA number of your film is opposite the red index mark. Be sure to set
your film speed on the shutter speed dial because the dial is connected to the
exposure meter system. |
|
 |
Film wind and rewind
1. Before turning the rapid wind lever, slowly turn the film
rewind knob clockwise until a slight resistance is felt. This prevents loosening
or warping of the film.
2. The first portions of the film cannot be used for picture
taking as t hey have already been exposed to light. Generally, two blank
exposures should be made before taking your first picture. Wind the rapid wind
lover until it stops. Watch to see that the film rewind knob turns
counterclockwise, indicating that the film is moving from cassette to take-up
spool. Trip the shutter. Wind the rapid wind lever for the first picture; the
exposure counter automatically turns to '1', indicating that the first picture
is ready to be taken.
|
3. After the final picture on the roll (20 or 36 exposures)
has been taken, the rapid wind- lever will not turn all the way as you stroke
it. This indicates that the final picture has been taken on your film, and that
the film must be rewound. DON'T open the back of the camera, or all
exposed frames will be ruined.
4. Unfold the film rewind crank.
5. Depress the film rewind release
button. Turn the rewind crank to rewind the film into the film cassette. The
film rewind crank permits rewinding at a smooth, even rate. (Under some
atmospheric conditions, erratic or too rapid rewinding will cause static
electricity marks on the film.) You will feel the tension on the rewind crank
lessen as the leader end of the film slips off the take-up spool.
Stop rewinding when you feel this happen. AVOID DIRECT
SUNLIGHT WHEN UNLOADING YOUR FILM. (The rewind release button will return to
normal position as you lead your next film and turn the rapid wind lever.)
6. Pull out the film rewind knob (the
back will open automatically), and remove the film cassette.
.
| Bright field focusing
1. You can start viewing and focusing before and after
winding the rapid wind lever. When the preview lever is in "A" (automatic)
position, and the meter is at "OFF the diaphragm is fully open except for the
moment of exposure.
2. Turn the distance scale ring until your subject image is
clearly in focus. It is not always necessary for you to view and focus with the
diaphragm fully open. In bright sunlight, you can easily focus with diaphragm
closed to f/5.6 or f/8, and still observe the depth of field. It is easier,
however, to focus with the diaphragm fully open as your subject image is much
brighter. When the letter "M" appears beside the lever, the lens is in manual
position; when "A" appears, it is in automatic position.
|
|
|
|
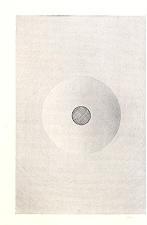
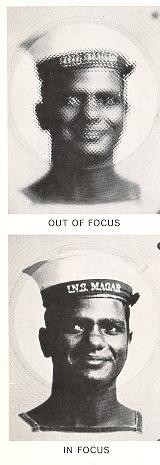
Microprism
Honeywell Pentax cameras have a Fresnel lens with a microprism center
underneath the ground glass. As you look through the finder, you will see that
the Fresnel lens consists of many concentric rings which provide the brightest
possible image on the ground glass.
The microprism is the center portion of this diagram. When your subject is in
focus, the image in the microprism will be sharp and perfectly clear. If your
subject is not in focus, the microprism will break the image up into many small
dots, much like an engravers screen. You can focus your subject on any portion
of the ground glass.
|
| Automatic diaphragm
When the preview lever is in "A" (automatic) position, and the exposure meter
is turned to "OFF", the fully automatic diaphragm is at its largest aperture at
all times, except for the instant of exposure, no matter what aperture is set on
the diaphragm ring. When you release the shutter, the diaphragm automatically
stops down to the predetermined aperture and the shutter curtains start
traveling instantly. When the exposure is completed, the diaphragm reopens to
maximum aperture completely automatically and you are ready to compose, focus,
and shoot your next pictures. If you wish to visually check exact depth-of-field
before making the exposure, move the preview lever to "M" Manual) position. This
stops the diaphragm to the aperture selected and shows you exactly how much
depth-of-field will appear in your picture. The preview lever may be moved back
to "A" (automatic) position before or after making your exposure, or, if you are
making pictures in bright sunlight, it may be left in manual position, which
permits a constant ('heck of depth-of-field.
|
|
* When the exposure meter switch is
turned to the "on position, the lens diaphragm changes from the automatic to
manual position even though the preview lever is in the "A" (automatic)
position. When the shutter is released, the lens diaphragm will automatically
return to its automatic position if the lever is set on "A".
Do not leave that switch on (UP) for a long time as it will drain you battery. |
Shutter
| Turn the shutter speed dial clock. wise or counter-clockwise to
the shutter speed desired. The shutter speed may be set either before or after
winding the rapid wind lever. As you wind the shutter by turning the rapid wind
lever, the "wind" indicator turns to red showing that the shutter is wound.
The indicator window blacks out as you trip the shutter button. For use of
the X setting on the shutter speed dial, refer to page 17.
With the shutter speed dial set on B (bulb), the shutter will stay open as
long as you depress the shutter button. As you release your finger from the
shutter button, the shutter closes. When a long exposure is desired while using
the B setting, attach a shutter release cable with a locking device to the
shutter button. This will permit a "Time" exposure.
|
 |
Cautions
1. At slow speeds-slower
than 1/30 - support your camera rigidly or use a tripod to prevent movement of
your camera.
2. To protect the shutter mechanism, trip the shutter
release before putting the camera out of use for any extended period.
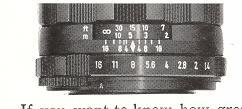 |
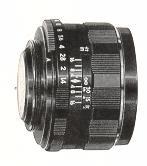
For example, if the lens opening of f/8 is to be used, the range on the
distance scale ring covered within the figure 8 on the depth-of-field guide
indicates the area in focus at the lens opening. You will note from the
depth-of-field guide in the photograph that the range from approximately 10 to
25 feet is in focus. Note that as the lens apertures change, the effective depth
of field also changes. For the depth of fields at different apertures and
distances.
Refer to page 14.
Depth of field is the range between the nearest and farthest distances which
are in focus at different lens apertures.
|
| Depth of field
If you want to know how great the depth of field is at a certain aperture,
look at the depth-of-field guide. In the above photograph, the distance scale is
set at 15 feet . . . the lens is focused on a subject 15 feet away. The
calibrations on each side of the distance index correspond to the diaphragm
setting and indicate the range of in-focus distance for different lens
apertures.
|
Range of light measurement
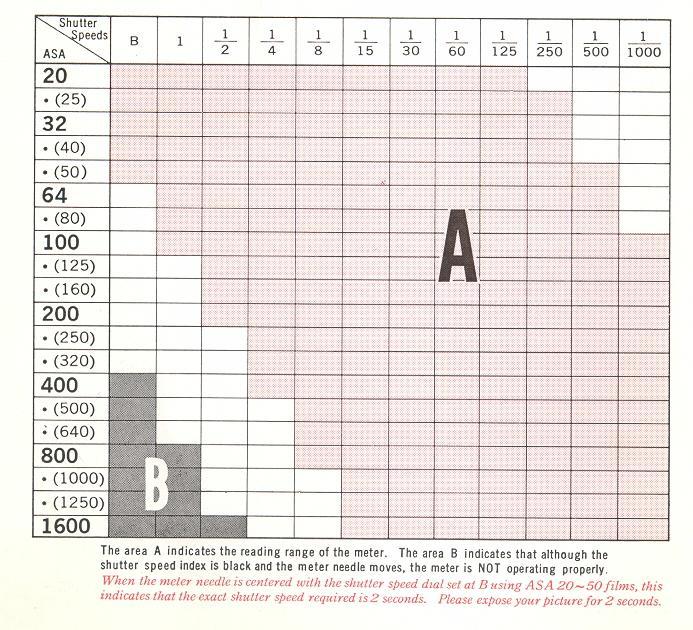
The exposure meter of the Spotmatic measures the brightness of the ground
glass. Therefore, the meter should be turned on after you have focused your
subject on the ground glass. The following table shows the range of the meter's
light measurement, and should not be interpreted as the camera's total range of
f/stop-shutter speed combinations. As you will note from the table below, with
an ASA100 film, you may use any shutter speed from 1 sec. to 1/1000 sec. in
combination with any aperture that will bring the meter needle to the midpoint
in the viewfinder.
The total range of the aperture settings is, of
course, determined by the minimum and maximum apertures of the lens being used.
For example, with the 50mm f/1.4 lens and ASA100 film, an aperture from f/1.4
(the maximum aperture of this lens) to f/16 (the minimum aperture) may be used
with any shutter speed from 1 sec. to 1/1000 sec. that will bring the meter
needle to midpoint.
|
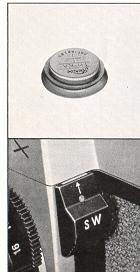
Mercury battery
|
|
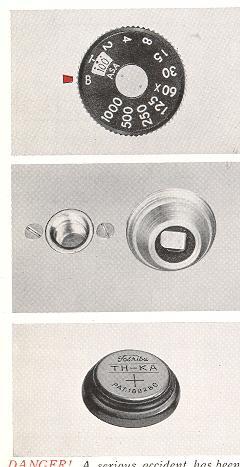
How to check it
1. Set the shutter speed dial to B (bulb) position.
2. Turn the ASA dial to ASA 100.
3. Push the meter switch to "on" position.
Look at the meters needle through the viewfinder. If the needle rapidly
drops, the meter battery has sufficient capacity; if it does not, replace the
mercury battery.
|
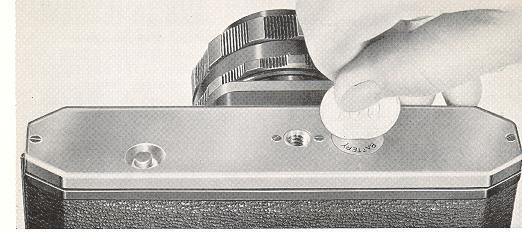
How to replace it
Open the battery
housing cover on the bottom cover plate with a coin. Remove old battery and
insert new battery with (+) side toward the top of the camera. For replacement,
use Mallory PX-400 or RM-400-R or equivalent.
You must get a
Wein Air battery to replace it. I have heard you can replace it with a alkaline
battery, but must have the meter adjusted due to the higher voltage (1.35v
against the alkaline 1.5v)
See this link on a Wein Air replacement battery.
CAUTION: The mercury battery is like a
phonograph record. It can be damaged by skin acids. Handle by the edges with a
dry cloth only. Be sure the battery is cleaned with the cloth before insertion
into the camera. The battery is not rechargeable.
DANGER: A serious accident has been reported
d of a small child who ho has put a mercury battery into his mouth and has been
hospitalized for serious gripes and stomach inflammation. Please always keep a
battery from the reach of small children
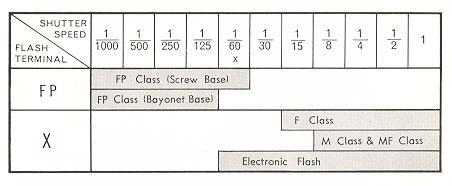
Flash synchronization
| The Honeywell Pentax has two sets of terminals --FP and X. The
table below shows which flash contact, which shutter speed and which flash bulb
may be combined for maximum lamp efficiency. Unless these combinations are
rigidly followed, there will be a failure in flash synchronization. Note the "X"
setting is exactly at the 60 marked on the speed dial. This indicates the
highest shutter speed at which Honeywell Strobonars or other electronic flash
units may be used. |
|
 |
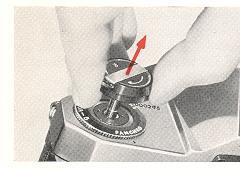
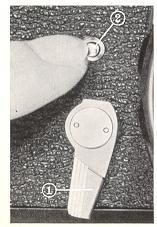
Self-timer
Depending upon how far down
you turn the self-timer winding lever 1, it will release the
shutter in 5-13 seconds. When operating the self-timer, always depress the
self-timer release button 2 to release the shutter. Do not depress the shutter
button... it will immediately release the shutter without delayed action. The
self. timer winding lever should be turned down at least 90° or the release
button will not operate. |
|
Important notes
|
|
1. A spare mercury battery for the light meter
is in the small pocket located in the inside upper portion of the camera case.
2. Always keep the meter switched off when not actually
taking readings. Leaving the meter switched on will rapidly exhaust the battery.
It is also necessary to keep the meter switched off when mounting a
Super-Takumar lens on the Spotmatic camera body. If it is switched on, the tip
of the automatic diaphragm release pin of the lens will hit the pin release
plate inside the camera body and it may get damaged.
|
|
|
3. When removing the Super-Takumar 50mm f 1.4 lens from the
camera body, do not place it on its threaded end without the rear mount cap in
place, or you will scratch its rear element lens. Never take off lens with meter
on ! ! You can bent the aperture pin.
4. When the index of the shutter speeds turns to red, it
indicates that the shutter and film speed settings are off the meters
measurability range. Change the shutter speed setting to a faster or slower
setting. Refer to page 15.
|
|
|
5. When the meter is switched on, the lens any Super-Takumar
lens) is in its manual position even when the diaphragm preview lever is in "A"
(automatic) position. When the meter is switched off manually, or automatically
after shutter release, the lens returns to its automatic position when it is set
in "A" position.
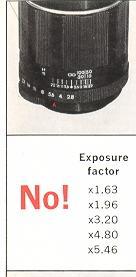
6. Exposure increase factors which apply when taking
pictures with filters, close-ups, macro- and micro-photos. do not apply to the
Spotmatic.
|
 |
7. Do not use the new Super-Takumar 50mm f 1.4 lens with any other
camera or any other Honeywell Pentax model except with models H3v and H1a,
having orange-colored "R" marking on the film rewind knob, or you will damage
the rear element of the lens.
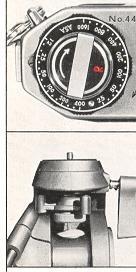
8. The length of the tripods screw should not exceed the
normal length of 3/16" 4.5mm). Do not extend it longer than this length when
mounting your camera on tripod. Forcing longer screws into the tripod socket of
the camera will damage the mechanism.
NO!
9. We do not guarantee the quality of photographs
when brands other than Takumar lenses and Pentax accessories, such as lens
extenders, are used.
|
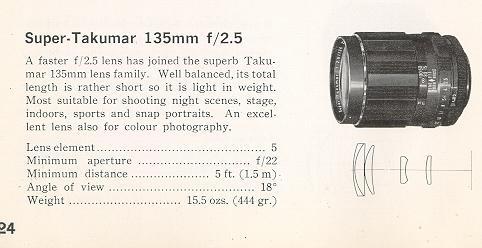
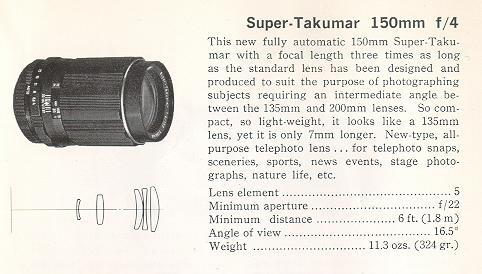
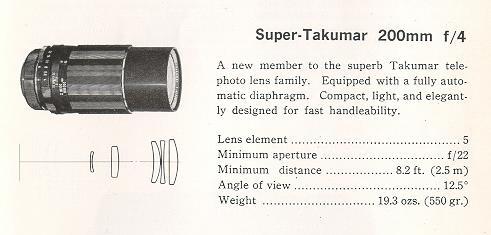
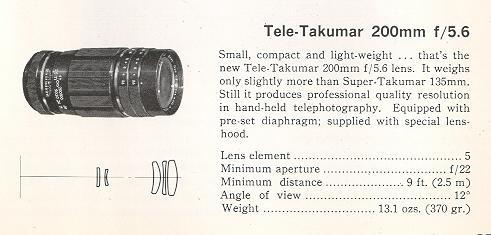
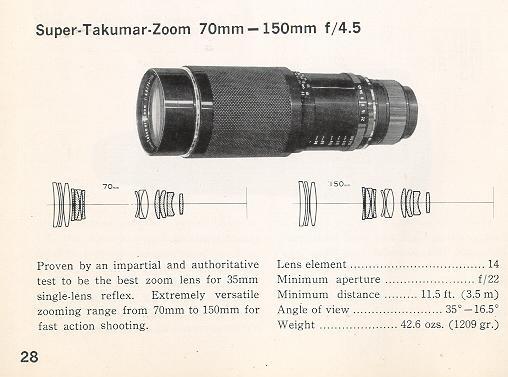
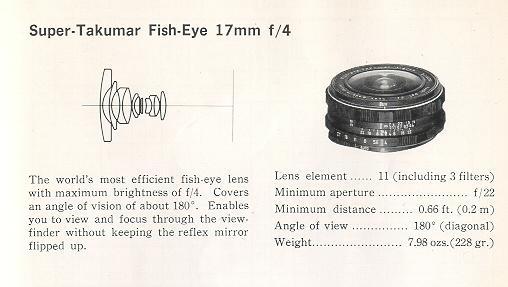
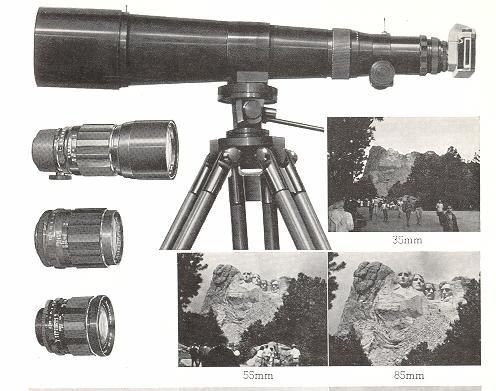
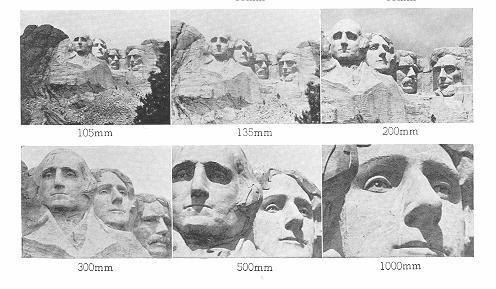
INTERCHANGEABLE LENSES
The
Honeywell Pentax offers many interchangeable lenses in a wide variety of focal
lengths, all of which are highly respected by both professional and amateur
photographers for their fine resolution. The photographic coverage Of the
various Takumar lenses is illustrated on page 21. With focal length longer than
55mm, the subject image is seen through the viewfinder larger than its life
size.
Regardless of the lens selected for your Honeywell
Pentax, there is never need for an accessory viewfinder, ordinarily required for
rangefinder type cameras. When interchanging lenses, hold the lens by the
distance scale ring. When attaching a lens, filter, or lens hood, do not screw
it too tightly, as you may find it difficult to remove.
| FIXED FOCUSING SETTING
Because of the considerable depth of field of wide-angle lenses, you can use
them as fixed focus lens-if the diaphragm and distance scales are set properly.
For your convenience, the Super-Takumar lenses shown on page 22 have a fixed
focus mark. Just align with the index the orange-colored figures of the
diaphragm and distance scales, and the lens will be in fixed focus from
foreground to infinity. You'll find this extremely convenient for fast shooting.
|
| Resolving Power of Takumar Lenses
Resolving power of all Takumar lenses is factory-tested by skilled optical
engineers. There are three types of tests: microscopic aerial test, projection
test and photographed film test. Resolving power of a lens shown by LPM (lines
per mm) varies depending upon the method of resolution test. Takumar lenses have
been tested for resolving power to conform to Asahi Optical Company standards
which are higher than those set by JIS (Japan Industrial Standards). All Takumar
lenses bear the seal of the Japan Camera Inspection Institute which insures the
highest standards of performance
When testing your lens performance . . .Use a slow-speed fine grain film.
Generally, high speed films are grainy and are not suitable for resolution test.
Support your camera on a good tripod. Use a shutter release cable to prevent
camera movement. The definition of the picture on the negative film may decrease
if exposure and developing time are not proper. Time your exposure and
development correctly.
If you do your own developing and enlarging, see that your enlarger uses a
fine quality enlarger lens. If it is not of a fine quality, your pictures can
never be sharp no matter what superb lenses are mounted on your camera. Usually,
the diaphragm of the enlarger should be closed down to f/8 or f/11.
|
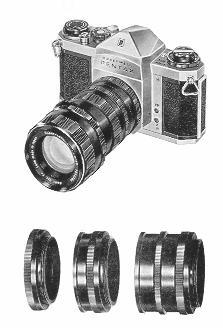 |
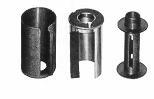
By inserting any or all of the extension tubes between the camera body and
the Takumar lens, subjects as close as 3 35/64 inches from the front of 55mm
lens may be photographed. By adding more extension tubes, close-ups as close as
the focal length of the lens may be easily and simply photographed.
The extension tube set consists of 3 rings: #1, #2 and #3; 9.5mm, 19.0mm and
28.5mm respectively. These rings may be used in combination as desired. Ring #1
is suited for moderate close-up work as in copying documents. When all extension
tubes are used simultaneously with the 55mm lens, the subject may be enlarged on
the film to a magnification of 1.04 of the life size. Such extreme close-up
photography is a special advantage of the single lens reflex camera because
there is no parallax problem and you do not need an accessory viewfinder as is
ordinarily required for rangefinder type cameras.
|
 |
SLIDE COPIER
Use this with the Bellows II for
duplicating your color slides.
You will never use this. There are "T"
mount slide copier devices you can buy.
They will work much better, fancier
ones have zoom lenses. |
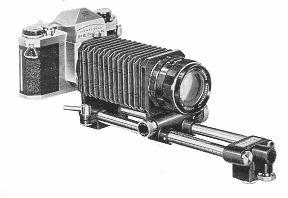
BELLOWS UNIT
Double-track, De Luxe model
bellows unit for extreme magnification. Mounted between your camera body and
standard lens, you can obtain the maximum magnification of more than 3 times the
life size. -> |
|
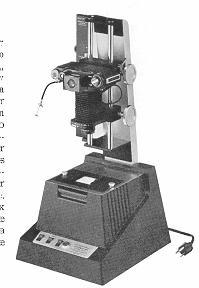
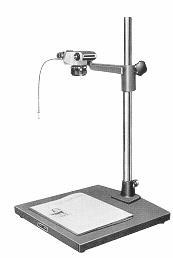
HONEYWELL REPRONAR
|
|
An extremely versatile accessory for the Honeywell Pentax owner
who specializes in color transparencies, the Repronar incorporates a specially
modified Honeywell Pentax camera with a precision 50mm f/4 Takumar lens and a
Strobonar electronic flash light source. It enables the user to duplicate
original transparencies, correct for exposure errors and color balance, crop and
enlarge portions of original transparencies, create special effects, and perform
many other processes in color or black and white. Focusing and composition are
quick and easy, and a built-in exposure scale takes the guesswork out of camera
settings. Complete with filters, slide holders, lens cap and dust cover. |
HONEYWELL PENTAX COPYPOD
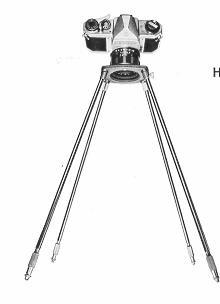 |
This new portable copying stand fits all models of the Honeywell
Pentax and can be used anywhere for copying documents, artwork, photographs,
stamps, etc. The Copipod consists of a lens board complete with adapter rings
for 46mm and 49mm sizes, and four calibrated telescoping legs. It can be set up
in seconds, and when disassembled, fits neatly into a pouch-type case which
occupies very little space. Lightweight, yet extremely rigid, the Copipod is a
practical accessory which will fill a need for many Honeywell Pentax owners. |
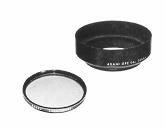
FILTERS AND LENSHOODS
| Honeywell Pentax lens hoods are recommended for use whenever
possible to guard against off-angle light which will cause flare in your
pictures. (All Takumar lenses from 85mm up to 1000mm are supplied with a special
lens hood.) Improve your picture quality by using the Honeywell Pentax filters
that are precision-ground, polished and coated for your Honeywell Pentax. |
|
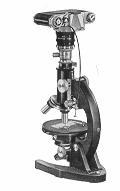
| MICROSCOPE ADAPTER
By inserting this adapter between the camera body and the micro scope tube,
photomicrography can be easily and simply accomplished with the optics of the
microscope.
|
|
REVERSE ADAPTER
Screwed into the front
thread of a Takumar lens which accepts 49mm~size filters and with the other end
threaded into extension tubes or bellows mounted on an Honeywell Pentax, this
adapter gives optimum performance in macrophotography of more than a life-size
magnification. |
|
|
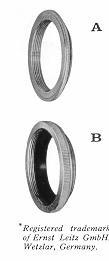
LEICA MOUNT ADAPTER
ADAPTER 'A' - For use of Leica-mount lenses on the Honeywell Pentax
camera body. Leica-mount lenses may be used on the Honeywell Pentax camera body
with this adapter ring ONLY for close-up photography. The following table
illustrates the film plane-to-subject distance that can be covered by
Leica-mount lenses when using this adapter.
ADAPTER "B" - For use of Takumar lenses on Leica mount camera bodies.
Primarily for use with Leica lens mount enlargers.
|
|
|
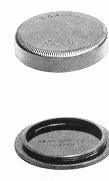
LENS MOUNT CAP
For use with all Takumar lenses. When your Takumar lens isnot on the camera
body, use this cap to avoid dust.
BODY CAP
Use this body mount cap when you do not have a lens on your camera body.
|
 |
|
LENS LEATHER CASE
for standard lenses
When using an accessory lens on your camera body, put your standard lens in
this leather case for protection.
|

|
| FILM MAGAZINE
For use in loading bulk film. You will never use this.
|
|
|
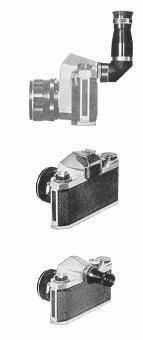
90° FINDER
A convenient accessory viewfinder to be
attached to the viewfinder frame of the Honeywell Pentax, for low-angle
close-up, photo-micrography, etc.
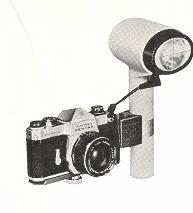
ACCESSORY CLIP
Attaches to the Honeywell Pentax
viewfinder window for mounting a folding flash gun, etc.
MAGNIFIER
2-power magnification. Most convenient for
critical focusing in close-ups, macrophotography, copying works, etc.
|
|
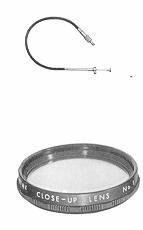
CABLE RELEASE
Use a cable release to
prevent camera movement
CLOSE UP LENS
For simple close-ups, this is an
extremely versatile and economical accessory, and enables you to close up your
objects as large as 1/3 the life size with your standard lens. It also fits
Takumar and SuperTakumar 105mm f/2.8, 135mm f/3.5 and Tele-Takumar 200mm f/5.6
lenses.
With this lens on a Super-Takumar lens, you can operate the diaphragm fully
automatically, without manipulation for exposure increase.
|
|
|
WARRANTY POLICY
All Honeywell Pentax camera equipment and accessories sold in the United
States and Mexico are unconditionally guaranteed against defects of material or
workmanship for a period of twelve months from date of purchase. Service will be
rendered and defective parts will be replaced 'without cost to you within that
period, provided the equipment has not been abused, altered, or operated
contrary to instructions. Because the tolerances, quality, and design
compatibility of lenses other than Pentax-Takumar lenses are beyond our control,
damage caused by use of such lenses will not be covered by this warranty policy.
Honeywell shall not be liable for any repair or alterations except those made
with its written consent and shall not be liable for damages from delay or loss
of use or from other indirect or consequential damages of any kind, whether
caused by defective material or workmanship or otherwise; and it is expressly
agreed that Honeywell's liability under all guarantees or warranties, whether
expressed or implied, is strictly limited to the replacement of parts as
hereinbefore provided. In order to validate your warranty, the warranty card
must be filled in COMPLETELY and mailed to the factory within ten days of
purchase.
PROCEDURE DURING 12-MONTH WARRANTY PERIOD
Any equipment which proves defective during the 12-month warranty period
should be returned to your Honeywell Pentax dealer. The dealer will forward the
equipment to the Honeywell factory or nearest Honeywell repair station. If the
equipment is covered by warranty, repairs will be made and parts replaced free
of charge, and the equipment returned prepaid to your dealer. If the equipment
is not covered by warranty, Honeywell's regular charges will apply. All models,
prices and specifications are subject to change without notice.
|
|
Mercury Battery
The mercury battery should be kept dry. Don't touch it with your finger
unnecessarily. Before inserting it into its housing, wipe its surface completely
with a dry piece of cloth. Don't try to measure the short current or to charge
the battery, to prevent rapid deterioration. Don't throw a used battery into
fire ... it may explode. Keep the battery out of the camera's battery housing
when you do not intend to use it for a lengthy period of time. See page 16.
You must buy Wein Air batteries, mercury batteries are illegal in U.S. Buy a
couple as they only last 3 - 6 months. If not used for a long time, cover the
air holes as that's how they operate. They produce power when the holes are
uncovered.
Should you need additional information about your Honeywell Pentax, address your
questions to: Customer Service at the address below:
Honeywell Inc., Photographic Products Division
4800 East Dry Creek Road, Denver, Colorado 80217
|