and historical purposes, all rights reserved.
This page is copyright© by
This page may not be sold or distributed without
the expressed permission of the producer.
I have no connection with any camera company
This camera manual library is for reference
and historical purposes, all rights reserved.
This page is copyright© by ![]() , M. Butkus, NJ.
, M. Butkus, NJ.
This page may not be sold or distributed without
the expressed permission of the producer.
I have no connection with any camera company
On-line camera manual library
If you find this manual
useful,
how about a donation of $3 to:
M. Butkus, 29 Lake Ave.,
High Bridge, NJ 08829-1701
and send your
e-mail address
so I can thank you.
Most other places would charge
you $7.50 for a electronic copy
or $18.00 for a hard to read Xerox copy.
If you use Pay Pal, use the link below.
Use the above address for a check, M.O. or cash.
Back to main camera manual page
Click here for
Pentax LX PDF
version made from this file
Click here for
Pentax LX Word document
made from this file
Click here for Pentax LX
Bedienungsanleitung
Pentax LX PDF
Direct scan from manual
Pentax LX focusing screen replacement
Pentax LX interchangeable viewfinders
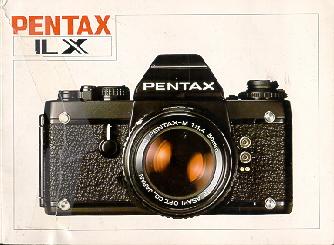
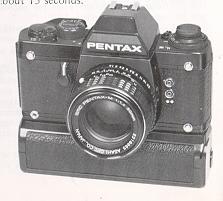
WELCOME TO THE WORLD OF PENTAX PHOTOGRAPHY!
Designed and engineered with the precision, reliability and dedication to quality that has made Pentax a leader in photography throughout the world, your new Pentax LX 35mm System SLR camera has the features and flexibility to meet virtually any photographic challenge, and the accuracy of its Integrated Direct Metering through-the-lens light measurement is unexcelled.
From the fast paced realm of news photography to capturing the breathtaking serenity of a panoramic mountain landscape, from the quick action of sports to the demanding world of macrophotography, from portraiture to candid, your Pentax LX is the key which will enable you to reach new levels of creativity and photographic excellence.
Whether you're a seasoned professional or just starting out, a little extra time taken to read through the Owner's Manual carefully will be time well spent. By familiarizing yourself thoroughly with your camera you will not only learn of all the benefits it has to offer, you'll also insure yourself years of trouble-free operation.
TABLE OF CONTENTS
|
Benefits of LX Photography ......4 Description of Parts ..................... 6 Batteries .........................10 Attaching the Viewfinder ............... 12 Mounting the Lens ....................14 Advancing the Film ............15 Loading the Film .....................16 Setting the Film Speed/Memo Holder ............17 Setting the Shutter Dial .................18 Activating the Meter ............19 Focusing .. . . . . . . . . . . . .. . 20 The Standard FA-1 Viewfinder Display 21 Shooting Automatically . . . . . .. . ... ... . 22 Using the Exposure Compensation Dial. . . . . 24 Manual Exposure Control . . . . . . . .26 Meter Coupling Range . . . . . . . 27 Unloading the Film . . . . . . . 28 Holding the Camera . . .. . . . 29 Using the Self-Timer/Depth-of- Field Preview/Mirror Lock. . . . . 30 |
Multiple Exposures ............32
Using a Tripod/Time Exposures at "B" . ............34 Infrared Photography 35 Depth-of-Field Scales: 36 Depth-of- Field Tables . . . . . . .. . 37 Shooting with TTL Integrated Automatic Flash Units . . . . . . . .38 "Dedicated" Automatic Flash Units . . . . . . . . 40 Other Flash Units , , . 41 Case and Strap . . . . . . . . . . 42 Grips . . . . . . . . . . . 43 Using thread mount Takamar Lenses . . . . . . . 44 Maintaining the Camera . . . . . . . . . . . . .45 LX Interchangeable Viewfinders . . . . . . . 46 Changing the Focusing Screen . . . . . . . . . 48 Winder/ Motor Drive System . . . . . . . . . . 50 Data Recording9 System . . . . . . . . . . . . 52 Pentax Lens System . . . . . . . . 56 Specifications . . . . . . . 62 Warranty . . . . . . . 64 |
THE BENEFITS OF LX PHOTOGRAPHY
IDM Light Measurement
The heart of the Pentax LX is the Integrated Direct Metering (IDM) system which employs a Silicon Photo Diode to measure light directly off the film plane for superb accuracy in exposure control. Incorporating a special pattern on the shutter curtain for high speed measurements and a unique secondary mirror which transmits information to the LX viewfinder almost to the precise moment of exposure, the IDM system of through-the-lens light measurement assures accuracy even under the most difficult and changing lighting conditions. The need for exposure compensation when using system accessories such as focusing screens or interchangeable finders is virtually eliminated.
Interchangeable Finders and Screens
The LX System includes a wide array of interchangeable viewfinders and focusing screens to meet the challenge of any photographic situation. The unique FB-1 Systems Finder features optional viewing accessories to create a viewing system within a system, and the standard FA-1 Finder features a built-in TTL "X" synch hot shoe which lets you take full advantage of the IDM light measurement system (See pages 46 to 49)
Titanium Electro-Mechanical Shutter
The LX camera features an extremely broad range of shutter speeds. The titanium electro-mechanical shutter mechanism delivers electronically-controlled stepless speeds in the automatic mode from an amazingly fast 1/2000th second down to 125 seconds, provides manual speeds from 1/2000th second to 4 seconds, and features a special design which provides manual speeds from 1/2000th second to "X" even when the batteries fail (see page 11,18).
TTL Integrated Automatic Flash Control
Integrated Automatic Flash Control with the Pentax AF-280T and AF-400T Flash Units makes flash photography exceptionally simple and accurate even with difficult bounce lighting or at close subject distances. Because the IDM system measures light at the film plane, the LX works with TTL flash models to measure both ambient and electronic flash lighting for exposure accuracy regardless of the lens aperture. These units also feature automatic "X" synchronization and a visible exposure check and ready light in the viewfinder when the capacitor reaches full charge (see page 38).
Rugged, Lightweight, Compact Design
Designed to handle the most rugged and demanding professional assignments, the LX remains incomparably compact and lightweight among the 35mm SLR camera systems. Its specially contoured body design allows it to rest comfortably in your hands even with Motor Drive or Winder attached. Weighing only 803 grams (28 ounces) with normal f/1.4 lens and standard Finder, the LX is designed to go anywhere and capture the action with the ultimate in handling ease and carrying convenience. Special gaskets and linings at key points throughout the body make the LX extra durable and resistant to heat, shock and moisture.
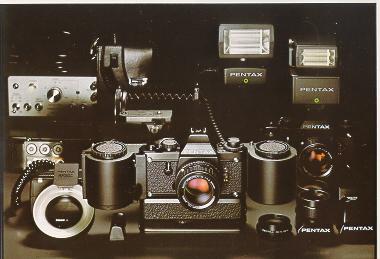
The LX is backed by a comprehensive system of accessories with more than 40 Super-Multi-Coated Pentax lenses and hundreds of attachments to meet virtually any picture-taking need. (seepages 56-59).
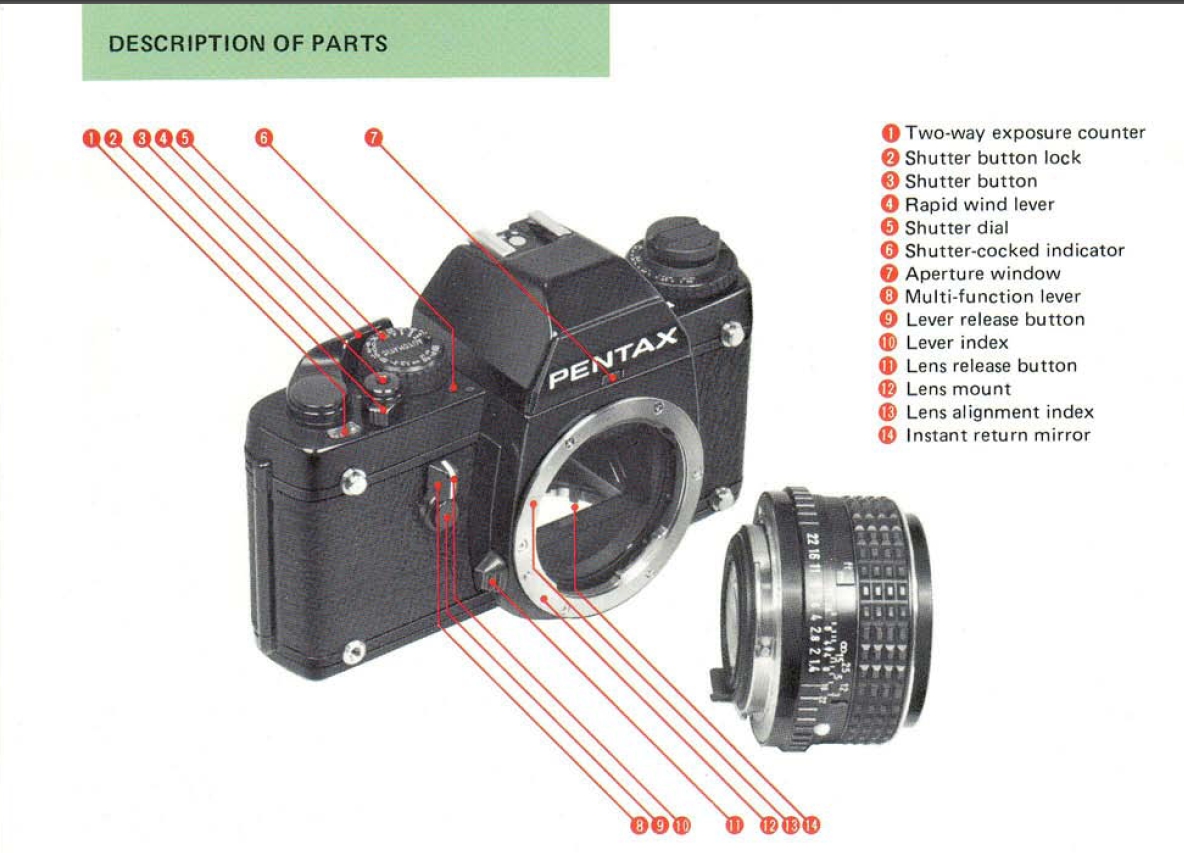
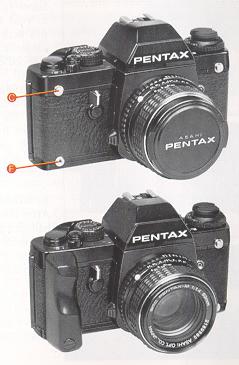
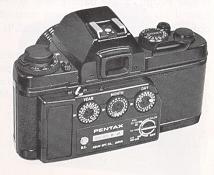
DESCRIPTION OF PARTS
Click here to enlarge photo of parts 1 to 14 below
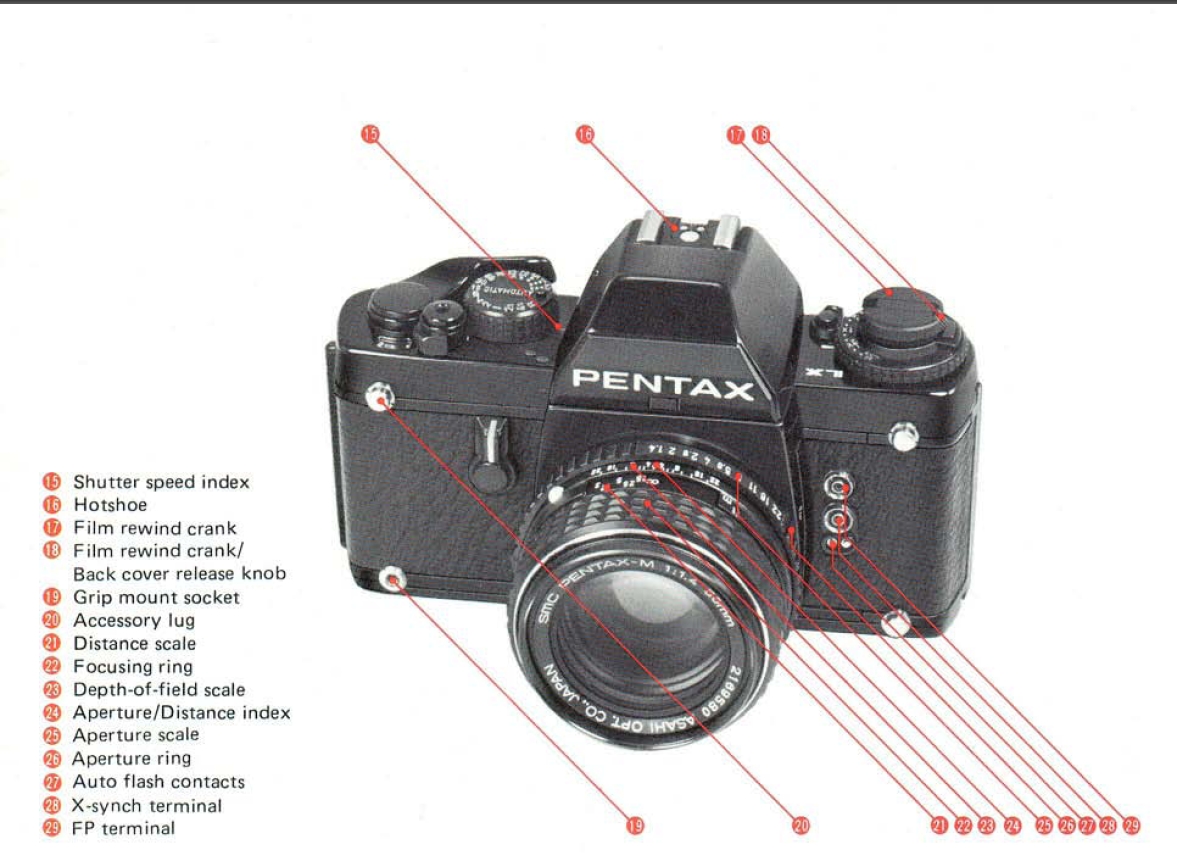
Click here to enlarge photo of parts 15 to 29 below
Click here to enlarge photo 30 to 53 below
Click here to enlarge photo of parts 54 to 64 below

|
(1) Two-way exposure counter (2) Shutter button lock (3) Shutter button (4) Rapid wind lever (5) Shutter dial (6) Shutter-winding indicator (7) Aperture window (8) Multi-function lever (9) Lever release button (10) Lever index (11) Lens release button Lens mount (13) Lens alignment index (14) Instant return mirror (15) Shutter speed index |
(16) Hotshoe (17) Film rewind crank (18) Film rewind crank/Back cover release knob (19) Grip mount socket (20) Accessory lug (21) Distance scale (22) Focusing ring (23) Depth-of-field scale (24) Aperture/Distance index (25) Aperture scale (26) Aperture ring (27) Auto flash contacts (28) X-synch terminal (29) FP terminal
|
|
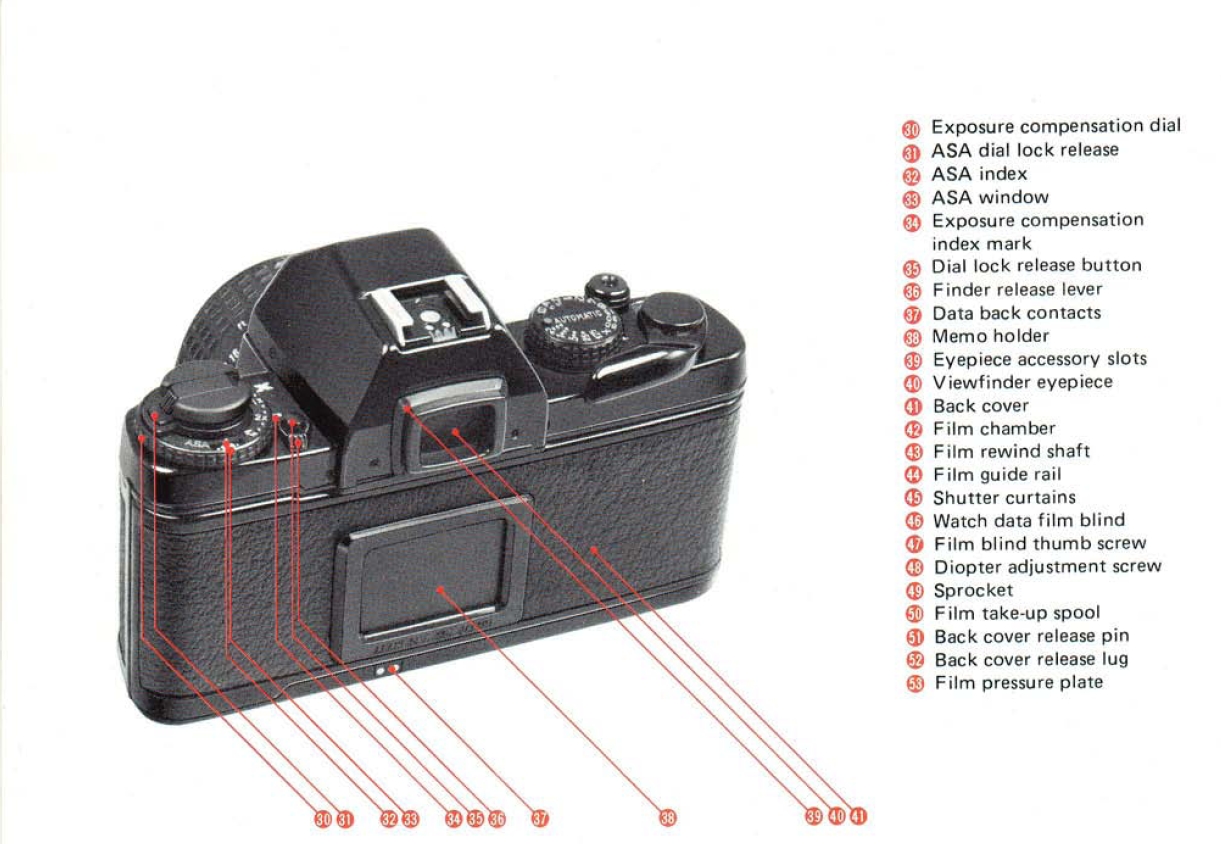
(30) Exposure compensation dial (31) ASA dial lock release (32) ASA index (33) ASA window (34) Exposure compensation index mark (35) Dial lock release/MD exposure check button (36) Finder release lever (37) Data back contacts (38) Memo holder (39) Eyepiece accessory slots (40) Viewfinder eyepiece (41) Back cover (42) Film chamber (43) Film rewind shaft (44) Film guide rail (45) Shutter curtains (46) Watch data film blind (47) Film blind thumb screw
|
(48) Diopter adjustment screw (49) Sprocket (50) Film take-up spool (51) Back cover release pin (52) Back cover release lug (53) Film pressure plate (54) Rubber grip (55) Automatic advance contacts (56) Auto film rewind coupling (57) Base plate (58) Battery chamber cap (59) Tripod socket (60) Film transport relay pin (61) Film rewind/ Multiple exposure button (62) Film transport rate control coupling (63) Film transport coupler (64) Rim of back cover (65) Roller |
BATTERIES
 |
Inserting the Batteries The electronic systems of your Pentax LX operate on two 1.5-volt mini batteries which are packed separately with your camera. To insert the batteries, first remove the battery chamber cap at the base of the camera by inserting the edge of a coin and turning in the direction of the arrow. Place the two batteries in the chamber as shown making sure the positive (+) sides face up. Replace the chamber cap and tighten securely. Battery Check After inserting the batteries it is often helpful to make a quick check to see if batteries are inserted properly and the camera's electrical systems are functioning. To check battery voltage, activate the camera's metering system by pressing the shutter button partway and observe the viewfinder LED shutter speed display. The shutter speed LED will glow continuously if normal voltage is being supplied. Low Battery Warning When batteries become weak the viewfinder shutter speed LED will begin to flicker. Although all electronic systems will continue to function accurately until the display goes out completely, both batteries should be replaced promptly to ensure uninterrupted operation of the camera's electronic exposure controls. |
Operating the Camera Without Batteries
When the LED shutter speed display no longer lights, batteries are dead. However, the LX camera incorporates an electro-mechanical shutter system which allows the photographer to continue taking pictures over a broad range of shutter speeds even when the batteries no longer function due to exhaustion or temporary failure from temperature extremes. Should battery failure occur while shooting within the camera's mechanical shutter speed range (i.e., from l /2000 second to "X") no interruption of camera operation will take place. However, should batteries fail while operating in the "Automatic" exposure mode or within the electronically controlled shutter speed range (from l /60 second to 4 seconds) the mirror will automatically lock up as a warning.
To continue picture-taking, simply turn the shutter speed dial to any of the mechanically operated settings (l /2000 second to "X").
NOTE: Should you wish to save the exposure being made when the mirror lock-up occurred, before changing the shutter speed dial, first cover the lens with the lens cap. Then, release the mirror as described above and press the film rewind/multiple exposure button at the base of the camera. Advance the film and take the picture.
IMPORTANT! NEVER THROW USED BATTERIES INTO FIRE OR EXCESSIVE HEAT TO PROTECT AGAINST EXPLOSION. Al WAYS KEEP BATTERIES OUT OF THE REACH OF CHILDREN.
Battery Care
Under normal operating conditions, the two 1.5-volt alkaline mini-batteries in your camera will last several months. Should batteries require replacement, replace BOTH at the same time with equivalent 1.5 volt alkaline or silver oxide mini-batteries.
Keeping a spare set of batteries on hand can help you avoid the inconvenience of battery failure during busy picture-taking sessions, especially when shooting in cold climates where failure due to extreme temperatures is not uncommon. Protect your camera from leakage by removing the batteries whenever the camera will not be in use for long periods of time.
CASE A CASE AND STRAP STRAP
Attaching the Strap
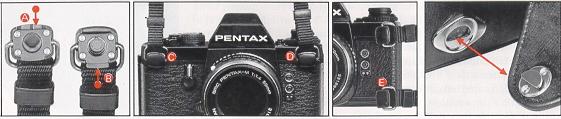
The strap which accompanies your LX can be used in two ways. Before attaching the strap, press the twin tab of the fastener (Tab A) with the edge of a coin until the single tab (Tab B) protrudes.
To Carry the Camera Horizontally
When carrying the camera around your neck or when using the Standard Eveready Case, first attach one of the strap fasteners to either Accessory Lug (C) or (D) and press Tab (B) with a coin until Tab (A) protrudes, thereby locking the fastener to the lug. Repeat with the other fastener.
To Carry the Camera Vertically
When you wish to carry the camera shoulder style, unlock the fastener attached to Accessory Lug C by pressing Tab (B) until Tab (A) protrudes. Then, remove the fastener and attach it to Accessory Lug (E)
IMPORTANT: Before carrying the camera by the strap, jiggle the fasteners back and forth while pulling on the strap to make sure that the fastener is locked securely to the accessory lug. If not locked properly, the strap could come off and damage your camera.
CASE
The standard Eveready Case for your LX features a half-moon lock as added protection against coming open while carrying the camera. To remove the case front cover, turn the cover a full 180° as shown so that the fastener unlocks, and separate.
CAUTION: Do not try to remove the front cover without first turning it so that the fastener unlocks (this could weaken or break the fastener).
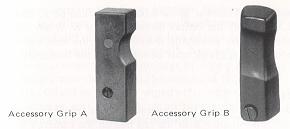 |
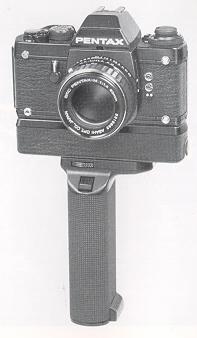
The Pentax LX system includes different types of accessory grips. Accessory Grip B is hand-contoured for added balance and handling convenience. For more precise requirements, the Accessory Grip A can be shaped to meet the photographer's individual needs using a whittling knife or similar instrument and sandpaper to smooth out the rough edges. |
 |
To attach either grip, first place the grip over the accessory lug (C) making sure the screw aligns with the socket at the bottom front of the camera (F). Tighten the screw using a screwdriver or coin. |
USING thread mount TAKUMAR LENSES
 |
Super-Takumar and SMC Takumar screw-mount lenses can be attached to your Pentax LX by using the Pentax Mount Adaptor K. When using this accessory, however, the automatic diaphragm of the lens will no longer function and meter readings must be made with the lens aperture stopped down. Mounting The Adaptor Removing The Adaptor |
MAINTAINING THE CAMERA
·Always keep the viewfinder eyepiece, finder-surface, lens and filters as clean as possible. Remove loose dust and dirt by first using a lens blower and then brushing gently with a camel's hair lens brush. Avoid scratching optical surfaces by trying to wipe away granular dust or grit. Smudges and fingerprint marks should be carefully wiped off using lens tissue or a clean soft cloth. A clean, previously-washed plain handkerchief is particularly good for this purpose. In extreme cases, use a good quality lens cleaning fluid to remove stubborn smudges.
·Never touch the mirror or the shutter curtain, particularly when changing the interchangeable focusing screen. When changing screens, use the pincette as described on page 48. Minor dirt or spots on the mirror will not affect the clarity of your photos.
·Whenever possible, carry your camera with its neck strap or in a carrying case or gadget bag. Accidentally dropping the camera can cause serious damage in the internal mechanisms.
·Be particularly careful not to drop the finder when changing viewfinder models. Slide the finder back slowly to avoid damage to the optical surfaces.
·Although your LX has specially-designed gaskets to minimize the possibility of damage from moisture, it is not waterproof. Several places exist where water can get inside and damage internal mechanisms. Protect both the camera body and lens from rain or splashing water. If the camera should get wet, dry it off immediately when a clean soft cloth. If it becomes submerged in salt water, place it in a pail of fresh water to retard the onset of corrosion and take it immediately to a Pentax Service Center to determine if repairs can be effected.
·The automatic shutter of the LX will operate over a temperature range of 50°C (1 22°F) to -20°C (-4OF), and the mechanical shutter will function from 50°C (122°F) to -30°C (-22°F). To assure reliable operation of the automatic shutter in low temperatures carry spare batteries.
·Always store your camera in a cool, dry, clean and well-ventilated place when it is not in use to avoid the possibility of damage due to condensation buildup. This is particularly important in areas of high humidity. Keep the camera in its case or in a gadget bag with the lens cap on as added protection. Condensation also builds up when bringing the camera into a warm room from the extreme cold, or vice versa. This can be prevented by immediately placing the camera in it's case, bag or wrapping so that temperature changes gradually.
USING THE SELF-TIMER/DEPTH OF FIELD PREVIEW/MIRROR LOCK
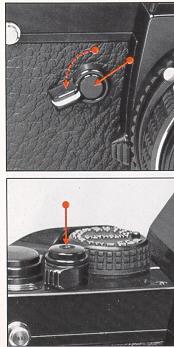 |
Your Pentax LX features a Multi-Function Lever which is used to operate the self-timer, preview depth of field and lock up the mirror. The lever operates as follows: Self-Timer The LX self-timer provides a variable 4 to 10 second delay of the shutter release. Press the lever release button and turn the multi-function lever counter-clockwise to set the timer delay. After making sure the shutter is wound, press the shutter release button to activate the timer run. The timer can be cancelled before the start of its run by returning the lever to its original position. Once you press the shutter release button, it can no longer be cancelled.
|
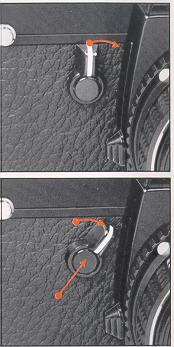 |
Depth of Field Preview
To preview depth of field, move the multi-function lever clockwise towards the lens mount. The lens diaphragm will then stop down to shooting aperture allowing you to see the area of acceptable sharpness in the camera viewfinder. Mirror Lock The mirror of the LX can be locked up to minimize vibration in close-up and photomacrography by simply pressing the lever release button and moving the multi-function lever clockwise towards the lens mount. It is not necessary to lock up the mirror for motor drive photography. To release the mirror lock, press the lever release button again.
|
MULTIPLE EXPOSURES
 |
Your Pentax LX allows you to make multiple exposures quickly and easily. After taking the first exposure, simply press the film rewind/multiple exposure button at the base of the camera to disengage the film transport mechanism and exposure counter. Advance the rapid wind lever to wind the shutter, adjust the exposure as required and press the shutter release to take the second exposure: Press the rewind/multiple exposure button once again for each additional exposure on the same frame. |
The random access feature of the LX camera's two way exposure counter enables you to produce multiple exposures on any frame as long as the film has not been wound off the take-up spool. As an example, let's say after reaching frame 15 you decide to double expose the image on frame 10. To do so:
1. Push the film rewind/multiple exposure button.
2. Lift the film rewind crank and wind the film back until the 9 index appears in the exposure counter window.
3. Cover the lens with the lens cap, advance the rapid wind lever, set the shutter dial to a manual speed to avoid long exposures and press the shutter release button.
4. Advance the rapid wind lever until the "10" appears in the exposure counter window and make the second exposure.
 |
If you wish to make double exposures on the remaining frames, or again on the same frame, you must press the film rewind/multiple exposure button once again for each additional exposure. To return to the original frame without exposing the images already on film, cover the lens with the lens cap and advance the rapid wind lever until the 15 index appears in the exposure counter window. You will return to the original position on the frame within a 0.2mm tolerance. |
USING A TRIPOD/TIME EXPOSURE AT "B"
 |
Using a Tripod The tripod socket at the base of the LX camera is designed to accept standard tripod threads having a depth no greater than 5.5mm (0.22 in.). To prevent any possibility of damage to the camera's internal mechanisms, do not use tripods with longer mounting screws and always avoid over tightening. Tripod Spacer Time Exposures at "B" |
INFRARED PHOTOGRAPHY
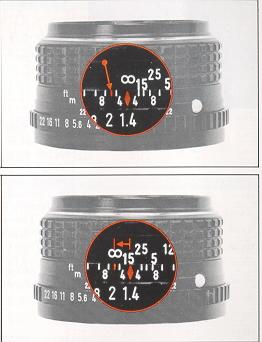 |
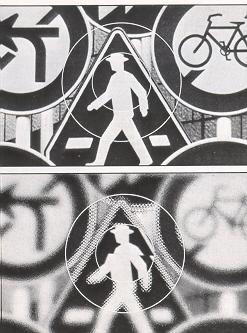
Because black & white infrared film records light rays which focus differently than light in the visible spectrum, when shooting it is necessary to adjust the focusing ring accordingly. After focusing normally on the subject, note the subject-camera distance on the lens distance scale and turn the focusing ring until that distance setting aligns with the orange infrared index mark. In the top photo, the lens is focused at infinity (00) for normal photography; in the bottom photo it has been adjusted for infrared photography by moving the infinity mark to the orange infrared index. NOTE: Compensation is not required when using infrared color films. If you wish to try IR photography, go digital. There are B&W and color IR abilities with digital cameras.
|
DEPTH OF FIELD SCALES
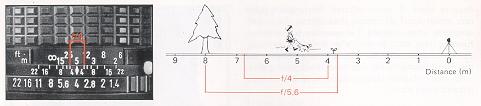
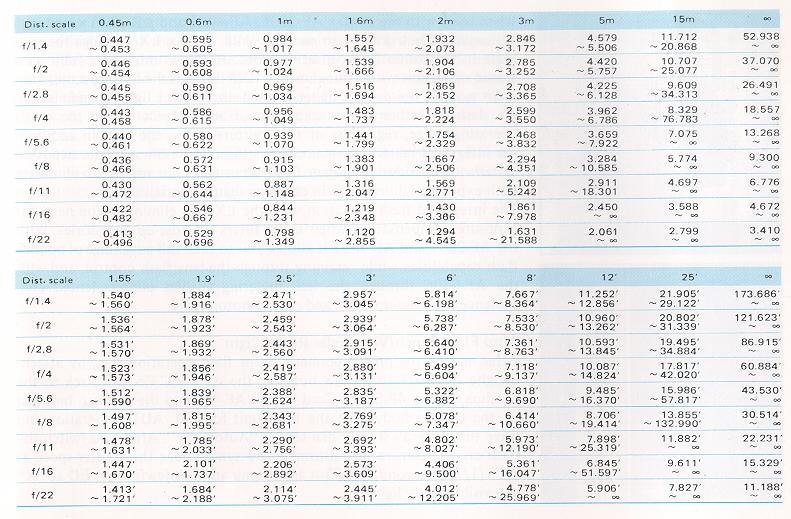
Depth of field is the area in acceptable sharpness in front of and behind the subject in focus at a particular f/stop setting. Depth of field can be checked visibly by activating the depth-of-field preview while looking through the camera viewfinder. If more precise information is required, however, the depth of field scales engraved on most camera lenses provide a convenient means of determining the approximate distances.
The numbers engraved on either side of the depth of field scale represent f/stops. To read the scale, look at the distance scale of the lens opposite the index marks on the depth of field scale representing the f/stop set on the aperture ring. For example, in the photograph the lens is focused on a subject 5 meters away. At f/4 the depth of field is from approximately 4 to 7 meters. At f/5.6, the depth would be increased from approximately 3.6 meters to 7.9 meters.
DEPTH OF FIELD TABLES.
SHOOTING WITH TTL INTEGRATED AUTOMATIC FLASH UNIT
 |
When used with the Pentax AF-280T, AF-400T and AF-080C Ring Light Automatic Electronic Flash models, your Pentax LX provides the ultimate in electronic flash versatility. Because these units offer fully integrated operation with your camera's IDM through-the-lens light measurement system, the camera meter reads both ambient lighting and electronic flash to assure proper exposure of any subject within the unit's operating range, regardless of the aperture set on the lens. In addition, the integrated metering system allows the non-flash automatic exposure system to override flash when flash exposure is not needed to eliminate flash exposure failures even in changing lighting conditions. The integrated flash operation with the LX also eliminates the need for exposure compensation when using filters or close-up accessories. With the AF-280T and AF-400T it allows you to take full advantage of bounce flash capabilities while retaining through-the-lens flash control, and with the AF-080C through the lens metering enables unprecedented convenience for close-up work and macrophotography.
|
Auto Flash Synch/Viewfinder Ready Light
 |
After making the proper connection for flash operation (i.e., by attaching the AF-280T to the LX hotshoe, the AF-080C Control Pack to the hotshoe, or the 4P Synch Cord for the AF400T to the X synch terminal on the camera body), set the flash unit for TTL AUTO operation and leave the camera's shutter dial set for "Automatic". After you switch the flash on, the camera will automatically synchronize the shutter speed at "X" (1 /75th second) for flash and illuminate the viewfinder LED at "X" as a visible ready light.
Viewfinder Flash Exposure Confirmation The chart on page 40 summarizes the dedicated flash features of these three units with the LX. For additional operating instructions refer to the instruction manual accompanying your flash unit. |
"DEDICATED" AUTOMATIC AUTOMATIC FLASH UNITS
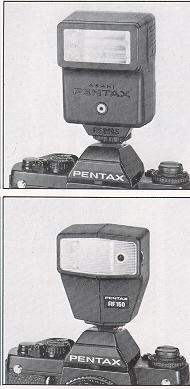 |
The Pentax AF-200S and AF-160 Automatic Electronic Flash Units are fully compatible with the LX camera's automatic shutter speed flash synchronization and viewfinder flash ready light features. When the flash unit is turned "ON" with the camera's shutter dial set at "Automatic" and the flash unit set for auto flash operation, the shutter automatically synchronizes at "X" (1/75th second) and the "X" indicator inside the viewfinder glows when the flash unit reaches full charge. NOTE: Dedicated flash is also offered with the above two units with the shutter dial set to "X." The AF-200S also features flash exposure override. When the viewfinder indication for the camera's metering system is between 1/30th second and 4 seconds (occasionally 1/60th second, due to stepless metering) flash synchronization is automatically obtained; when faster speeds are indicated, however, non-flash exposure system overrides flash, preventing overexposure. (This feature is not offered with the AF-1 60).
|
OTHER FLASH UNITS
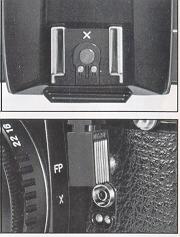 |
Your LX camera is designed to accept a wide array of flash models using either the built-in hotshoe of the standard FA-1 Viewfinder or the synchronization terminals at the front of the camera body. The "X" terminal is for synchronization of electronic flash or F-type and MF-type bulbs; the "FP" terminal for synchronization with focal plane bulbs. The LX system offers you the unique option of synchronization even with non-dedicated electronic flash units with the shutter dial set at "Automatic." In addition, manual speeds from "X" through "B" may be used. On "Automatic" the synchronization range is between 1/30th second and 4 seconds. Do not use "Automatic" for flash when the viewfinder indicates a faster speed or the complete frame will not be exposed; be sure to take precaution against picture blur when long exposures are indicated. The chart below represents the usable synchronizations with both electronic flash and bulb-type flash units. |
ATTACHING THE VIEWFINDER
 |
Your Pentax LX is a complete System 35mm SLR which offers you an exceptionally wide variety of interchangeable viewfinders (see page 46). Once you have selected the viewfinder best suited your picture-taking needs, attach it to the camera body as follows: Remove the protective body cap by moving the finder release lever counter-clockwise and sliding the cap away from the camera body as shown. Carefully remove the protective cap from the finder and align the finder with the body, making sure both units are seated properly. Slide the kinder toward the front of the camera body until it locks firmly in place. When attaching the finder, it's a good idea to jiggle it to make sure it is locked securely in place. To remove the finder on the camera for attaching a new finder, move the finder release lever counter-clockwise and carefully remove the existing finder by sliding it away from the camera body slowly and smoothly. Do not move too quickly to avoid dropping the finder on your working surface and damaging it. Place the protective finder cap on the finder to protect it against dust and scratches. IMPORTANT: Avoid touching the glass surfaces of the finder, eyepiece and camera body when attaching or removing the finder to protect against possible damage from fingerprints, dust, grit and grease. When absolutely necessary, use a blower or camel's hair brush to remove loose dust or grit and ensure the brightest, cleanest image. |
Adjusting The Diopter Correction
 |
Pentax FA-1 and FA-2 Interchangeable Viewfinders feature built-in diopter correction for the focusing convenience of eyeglass wearers. To adjust the degree of correction, first move the finder release lever counter-clockwise and gently slide the finder away from the body until the diopter adjustment screw is visible. With the finder in this position, carefully bring the camera up to your eye and look at split-image center spot in the center of the viewfinder. Using the tool packed with the finder, turn the adjustment screw until the border lines of the center spot come in sharp and crisp. Remove the tool and slide the finder toward the front of the camera body to once again lock it securely in place. |
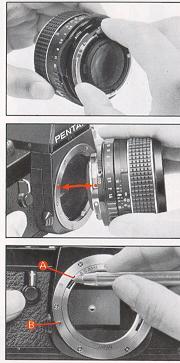
MOUNTING THE LENS
 |
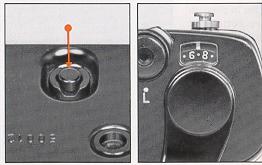
After removing the rear lens and body caps, hold the camera firmly in your left hand and align the red dot (A) on the camera body with the red dot (B) on the lens. Insert the lens into the body chamber until it seats against the lens mount and turn it clockwise until it locks into place with an audible click. In dim light situations where it becomes difficult to see the red dots, align the raised white node (C) on the lens barrel with the lens release (D) by touch and continue mounting the lens as described. When mounting longer lenses such as telephoto or zoom focal lengths, it's a good idea to rest the camera body in the palm of the left hand. This procedure provides a better balance and more convenient handling during the mounting operation. WHEN CHANGING LENSES OUTDOORS WITH FILM IN THE CAMERA, TAKE THE ADDED PRECAUTION OF AVOIDING DIRECT SUNLIGHT.
|
Removing the Lens
To remove the lens, hold the camera in the left hand and press the Lens release button 13 while turning the lens counter-clockwise with the right hand.
IMPORTANT: If it becomes necessary to put the lens down without the rear lens cap in place, make sure the lens rests only with the front element down. Never put the lens down with the front element up.
The film advance system and exposure counter of your new Pentax LX are designed to provide you with the utmost in rapid winding convenience and frame indication accuracy.
ADVANCING THE FILM
 |
Shutter Wind Indicator When the shutter has been wound for the next exposure, the shutter winding indicator turns red as a reminder. The Indicator returns to clear when the shutter has been fired. |
|
Two-Way Exposure Counter The LX exposure counter is a sequential type which advances one frame each time the rapid wind lever or film transport is activated. The scale is indexed from "O" to "36" with frames "12," "20," "24" and "36" marked in red. The counter also operates in reverse when rewinding the film and disengages when making multiple exposures to ensure frame indication accuracy. It automatically resets to "O" when the back cover is opened. |
Rapid Wind Lever The LX features a single-stroke 120 rapid wind fever which advances the film and winds the shutter. A 25° stand-off position is provided for rapid winding ease and comfort.
LOADING THE FILM
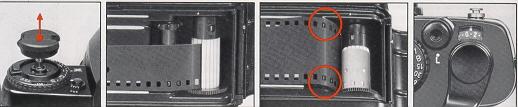
* To avoid unnecessary delays when loading the film, before starting it's a good idea to set the shutter dial to one of the faster manual settings, e.g. 1/2000th second. If you must load film with the dial set to "Automatic," remove the lens cap and aim the camera towards a bright light source to avoid excessively long shutter speeds when advancing the film.
* Open the camera back by lifting up sharply on the film rewind knob. Insert the film cartridge in the film chamber and lock the cartridge in place by returning the film rewind knob to its original position.
* Draw the film leader across the back and insert it into any of the white needles in the film take-up spool. Make sure the film is engaged properly on the spool by inserting the leader at least the width of one perforation.
* Wind the film by alternately advancing the rapid wind lever and firing the shutter release button until both top and bottom sprockets engage the film perforations. When you are sure the film has engaged properly, close the back cover and wind the film rewind crank in the direction of the arrow to take up any slack.
* Continue advancing the film until the exposure counter registers "1." You can be sure the film is moving properly through the camera by checking to see that the film rewind knob rotates each time the rapid wind lever is advanced.
|
|
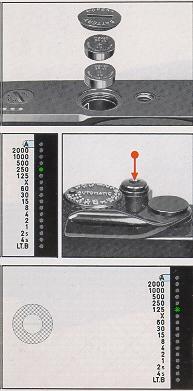
SETTING THE FILM SPEED /MEMO HOLDER To set the film speed, press the ASA dial lock release and turn the dial until the ASA number of the film being used is opposite the index mark. To ensure accuracy, make sure the dial locks only in the click-stop positions. The chart below represents the index markings on the LX film speed scale. |
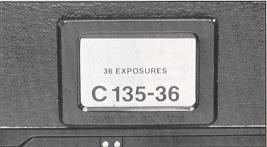 |
MEMO HOLDER For added convenience, your LX features a film memo holder which acts as a reminder of the film type and number of exposures loaded in the camera. Simply tear off the end of the film carton and insert it into the holder frame. |
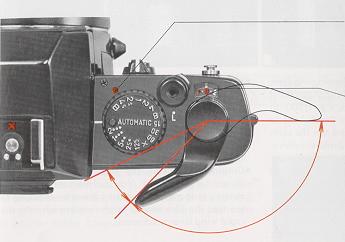
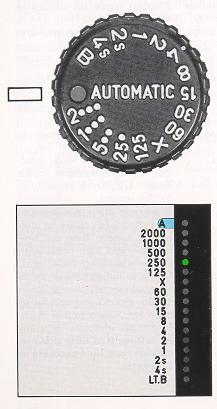
SETTING THE SHUTTER DIAL
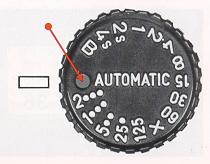 |
To set your Pentax LX for automatic exposure control, rotate the shutter dial until the word "Automatic" locks into place opposite the index mark as shown. When manual control is desired, press the shutter dial lock release and turn the dial until the speed setting you wish to use aligns with the index at the click-stop position. Indices on the dial from "2000" to "2" represent fractions of a second (i.e., 1/2000th second to 1/2 second) while "1" through "4S" represent full second increments. The "X" index setting corresponds to 1 /75th second for synchronization with electronic flash units not providing "dedicated" flash capability with the LX camera (see page41). |
Electronically-Controlled Shutter Speeds
Your Pentax LX provides electronically-controlled stepless shutter speeds in the "Automatic" mode from 1/2000th second down to 125 sec. (At ASA 100, f/1.2) and electronically-controlled manual shutter speeds from 1/60th second to 4 full seconds. These speeds are not functional without batteries or when battery failure occurs.
Mechanically-Controlled Shutter Speeds At shutter speed settings from 1/2000th second to "X" and at the "B" (Bulb) setting, the shutter operates mechanically without the need for battery powered. These speed settings should be used in the event battery failure interrupts normal camera operation.
ACTIVATING THE METER
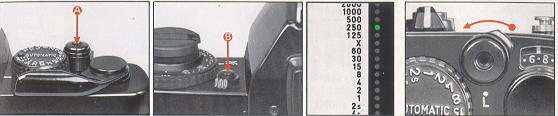
The LX provides you with the option of activating the exposure meter in two ways: /9 with the shutter button and (B) with the dial lock release/MD exposure
· check button.
Shutter Release Button For general shooting, it is simplest to activate the meter for exposure checks using the LX's feather touch shutter button, which also serves as a meter "on" switch. By pressing the shutter button lightly, both the exposure metering system and viewfinder LED display are activated and remain on up to 25 seconds, after which the meter and display will automatically turn off to prevent excessive battery drain.
Meter Activation/Exposure Checks with Motor Drive and Winder You can also activate the LX's exposure meter using the dial lock release/MD exposure check button. When pressed this activates the meter and lights the viewfinder display for up to 25 seconds the same as the shutter button. Whether you use the shutter button or the MD exposure check button for normal exposure is optional. However, to activate the meter and check the exposure when using the LX in conjunction with the motor drive or winder, always use the MD exposure check button. This is because the shutter stroke is shorter than normal when the motor drive and winder are attached and use of the shutter button in this instance may cause premature shutter release.
Shutter Release Lock Slide to the left to lock shutter button and metering system, slide to the right to unlock.
FOCUSING
 |
The Pentax LX comes equipped with the standard SC-21 split-image/microprism focusing screen which provides a split-image center spot surrounded by a microprism collar on a matte field The SC-21 is fully interchangeable with eight other focusing screen models to provide focusing versatility capable of meeting almost any picture-taking need (see page 49). When using the split-image center spot simply turn the lens focusing ring until the broken image in the center spot in the viewfinder aligns as one. When using the microprism collar surrounding the center spot, rotate the lens focusing ring until the "shimmering" effect in the collar area seems to disappear. The matte field is quite handy for focusing in rapidly changing conditions where there simply isn't time to use either the split-image spot or microprism collar or for focusing with long telephoto lenses having small apertures. To focus, turn the focusing ring on the lens until the image on the matte field appears sharp and crisp. |
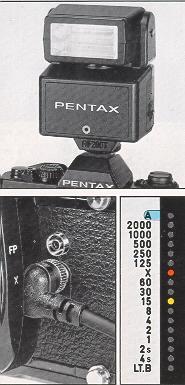
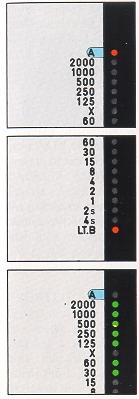
THE STANDARD FA-1 VIEWFINDER DISPLAY
 |
Aperture Window Displays f/stop set on camera lens.
Red Flag Exposure compensation warning. Blue Flag Indicates position of shutter dial. Red LED Indicates overexposure when lit. A Indicates automatic exposure control. Shutter Speed Scale Represents shutter speeds as they appear on shutter dial. Green LEDs Glows to indicate meter selection of hand-hold able speeds from 1 /2000th second to 1/30th second. "X" Electronic flash synchronization. Red LED glows to indicate automatic flash synchronization and flash ready with Pentax dedicated flash units. Yellow LEDs Glows to indicate meter selection of speeds slower than 1/30th second as reminder to open lens, use tripod or flash. LT, B In manual, indicates "B" shutter setting; Red LED glows to indicate long time exposure in automatic. |
SHOOTING AUTOMATICALLY
 |
Whenever time is limited and light is changing rapidly, you're sure to find the automatic exposure control capabilities of the Pentax LX a useful and welcome feature. Because the LX incorporates a direct off-the-film plane light measurement system, readings are made continuously to ensure uncanny accuracy even under the most difficult lighting conditions. For macrophotography and portraiture where depth-of-field control is extremely critical, the aperture-preferred system of automation provides the maximum in flexibility, ease of operation and convenience. The LX is equally responsive, however, in fast action situations where by simply opening the lens to its widest aperture, the camera automatically selects the fastest possible shutter speed lighting will allow to capture those fleeting moments. To operate the Pentax LX in the automatic exposure control mode, first rotate the shutter dial until the word "Automatic" locks in place opposite the index mark. Set the lens f/stop you desire on the camera lens and activate the metering system by pressing lightly on the shutter release button. (if using motor drive or winder, check the exposure with the dial lock release/MD exposure check button) The LX will then read the amount of light striking the film plane, select the precise shutter speed required for a proper exposure from the continuously variable range of 1/2000th second down to 125 seconds curing normal temperatures. The approximate speed selected is indicated on the viewfinder display. Speed selected by the camera can be changed by merely selecting a different f/stop or by using the exposure compensation dial (see page 24). To take the picture, press down firmly and smoothly on the shutter release button. |
SHOOTING AUTOMATICALLY
 |
A red LED will glow next to the "A" index on the viewfinder scale to indicate overexposure. When this occurs, stop your lens down or change to manual exposure control to obtain acceptable exposures. |
| A red LED will glow next to the "LT, B" index on the scale when there is insufficient light for a proper exposure or when the camera has selected a time exposure longer than 4 seconds in the automatic mode. | |
| Green LEDs are used along the shutter speed scale between 1 /2000th and 1/30th second to indicate hand-hold
able speeds. |
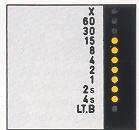 |
Yellow LEDs are used along the shutter speed scale between 1/1 5th second and 4 seconds as a slow speed warning and reminder to use a tripod or supplemental lighting, or to change the lens to a wider aperture setting. |
IMPORTANT: Should you accidentally press the shutter release with the lens cap on or in the dark while the shutter dial is set to "Automatic," an excessively long exposure will result. To re-set the camera, move the dial to one of the manual speed settings and return it to the "Automatic" position before resuming shooting.
USING THE EXPOSURE COMPENSATION DIAL
 |
Although the center-weighting of your LX camera's metering system is designed to provide accurate exposure measurement under the majority of lighting conditions, when using the camera in the automatic mode you may find that a degree of exposure adjustment is desirable. This is particularly true in scenes with extremely contrasty backgrounds or foregrounds, or where special creative effects can enhance the overall quality of the photograph. The exposure compensation dial allows you to make these adjustments quickly and easily. |
|
|
The dial, located beneath the film rewind knob, permits you to override the automatic exposure setting by a full +2 EV (i.e., two full f/stops over or underexposure) in 1/3 increments. The dial is indexed at 4X (2 f/stops increase), 2X (one f/stop increase), 1/4X (2 f/stops decrease' and 1/2X (one f/ stop decrease) with click stops at each 1/3 increment.
Normal Position: For normal automatic exposure control, make sure the dial is set to the "1X" position. The Dial locks firmly in this position to prevent accidental movement.
When the dial is off the "1X" index, a red flag will appear in the upper right-hand side of the camera viewfinder as a reminder.
 |
BACKLIT SUBJECTS: When shooting a subject against a bright background such as a window, bright sky, sand or snow, the camera meter will tend to underexpose the subject. To compensate, press the dial lock release and change the dial towards the 2X or 4X position depending on the degree of additional exposure desired. |
 |
FRONT LIT SUBJECTS: When your subject is spotlighted against a dark background such as on a stage, the meter will tend to overexpose subject details creating a washed-out appearance. To compensate, press the dial lock release and change the dial to wards the 1/2X or 1/4X position depending on what degree of underexposure is necessary or desirable. |
EXPOSURE COMPENSATION RANGE
 |
While the range of the exposure compensation dial is sufficient to allow exposure compensation at all film speeds featured in the camera's film speed range, with extremely fast and extremely slow films, compensation is not available for the plus and minus settings indicated by the black dots below. |
MANUAL EXPOSURE CONTROL
 |
In the manual exposure mode your Pentax LX provides rapid response through-the-lens metering combined with an extensive manual shutter speed range from 1/2000th second to 4 full seconds. To set the LX for manual exposure control, press the shutter dial lock release and move the dial from the "Automatic" position. The shutter speed selected by the dial will be displayed in the camera viewfinder by a blue flag at the I right-hand side of the scale. Metering With Pre-set Aperture In situations where depth of field is critical, it's a good idea to pre-set the aperture when metering. Once you've turned the lens aperture ring until the desired f/stop appears in the viewfinder aperture window, activate the meter and viewfinder display by pressing the shutter release lightly. To set the correct shutter speed for a proper exposure, rotate the shutter dial until the blue flag aligns with the speed recommended by the I meter via the glowing LED. A red LED at the top or bottom of the scale | indicates that the f/stop-speed combination is out of the camera's metering range and should be changed accordingly. |
Metering With Pre-set Shutter Speed
When fast action calls for pre-setting the shutter speed, rotate the shutter dial until the blue flag in the viewfinder aligns with the shutter speed index desired. Activate the viewfinder display by lightly pressing the shutter release and rotate the aperture ring until the LED along the shutter speed scale aligns with the pre-selected speed. A red LED at the top or bottom of the scale indicates that the speed-f/stop combination is out of the camera's metering range and should be changed accordingly.
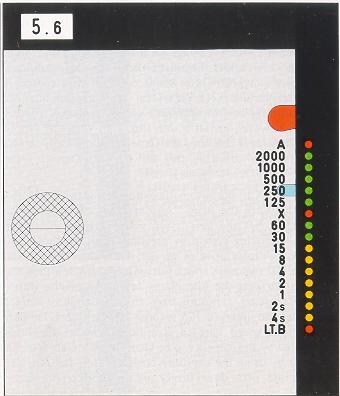
METER COUPLING RANGE -
The IDM (Integrated Direct Metering) system of your Pentax LX assures superbly accurate exposure readings over a broad range of shutter speed/film speed combinations. The working EV range of the IDM metering system for both manual and automatic exposures is reflected in the reference chart above. With ASA 100 film at f/1.4, for example, the manual coupling range extends from EV 1 (1 sec. at f/1.4, 2 sec. at f/2) through EV 19 (1/2000th sec. at f/16, 1/1000th sec. at f/22). In the automatic mode with ASA 100 film and an f/1.2 lens, it extends all the way from EV -6.5 through EV 20 (125 sec. at f/1.2 - 1/2000th sec. at f/22 under normal temperatures and humidity).
Although the meter coupling ranges for the respective manual and automatic exposure modes change in relation to film speed, you can calculate what the working EV range would be at other film speeds by mentally adjusting the position of the frame of the chart which defines the coupling range for the mode in question. The red frame defines the manual meter coupling range and moves vertically along the right hand film speed index; the green frame defines the lower limits of the coupling range for automatic exposures and moves horizontally along the left-hand film speed index. The boundaries of the red frame should be disregarded when determining the coupling range for automatic exposures; at the higher end of the EV scale, meter coupling is provided for all available film-speed/shutter-speed/f-stop combinations during automatic exposure operation.
UNLOADING THE FILM
 |
When the last frame on the film cassette has been exposed you will feel resistance when trying to operate the rapid wind lever. Do not force the lever to avoid tearing the film from the cassette spool.
To rewind the Film, press the film rewind button at the base of the camera, lift the film rewind crank as shown and turn it in the direction of the arrow until tension on the crank lessens. The two-way exposure counter allows you to double check to make sure the film has rewound properly into the cassette before opening the camera back. After rewinding, lift up sharply on the film rewind knob to open the camera back and remove the film cassette for processing.
|
AVOID DIRECT- LIGHT WHEN UNLOADING THE FILM
HOLDING THE CAMERA
 |
For proper balance, handling convenience and quick access to all camera controls, hold the camera in the palm of your left hand with the thumb and index finger around the lens barrel as shown. The right hand should be positioned comfortably around the camera body with the index finger over the shutter release button. |
Shooting Horizontally-- Hold the camera as described above and keep your arms close to your body to minimize camera movement which can cause blurry photographs.
Shooting Vertically -- Press the camera tightly to your forehead for added support and keep the arm drawn towards the body.
LX INTERCHANGEABLE VIEWFINDERS
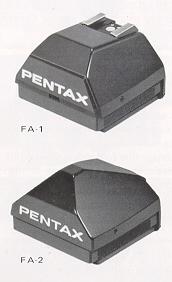 |
The Pentax LX System includes an array of optional interchangeable viewfinders designed to meet almost any photographic situation. Because the LX Integrated Direct Metering system measures light at the film plane, no exposure compensation is required with any of the LX Finder models. Model FA-1 Eye-Level Pentaprism Finder
|
Model FA-1W Eye-Level Pentaprism Finder The same features as the FA-1 with an extended built-in diopter correction range from - 3 to +1 inclusive.
Model FA-2 Eye-Level Pentaprism Finder
Similar to the FA-1 standard Pentaprism viewfinder without the built-in hotshoe. Available in the - 1.5 to 0 diopter range as with the FA-1; no wide range model is available.
NOTE: The Pentax FA-1, FA-1W and FA-2 Finder models are fully compatible with all Pentax critical focusing accessories.
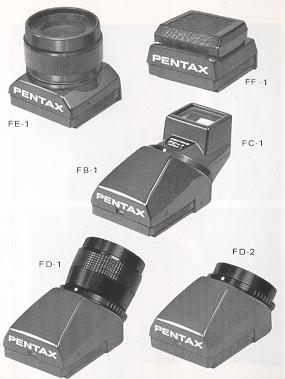 |
Model FE-1 Waist-Level Finder A high magnification waist-level viewing model ideal for close-up work or in any situation where critical focusing is important. Adjustable diopter correction range from--5 to +4 inclusive is provided and all data except aperture setting is visible.
Model FF 1 Waist-Level Finder Model FB-1 System Finder FC-1 Action Eyepiece -- Rotates a full 180 for total flexibility in the viewing angle. |
FD-1 Magni Eyepiece--A waist-level finder eyepiece with a convenient 45° viewing angle. Focusing-type diopter correction from -4.5 to +3.5 inclusive.
FD-2 Standard Eyepiece --Provides a convenient 45° viewing angle ideal for microscope use or copy work.
CHANGING THE FOCUSING SCREEN
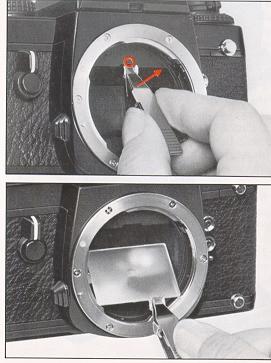 |
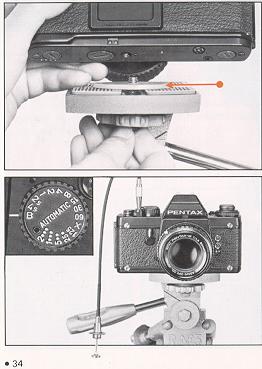
To change the LX Focusing Screen, use the pincette supplied with your new focusing screen. Insert the head of the pincette against the top plate of the mount so that the two ear-like tabs rest against the indentation in the plate as illustrated. Then, gently lift upward on the handle of the pincette until the focusing screen frame drops down. CAUTION: Move the pincette very carefully. If the screen doesn't release immediately, do not exert excessive pressure: a slip could damage either the focusing screen or mirror surface. Squeeze the handle of the pincette and very carefully sandwich the tab of the focusing screen between the two sections of the head. Lift the screen out of the frame and place it in the container for protection. To install the new focusing screen: Pick up the screen by the tab with the pincette as described above and place it on the focusing screen frame with the tab on the right hand side as shown. Push the frame back to its original position until it locks in place. |
IMPORTANT: Only handle the screen with the pincette and by the tab only. Never wipe screen surfaces with clothing or a cloth to avoid damage. Remove dust particles with a blower or camel's hair brush.
The LX system includes twelve focusing screens to provided focusing aids for a wide variety of general and specialized applications.
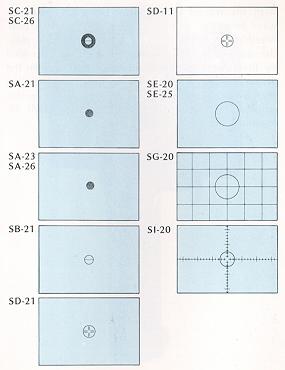 |
SC-21 The standard screen featuring a central split-image spot with a microprism collar on a matte field. SA-21 A highly versatile yet simple screen comprised of a central microprism grid on a matte field. SA-23 Similar to the SA-21 with sharper prism angles to aid focusing with high speed (f/1.2 --f/2.8) lenses. SA-26 A microprism screen with a matte field suited for telephotos longer than 300mm. A 4° prism angle permits use up to f/8. SB-21 Standard split-image focusing center spot on a matte field. SC-26 A split-image/microprism screen on a matte field for use with telephotos in excess of 300mm. A 4° prism angle permits use up to f/8. The split-image spot diameter is 25mm while the microprism collar is 5mm in diameter. SD-21 An all matte focusing screen with central cross hairs for use in photomicrography, astrophotography and photomacrography in dim light. |
SD-11 Similar to SD-21 but with no matte.
SE-20 An all-matte screen especially suited for focusing small aperture telephoto or macro lenses.
SE-25 An all-matte screen suitable for telephoto lenses longer than 300mm. For situations where the split-image and microprism are inadequate.
SG-20 Similar to the SE-20 but with etched cross lines in 6mm squares. Excellent for architectural subjects and multiple exposure composition.
Sl-20 Similar to SE-20 but with engraved scales for determining subject size with bellows and microscope photography.
WINDER/MOTOR/ DRIVE SYSTEM
With the Winder LX or Motor Drive LX, you'll always be ready to capture even the fastest action. Whether its sports, news or active children at play, the automatic film transport capabilities provided by these accessories help you keep your eye on the action and the shutter ready to fire. Even changing film is made simpler and faster through the built-in automatic rewind feature which rewinds a full 36 exposure film cassette in just seconds.
 |
Winder LX Powered by four 1.5-volt AA batteries, the Winder LX can record the action at speeds of up to 2 frames per second at the continuous ("C") setting or provide single frame exposures with automatic film advance at "S" while retaining full synchronization with all LX camera shutter speeds (except "B"). The compact, lightweight unit attaches quickly and easily to the camera's tripod socket and can be fired by the camera shutter release or the optional remote control unit. An LED flashes when the film stops automatically at the end of the cassette and the automatic rewind feature rewinds a full 36-exposure cassette in about 1 15 seconds. |
 |
Motor Drive LX To meet the challenge of professional high speed sequential applications, the Motor Drive LX provides automatic film advance at speeds up to 5 frames per second in "High" or as slow as 0.5 frame per second in "Low." Other features include a single-frame setting, full synchronization with all camera shutter speeds (except "B"), an end of film LED and automatic film rewinding (36-exposures in 8 seconds). The Motor Drive LX mounts quickly to the base of the camera via the tripod socket. The shutter can be triggered by the camera shutter release button, the release button on the Battery Grip M or by remote control via the optional remote control unit. An optional 250-exposure bulk film back is also available. The Motor Drive LX provides a wide variety of power options including the Battery Grip M for penlight batteries, the Ni-Cad Battery Pack LX for rechargeable nickel cadmium cells or the Power Pack M for standard AC current.
|
DATA RECORDING SYSTEM

|
By taking advantage of the fully interchangeable back of your Pentax LX, the camera can quickly and easily be converted into a sophisticated data camera capable of recording valuable information directly on the finished photograph. This can be a valuable tool in scientific and biomedical photography, in architectural and industrial applications to record progress of a given project, in government and evidentiary photography, or simply for recording the growth of the family as years pass. |
 |
Dial Data LX The Dial Data LX provides thee alpha-numeric wheels indexed in numbers from 0 to 36 and in letters from A to O. This accessory is particularly good for recording the year-month-day a photograph is taken as well as for recording exposure information such as shutter speed, aperture or frame number directly in the corner of the frame. The Dial Data LX is powered by three 1.5-volt Alkaline or Silver Oxide mini-batteries and can be set for two ASA ranges for color film (ASA 25-50 and ASA 64-400) as well as for black & white films. A built-in battery check and confirmation LED are also provided.
|
 |
Watch Data LX The unique Watch Data LX allows you to record the face of a timepiece directly in the corner of your photograph to display the day of the month, hour, minute, and second the photograph is taken. The central portion of the watch itself provides a ground glass portion where additional information can be penciled. Three settings are provided for black & white film (ASA 100, 200 and 400) and one setting for color film (ASA 160). The Watch Data LX is powered by a single 6-volt Alkaline or Silver Oxide Battery and provides a built-in confirmation LED and battery check. |
Using the Film Blind
 |
When using the Watch Data LX, it is necessary to lower the special film blind to block out the corner of the film for recording purposes. Before taking pictures with this back, open the camera and lower the blind by turning the small thumbwheel on the lower right hand side of the shutter counter-clockwise. Remember to return the film blind to its normal position before resuming non-data photos. MAKE SURE YOU AVOID TOUCHING THE SHUTTER CURTAINS. Note: The film blind is used only for the Watch Data LX and need not be lowered when using the Dial Data accessory. |
PENTAX LENS
LENS
SYSTEM
 |
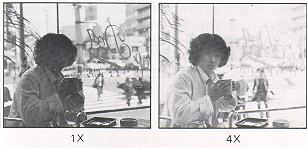
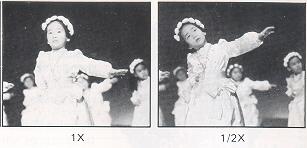
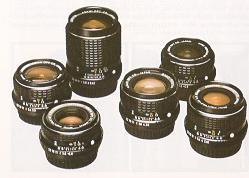
The over 40 SMC Pentax Lenses which make up the Pentax Bayonet Lens System feature the latest in computer designs and represent the superb quality that has been associated with Pentax optics for over 60 years. The available selection runs all the way from 15mm ultra-wide-angle to 2000mm super telephoto and offers an assortment of special purpose lenses including eight zooms, plus fisheye, macro, bellows and shift lenses. All SMC Pentax Lenses feature exclusive Super-Multi-Coating to minimize flare while increasing light transmission and enhancing resolution, contrast and color balance. Superb Pentax quality control assures matched color balance throughout the lens system and the utmost in mechanical and optical reliability. |
* the photo below shows two kinds of optical groups, each made up of two glass elements cemented together. The group on the left has been Super-Multi-Coated; significant reduction in the amount of reflection is readily apparent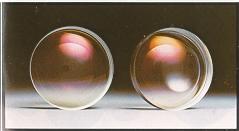 |
SUPER-MULTI-COATING (SMC)
SMC Pentax lenses evidence very low levels of flare, virtually no ghost images and offer excellent image reproduction and color rendition. The experienced pro can literally take pictures directly into the setting sun with them and obtain exciting results. The high quality of SMC Pentax lenses is the combined product of Pentax space-age optical engineering and SuperMulti-Coating, Asahi Optical's own unique 7-layer lens-coating process that eliminates both flare and ghost images, and transmits more light for vivid colors. Reflection ratio is a mere 0.2%, while reflection control is nearly flat against the whole range of visible light. These two factors result in improved performance in almost all lighting situations. |
* With Super-Multi-Coating, flare and ghosts and other unwanted reflections are almost totally eliminated; images are further sharpened by elimination of side-lighting. With ordinary coating, flare is induced as direct sun rays trounce off of successive lens surfaces. |
Moreover, recently improved multi-coating techniques entail the coating of most glass surfaces within the lens, including some which were previously cemented together, and others which were only single-coated previously. The effects of Super-Multi-Coating are particularly outstanding with zoom lenses, which have a great many individual lens elements and transmit less light than other lenses. Without any coating a zoom lens transmits about 17.5% of the light. With conventional coating, transmission increases to 66.3%, while with Super-Multi-Coating, transmission is 95.3% -- about 50% brighter than with conventional coatings. |
Wide Angle Lenses
 |
Whether you're shooting a panoramic landscape, a party or the cover of an annual report, the Pentax SMC Lens System lets you select the focal length and features just right for your needs. From the incredible effects of the SMC Pentax 15mm f/3.5 to the classic wide angle view of the SMC Pentax-M 35mm f/2.8, over 10 different focal lengths provide the versatility in angle of view, lens speed and styling required to capture the unusual world of wide angle images. |
Telephoto Lenses
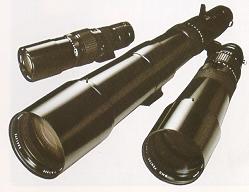 |
Fifteen focal lengths comprise the comprehensive Pentax SMC Telephoto lens group allowing the LX photographer to choose from portraits at 85mm, candids at 200mm, wildlife at 2000mm or just about anywhere in between. Designed to complement the lightweight, compact styling of the Pentax LX and all other Pentax compact 35mm SLR cameras, these superb telephoto and ultra telephoto lenses afford the photographer with the flexibility to meet al most any photographic challenge with complete confidence. |
Zoom Lenses
 |
The eleven lenses in this lens group are truly representative of the Pentax dedication to optical versatility and handling ease. Whether you're an architectural photographer requiring the wide angle perspectives of the SMC Pentax-M 24-35mmf/3.5, a nature lover who appreciates the power of the 135-600mm f/6.7 zoom or just an all-around photographer looking for the flexibility provided by the 40mm f/2.8-80mm f/4 Close Focusing Zoom, there's a Pentax zoom that's ideal for you. |
Special Purpose Lenses
 |
When the unusual calls and the demands require a special kind of handling, the SMC Pentax system is there. Whether you're exploring the canyons etched in the face of a grain of sand with a bellows, capturing a life-size image of a cherry blossom, or taking advantage of the unique perspectives of the 17mm fisheye lens or the perspective control provided by the 28mm shift lens, you can be confident that the images will be recorded with superb resolution, contrast and color balance. |
SPECIFICATIONS
Type: 35mm full-frame single lens reflex camera, with IDM off-the-film plane aperture-preferred automatic or full manual exposure measurement, TTL integrated flash control with Pentax "T"-type flash unite.
Lens Mount: Pentax Bayonet Mount with fully automatic diaphragm coupling.
Standard LENS: SMC Pentax 50mm f/1.2, SMC Pentax-M 50mm f/1.4, 50mm f/1.7, 50mm f/2, 40mm f/2.8.
Shutter: Electro-mechanical horizontally-run titanium focal plane shutter; manual speeds mechanically controlled from 1/2000th second to "X" (1/75th second) and electronically controlled from 1/60th second to 4 seconds; mechanical speeds and "B" operational without batteries; automatic exposures electronically controlled in stepless range from 1 /2000th second down to 125 seconds; shutter lock provided; shutter dial locks at "automatic" with push button release; built-in curtain blind for use with Watch Data LX.
Flash Control: TTL measurement of ambient and electronic flash lighting directly off film plane with "T"-type Pentax flash models providing auto flash synch at "X" and visible ready light/exposure check in viewfinder when flash reaches full charge; automatic flash synch and visible viewfinder ready light with other Pentax dedicated flash models.
Flash Synchronization: FP terminal and X terminal, plus contacts for TTL integrated automatic flash control at camera front
FA-1 standard Finder features built-in X-synch hotshoe with TTL contacts
Sell-Timer/ Preview: Multi-Function Lever provides 4 to 10 second delay manually activated self-timer, depth of field preview and mirror-lock capability.
Exposure Measurement: Open aperture, center-weighted, through-the-lens light metering for both automatic and manual modes. Integrated Direct Metering (IDM) system measures light at the film plane via Silicon Photo Diode (SPD): high speed measurements for automatic operation are made off fixed pattern on front shutter curtain, slow speed measurements off curtain pattern and film automatic electronic flash/ambient light measurement with TTL "T"-type flash models. Manual exposure range from EV 1 to EV 19 (ASA 100, f/1.4); stepless automatic exposure range extends to EV -5.5 ~.EV 20 (125 second at f/1.2 to 1/2000th second at f/22 at ASA 100 under normal temperatures and humidity). Meter activated by light pressure on shutter release button or MD exposure check button; automatic shut off after 25 seconds. ASA film speed range: ASA 6 ~ 3200
Exposure Compensation: Up to +2 EV automatic exposure compensation in automatic mode by dial control; dial indexed at 1/4X, 1/2X, 1X, 2X and 4X with click stops at 1/3 EV positions; red flag appears in viewfinder to indicate dial is off "1X" normal exposure position; dial lock provided at "1 X" with push button release.
Viewfinder: Standard FA-1 Interchangeable Eye-Level Pentaxprism Finder features silver-coating and shows 98% vertical, 95% horizontal of picture area plus full data viewfinder display; built-in Copter correction by adjustment screw. Finder removable by release lever.
Viewfinder Display: Tri-color display for TTL measured shutter speeds with green LEDs indicating hand-holdable speeds from 1 /2000th second to 1 /30th second, yellow LEDs as slow speed warning from 1/15th second to 4 seconds, and red LEDs to indicate overexposure or long time and X synch ready light with TTL and dedicated flash units; blue flag indicates automatic at "A" and manually selected shutter speeds; aperture visible in standard FA-1 finder model.
Focusing Screen: SC-21 standard with center split-image spot surrounded by microprism collar on ground glass field; fully interchangeable with 8 other focusing screen models through the lens mount.
Film Transport: Pentax Magic Needle Loading System. Single-stroke, rapid wind lever with 120° throw and 25° standoff angle; built-in shutter wind indicator. Accepts Winder LX and Motor Drive LX for automatic film advance and automatic rewind capability.
Exposure Counter: Additive two-way exposure counter moves from loading indicator to "36" with color-coded indexes at "0", "20", "24" and "36"; operates in reverse to indicate precise film location for rewind or tracking of multiple exposures.
Film Rewind: Crank type: Film Rewind Button doubles as multiple exposure button to disengage film advance mechanism. Automatic rewind with Winder LX and Motor Drive LX.
Power Source: Two 1.5-volt alkaline or silver oxide mini-batteries power all electronic systems in both automatic and manual modes; LED flickers in viewfinder to indicate low battery condition; mirror locks when batteries fail.
Mirror: Large back-swing type, instant-return mirror to virtually eliminate image cutoff with most lenses; lock provision.
Back Cover: Standard camera back with spring catch, built-in film memo holder. Back is fully interchangeable with Dial Data LX, Watch Data LX and LX Bulk Film Magazine.
Body Size: 144.5mm x 90.5mm x 50mm (5.7" x 3.6" x 1.9' ) with standard FA-1 Finder attached.
Weight: 570 grams (20 ounces) with standard FA-1 Finder and batteries.
Other Features: Optional hand grips, special gaskets to minimize entry of dust and moisture, rubber fittings at base for stability on flat surfaces, interchangeable strap fasteners, Tripod Spacer Ring for use with very compact or large diameter lenses , neck strap with shoulder pad.
WARRANTY POLICY
All Pentax cameras purchased through authorized bona fide photographic distribution channels are guaranteed against defects of material or workmanship for a period of twelve months from date of purchase. Service will be rendered and defective parts will be replaced without cost to you within that period, provided the equipment has not been abused, altered, or operated contrary to instruction. Because the tolerances, quality, and design compatibility of lenses other than Pentax lenses are beyond our control, damage caused by use of such lenses will not be covered by this warranty policy. The manufacturer or its authorized representatives shall not be Liable for any repair or alterations except those made with its written consent and shall not be liable for damages from delay or loss of use or from other indirect or consequential damages of any kind, whether caused by defective material or workmanship or otherwise; and it is expressly agreed that the liability of the manufacturer or its representatives under all guarantees or warranties, whether expressed or implied, is strictly limited to the replacement of parts as herein before provided.
Procedure During 12-month Warranty Period
Any Pentax which proves defective during the 12month warranty period should be returned to the dealer from whom you purchased the equipment or to the manufacturer. If there is no representative of the manufacturer in your country, send the equipment to the manufacturer, with postage prepaid. In this case, it will take a considerable length of time before the equipment can be returned to you owing to the complicated customs procedures required in Japan in importing and re-exporting photographic equipment. If the equipment is covered by warranty, repairs will be made and parts replaced free of charge, and the equipment will be returned to you upon completion of servicing. If the equipment is not covered by warranty, regular charges of the manufacturer or of its representatives will apply. Shipping charges are to be borne by the owner. If your Pentax was purchased outside of the country where you wish to have serviced during the warranty period, regular handling and servicing fees may be charged by the manufacturer's representatives in that country. Notwithstanding this, your Pentax returned to the manufacturer will be serviced free of charge according to this procedure and warranty policy. In any case, however, shipping charges and customs clearance fees are to be homed by the sender. To prove the date of your purchase when required, please keep the receipts or bills covering the purchase of your equipment for at least a year. Before sending your equipment for servicing, please make sure that you are sending it to the manufacturer's authorized representatives or their accredited repair shops, unless you are sending it directly to the manufacturer. Always obtain a quotation of the service charge, and only after you accept the quoted service charge, instruct the service station to proceed with the servicing.
This warranty policy does not apply to Pentax products purchased in the U.S.A., U.K., or Canada. The local warranty policies available from Pentax distributors in those countries supersede this warranty policy.