and historical purposes, all rights reserved.
This page is copyright© by
This page may not be sold or distributed without
the expressed permission of the producer.
I have no connection with any camera company.
This camera manual library is for reference
and historical
purposes, all rights reserved.
This page is copyright© by
![]() , M. Butkus,
NJ.
, M. Butkus,
NJ.
This page may not be sold or distributed without
the expressed
permission of the producer.
I have no connection with any camera company.
On-line camera manual library
If you find this manual
useful, Back to main camera manual page
CLICK HERE FOR A Pacemaker Graphic PDF
This is a condensed operating manual covering the basic points
of the Pacemaker GRAPHIC Cameras. If you desire a more complete manual, just
drop a line to our Technical Service Dept., and it will be sent to you.
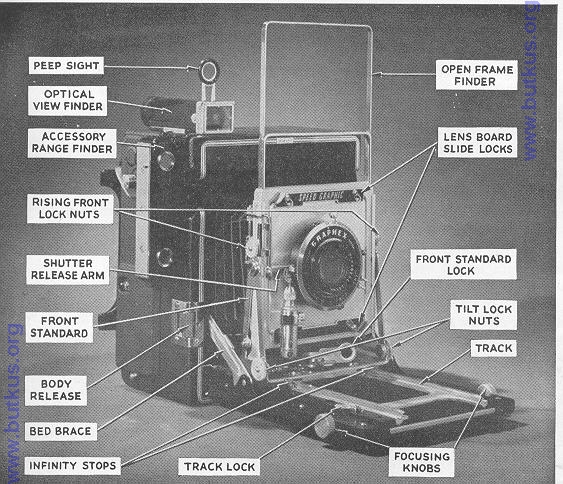
Opening the Camera: the bed release button located at the
top center or top left side of the camera body. Draw the front standard out to
the infinity stops and lock.
NOTE: that these are constant reference points to permit checking
ground glass sharpness at all times. They may be folded down to allow use of
additional bellows extension.
TAKING THE PICTURE:
3. Attach film receptacle and withdraw the dark slide.
6. Replace the slide of the film receptacle and change the film for the next
exposure.
GRAPHEX SHUTTERS
Flash with Synchronized GRAPHEX: Connect the cord from
contact posts on the shutter to the SHUTTER (series) Outlet of battery case.
Move synchronizer control lever to position recommended by the lamp
manufacturer's flash tables before winding shutter. Double "M" setting: for
faster (black) speeds, use black "M" position, for slower (red) speeds, use
corresponding red "M". For gas-filled type "F" lamps or high speed electronic
flash not operated by a relay, use "X-F" setting. Use red shutter speeds with SM
and SF lamps. Place in the "OFF position if flash is not being used or
shutter is being tripped with a solnoid. Trip shutter by the Body Release.
Do not attempt to use the button on the battery case.
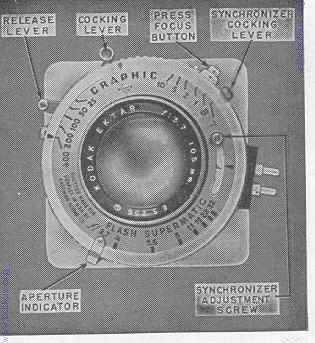
SUPERMATIC SHUTTERS
Selecting Speeds: Turn the outer knurled ring until a
pointer is opposite the shutter speed number for the exposure required.
Flash Synchronization with Flash Supermatic: Connect the
cord from the shutter contact posts to SHUTTER (series) outlet in the battery
case. To set, pull adjustment control button up to unlock, or loosen screw, if
shutter has this type of adjustment. Set synchronizer adjustment to position
recommended by lamp manufacturer's flash tables.
SUPERMATIC (X) SHUTTER
Position of Bed When Wide Angle Lens is Used
The GUAFLEX Technical Service Department will be pleased to answer-questions
relating to your GRAPHIC and help you solve photographic problems. When writing
to this Department, be sure to refer to the camera serial number and if
possible, send in negatives with exposure data.
GRAFLEX, INC.
MAIN OFFICE AND FACTORIES: ROCHESTER 8, N. Y., U. S. A. NO. 18BA/5-553
how about a donation of $3 to:
M. Butkus, 29 Lake Ave.,
High Bridge, NJ 08829-1701
and send your
e-mail address
so I can thank you.
Most other places would charge
you $7.50 for a electronic copy
or $18.00 for a hard to read Xerox copy.
This will help me to continue to host this site,
buy new manuals,
and pay their shipping costs.
It'll make you feel better, won't
it ?
If you use Pay Pal, use the link below.
Use the above address for a
check, M.O. or cash.
MADE FROM THIS HTML FILE
--
BETTER PRINTING --
1. Set the diaphragm pointer and the shutter speed scale according to the film
manufacturer's recommendation for the film being used. A good exposure meter is
invaluable for obtaining proper exposure. If using a Speed GRAPHIC, make sure
that the focal plane shutter is open when using the front shutter and vice
versa. Set or wind the shutter.
2. Focus the lens using the focusing scale, ground glass or accessory
rangefinder.
4. Center the subject matter in the open frame finder or optical viewfinder,
check the adjust. meets for parallax correction.
5. Hold the camera steady and squeeze back on the body release to make the
exposure.
Closing the Camera: Before closing the front bed or tilting it
downward, be sure to roll the track back as far as possible
with the focusing knob. Lock the front standard after sliding it back in the
camera body.
Focusing Scales: For greater distances, align the marking for
the same distance setting indicated on both scales. For shorter distances, set
the pointer at the front of the scale opposite the figure representing the
distance to the subject.
Focusing scales: must be calibrated for each individual lens. More than one
set of scales and stops can be fitted to Pacemaker GRAPHICS.
Finders: The open frame finder is generally used for fast
action. Click stops and scale markings for parallax adjustment are at the right
side of the open frame. Interchangeable masks eliding into the front frame of
the optical viewfinder indicate the field included by lenses of different focal
lengths. The correct setting on the parallax dial should be turned to the
indicator line along the top of the finder.
Ground Gloss Focusing: Press in on the small latch at the
bottom of the viewing hood. Open both shutters of the camera. To remove the hood
for close examination of the corners of the ground glass, press outward on the
spring clips at either side of the hood and lift off. To close the viewing hood,
press inward on the side wings, fold the lower flap up and fold the top down to
lock.
Groflok Bock: This uses ONLY GRAPHIC attachments. It
is a spring back with a panel removable by pressing inward on the knurled edges
of the panel arms at the top and bottom and sliding the assembly to the right
where it may be lifted off. The GRAPHIC Roll Holders, film pack adapters and
GRAFMATIC Film Holders may then be fitted and locked in place with the elide
locks. The last two accessories can also be inserted beneath the focusing panel
and locked in place with the slide locks.
Groflex Bock: This accepts ONLY GRAFEEX attachments.
Film receptacles and the focusing panel are held by top and bottom slide locks.
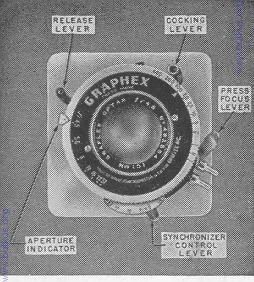
Selecting Speeds: Turn the outer knurled
ring until desired number is opposite the pointer on the front of the
shutter (additional pressure is required in turning to 1/400 to overcome
resistance of the booster spring).
To Operate: If you have a Speed GRAPHIC, be sure
the focal plane shutter is open. Set synchronizer control lever if flash is
being used. Set shutter speed and aperture indicator (diaphragm) for the
exposure required. (Use film exposure guide or a meter for best results). Move
winding lever to the right to wind the shutter. Hold the camera steady and
carefully squeeze the shutter or body release to make the exposure. For
convenience in opening the shutter for ground glass focusing, the "press focus"
lever may be used. Wind the shutter in the normal way, depress the "press focus"
lever until the shutter leaves open. To close, move the "press focus lever"
forward and upward. Trip the shutter as above. This shutter may be operated by
an external solenoid, if desired, but be sure to move control lever of
synchronized shutter to "OFF."
Graphex (X) Shutter: The GRAPHEX (X) shutter is operated in the
same manner as that described above. The contact posts on the side of the
shutter are intended to be used only with Class "X" (zero delay) high speed
electronic flash units, and not with standard flash lamps. For synchronization
with standard flash lamps and with relay operated high speed units, a solenoid
should be attached to the shutter and synchronized with its operation.
For synchronization with high speed electronic units not operated
by a relay, wind and release shutter in the normal way. Trip by pressing Body
Release. Do not attempt to use the button on the battery case. The Flash
Supermatic Shutter is not intended to be solenoid operated.
To Operate: If you have a Speed GRAPHIC, be sure
the focal plane shutter is open. Set the shutter speed and aperture indicator
(diaphragm) for the exposure required. (Use film exposure guide or meter for
best results). Wind the shutter lever by moving to the right. (For flash
synchronization with Type F or Type M lamps, also wind the synchronizer winding
lever by moving as far as possible). Hold the camera steady and carefully
squeeze the shutter or body release to make the exposure. For convenience when
focusing with the ground glass, the "press focus button" may be used. Wind the
shutter in the normal way. With the button held down, trip the release lever. To
close, rewind the shutter. Trip shutter as above.
The Supermatic (X) Shutter is operated in the manner already described. The
contact posts on the side of the shutter are intended to be used only with Class
"X" (zero delay) high speed electronic flash units, and not with standard flash
lamps. For synchronization with standard flash lamps, and relay operated high
speed units, a solenoid should be attached to the shutter and synchronized with
its operation.
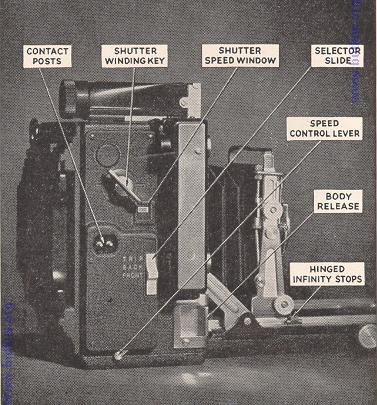
Body Release: This permits tripping the front shutter and the
focal plane shutters of the Speed Graphics, Set the selector slide at FRONT for
tripping the front shutter, and BACK for tripping the focal plane shutter. Press
in on the lower edge to move the slide up or down.
Focal Plane Shutter: The focal plane shutter produces six
accurately controlled speeds read directly in the shutter speed window. Shutter
speeds are changed by (a) turning the winding key, (b) tripping or "running
down" the shutter, (c) moving the speed control lever forward or backward. The
shutter may be tripped without closing the synchronizer circuit by moving the
selector slide up to TRIP and down again.
Time Exposure: Set the shutter at "T" with the speed control
lever moved back. Trip once to open and once again to close the shutter.
Synchronization: The Focal Plane Shutter is synchronized at
speeds of 1/1000 and 1/250 with only No 31 and No. 2A lamps. Other lamps and
electronic flash tubes can be used at the "Time" setting. The lamp will be fired
as the shutter is tripped by the body release, but not by pressing a button on
the battery case. Lamps will not be fired when the shutter is wound.
Drop Bed: For wide angle photography, the bed of the camera may
have to be dropped. Refer to the table ( Page 8), which indicates the
recommended position of the bed when most wide angle lenses are used. In case of
question always check the image on the ground glass at the back of the camera.
Before dropping or raising the bed, be sure that the track is racked all of the
way back into the camera body. In some instances an infinity stop for the wide
angle lens will be located behind the front standard on the short section of the
sliding track.
Exposure: The many types and speeds of film which may be used
in your camera make it rather difficult to include adequate exposure data in
this booklet. Film manufacturers supply this data with many films and can also
supply exposure charts and guides for their films. An exposure meter is always
helpful in obtaining good exposure.
Lens
Crown "23"
Speed "23"
Crown "34"
Speed "34
Crown "45"
Speed "45"
65MM Optar W.A.
Normal
--
Drop
--
--
--
80MM W.F. Ektar
Normal
Normal
Normal
Drop
--
--
88MM B&L W.A.
Normal
Normal
Normal
Normal
Drop
Drop
90MM Optar W.A.
Normal
Normal
Normal
Normal
Drop
Drop
100MM W.F. Ektar
--
--
Normal
Normal
Normal
Normal
FRONT MOVEMENTS
The front standard of the camera can be raised, tilted or shifted.
The lock nuts at the center of the sides are used when the lens is raised. The
lock nuts at the base are used to tighten the tilt position. To shift the front
standard laterally, loosen the front standard lock and depress the plate beneath
it and move the standard. Then retighten the lock. These movements are used to
center the image on the ground glass when it is not desirable to tilt or swing
the camera because of resulting unpleasant convergence of lines such as room or
building corners. Special effects can also be obtained such as the photographing
of large groups or areas from an elevation, bringing the entire area into sharp
focus, even with a large lens opening, merely by tilting the lens forward a
little.
The registration card packed with your camera when it left the factory should be
filled out completely and mailed promptly. It will help us to give you more
complete service.
For your convenience GPLAFLEX maintains completely equipped authorized service
facilities in the cities noted below:
Graflex, Inc., Western Division, Sales and Service
800 N. Cole Avenue, Hollywood 38, Calif.Graflex, Inc., New York Sales and Service
Suite 922, 50 Rockefeller Plaza, New York 20, N. Y.
in Canada
Graflex of Canada Limited,
137 Wellington Street, West, Toronto
Ontario, Canada