This camera manual library is for reference
and historical purposes, all rights reserved.
This page is copyright© by
This page may not be sold or distributed
without the expressed permission of the producer
I have no connection with any camera company
On-line camera manual library
Back to main on-line manual page
If you find this manual
useful,
how about a donation of $3 to:
M. Butkus, 29 Lake Ave.,
High Bridge, NJ 08829-1701
and send your
e-mail address
so I can thank you.
Most other places would charge
you $7.50 for a electronic copy
or $18.00 for a hard to read Xerox copy.
buy new manuals,
and pay their shipping costs.
It'll make you feel better, won't
it ?
If you use Pay Pal, use the link below.
Use the above address
for a check, M.O. or cash.

www.PayPal.me/lynnbutkus
Venmo is @mike-butkus-camera
Ph 2083
<<< IF YOU WOULD LIKE THIS OR ANY PDF FILE
PRINTED, BOUND AND MAILED TO YOU,
SEE THIS OUTSIDE COMPANY'S OFFER >>>
English - Contents
|
Names of Parts . . . . 2 Features .... 2
Test Firing and Open Flash ... 3 Attaching the Bracket ... 3 When Using for ZE-X- - - - - - - - - - 3
Using on the ZE-X with the E Lens ..... 5 When Using Cameras other than ZE-X ..... 5 |
Bounce Flash Photography· ..... 6 Using the Wide Adapter · ..... 6
Exposure for Multiple Flash ... 7 When Using the Flash for Cameras of Other Makes .. 7 Slave Flash and Remote Control Photography . . . 7 Specifications . . . . . 8 |
Mamiyalite MZ36R Besides permitting
selection of a wider range aperture than the conventional reflected light
integration system automatic flash, the Mamiylite MZ 36R automatically controls the quantity of
light according to the distance to the subject by means of a revolutionary
radiated light integration system (when used in combination with the ZE-X
camera and an EF lens). In the manual flash mode, the quantity
of light can be adjusted over five stages from the quantity of full Hash to
1/16 of the former (G.N. 9). System accessories expand the applications of the
flash to include remote control flash photography, slave Hash, and so forth. The
photo numbers throughout the instructions refer to pictures on the fold-out
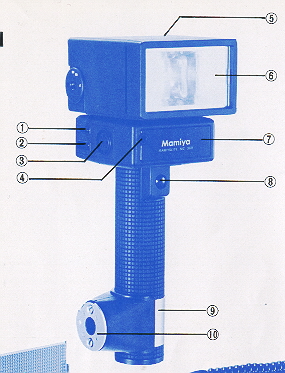
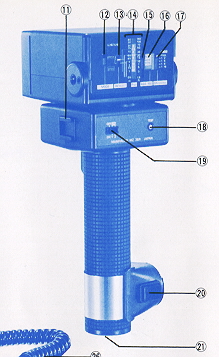
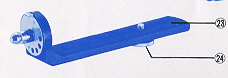
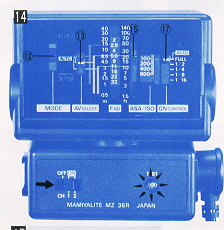
pages at the back. Names of Parts
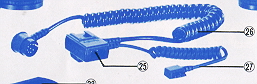
(Photo. 1) 2. External power socket 3. Main cord socket 4. Light sensor 5. Flash head 6. Flash window 7. Battery chamber cover 8. Shutter release button 9. Clamp ring CR-2 10. Clamp CL-2 12. Flash mode selector switch 13. Aperture selector (AUTO position) 14. Exposure calculator 15. Film speed setting knob 16. Film speed scale (ASA) 17. GN adjusting switch 18. Pilot lamp/Test button 19. Main switch/Channel selector switch 20. Clamp release button 21. Tripod socket 24. Camera set screw 26. Main cord 27. Shutter release cord Features 1. Distance Priority Flash AE System: (Radiated Light integration System ) When the ZE-X camera and EF lens is employed and the Hash is
set to MZ-AUTO, the flash is operated by the distance priority Hash AE system.
This system controls the quantity of light according to the distance to the
subject, read from the EF lens, so that optimum exposure can be obtained without
being affected by the reflectivity of the subject. a. If the aperture is set to
a desired aperture value, the system automatically emits the optimum light
quantity calculated from the set aperture value, the distance to the subject,
and the film sensitivity. b. If the aperture is set to AUTO, the camera
automatically determines the proper aperture according to the distance to the
subject and the film sensitivity. 2. Ordinary Automatic Flash System: (Reflected Light Integration System) When using any lens other than the EF lens, the flash is
operated at all times in the same way as an ordinary auto electronic flash. That
is, the system automatically controls the quantity of light according to the
amount of light reflected back to the flash from the subject, the aperture, and
the him sensitivity. a. When using for the ZE-X camera attached an E lens, and
the flash is set to MZ-AUTO, a proper aperture will be set automatically. If you
desire, the aperture can be set manually within the range shown in the Table
(T-2). b. When using cameras other than ZE-X, set the flash to AUTO and select
an aperture according to the film sensitivity. Automatic Setting of the Shutter Speed: If a ZE series camera is used, the shutter speed is
automatically set to a synchronization speed of 1/60 sec as soon as the flash
unit is fully charged. Even if the shutter speed was set to a high speed, it is
automatically adjusted to 1/60 sec. to enable flash photography. If the shutter speed of the ZE-X or ZE-2 camera is set to a
slower speed than 1/60 sec., the shutter operates at that speed. This is
effective for shooting a dim background with an extended exposure in conjunction
with use of the flash. Prevention of Flash by the Crossover System of the ZE-X Camera:
Loading Batteries 1. Tilt the flash head upward and push up the battery chamber cover to remove
(Photo 2). 2. Pull out the cartridge of the battery chamber.
3. Insert the cartridge into the battery chamber.
4. Match the mark on the battery chamber cover with the mark on the side of
the battery chamber and push down the cover while pushing the cartridge into the
battery chamber.
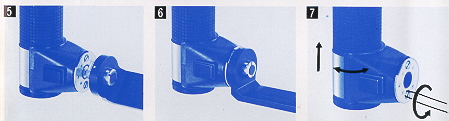
1. Match the notched part of the outer rim of the clamp with the white dot on
the bracket and press into position (Photo 5).
2. Rotate until the white dot on the bracket faces upright to lock the
bracket into position (Photo 6).
3. Screw the camera set screw into the tripod socket of the camera.
When Using for ZE-X
(2) Insert the main cord into the main cord socket of the flash.
(3) Insert the shutter release cord into the release socket of the camera.
Now the shutter of the camera can be released by pressing the shutter release
button of the flash unit. Exposure information will appear in the viewfinder if
the shutter release button is pressed half way, in the same way as the shutter
release button of the camera. Using on the ZE-X with the EF Lens:
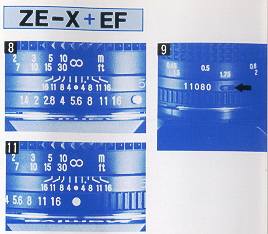
A. Using the flash With the aperture set to a desired aperture value:
1. Set the desired aperture value to the center index by fuming the aperture
ring, f/5.6 for instance (Photo 8).
2. Turn the distance priority switch of the EF lens by pushing it in the
direction of the arrow (Photo 9). When the switch is on the opposite side, it
shows orange on the left indicating it is fumed off, and in this state, the EF
lens functions in the same way as the E lens.
3. Set the shutter speed dial of the camera to "A".
4. Set the flash mode selector switch (12) to MZ AUTO, and turn on the main
switch (19). The channel number may be set to either CH1 or CH2 (Photo 10). 5. A few seconds later, the pilot lamp will light to indicate that the flash
is ready to fire. If the shutter button is pressed halfway the EF mark
indicating completion of charging and the previously set aperture value will
appear in the viewfinder.
Automatic Aperture Control by the Crossover System:
When the focusing distance of the subject is too far away for a proper
exposure at the aperture setting, the Crossover System will automatically
correct the aperture to obtain a proper exposure. The "O" crossover symbol
appears at the right of the aperture value.
If the subject is too far away for a proper exposure even at the maximum
aperture of the lens in use, the maximum aperture indication in the viewfinder
will flash to inform that the subject is out of flash exposure range.
When the Crossover is Disengaged:
4. For the subject distance exceeding about 26m, the "EF1.4" will flash
repeatedly to warn that you have exceeded the flash range.
(1 ) Attach the sensor base to the hot-shoe.
(such as RB67, M645 with the waist level finder, Mamiya Press, Mamiya C,
etc.)
Shutter speed of the camera to be used
3. Use only shutter speeds slower than 1/250 sec. when using the lens shutter
of the RB 67, Mamiya Press, Mamiya C, or the like.
Bounce Flash Photography
The flash head can be rotated 90 degrees upwards, 180 degrees to the left and
150 degrees to the right. Soft illumination can be obtained by permitting light
to bounce on a white wall or ceiling. To correctly receive reflected light
from a subject, it is recommended to mount the sensor to the sensor base. In
this case, the flash unit can be used while separated from the bracket.
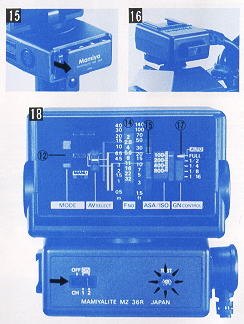
1. Open the battery chamber cover and withdraw the sensor (Photo 15).
2. Insert it into the sensor base with its groove facing downward (Photo 16).
· Do not insert the sensor upside down with force, otherwise it does not
operate and can not be removed.
· Make sure the direction of the sensor when replacing the sensor to the
flash unit.
·The effective flash range varies with the reflectivity of the bouncing
surface, the angle and the distance.
· In the bounce flash photography, the color tone will be affected by the
color of the reflecting surface. ·When bounce-photographing, make sure that the distance priority switch of
the EF lens is kept OFF. Since the EF lens controls the light quantity as the
direct light to the subject, the light quantity will become insufficient if the
distance priority switch is kept ON. In addition, neglect the distance
indication appearing in the viewfinder.
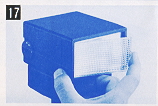
Using the Wide Adapter
Insert the protuberance of the adapter into the groove on the left of the
flash window and press the right side.
To remove the wide adapter, pull out the right side first.
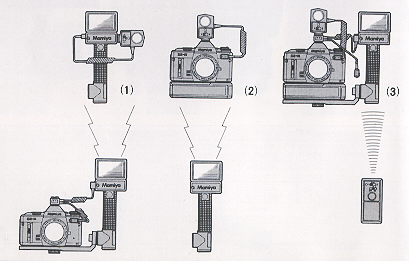
Slave Flash and Remote Control Photography: Typical Example of use:
(1) Slave Flash (Fig.1)
(How to Use): (2) Using as the Transmitter
(Fig. 2)
Specifications:
MZ-AUTO: 0.5-26m when using f/1.4 EF lens 0.5-1 am when using
f/1.4 E lens
Notes:
4. For the subject distance exceeding about 26m, the "EF1.4" will flash
repeatedly to warn that you have exceeded the flash range.
(1 ) Attach the sensor base to the hot-shoe.
(such as RB67, M645 with the waist level finder, Mamiya Press, Mamiya C,
etc.)
Shutter speed of the camera to be used
3. Use only shutter speeds slower than 1/250 sec. when using the lens shutter
of the RB 67, Mamiya Press, Mamiya C, or the like.
Bounce Flash Photography
The flash head can be rotated 90 degrees upwards, 180 degrees to the left and
150 degrees to the right. Soft illumination can be obtained by permitting light
to bounce on a white wall or ceiling. To correctly receive reflected light
from a subject, it is recommended to mount the sensor to the sensor base. In
this case, the flash unit can be used while separated from the bracket.
1. Open the battery chamber cover and withdraw the sensor (Photo 15).
2. Insert it into the sensor base with its groove facing downward (Photo 16).
· Do not insert the sensor upside down with force, otherwise it does not
operate and can not be removed.
· Make sure the direction of the sensor when replacing the sensor to the
flash unit.
·The effective flash range varies with the reflectivity of the bouncing
surface, the angle and the distance.
· In the bounce flash photography, the color tone will be affected by the
color of the reflecting surface. ·When bounce-photographing, make sure that the distance priority switch of
the EF lens is kept OFF. Since the EF lens controls the light quantity as the
direct light to the subject, the light quantity will become insufficient if the
distance priority switch is kept ON. In addition, neglect the distance
indication appearing in the viewfinder.
Using the Wide Adapter
Insert the protuberance of the adapter into the groove on the left of the
flash window and press the right side.
To remove the wide adapter, pull out the right side first.
Slave Flash and Remote Control Photography: Typical Example of use:
(1) Slave Flash (Fig.1)
(How to Use): (2) Using as the Transmitter
(Fig. 2)
Specifications:
MZ-AUTO: 0.5-26m when using f/1.4 EF lens 0.5-1 am when using
f/1.4 E lens
Notes:

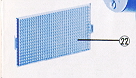
22. Wide adapter
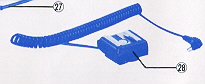
28.
PC.adapter
If the camera with the EF lens or the E lens is set to the
Crossover System in the AE mode, the flash will not operate even after fully
charged in situations where a correct exposure can be obtained without flash,
that is, it will not operate when the shutter speed is above the "camera shake"
limit.
For instance, the flash does not operate if shooting is possible at a shutter
speed faster than 1/30 sec. with a 50mm lens.
When you want to use a flash in such situations, disengage the Crossover and the
flash will operate after it charges regardless of the brightness.

Insert batteries into the cartridge, making sure that the polarities of the
batteries match the marks on the cartridge.
The cartridge may be inserted upside-down. (Photo 3).
· Use eight 1.5V M-size alkaline-manganese batteries or Ni-Cd batteries.
· Keep the power switch/channel selector switch OFF when not using the flash, to
avoid consumption of batteries.
Test Firing and Open Flash (Photo 4)
Turn ON the main switch and press the pilot/test button after the pilot lamp
lights. To test the flash, set the flash mode selector switch to positions other
than MZ-AUTO. If the flash mode selector switch is set to MZ-AUTO, the flash
will not operate unless it is mounted on the ZE-X camera and the shutter release
button of the camera is pressed.
The flash can be used as a transmitter when combined with a receiver MZ. Operate
it in the same way as in the test firing procedures.
· To remove the clamp from the bracket, press the clamp release button and
rotate to the notched part and pull out the bracket.
· To shift the flash unit up and down or to rotate it left or right, use a coin
to loosen the two clamp lock screws (Photo 7).
· The bracket MB-1 equipped with two positioning pins is available as an
optional for medium format cameras such as M645 and RB67. The bracket prevents
accidental or inadvertent twist of the camera.
(1 ) Attach the sensor base to the hot shoe.
· Overexposure will occur in a short distance as the aperture is set between f/8
and the maximum aperture (f/1.4) since the exposure exceeds the automatic flash
range. Stop down the aperture (f/ 8 or smaller) in such a case.
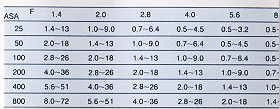
· The automatic flash range varies with the sensitivity of the film. Refer to Table (T-1 ) to use a film of
sensitivity other than of ASA100. The figures on the table represent the distance in meters.
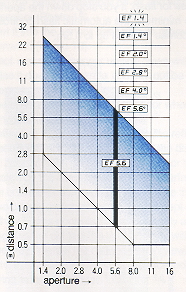
Aperture Change with Subject Distance (at ASA100, with 50mm f/1.4 EF lens)
B. Using the flash with the aperture set
to AUTO:
1. Align the white button on the aperture ring with the center index
(Photo 11).
2. Turn on the distance priority switch of the EF lens (Photo 9).
3. Set the flash mode selector switch (12) to MZ AUTO, and turn on the
main switch (19). The channel number may be set to either CH1 or CH2 (Photo 10).
4. A few seconds later, the pilot lamp will light. When the shutter button
of the camera is pressed slightly, the EF mark indicating completion of
charging and the correct aperture value calculated by the camera will appear
in the viewfinder.
Aperture Change with Subject Distance:
(when using ASA100 film and a 50mm U1.4 EF lens)
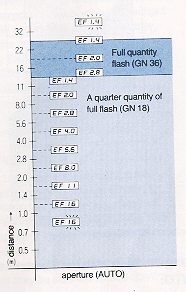
2. A quarter quantity of full flash (GN18) will emit for subject distance
up to about 1 3m. Since 3/4 of the energy remains in the capacitor,
recharging can be made rapidly.
3. The flash is automatically switched to the full quantity flash for a
subject distance exceeding about 1 3m.
5. When the focusing distance is less than 1.1 m, "EF16" will flash to
warn that the subject is too close for flash. If you stop down the
aperture to the minimum, the automatic flash control becomes possible up
to 0.5m.
Using on the ZE-X with the E Lens:
1. Align the white button of the aperture ring with the center index (Photo 12).
2. Set the Hash mode selector switch (12) to MZ AUTO, and turn on the main
switch (19). The channel number may be set to either CH1 or CH2 (Photo 1 3).
3. A few seconds later, the pilot lamp will light. If the shutter button is
pressed halfway, the EF mark representing the completion of charging and the
effective flash range will be displayed in meters. When ASA 100 film is used,
for example, the value will read 4.0 m, and the aperture of the camera is
automatically set to f/8.
4. To take a photograph of a subject farther than the distance displayed in the
viewfinder, open up the aperture. The limit distance will then increase. The
distance displayed when the aperture is fully opened represents the limit at
which photographing with correct exposure is possible.
· The distance indications given in the viewfinder are based on the lens
aperture scale and should be taken as approximate only.
· The aperture range that can be used varies depending upon the film
sensitivity, and the effective flash range with respect to the apertures also
varies. For detail, refer to Table (T-2). The figures on the table represent the
distance in meters and the figures in parentheses indicate when a wide adapter
is employed.
When Using Cameras other than ZE-X (such as ZE, ZE-2, M645, RB67, etc.)
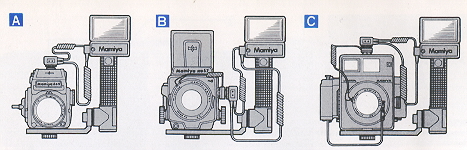
Using on cameras equipped with a hotshoe
(Fig. A)
(such as ZE, ZE-2 or M645 with a finder having hot-shoe)
(2) Insert the main cord into the main cord socket of the flash. The shutter
release cord is not used.
Using on cameras not equipped with a hot-shoe (Fig. B and C )
(1 ) Attach the sensor base to the PC adapter and fit the adapter to the camera
body or to the accessory shoe of the flash unit.
(2) Insert the PC adapter plug into the X contact on the lens or camera. If the
lens is an M-X selecting type, set it at the X setting.
(3) Insert the main cord into the main cord socket of the flash. The shutter
release cord is not used.
Be sure to use the PC adapter and insert the plug into the synchro terminal of
the lens, do not insert the plug into the terminal on the camera body.
Note:
When not using the shutter release cord of the sensor base such as
when using the flash unit for cameras other than the ZE-X camera, the shutter
release cord can be kept plugged into the receiver socket (1 ) of the flash
unit. However, when you hold the flash unit, keep off your fingers from the
shutter release button of the flash unit because when the shutter release button
of the flash unit is pressed, the flash will be fired independently of the
shutter release.
Set the flash to AUTO and select an aperture
(Photo 14)
1. Set the flash mode selector switch)
to AUTO. Flash is prevented when the switch is set on MZ AUTO.
2. Set the GN adjusting switch (17) to AUTO (FULL).
3. Move the film speed seeing knob (15) and align the film speed to be
used with the red line.
4. Select any one of aperture values indicated by green, orange and blue
lines and match the index of the aperture selector (13) with the selected
line.
· The figures on both sides of the aperture scale represent the distance in
meters and feet, at which flash photographing is possible, for each aperture
value.
· When using an ASA 100 film, automatic flash is possible up to the subject
distance of 13 meters for green (f/2.8), 6.5 meters for orange (f/5.6) and 3.2
meters for blue (F/11). See Table (T-2) for details.
5. Set the lens aperture of the camera to the same value as the aperture value
set to the flash.
6. Turn ON the main switch/channel selector switch (19). The channel number may
be set to either CH1 or CH2.
7. A few seconds later, the pilot lamp will light, indicating that the flash
unit is ready for firing.
1. In the ZE and ZE-2 cameras, the shutter speed is automatically
set to 1/60 sec. as soon as the flash unit is fully charged. If the shutter
speed is set to a speed slower than 1/60 sec., the camera works at that speed.
When the ZE-2 camera is used in the manual mode, the mark "M" will flash in the
viewfinder. The mark "M" will stop flashing and keeps lighting when the flash
unit is fully charged.
2. Set the shutter speed to "X" in the M645 series' cameras.
When using a wide-angle lens of 60 degrees or more, attach the wide
adapter to the flash window.
The flash angle is approximately 70 degrees in the horizontal direction and
approximately 53 degrees in the vertical direction and covers the angle of view
of a 28mm lens of a 35mm camera. The guide number in this case reads "26".
When close-up photographing within 1 meter, it is recommended to use the wide
adapter even when a standard lens is used. An exposure error is likely to occur
in a short range due to deviation between the optical axis of the lens and the
direction of flash. This error can be covered if the light is diffused by the
wide adapter.
Manual Operation (Photo 18)
1. Set the flash mode selector switch (12) to MANU.
2. Decide the flash quantity with the GN adjusting switch (17). Use generally at
the "FULL" position.
3. Move the film speed seeing knob (1 5) and align the film speed to be used
with the red line.
4. Measure the subject distance and read the aperture value corresponding to the
distance from the exposure calculator (14). Set the aperture of the lens to the
value to obtain a proper exposure. For instance, if the shooting distance is
6.5m at the "FULL" quantity flash with an ASA 100 film, it is obvious that the
aperture is to be set to 5.6
· When using the wide adapter, open the aperture by one step than the value
obtained as above.
· When you want to shoot a subject at a specified aperture value, follow the
following routine to adjust the flash quantity.
1. Slide the film speed setting knob (15) until the aperture value "8" matches
3m on the exposure calculator.
2. Move the GN adjusting switch (17) until the red line matches the sensitivity
of the film used. A half quantity of full flash will then emit to obtain a
correct exposure.
Exposure for Multiple Flash 1. A proper exposure for multiple flash varies with
the photographing situations. Under the multiple flash condition, the proper
exposure can generally be determined by an aperture obtained from the guide
number for the main flash, or else stop down by 1/3 to 1/2 step of the former.
2. When using plural flashes at the same position to increase the flash
quantity, determine the guide number by the following equation:
GN = (root) GN1squared + GN2 squared
For instance, when the guide number 36 and a flash with a guide number 18 are
used in combination, the sum of the guide numbers is given by:
GN= (root) 32 squared + 18 squared = 40.
3. Carry out test photographing, or use a flash meter, to decide the precise
exposure.
The guide number changes with the using film sensitivity and the
quantity of light of the flash, as tabulated in Table 3.
Table3: Guide Number Table
Light Quantity
Guide Number
Full
18
25
29
36
51
72
102
1/2
13
18
20
25
36
51
72
1/4
9
13
14
18
25
36
51
1/8
6
9
10
13
18
25
36
1/16
4.5
6
7
9
13
18
25
(ASA)
(25)
(50)
(64)
(100)
(200)
(400)
(800)
Connect the cord to a synchro terminal of a camera or lens, using the PC adapter
for safety. If the sensor base is directly mounted to a camera equipped with a
hot-shoe, the camera or flash will be damaged due to accidental or inadvertent
contact of two contacts at the rear. Make sure to use the PC adapter.
Slave flash can be made using another Mamiya MZ 36R in combination with the
receiver MZ.
Set the mode selector switch (12) of MZ 36R attached on the camera to SLV. Set
the channel selector switch (19) to either CH1 or CH2 and the channel of the
receiver MZ to the same channel number.
In this case, the MZ 36R attached on the camera operates in the manual flash
mode. The quantity of light of the MZ 36R, to which the receiver is attached,
can be adjusted by seeing the mode selector switch to MANU and adjusting the GN
adjusting switch. Set the aperture of the lens to an aperture value calculated
in accordance with "Deciding the Exposure for Multiple Flash".
Remote control photography can be made by using the receiver MZ in
conjunction with the winder ZE.
(How to Use)
Set the switches of the MZ 36R and the receiver MZ in the same way
as above. In this case, the flash of the MZ 36R is used for transmission, so no
flash effect can be obtained. The effective operation range is about 20m.
(3) Remote Control Flash Photography (fig. 3)
Full scale remote control flash photography be made by combining
the MZ 36R with the transmitter MZ, the receiver MZ and the winder ZE.
(How to Use)
Set the channel of the transmitter to that of the receiver. Set the
Mode Selector Switch of the MZ 36R to MZ-AUTO. In this case, flash photography
can be made in the automatic flash mode.
Type: Grip type auto-electronic flash (equipped with sensor base)
Guide number: 36 (ASA100 · m), 26 with wide adapter
Angle of coverage: 45° vertical,60° horizontal. Provides coverage for
28mm wide-angle lens with wide adapter.
Recycling time: Alkaline-manganese M-Type: 10 sec. or less. Ni-Cad M
Type: 7 sec. or less
Number of flashes: Alkaline-manganese: approximately 90 times. Ni-Cad:
approximately 60 times.
Flash control system: Three flash mode selection of MZ-AUTO, AUTO, and
MANU. MZ-AUTO: Full automatic flash control according to the subject distance
(when combined with EF lens and ZE-X); reflected light control is also possible.
AUTO: Automatic flash control by the quantity of reflected light. MANU:
Adjustable over five stages from the full flash quantity to 1/16 of the full
flash quantity.
Auto flash range: (ASA100)
AUTO: 1.0-13m at f/2.8 0.5- 6matf/5.6 0.5- am at f/11
Bounce: 90° up, 180° left and 150° right.
Slave control: Two-channel transmission is possible when set to SLV.
Film speed sensitivity: ASA25 to ASA800.
Shutter speed setting: When attached to Mamiya ZE series' camera, the
shutter speed is automatically set to 1/60 sec. when the unit is fully charged.
Power source: Eight alkaline-manganese or Ni-Cd M-type batteries.
· All specifications are subject to change without notice.
· The guide numbers given were measured with new batteries 30
seconds after the pilot lamp lit.
· Recycling time is the shortest interval required between three consecutive
flashes using Fresh batteries or fully charged Ni-Cad batteries. (the
newer alkaline rechargeable batteries may be better)
· The number of flashes is the count found by discharging the flash continuously
at 30-second intervals until 30 seconds were required for the pilot lamp to
light with a set of fresh batteries or fully charged Ni-Cad bakeries.
Notes on Batteries
1. Remove the batteries when the Mamiyalite MZ is not to be used
for an extended period in order to prevent possible damage due to leakage.
2. Manganese batteries can also be used but the recycling time is longer and
fewer flashes are possible.
3. Battery performance is less under low temperature conditions, so Ni-Cad
batteries should always be used fully charged. Alkaline/manganese batteries
should be kept warm during use.
4. All eight batteries should be replaced at the same time. Never mix new and
old batteries, or batteries of different brands, as leakage may result.
5. Battery life varies depending on the type of bakery, the storage after
manufacture, the amount of time that has elapsed since manufacture, whether
usage is continuous or intermittent and the ambient temperature.
B. Using the flash with the aperture set
to AUTO:
1. Align the white button on the aperture ring with the center index
(Photo 11).
2. Turn on the distance priority switch of the EF lens (Photo 9).
3. Set the flash mode selector switch (12) to MZ AUTO, and turn on the
main switch (19). The channel number may be set to either CH1 or CH2 (Photo
10).
4. A few seconds later, the pilot lamp will light. When the shutter button
of the camera is pressed slightly, the EF mark indicating completion of
charging and the correct aperture value calculated by the camera will appear
in the viewfinder.
Aperture Change with Subject Distance:
(when using ASA100 film and a 50mm U1.4 EF lens)
2. A quarter quantity of full flash (GN18) will emit for subject distance
up to about 1 3m. Since 3/4 of the energy remains in the capacitor,
recharging can be made rapidly.
3. The flash is automatically switched to the full quantity flash for a
subject distance exceeding about 1 3m.
5. When the focusing distance is less than 1.1 m, "EF16" will flash to
warn that the subject is too close for flash. If you stop down the
aperture to the minimum, the automatic flash control becomes possible up
to 0.5m.
Using on the ZE-X with the E Lens:
1. Align the white button of the aperture ring with the center index (Photo 12).
2. Set the Hash mode selector switch (12) to MZ AUTO, and turn on the main
switch (19). The channel number may be set to either CH1 or CH2 (Photo 1 3).
3. A few seconds later, the pilot lamp will light. If the shutter button is
pressed halfway, the EF mark representing the completion of charging and the
effective flash range will be displayed in meters. When ASA 100 film is used,
for example, the value will read 4.0 m, and the aperture of the camera is
automatically set to f/8.
4. To take a photograph of a subject farther than the distance displayed in the
viewfinder, open up the aperture. The limit distance will then increase. The
distance displayed when the aperture is fully opened represents the limit at
which photographing with correct exposure is possible.
· The distance indications given in the viewfinder are based on the lens
aperture scale and should be taken as approximate only.
· The aperture range that can be used varies depending upon the film
sensitivity, and the effective flash range with respect to the apertures also
varies. For detail, refer to Table (T-2). The figures on the table represent the
distance in meters and the figures in parentheses indicate when a wide adapter
is employed.
When Using Cameras other than ZE-X (such as ZE, ZE-2, M645, RB67, etc.)
Using on cameras equipped with a hotshoe
(Fig. A)
(such as ZE, ZE-2 or M645 with a finder having hot-shoe)
(2) Insert the main cord into the main cord socket of the flash. The shutter
release cord is not used.
Using on cameras not equipped with a hot-shoe (Fig. B and C )
(1 ) Attach the sensor base to the PC adapter and fit the adapter to the camera
body or to the accessory shoe of the flash unit.
(2) Insert the PC adapter plug into the X contact on the lens or camera. If the
lens is an M-X selecting type, set it at the X setting.
(3) Insert the main cord into the main cord socket of the flash. The shutter
release cord is not used.
Be sure to use the PC adapter and insert the plug into the synchro terminal of
the lens, do not insert the plug into the terminal on the camera body.
Note:
When not using the shutter release cord of the sensor base such as
when using the flash unit for cameras other than the ZE-X camera, the shutter
release cord can be kept plugged into the receiver socket (1 ) of the flash
unit. However, when you hold the flash unit, keep off your fingers from the
shutter release button of the flash unit because when the shutter release button
of the flash unit is pressed, the flash will be fired independently of the
shutter release.
Set the flash to AUTO and select an aperture
(Photo 14)
1. Set the flash mode selector switch)
to AUTO. Flash is prevented when the switch is set on MZ AUTO.
2. Set the GN adjusting switch (17) to AUTO (FULL).
3. Move the film speed seeing knob (15) and align the film speed to be
used with the red line.
4. Select any one of aperture values indicated by green, orange and blue
lines and match the index of the aperture selector (13) with the selected
line.
· The figures on both sides of the aperture scale represent the distance in
meters and feet, at which flash photographing is possible, for each aperture
value.
· When using an ASA 100 film, automatic flash is possible up to the subject
distance of 13 meters for green (f/2.8), 6.5 meters for orange (f/5.6) and 3.2
meters for blue (F/11). See Table (T-2) for details.
5. Set the lens aperture of the camera to the same value as the aperture value
set to the flash.
6. Turn ON the main switch/channel selector switch (19). The channel number may
be set to either CH1 or CH2.
7. A few seconds later, the pilot lamp will light, indicating that the flash
unit is ready for firing.
1. In the ZE and ZE-2 cameras, the shutter speed is automatically
set to 1/60 sec. as soon as the flash unit is fully charged. If the shutter
speed is set to a speed slower than 1/60 sec., the camera works at that speed.
When the ZE-2 camera is used in the manual mode, the mark "M" will flash in the
viewfinder. The mark "M" will stop flashing and keeps lighting when the flash
unit is fully charged.
2. Set the shutter speed to "X" in the M645 series' cameras.
When using a wide-angle lens of 60 degrees or more, attach the wide
adapter to the flash window.
The flash angle is approximately 70 degrees in the horizontal direction and
approximately 53 degrees in the vertical direction and covers the angle of view
of a 28mm lens of a 35mm camera. The guide number in this case reads "26".
When close-up photographing within 1 meter, it is recommended to use the wide
adapter even when a standard lens is used. An exposure error is likely to occur
in a short range due to deviation between the optical axis of the lens and the
direction of flash. This error can be covered if the light is diffused by the
wide adapter.
Manual Operation (Photo 18)
1. Set the flash mode selector switch (12) to MANU.
2. Decide the flash quantity with the GN adjusting switch (17). Use generally at
the "FULL" position.
3. Move the film speed seeing knob (1 5) and align the film speed to be used
with the red line.
4. Measure the subject distance and read the aperture value corresponding to the
distance from the exposure calculator (14). Set the aperture of the lens to the
value to obtain a proper exposure. For instance, if the shooting distance is
6.5m at the "FULL" quantity flash with an ASA 100 film, it is obvious that the
aperture is to be set to 5.6
· When using the wide adapter, open the aperture by one step than the value
obtained as above.
· When you want to shoot a subject at a specified aperture value, follow the
following routine to adjust the flash quantity.
1. Slide the film speed setting knob (15) until the aperture value "8" matches
3m on the exposure calculator.
2. Move the GN adjusting switch (17) until the red line matches the sensitivity
of the film used. A half quantity of full flash will then emit to obtain a
correct exposure.
Exposure for Multiple Flash 1. A proper exposure for multiple flash varies with
the photographing situations. Under the multiple flash condition, the proper
exposure can generally be determined by an aperture obtained from the guide
number for the main flash, or else stop down by 1/3 to 1/2 step of the former.
2. When using plural flashes at the same position to increase the flash
quantity, determine the guide number by the following equation:
GN = (root) GN1squared + GN2 squared
For instance, when the guide number 36 and a flash with a guide number 18 are
used in combination, the sum of the guide numbers is given by:
GN= (root) 32 squared + 18 squared = 40.
3. Carry out test photographing, or use a flash meter, to decide the precise
exposure.
The guide number changes with the using film sensitivity and the
quantity of light of the flash, as tabulated in Table 3.
Table3: Guide Number Table
Light Quantity
Guide Number
Full
18
25
29
36
51
72
102
1/2
13
18
20
25
36
51
72
1/4
9
13
14
18
25
36
51
1/8
6
9
10
13
18
25
36
1/16
4.5
6
7
9
13
18
25
(ASA)
(25)
(50)
(64)
(100)
(200)
(400)
(800)
Connect the cord to a synchro terminal of a camera or lens, using the PC adapter
for safety. If the sensor base is directly mounted to a camera equipped with a
hot-shoe, the camera or flash will be damaged due to accidental or inadvertent
contact of two contacts at the rear. Make sure to use the PC adapter.
Slave flash can be made using another Mamiya MZ 36R in combination with the
receiver MZ.
Set the mode selector switch (12) of MZ 36R attached on the camera to SLV. Set
the channel selector switch (19) to either CH1 or CH2 and the channel of the
receiver MZ to the same channel number.
In this case, the MZ 36R attached on the camera operates in the manual flash
mode. The quantity of light of the MZ 36R, to which the receiver is attached,
can be adjusted by seeing the mode selector switch to MANU and adjusting the GN
adjusting switch. Set the aperture of the lens to an aperture value calculated
in accordance with "Deciding the Exposure for Multiple Flash".
Remote control photography can be made by using the receiver MZ in
conjunction with the winder ZE.
(How to Use)
Set the switches of the MZ 36R and the receiver MZ in the same way
as above. In this case, the flash of the MZ 36R is used for transmission, so no
flash effect can be obtained. The effective operation range is about 20m.
(3) Remote Control Flash Photography (fig. 3)
Full scale remote control flash photography be made by combining
the MZ 36R with the transmitter MZ, the receiver MZ and the winder ZE.
(How to Use)
Set the channel of the transmitter to that of the receiver. Set the
Mode Selector Switch of the MZ 36R to MZ-AUTO. In this case, flash photography
can be made in the automatic flash mode.
Type: Grip type auto-electronic flash (equipped with sensor base)
Guide number: 36 (ASA100 · m), 26 with wide adapter
Angle of coverage: 45° vertical,60° horizontal. Provides coverage for
28mm wide-angle lens with wide adapter.
Recycling time: Alkaline-manganese M-Type: 10 sec. or less. Ni-Cad M
Type: 7 sec. or less
Number of flashes: Alkaline-manganese: approximately 90 times. Ni-Cad:
approximately 60 times.
Flash control system: Three flash mode selection of MZ-AUTO, AUTO, and
MANU. MZ-AUTO: Full automatic flash control according to the subject distance
(when combined with EF lens and ZE-X); reflected light control is also possible.
AUTO: Automatic flash control by the quantity of reflected light. MANU:
Adjustable over five stages from the full flash quantity to 1/16 of the full
flash quantity.
Auto flash range: (ASA100)
AUTO: 1.0-13m at f/2.8 0.5- 6matf/5.6 0.5- am at f/11
Bounce: 90° up, 180° left and 150° right.
Slave control: Two-channel transmission is possible when set to SLV.
Film speed sensitivity: ASA25 to ASA800.
Shutter speed setting: When attached to Mamiya ZE series' camera, the
shutter speed is automatically set to 1/60 sec. when the unit is fully charged.
Power source: Eight alkaline-manganese or Ni-Cd M-type batteries.
· All specifications are subject to change without notice.
· The guide numbers given were measured with new batteries 30
seconds after the pilot lamp lit.
· Recycling time is the shortest interval required between three consecutive
flashes using Fresh batteries or fully charged Ni-Cad batteries. (the
newer alkaline rechargeable batteries may be better)
· The number of flashes is the count found by discharging the flash continuously
at 30-second intervals until 30 seconds were required for the pilot lamp to
light with a set of fresh batteries or fully charged Ni-Cad bakeries.
Notes on Batteries
1. Remove the batteries when the Mamiyalite MZ is not to be used
for an extended period in order to prevent possible damage due to leakage.
2. Manganese batteries can also be used but the recycling time is longer and
fewer flashes are possible.
3. Battery performance is less under low temperature conditions, so Ni-Cad
batteries should always be used fully charged. Alkaline/manganese batteries
should be kept warm during use.
4. All eight batteries should be replaced at the same time. Never mix new and
old batteries, or batteries of different brands, as leakage may result.
5. Battery life varies depending on the type of bakery, the storage after
manufacture, the amount of time that has elapsed since manufacture, whether
usage is continuous or intermittent and the ambient temperature.