and historical purposes, all rights reserved.
This page is copyright© by
This page may not be sold or distributed
without the expressed permission of the producer
I have no connection with any camera company
This camera manual library is for reference
and historical
purposes, all rights reserved.
This page is
copyright© by
![]() , M.
Butkus, NJ.
, M.
Butkus, NJ.
This page may not be sold or distributed
without
the expressed permission of the producer
I have no
connection with any camera company
On-line camera manual library
If you find this manual
useful,
how about a donation of $3 to:
M. Butkus, 29 Lake Ave.,
High Bridge, NJ 08829-1701
and send your
e-mail address
so I can thank you.
Most other places would charge
you $7.50 for a electronic copy
or $18.00 for a hard to read Xerox copy.
If you use Pay Pal, use the
link below.
Use the above address for a check, M.O. or cash.

www.PayPal.me/lynnbutkus
Venmo is @mike-butkus-camera
Ph 2083
<<< IF YOU WOULD LIKE THIS OR ANY PDF FILE
PRINTED, BOUND AND MAILED TO YOU,
SEE THIS OUTSIDE COMPANY'S OFFER >>>
Back to main
camera manual page
CLICK HERE TO
CONTINUE TO
Mamiya MSX 1000 MS WORD Style Document
CLICK HERE TO
CONTINUE TO
Mamiya MSX1000 & MSX500
PDF made from HTML Page
Mamiya 35mm average metering system camera
The MSX 500 did
not have a self-timer

| CONTENTS Specifications .....4 Short course of instructions .....6 Inserting the battery .....8 Loading the film .....9 Setting the film speed .....11 Selecting the shutter speed .....12 Focusing and viewing .....13 Infra-red photography .....13 Turning on the meter .....14 Setting the exposure .....15 |
Depth of field 17 Changing lenses I g Holding the camera .....20 Self timer .....21 Flash photography .....22 Rewinding the film .....24 Multiple exposures .....24 Stopped down aperture operation .....25 Trouble shooting .....26 Lens comparison chart .....28 Accessories .....30 Helpful hints .....35 |
|
|
|
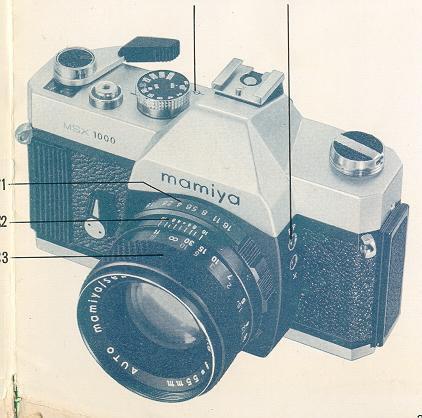
| 1. Neck strap eyelet
2. Exposure counter 3. Meter "OFF" button 4. Film advance lever 5. Shutter release button 6. Shutter speed dial and ASA/DIN window 7. Accessory shoe (MSX 1000 only)
|
8. Rewind knob and film compartment door release 9. Film plane reference mark 10. FP & X flash terminals 11.Aperture ring 12. Depth-of-field scale 13. Focusing ring 14.Self-timer winding lever (MSX 1000 only 1 5. Lens release button
|
 |
|
|
|
| 16.Film chamber
1 7. Viewfinder eyepiece 1 8. Focal plane shutter 1 9. Film advance sprockets 20.Film take-up spool 21.Film compartment door |
22.Film pressure plate 23.Film cartridge pressure plate 24.Battery compartment cover 25.Tripod socket 26.Rewind release button
|
SPECIFICATIONS: Mamiya MSX 1000 and MSX 500
CAMERA TYPE: 35mm Single Lens Reflex with behind-the-lens, spot readings,
full aperture metering system.
FILM SIZE AND CAPACITY: Perforated 35mm film in standard 20 or 36 exposure cartridges.
STANDARD AUTOMATIC LENSES:
Mamiya/sekor SX 55mm f/1.4
7 elements in 5 groups
Angle of view: 43°
Accessory size: 52 mmMamiya/sekor SX 55mm f/1.8
6 elements in 5 groups
Angle of view: 43°
Accessory size: 52 mmMamiya/sekor SX 50mm f/2
6 elements in 4 groups
Angle of view: 47°
Accessory size: 52 mm
LENS MOUNT: Universal thread mount (42mm) with locking pin.
SHUTTER: MSX 1000: Focal plane with speeds from 1 to 1/ 1000 second and B for time exposures. Built-in variable delay self-timer. (MSX 1000 only) MSX 500: Focal plane with speeds from 1 to 1/ 500 second and B for time exposures.
EXPOSURE CONTROL: CdS cell positioned on the back of the reflex mirror (spot system). The metering system is cross coupled to the shutter speed control, film speed dial, and diaphragm mechanism on all automatic SX lenses. This system accurately measures light at full aperture with Mamiya/sekor SX lenses. With other universal thread mount lenses, the metering system will operate in the stop-down mode.
The film advance lever switches the metering system on and actuates the diaphragm mechanism on all automatic SX lenses.
METER SENSITIVITY: ASA 25 to 3200 DIN 15 to 36
VIEWFINDER: Pentaprism type with micro-diaprism center
spot on Fresnel screen for rapid focusing. Brackets visible in finder indicate
location of spot meter reading area (10% of field).
Exposure needle and reference points indicate necessary exposure adjustments.
FLASH SYNCHRONIZATION: Two separate flash contacts are provided, marked "FP" and "X". Proper selection of terminals allows correct synchronization for all types of flash pictures.
A built-in "hot shoe" accessory bracket is located atop the viewfinder, for use with cordless flash units. (MSX 1000 only)
REFLEX MIRROR: Instant return type
FILM ADVANCE: Ratchet type film advance lever transports film, winds shutter, and advances exposure counter in a single stroke(1600)or by a number of shorter strokes .
EXPOSURE COUNTER: Progressive type, reads from "S" (start) to 36. Counter automatically resets to "S" when film compartment door is opened.
DIMENSIONS: Width :5 31/32 in. (151.5mm)
Height : 3 3/4 in. (95 mm)
Thickness: With 55mm f/1.4 lens 3 61/64 in.
(100.5mm With 55mm f/1.8 lens 3 25/32 in.
(96mm) With 50mm f/2 lens: 3 3/4in. (95mm)
WEIGHT:
MSX 1000 camera body: 25.6 oz. (7259)
MSX 500 camera body: 24.9 oz. (7059)
55mm f/1.4 lens : 8.6 oz. (2459)
55mm f/1.8 lens : 6.5 oz. (1859)
50mmf/21ens : 6.2 oz.(175g)
SHORT COURSE OF INSTRUCTIONS
 |
Insert an Eveready S-76 silver oxide battery (or equivalent) |
|
Load the film.
Pull up the rewind knob to open the film compartment door, drop in the film cartridge and push down the knob, turning it until it drops into place. Insert the end of the film leader into the film take-up spool, making sure the perforations along the film edge are hooked onto the teeth of the sprocket. Close the film compartment door and advance the film and press the shutter button repeatedly until the number "1" appears in the Exposure Counter Window. |
 |
Set the
film speed.
Pull up the outer ring of the film speed dial and turn it until the ASA/DIN number (or representative reference mark) of the film you are using appears in the window opposite the white index mark.
|
| Set the shutter speed.
When outdoors in bright or hazy sunlight, 1/ 125 second is generally suitable for most photographs. When indoors in a well lit room 1/60 second should be sufficient to capture your subject, depending upon the film you are using.
|
|
| Focus on your subject
by rotating the focusing ring until the image in the center of the viewfinder screen appears sharp.
|
 |
Turn on the exposure
meter
by pulling the Film Advance Lever away from the camera body approximately 1/2 inch. |
| Set the
exposure.
Aim the camera so that the bracketed area falls upon the most important part of the picture. Center the exposure meter needle between the brackets in the viewfinder by turning the Aperture Ring or the Shutter Speed Dial. |
|
| Compose your picture and press the shutter release button. |
1. INSERTING THE BATTERY
 |
Open the battery compartment door on the
base of the camera by turning the cover counterclockwise with your thumb
until the white dot aligns with the letter "0" (open).
Clean the battery contacts with a clean, dry cloth to assure they are free of oil or dust which may interfere with making positive contact. With the (+) sign facing you, insert the battery and replace the cover, tightening it with the thumb, turning it a one-quarter turn in the opposite direction of the arrow. |
2. LOADING THE FILM
 |
A. Open the film compartment door by
pulling up the Rewind Knob. Drop the film cartridge into the compartment and
rotate the Rewind Knob until it drops down and locks the cartridge in place. B. Insert the film leader into one of the slots in the Take-up Spool. |
 |
C. Slowly advance the film by stroking
the Film Advance Lever as far to the right as it will go. If the lever stops
midway, press the Shutter Release Button to free it for another stroke. Be
sure that the holes on both sides of the film are caught by the teeth on the
Film Transport Sprockets.
NOTE: The film must pass under the Take-up Spool when advanced. D. Gently turn the Rewind Knob clockwise to take up the slack in the film. E. Close the Film Compartment Door and advance the film several times until the number "1" appears in the Exposure Counter Window. As the film is advanced through the camera the knob will turn in a counterclockwise direction, indicating the film is advancing properly. As the film is advanced the shutter will be wound automatically. Your camera is now loaded and ready to go. |
3. SETTING THE FILM SPEED
 |
Lift the outer ring of the Shutter Speed
Dial and turn it in either direction until the ASA rating of the film you
are using appears opposite the index mark. Your films ASA rating can be
found printed on the film cartridge or in the instruction sheet packed with
it.
To use the DIN rating, turn the Shutter Speed Dial until the correct number appears in the DIN window on the dial. Below is a table of the available ASA/DIN ratings with the numbers represented by the dots shown beneath them. |

4. SELECTING THE SHUTTER SPEED
 |
The shutter controls the length of time
light is allowed to strike the film. The speed at which the two shutter
curtains pass across the film is measured in fractions of a second that
correspond to the numbers on the Shutter Speed Dial. (250 is 1/250 second, 2
is 1/2 second, etc.) The number "1" on the dial represents one full second
exposure. When set on the "B" setting, the shutter will remain open as long
as the Shutter Release Button is depressed. When using the "B" setting, and
for exposures longer than 1/30 second, a cable release and tripod should be
used to minimize camera movement.
To select a shutter speed, turn the Shutter Speed Dial until the desired speed lines up with the index mark. NOTE: Shutter speeds may be set before or after the film is
advanced, but be careful not to pull up on the Shutter Speed Dial. You may
inadvertently change the film speed setting. |
5. FOCUSING AND VIEWING
 |
The Mamiya MSX is an SLR camera. That
means that the image you see in the viewfinder is the same image you will
see in the final photograph. Focusing the MSX is made easier by the micro diaprism focusing grid in
the viewfinder. This small, round area in the center of the viewfinder
exaggerates the difference between the "in focus" and "out of focus"
image. By rotating the focusing ring on the lens barrel until the micro
diaprism disappears, the image is brought into focus. For subjects with irregular outlines, like wooded hillsides, the entire
ground glass surrounding the micro diaprism may be easier to focus with,
turning the Focusing Ring until the image appears sharp.
|
INFRA-RED PHOTOGRAPHY
Infra-red light waves focus on a plane slightly behind that of visible light.
When using infra-red film you can compensate for this difference by focusing
slightly behind your subject. First focus normally until your subject is sharp.
Note the position of the Footage Index Mark on the Distance Scale. Rotate the
Focusing Ring until the small red dot moves into this position and your lens
will be focused for infra-red photography.
6. TURNING ON THE METER
 |
To activate the cameras metering system, pull the Film Advance Lever away from the camera body approximately 1/2 inch until it clicks into position. To prevent unnecessary drain on the battery, lock the meter in the "OFF" position when the camera is not in use. Press the "OFF" button on top of the Film Advance Lever and the lever will retract towards the body. |
7. SETTING THE EXPOSURE
 1.Turn the Shutter Speed Dial until the shutter speed you wish to use lines up with the index mark. Outdoors in bright or hazy sunlight 1/125 second should be fast enough for most situations, depending upon the film you use. Indoors in a well lit room, 1/60 second or slower should be sufficient under most conditions. 2.Look through the viewfinder and aim the camera so the brackets f all on the most important part of the picture. For the most accurate reading be sure the bracketed area doesn't include objects much lighter or darker than the area you want to measure. 3.Rotate the Aperture Ring on the lens until the needle to the right of the finder is centered between the open ends of the index mark. When the needle centers, the exposure will be correct. If the meter needle does not come to the center no matter what aperture you choose, change shutter speeds. When the needle is on the (+) side, the picture is overexposed and you need to select a faster shutter speed. When the needle is on the ( ) side, the picture is underexposed and a slower speed should be chosen.
|
 |
NOTE: You may reverse the procedure if you wish to use a certain aperture. In this case, select the aperture and center the meter needle by rotating the Shutter Speed Dial. When using SX lenses it is not necessary to push the Film Advance Lever
toward the camera body to take a meter reading. This action is taken only to
view depth-of-field. |
8. DEPTH OF FIELD
 |
When the camera is focused on an object,
an area in front of and behind the object will also be in acceptably sharp
focus.
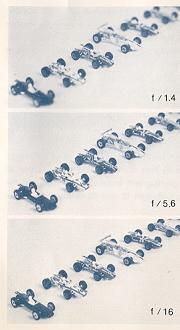
The distance between the nearest and farthest objects in focus is called Depth-of-Field. Each time the aperture is changed, depth-of-field changes also. As the lens is stopped down towards f /16, depth-of-field increases, and as the lens is opened towards f/2, it decreases. Knowing how to use depth-of-field allows the photographer to use the principles of "selective focus" to eliminate unwanted foreground and background objects from his photographs, and could mean the difference between a snapshot and a successful photograph. To view the depth-of-field in your photograph with the MSX, bring your subject into sharpest focus and press the Film Advance Lever in towards the camera body. This causes the lens diaphragm to "stop down" (become smaller). The exposure meter needle may deviate from the center of the index mark, but do not readjust the exposure setting. The lens is now at the aperture at which the picture will be taken. NOTE: When taking exposure meter readings with SX lenses, DO NOT press the Film Advance Lever for meter reading. |
 |
The depth-of-field will appear in the
viewfinder exactly as it will appear in the finished picture. By changing
the focus while the lens diaphragm is stopped down you can select the area
of sharpness in your photograph. When using preset or non-automatic lenses
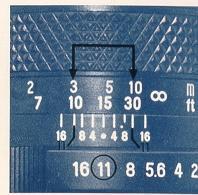
the diaphragm must be set manually, but the same results are achieved. You may also determine the depth-of-field by checking the scale on the lens barrel. Numbers representing lens apertures appear at the near and far limits of depth for any given focus distance and lens opening. For example, if the standard lens is focused at 15 feet, one of the marks representing f/ill appears at the 10 foot mark and the other at the 30 foot mark. This means that in a photograph focused at 15 feet and the diaphragm set at f/ill, everything between 10 and 30 feet will be in acceptably sharp focus. |
9. CHANGING LENSES
 |
CAUTION: PLEASE READ THIS SECTION
CAREFULLY BEFORE ATTEMPTING TO REMOVE OR INSTALL A LENS.
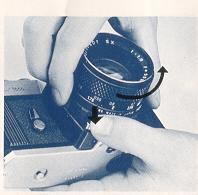
To remove an automatic lens from your camera, first press the meter "OFF" button. Hold the camera securely with one hand and press the Lens Release Button. With the other hand, firmly grasp the lens and rotate it counterclockwise until all the threads have been disengaged. To mount the lens, screw the lens threads into the lens mount on the camera body, rotating the lens clockwise until it stops and locks into place with a sharp click. While mounting the lens, never press the lens release button. Always be sure the meter is in the "OFF" position, and that the threads are properly engaged. If the lens is difficult to screw in, remove it and inspect the threads for dirt or other foreign matter. Do not touch the reflex mirror in the camera body after removing the lens. Dust particles can be removed with a blower or soft camels hair brush. |
10. HOLDING THE CAMERA
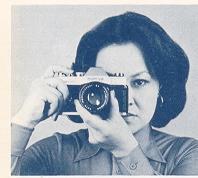 |
Support the camera in the palm of the
left hand, with the thumb and forefinger gripping the focusing ring. The
palm of the right hand should fit against the right side of the camera body
with the forefinger resting near the Shutter Release Button and the thumb on
the camera back.
Look through the viewfinder with the camera resting against the
forehead to help steady it, and the left elbow held in against the body.
|
IMPORTANT: When attaching the camera to a tripod that has a
long attachment screw, adjust the screw to less than 1/4 inch (6.35mm) to
prevent damage to the interior of the camera body.
11. SELF TIMER
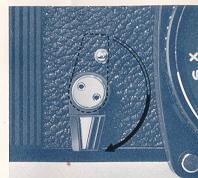 |
The MSX 1000 has a built-in self-timer,
providing a method of delaying the shutter release up to 10 seconds,
allowing the photographer to include himself in his own photographs.
When the self-timer is rotated 180 degrees, a delay of 10 seconds is provided before the shutter is released. Rotating the lever less than 180 degrees gives shorter delay times. The self-timer "activating" button is located behind the lever and is visible only when the timer is set for use. Since the self-timer operates independently of the Shutter Release Button, the camera may be operated in the normal manner, using the Shutter Release Button, even when the self-timer has been set. NOTE: If the Self-timer Lever is not rotated at least 90 degrees, it will not function. |
12. FLASH PHOTOGRAPHY
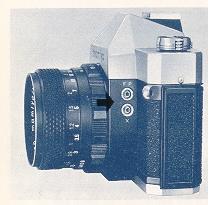 |
The flash terminals, marked FP and X (10), allow for a choice of flash synchronizations. The selection of a terminal depends upon the type of flash used, as well as shutter speed. The following table shows the correct combinations to be used in various flash situations. These combinations must be observed to insure correct synchronization. |
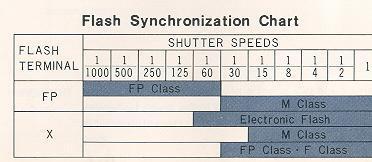 |
Shaded areas indicate the shutter speeds at which listed bulbs are to be used, with the cord attached to the correct terminal position. |
 |
In flash photography, exposure is
determined by the guide number of the flash bulb or electronic flash unit.
The guide number represents a relationship between the power of the flash
and the speed of the film. Flashbulb guide numbers can be found on the
package they came in. Guide numbers for electronic flash units are found in
the manufacturers specifications.
Once you've found the correct shutter speed for your type of flash,
(see Flash Synchronization Chart), you can compute the correct lens
opening by this formula: |
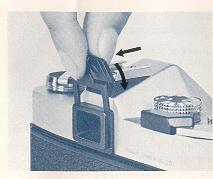
| To use the X ("hot shoe") contact on the camera with cordless flash units, pull the cover off the shoe and fold it down out of the way. NOTE: When using flash units with synchronization cords, an electrical charge is present in the shot shoe". Keep the cover in place to prevent the possibility of a light electrical shock while the unit is connected. | If the flash you are using has a guide number of 56, for example, and if, after focusing, you determine from the lens barrel Distance Scale that the subject is 7 feet away, divide 56 by 7. The answer is 8; therefore the correct aperture is fee. Not only is flash the most effective light source for indoor snapshots and shooting in dark places, but it's also an effective tool for backlighting portraits and filling in shadows. Remember that when flash is used as a supplemental light source, exposure must be based on the light from the main light source (such as the sun). |
13. REWINDING THE FILM
 |
After a roll of film has been exposed,
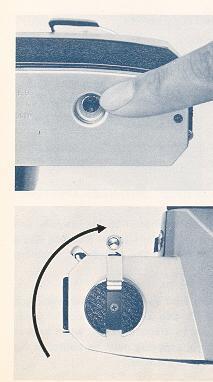
it must be rewound into its cartridge before being removed from the camera. Push the rewind button on the camera bottom and slowly turn the rewind
knob clockwise until the film pulls free of the take-up spool. While the film is being rewound, a click can be heard each time a frame is rewound. When the clicking stops the film has been rewound, but if for some reason you're not sure, hold the rewind crank and advance the film lever 3 or 4 strokes. If there is no tension on the rewind crank the film has been completely rewound. Open the camera back, pull up the rewind knob, and remove the film cartridge. |
MULTIPLE EXPOSURES
Your new Mamiya MSX camera is protected from accidental double exposure under
normal picture taking situations since you cannot take a picture until you
advance the film and relock the shutter. However, to make double exposures for
special effects:
1.Take your first picture in the usual manner.
2.Press the film rewind button on the base of the camera and slowly turn the film rewind knob clockwise until you hear a click. Stop. The click means that you have rewound the film one full frame. Next, advance the film twice. This winds the shutter and repositions the original frame for the second shot or double exposure.
14. STOPPED DOWN APERTURE OPERATION
 |
Your Mamiya MSX is designed to operate
automatically at full aperture with the complete range of SX lenses.
However, in some cases exposure must be determined by the "stopped down"
method.
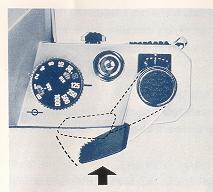
A. When using lenses with universal thread mounts, such as those designed for use with the Mamiya/sekor TL and DTL series. (With lenses that have an "Automatic/Manual" selector switch, set the switch on "Automatic"). B. When using the SX (or TL/DTL) preset lenses. C./ When photographing with the SX (or TL/DTL) lens separate from the camera body, as when using the SX lenses on accessories like the auto-bellows extension and auto-extension tubes. To use the "stopped-down" method, press the Film Advance Lever in towards the camera body as far as it will go. Rotate the Aperture Ring or Shutter Speed Dial until the meter needle is centered between the open ends of the index mark. |
15. TROUBLE SHOOTING YOUR CAMERA
The proper operation of a precision instrument like the Mamiya MSX
camera requires strict attention to the correct manipulation of controls. In
many cases, the camera may appear to malfunction simply because some small
detail was overlooked, or the operations were not in the proper sequence. Before
you decide the camera is broken, there are some things you can look for.
Problem: EXPOSURE METER NEEDLE WILL NOT MOVE TO TAKE
READING.
Possible cause: Improper shutter speed/aperture combination for film and
light conditions. Try changing the shutter speed/aperture combination until
needle reacts. Or check to see that the correct type of battery is being used
and has been inserted correctly.
Problem: FILM
COMPLETELY BLANK WHEN PROCESSED, INDICATED NO EXPOSURE HAS BEEN MADE.
Possible cause: Improper loading. Review the section on film loading and be
sure you are loading the camera correctly with the film being securely attached
to the take-up spool and winding in the CORRECT DIRECTION, that is UNDER the
take-up spool. Film may not have gone through camera at all.
Problem: SELF TIMER DOES NOT OPERATE SHUTTER.
Possible cause: Timer not rotated at least 90 degrees.
Problem: FLASH PICTURES BLANK OR PARTIALLY EXPOSED.
Possible cause: Improper shutter speed for the type of flash used, or
improper cord receptacle used for the type of bulb or shutter speed. Check Flash
Synchronization Table carefully.
Problem: LENS VERY
HARD TO REMOVE FROM CAMERA. STOP IMMEDIATELY!
Possible cause: Pressure on Film Advance Lever causing automatic diaphragm
actuating plate to press against pin on back of lens. THIS CAN CAUSE SERIOUS
DAMAGE TO YOUR LENS. DO NOT FORCE THE LENS! Check to be sure the film advance
lever is retracted.
Problem: SHUTTER WILL NOT RELEASE.
Possible cause: Film Advance Lever not advanced far enough. A full stroke is
necessary to wind the shutter. However, a ratchet incorporated within the film
advance mechanism will allow you to accomplish a full wind in a series of short
strokes.
If the problems above cannot be solved in the
manners suggested, do not attempt to repair the camera yourself. Take it to the
nearest service center. A minor problem could be aggravated by tampering.
16. LENS COMPARISON CHART

| A variety of interchangeable lenses are available to add to the versatility of your Mamiya MSX. You can add telephoto lenses to get in closer to those far away scenes, or a wide angle lens so you can get in close and still get everything into your picture. |
THE AUTOMATIC LENS
The Mamiya/sekor standard lens features an automatic diaphragm to let you
view the scene at the lens maximum aperture. When you press the Shutter Release
Button the lens will automatically "stop down" to the aperture you selected and
re-open immediately.
PRESET LENSES
Preset lenses have 2 parallel rings controlling the aperture setting. One,
the preset ring has click-stops al the numbered aperture positions. The other,
the diaphragm control ring, turns freely, without click-stops Using the
stop-down metering method, turn the preset ring until the needle in the
viewfinder lines up correctly Then open the lens to maximum aperture with the
diaphragm control ring, for focusing. After focusing, close the diaphragm down
to the preset position by turning the diaphragm control ring in the opposite
direction. will stop at the preset aperture.
17. ACCESSORIES
Filters:
Five different filters, (Y2, YG, 02, UV, and SL) are available for each
size mentioned in the lens comparison chart.
Lens
Hood:
Refer to the lens comparison chart. A lens hood is a necessary accessory to
keep unwanted light from striking the lens and causing flare.
Diopter Correction Lenses:
Many near and far-sighted persons have difficulty looking through a
camera viewfinder while wearing glasses, but they could not focus accurately
without them. This common problem can be corrected by Rubber Eye-cup with using
a diopter correction lens that mounts easily over the viewfinder eyepiece.
Diopter correction lenses are available in strengths +3, +2,+1, -1, -2, and -3.
The diopter correction lens is attached using the rubber eye-cup with adapter.
Rubber Eye-Cup Adapter:
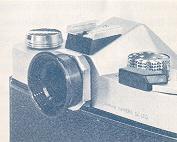 |
The rubber eye-cup helps eliminate unwanted light from entering the viewfinder from the back and sides while viewing. |
Accessory Shoe model 2:
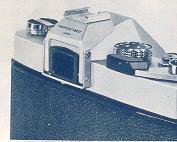 |
Accessory Shoe model 2: The accessory shoe permits a clip on type flash unit to be attached t the MSX 500 camera. |
The Magnifier:
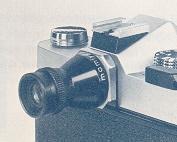 |
The Magnifier: The magnifier is a useful aid for critical
focusing required in copy work, close-up photography, etc. Only the center
portion of the finder image is visible through the magnifier, and the size
of the image is doubled. The magnifier provides for a diopter adjustment of
+5 to -5. |
Angle Finder:
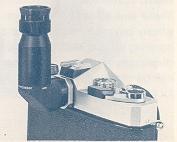 |
Angle Finder: The angle finder, useful for waist level or right angle viewing, can be rotated in any direction for more convenient viewing, particularly in close-up and microphotography. The angle finder provides the same magnification as the viewfinder and allows for a diopter adjustment of from +2 to—2. A rubber eye-cup is provided to eliminate unwanted light from entering the viewfinder. |
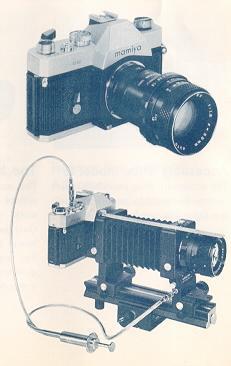 |
Auto Extension Tubes: These lens extension
tubes are intended for close-up photography and mount between the camera
body and lens, directly coupling with the MSX metering system and the lens
automatic diaphragm. A set of three connecting tubes of different lengths
can be combined to give a magnification range from 0.17 x to 1x life size
with the standard 55mm lens.
Auto Bellows: This is a bellows type unit similar in function to the auto extension tube set, but allowing more flexibility and a greater degree of magnification. Mounted with the 55 mm lens the bellows unit is able to achieve 3.3 x magnification. The prime lens can also be turned around and mounted in the reverse position for optimum corner-to-corner resolution at close distances. The lens automatic diaphragm is operated by a dual cable release with the bellows attached, and the entire unit can be focused without losing magnification when the focusing rail accessory is used. |
Slide Copier:
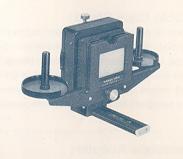 |
Used with the bellows unit, the slide copying attachment is mounted in front of the lens to allow the photographer to copy slides and film strips. It has a slide stage that moves in any direction to make it easy to crop slides for better composition and a removable film tray to facilitate copying long rolls of 35 mm film. |
Bellows Stand:
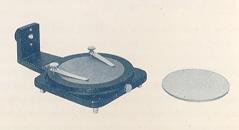 |
The bellows stand is actually a stage for photographing small objects. The platform rotates to allow for the best positioning of the subject with small clips to hold it in place. The surface of the stage itself has a reflectance of approximately 18%, ideal for exposure measurements. A clear glass stage is provided to allow for backlighting and incident light measurement. |
Portable Copy Stand:
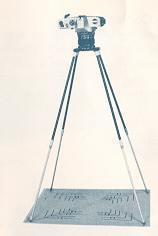 |
The unit is a light, portable, four legged copy stand used
to insure that the cameras film plane is held parallel with the copy
material for maximum sharpness. Using a 55mm lens, flat objects sized from
8-1/4 x11-3/4 inches (21.0 x29.7 cm) to 4-1/8 x5-7/8 inches (10.5 x14.8 cm)
can easily be copied. The stand comes complete with a handy carrying case. |
Microscope Adapter:
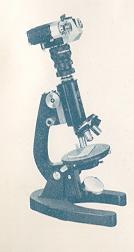 |
The microscope adapter permits the MSX camera to be mounted to the eyepieces of a microscope. The cameras built-in exposure metering system provides an accurate light measuring guide for photomicrography. |
Chest Pod:
 |
This one-legged portable support helps prevent movement when hand-holding your camera or when a larger tripod would be impractical. It proves quite effective in high angle and sports photography where stability and mobility are important. |
STORAGE:
If the camera will not be used for an extended period of time, store it with the shutter un-wound to relieve tension on the spring. Lock the exposure meter "OFF" and remove the battery.
Never store in areas where the temperature exceeds 100 degrees F, or go below freezing (32 degrees F).
Protect against moisture. Never expose the camera to direct sunlight for extended periods of time.
Avoid areas where exposure to salt water or salt air is heavy.
CARE AND CLEANING:
Use a blower or camel hair brush to clean the entire film compartment before loading film into the camera. Never use your breath to blow dust or dirt from the compartment, the moisture can corrode the precision working parts.
To clean the lens surface, rub VERY GENTLY in a circular motion with a high
quality lens tissue. In severe cases you can use a very small amount of lens
cleaning solution, again wiping in a circular motion. NEVER RUB THE LENS TO
REMOVE DIRT OR GRIT! If the dirt will not come loose with a brush or blower,
take the camera to a factory approved service technician. Never touch the lens
or the reflex mirror with your fingers or any material other than a lens tissue.
Dirt on the reflex mirror will not affect your photograph.