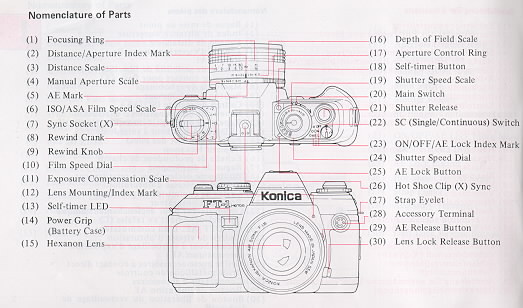
If you find this manual
useful,
how about a donation of $3 to:
M. Butkus, 29 Lake Ave.,
High Bridge, NJ 08829-1701
and send your
e-mail address
so I can thank you.
Most other places would charge
you $7.50 for a electronic copy
or $18.00 for a hard to read Xerox copy.
This will help me to continue to host this site,
buy new manuals,
and pay their shipping costs.
It'll make you feel better, won't
it ?
If you use Pay Pal, use the link below.
Use the above address for a check, M.O. or cash.
Back to main camera manual page
Problems opening PDF files or printing problems
- click here
Konica FT-1 PDF
made from HTML version
- better printing
CLICK HERE FOR WORD VERSION
CLICK HERE FOR
Konica FT-1 motor PDF direct from manual
- English
only
Operating Instructions
(Quick Start)
 |
| 1. Insert batteries. |
2. Turn the main switch to the "ON" position. |
3. Set the AE position. |
4 . Load the film.
|
 |
|
5. Set the ISO/ASA film speed. |
6. Determine the shutter speed. |
7. Look through the finder. Focus and frame, and depress the shutter button. |
8. After completing your film, rewind the film. |
 |
 |
| Attaching and Removing the Lens
|
|
Loading the Batteries
Film Loading (Auto-Loading)
Check of Auto-Loading
Setting the Film Speed |
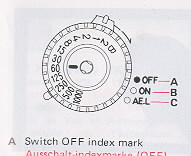
Main Switch Function |
A. Switch OFF index mark
B. Switch ON index mark |
C. AE Lock index mark |
Changing the Shutter Speed
|

Focusing |
A. Micro-diaprism B. Split image C. Matt plane
AE Photography (Check of Exposure)
(A) Manual Mode Signal (LED blinks)
(B) Indication of Correct Exposure Value
(LED "ON")
Releasing the Shutter |
 |
Self-Timer
 |

Shading of the Eyepiece |
Exposure Compensation
(1) Taking Pictures in the AE Lock Mode |
 |
(2) Picture-Taking with Exposure Compensation
Manual Modes
Picture-Taking in the Stopped Down Metering Mode with Konica Accessories used on the
camera.
B (Bulb) Exposure (Manual Model)
Electronic Flash Mode: Taking Pictures with X24 or X-36
Adjustment Range of the Exposure Compensation Scale by Film Speed for Auto Flash Photography
Warning of Drop in the Power Source's Voltage
Removing the Film
Selection of Shutter Speed
Selection of Aperture and Depth of Field
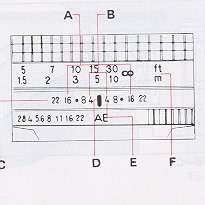
A. Depth of field for F/16
B. Depth of field for F/4
C. Depth of field scale
D. Distance/Aperture scale index mark
E. Infrared compensation mark
F. Distance scale
Holding the Camera
Specifications of the Konica FT-1 Motor
Type: 35mm focal plane shutter TTL-AE single-lens reflex camera with built-in auto-winder
Format: 24 x 36mm negative (standard 35mm film)
Standard lenses:
Hexanon AR 40mm f/1.8
Hexanon AR 50mm f/1.8
Hexanon AR 50mm f/1.4
Hexanon AR 57mm f/1.2
Lens mount: Bayonet Konica mount II
Aperture control: Fully automatic and manual
Shutter: Digital-control vertical action electronic metal focal plane shutter
Shutter speeds: B. 2, 1 - 1/1000 see, equally calibrated in 1:1 progression
Synchro: Hot shoe and X contact with synchro socket, automatically set to 1/100 sec with
dedicated Auto-Electronic Flash. Manually set to 2 - 1/60 see with non-dedicated electronic flash.
Synchronized with M, FP and ME bulbs at 1/30 see and slower shutter speeds.
Self-timer: Digital-controlled self-timer with a duration of 10 sec. Operation indicated by LED. Self-timer action may be cancelled.
Finder: Pentaprism eye level finder, shows 92%of picture field magnification 0.81 at the center. Central split-image spot plus microdiaprism on matte focusing screen.
Finder display: LED dot display indicates aperture opening in AE mode, over/under exposure warning, low voltage warning, manual mode setting and correct aperture setting for manual
mode, electronic flash ready light, correct aperture setting for stopped-down shooting.
Metering system: TTL center-weighted metering at the full lens opening. Silicon-pin Photo Diode (SPD) compound photocell.
Exposure adjustment: Shutter-speed priority aperture control metering system. Coupled to film speed, shutter speed and f-stop value at the full lens opening with Hexanon AR lens
(metering at full lens opening). Automatic aperture control with priority given to shutter speed in the AE mode. Correct aperture value reading in the manual mode. Fixed point alignment
system coupled to film speed, shutter speed and aperture with Hexanon lens, bellows, etc. (stopped down metering).
AE coupling range: EV 0.7 (f/1.8 at 2 see) to EV 19 (f/22 at 1/1000 see) with ASA/ISO 100
Film speed range: ASA/ISO 25-3200
Main switch: Turns power source on and off and controls the AE lock
AE Lock: When main switch set at 'AEL' partial depression of shutter release shows aperture setting in finder and locks aperture at that setting (over/under exposure warning inactive in ALL
mode)
Exposure compensation: +2EV, 1/3 step intervals (at ASA25, -2 to 0 EV, at ASA3200, +2 to 0 EV)
Shutter release: Electromagnetic release partial depression of shutter activates light meter full depression of shutter triggers shutter.
Single/continuous advance: S/C switch for single frame auto winding
or continuous-shooting at 2 fps
Film transport capacity: With 36-exposure film continuously used at constant temperature, more than 20 rolls with AAA alkaline batteries, more than 10 rolls with AAA manganese
batteries, more than 40 rolls with AA alkaline batteries more than 20 rolls with AA manganese batteries (under Konica's test conditions) before low voltage warning appears in viewfinder.
Film loading: Auto-loading system
Film advance: Auto-winding system with electric motor. Index mark turns in the film advance window to indicate positive film wind
Film rewind: Crank system, LED end of roll indicator. Rewind button automatically returns to the original position. Automatic resetting frame counter.
Dimensions and weight: 143 x 91 x 46mm (5.6" x 3.6" x l.8") 570g (20.1 oz) (without batteries) 143 x 91 x 78mm (5.6" x 3.6" x 3.1") 740g (26.1 oz) with 50mm f/1.8 lens (without
batteries)
* The above specifications are based on the results of tests conducted by Konica's.
* The specifications and external appearance of this product are subject to alteration without notice.
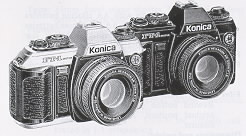
Thank you for your purchase of the Konica FT-1 Motor. The Konica FT-1 Motor is the result of a combination of state of the art electronic
technology with Konica's 100 plus years of camera design innovation. The FT-1 Motor combines numerous camera features pioneered by Konica like
automatic loading, automatic winding, automatic exposure, and shutter priority into a sleek, lightweight SLR camera. Of course, the full range of
Konica Hexanon lenses will fit the FT-1 Motor like they have fit all Konica SLR cameras since 1967. In addition, the FT-1 Motor is compatible with
the complete line of electronic accessories developed specifically for the Konica F cameras, making the camera a versatile fun system instrument. The
addition of an X-24 dedicated flash will complete your Konica FT-1 Motor camera outfit. For the correct use of your Konica FT-1 Motor, we hope that
you will carefully read this instruction booklet and continue to enjoy taking pictures with your new Konica camera.
1. Attaching and Removing the Lens (P. 8)
* A rear lens cap may be fitted to the bottom of the lens barrel and a body cap to the lens mount of the camera body to protect the lens and the inner part
of the camera body.
* When the lens is removed do not touch the inner part of the camera body. Avoid getting fingerprints on the lens. To prevent fingerprints, handle the
lens with the lens cap on.
* The pin which operates the AE mode juts out of the surface of the lens mount. Do not place your lens down on the mount side.
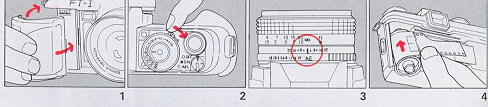
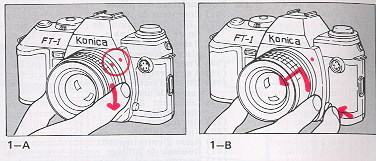
Attaching the Lens
Align the red dot of the lens with the red dot (Lens mounting index mark (12)) of the camera body and slowly insert the lens into the camera body. Hold
the lens and turn it clockwise until it clicks into position. (1--A)
Removing the Lens
While the Lens lock release button (30) is kept depressed, turn the base of the lens counterclockwise until the red dot of the lens is brought in line with
the red dot on the camera body. (1--B)
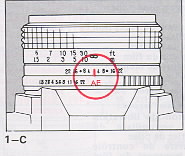
Setting and Check of the AE Mark
Turn the Aperture control ring (17) and align the AE mark (5) with the index mark (2), the ring will be locked to set your camera to the AE picture-taking mode. (1--C)
2. Loading the Batteries (P. 9)
* Your Konica FT-I uses four LR03 (AAA) or LR6 (AA) alkaline dry batteries for all its functions The
camera will not operate without batteries.
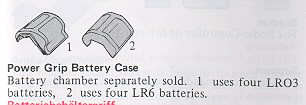
* The Power grip (14) battery chamber comes in two types - one for AAA batteries and the other for AA. The case for LR6 (AA) is sold as a separate
accessory. * In the continuous-shooting mode, approximately 20 rolls of 36-frame film may be exposed with LR03 (AAA) alkali dry batteries and approximately 40 rolls with LR6 (AA) alkali dry batteries (under
Konica's test conditions).
* When the voltage of the batteries loaded in your camera has run down, a warning signal (LED) blinks in the finder, providing sufficient time to
purchase new batteries before the old ones are completely exhausted.
* The performance of the batteries will drop when the temperature is under 0°C. Keep your camera warm when pictures are to be taken at low
temperature or use a Konica Remote Battery Pack.
* Pictures may be taken with ordinary manganese dry batteries, but the number of pictures which may be taken will be increased with alkali dry
batteries. It IS advisable to use alkali dry batteries which are more powerful and have a greater capacity.
* Nickel-cadmium (Ni-Cd) batteries must not be used because of their voltage rating.
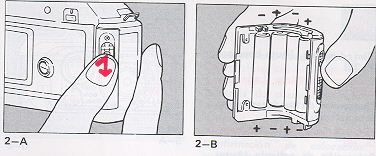
1) Depress the Battery case lock release button and slide it down. Push toward the front and the Power grip ( 14) will be detached. (2--A)
2) Insert four alkali dry cells, in the proper direction (a terminals are indicated on the inside of the Battery case). Each battery may be easily inserted if
the "-" side is inserted first. (2--B)
If "+" and "-" poles of batteries are not correctly aligned, the camera will not operate and may be damaged.
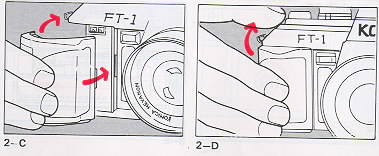
3) Put the guide claw (orange) of the Power grip into the groove on the camera
body. (2--C)
4) Rotate the battery case around until it clicks into position. (2--D)
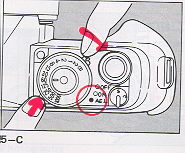
3. Film Loading (Auto-Loading) (P. 10)
* The Konica FT-l's auto load system is so designed that once the film is set in place in the camera back and the back cover closed, the film will be
automatically advanced to frame #1.
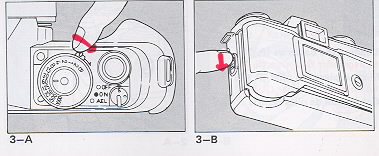
1) Turn the Main switch lever (20) to the "ON" position. (3--A)
2) Slide down the Back cover rock release (36), and the Back cover (45) will open. (3--B)
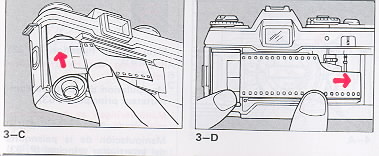
3) Slide standard 35 mm film magazine into the Film chamber (37). (3--C)
4) While holding the film magazine, in place pull the tongue of the film and lay it on the Film take-up
spool (44). (3--D)
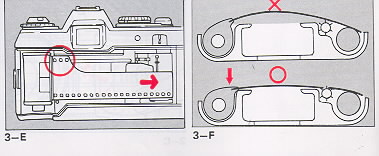
* For films with longer leaders, pull out the film until the first two or three perforations on the upper portion of the film appear. (3--E)
5) If the film magazine has moved out of its chamber push it down to make sure that there is no film slack. (3--F)
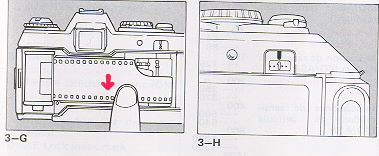
6) Bring the lower side of the film in line with the Guide rail (39). Unless the film is in parallel with the guide rail, the film will not be correctly loaded.
(3--G)
7) The moment the back cover is snapped closed, the film will be automatically advanced to the first exposure frame with "1" appearing in the Frame
counter (31). (3--H)
* The film may also be loaded with the main switch lever turned off, turn on the switch after the back cover is closed.
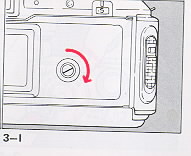
Check of Auto-Loading
To verify proper film loading, check to see that the orange needle in the film transport indicator window (48) is rotating when the film is advancing.
(3--l)
* If certain types of film with extremely thin film base is used, there are cases in which the index mark in the film transport indicator window will not
revolve even though the film is actually being advanced. After the film has been automatically loaded in such cases, check its transport by turning the
Film rewind crank (8) (clockwise). If the film is loaded properly, the crank will not turn more than a 1/2 turn. (Do not apply strong pressure, or film
may break.)
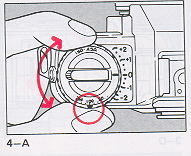
4. Setting the Film Speed (P. 12)
* Lift up and turn the Film speed dial (10) around the Film rewind knob (9) to set the ISO/ASA Film speed of the film you are using to match the film
speed scale setting. (4--A)
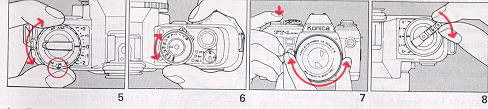
5. Main Switch Function (P. 12)
* The Main switch (around the shutter speed dial) is used to turn the power on and off and to set the camera to the automatic exposure lock (AEL)
mode.
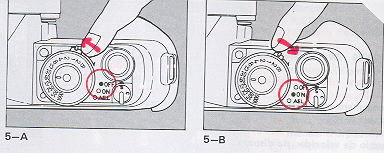
1) Shut off the power by moving the Main switch lever (20) until a white dot appears next to the "OFF" (23) position. Your camera should be
kept in this position when it is not in use. (5--A)
2) Power is turned on by moving the Main switch lever (20) until the white dot appears next to the "ON" (23) position mark, should you turn off the
power when the camera is in the loading, self-timer or bulb exposure mode power will remain on until the function is completed. Power will then be
automatically shut off: (5--B)
3) To set your camera to the automatic exposure lock position depressed the AE lock button (25) while moving the Main switch lever (20) until the
white dot appears next to the "AE.L" (23) position mark. After finishing
AE lock photography, return the Main switch to either the "ON" or
"OFF "
position. (5-C)
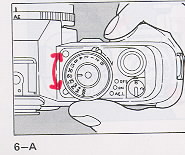
6. Changing the Shutter Speed (P. 14)
* Turn the Shutter speed dial (24) to align the reading of a desired shutter speed with the index mark. The dial may be turned clockwise or
counterclockwise. Operate the dial with the thumb while gripping the Power grip (battery case) (14) to change Shutter speeds instantly during the
course of taking pictures. (6--A)
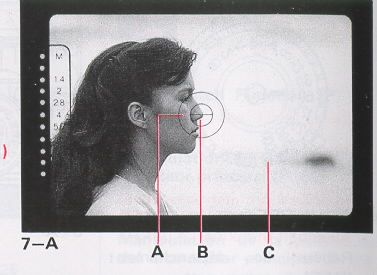
7. Focusing (P. 14)
To focus your Konica FT-I, look through the finder bring your subject to the center of the field of view and turn the Focus ring (1) of the lens.
At the center of the finder's field of view, there is a Split Image spot where the upper and lower images are to be aligned. Around this, there is a
Micro-Dlaprism field in which the image suddenly stops flickering once the subject has been focused. Depending on the type of subject, focus using
whatever method is suitable. (7--A)
* If it is difficult to focus a subject with the split Image assembly m the close-up or telephoto mode, use the peripheral Ground Glass.
8. AE Photography (Check of Exposure) (P. 15)
LED Finder Display
* Turn the lens Aperture control ring (17) to the AE mark (5) of the lens. Turn the Main switch (20) to "ON" and slightly depress the shutter release An LED (red) will light up in the view finder,
indicating the aperture value, automatically selected by the AE mechanism. Depress the Shutter Release (21) further to trigger the shutter. LED's will
also light to indicate warnings and other data.
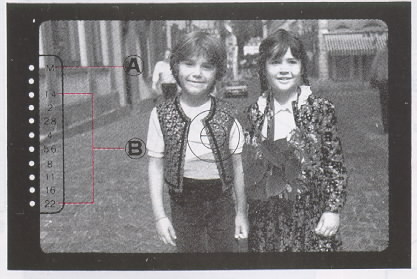
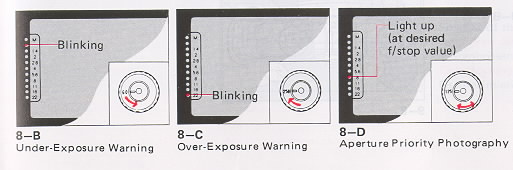
Indication of Correct Exposure
Value
When the aperture value corresponding to a selected shutter speed is within the correct exposure range, one of the LEDs from f/1.4 to f/22 (f/2 to f/22
with an f/1.8 standard lens) will light up, indicating the correct aperture value in the AE mode. (8--A)
*In taking pictures under florescent lamps, there are cases were two LEDs indicating the correct aperture values flicker at the same time. This
phenomenon is produced by the flickering of the fluorescent lamps and win not affect your pictures.
Correct aperture indention in Manual Mode
When your camera has been switched from the AE mode and set to the manual mode, the LED at the M mark blinks at the same time the LED of the
correct aperture value lights up. (8--A)
*In the B (bulb) mode, the LED of the M mark blinks, indicating that your camera is set to the manual mode.
Under-Exposure Warning
When the shutter release button is slightly depressed, the LED at f/1.0 (intermediate point between M and f/1.4) will blink if there is insufficient
available light. A picture taken in this situation will be underexposed.
Select a slower shutter speed. (8--B)
Over-Exposure Warning
When the shutter release button is slightly depressed, the LED at f/22 win blink, indicating over-exposure (too match light). Select a faster shutter
speed. (8--C)
Aperture Priority Photography
While looking through the finder, depress the Shutter button (21) slightly, and turn the Shutter speed dial (24)
until the LED of the desired aperture
value is turned on. (8--D)
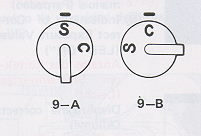
9. Releasing the Shutter (P. 16)
* Your Konica FT-I may be set to the single-frame or continuous action mode with the SC (single/continuous) switch (22).
Single-Frame Shooting
Turn the SC switch to bring the S in line with the index mark. Slowly depress the shutter button and the shutter win be released. The film will be
advanced by one frame and the frame counter will advance by one number. (9--A)
Continuous Shooting
Turn the SC switch to bring C in line with the index mark.
Press down the shutter release and keep it depressed this will cause the shutter to fire continuously, while film is advanced at the rate of 2 frames per
second, enabling you to take as many pictures in succession as you want. (9--B)
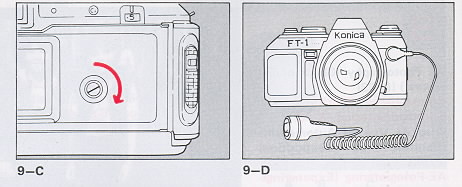
* In the continuous shooting mode, one is apt to forget the number of pictures taken. Check the Frame counter (31). (9--C)
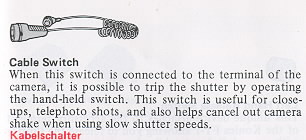
Shutter Release with Cable Switch
In taking pictures at shutter speeds slower than 1/30 second, in the B (bulb) mode, in the telephoto mode
or in the close-up mode, your camera may be
jarred if It IS hand held. It is advisable to use a tripod and a cable switch.
Remove the cover of the Accessory terminal connector (28) and screw in the cable switch. The shutter will be released each time the button on the
cable switch is pressed. (9--D)
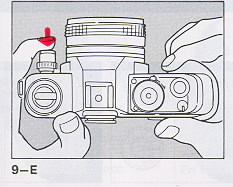
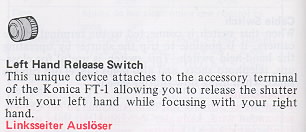
Left-Hand Release Switch
If you are left-handed, screw the left-hand release switch (separately sold) on the Accessory terminal connector, and you win be able to depress the
shutter button with your left hand.
* Before attaching the left-hand release switch' turn off the main switch to prevent the shutter from being accidentally released. (9--E)
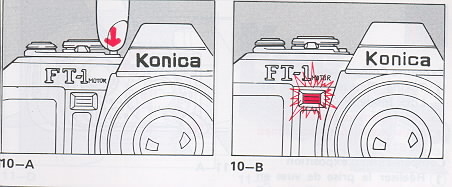
10. Self-Timer (P. 17)
* The self-timer may be used in the AE or flash mode and win provide a 10 second interval from when the self-timer button is pressed to shutter
release.
1) Mount your camera on a tripod, focus and depress the Self-timer button (18). (10--A)
2) 10 seconds after the self-timer LED (13) starts blinking, the shutter win be released. The LED win
blink at a continuously faster rate advising you
when the shutter will be released. (10--B)
* In a situation where the Self-timer button is to be used in the flash mode, make sure the electronic flash has been charged before pressing self-timer
button.
* To cancel the self-timer when it is in operation lightly depress the shutter release button(21). (As there is a chance of releasing the shutter when this is
done it is advisable to turn the Main switch lever (20) to the OFF position.)
* The self-timer cannot be used at the B (bulb) setting.
* The self-timer cannot be used when an accessory IS attached to the accessory terminal (28).
Shading of the Eyepiece
Shade the eyepiece when pictures are to be taken with the eye detached from the eyepiece, such as in the remote-control mode.
When the self-timer is used or when a picture is to be taken with your eye away from the eyepiece incorrect exposure may result from light entering
through the finder eye piece. After a picture has been framed through the finder, shade the Eyepiece (34) with the finder cover attached to the neck strap. (A Twist the right- and left-hand sides of the (adjusting link)
and divide it into two. (I) Insert the divided halves into the Accessory clip grooves (33) of the eyepiece frame Tom the right- and left-hand sides to shade
the eyepiece with the strap. (10--C)
11. Exposure Compensation
(1) Taking Pictures in the AE Lock Mode (P. 18)
* Konica's FT-1 AE system will always provide a proper exposure.
In a situation where pictures are to be taken in back lighting or when there is much difference between brightness of the subject and the periphery, it is
advisable to adjust the exposure
In such a situations, take pictures in the AE lock mode or use the exposure compensation scale.
* In the AE lock mode, note that there will be no warning for an under-exposure or over-exposure in the finder.
* If the finger is released from the shutter button, the AE lock win be released.
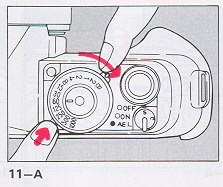
1) While the AE lock button (25) is kept depressed, turn the Main switch (20) until the white dot appears next to the
AEL mark (23). While looking
through the finder, depress the shutter button slightly, and an LED will light up in the finder, indicating the correct aperture value As long as the shutter release
is kept depressed, the aperture value will remain unchanged even if your camera is pointed in a different
direction Depress the shutter release further, to
take a picture at the locked aperture value. (11--A)
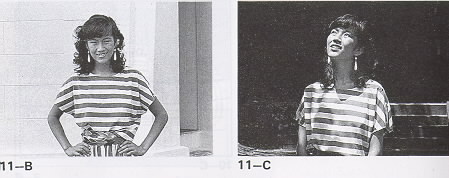
2) For example, in back light with the subject standing against the background of the sky, the subject will be under-exposed as the exposure win be
affected by the bright sky.
In this situation, point your camera downward, lightly depress and hold the shutter release. With the Al system locked, point your camera at the subject
and release the shutter, and the subject will now be properly exposed. (11--B)
3) Conversely, in a situation where the subject is bright but the background is extremely dim, the subject would be over-exposed in the
ordinary AE
mode.
In this situation, bring your camera close to the subject, and depress and hold the shutter release locking in the correct exposure. Return to your original
position and take the picture.
* After you finish taking pictures in the AE lock mode, return the Main switch (20) to the "ON" position (23). (11--C)
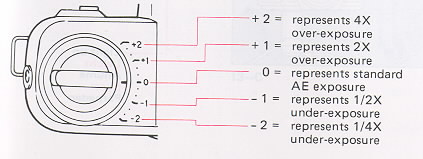
(2) Picture-Taking with Exposure Compensation (P. 19)
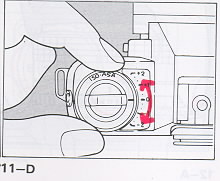
* The Exposure compensation scale (11) may be used in each click stop (calibrated in a 1/3 step). After pictures have been taken, return the scale to 0.
1) Turn the Exposure compensation dial (ISO/ASA set dial) (10) which concurrently serves as the film speed dial and set desired Exposure
compensation (+2 ~-2 EV). (11--D)
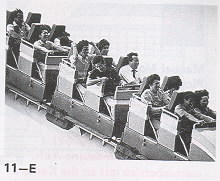
2) Compensate the exposure by +1 in a situation where the background is bright and the subject dim.
(11--E)
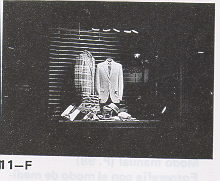
In a situation where the periphery is dim and the (subject) is bright, compensate the exposure by -1.
(11-F)
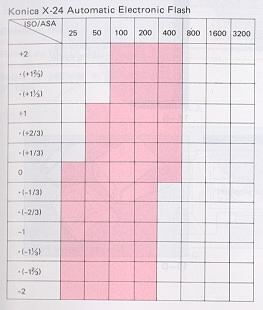
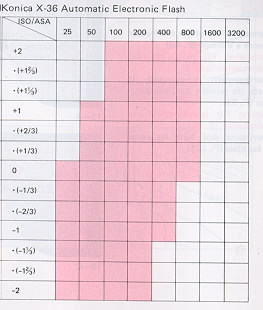
Adjustment Range of the Exposure Compensation Scale by Film Speed
| ISO/ASA 3200 |
+2 ~ 0 |
| ISO/ASA 1600 |
+2 ~-1 |
| ISO/ASA 100 ~ 800 |
+2 ~-2 _ |
| ISO/ASA 50 |
+1 ~ -2 |
| ISO/ASA 25 |
0 ~ -2 |
12. Manual Modes (P. 20)
To manually set the exposure with your Konica merely press the AE release button and set the lens to any aperture other than the AE position. A
red LED will continuously blink at the "M" mark in the
viewfinder to signify manual operation.
The Konica FT-1 Through-the-lens (TTL) Automatic Exposure (AK) system operates at all times, even during manual operation displaying the correct
exposure in the viewfinder even through you have set an aperture and shutter speed combination manually.
Picture-Taking in the Stopped-Down Metering Mode with Koni" Accessories Used on the Camera
* When using an extension ring or bellows where your camera cannot be set to the AE mode because you are using a manual aperture lens, pictures
may be taken in a stopped-down metering mode.
* When an pictures have been taken in the manual mode, return the lens aperture ring to the AE mark.
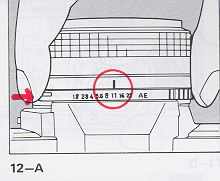
1) Press the AE release button (29) on the lens and set the lens to a manual aperture. (12--A) The LED of the M mark will flicker in the finder.
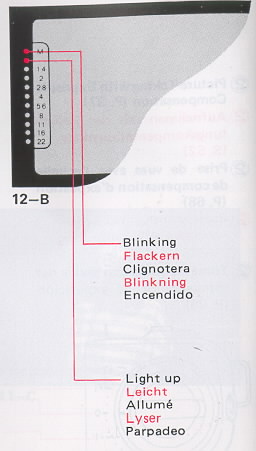
2) Point your camera at the subject, and look through the finder. While the shutter release is slightly depressed, turn the Aperture control ring (17) or
the Shutter speed dial (24) until the LED of f/1.0 (intermediate point between M and f/1.4) lights up. With this done, the correct exposure win be
assured. (12--B)
* Stopped-down metering tends to be affected by the light which strays into the Eyepiece (34). Use an eyecup 2 (separately sold).
* To take microscopic pictures, the exposure is determined in the stopped-down metering mode. As no diaphragm is used, make an adjustment by
changing the shutter speed or adjusting the brightness of the light source.
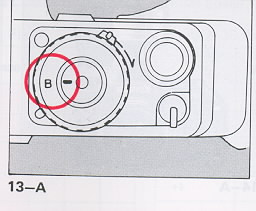
13. B (Bulb) Exposure (Manual Mode) (P. 21)
* The B setting on the shutter speed dial will keep the shutter open for as long as the shutter release button is depressed.
* With your camera set to "B" exposure, pictures can be taken in the manual mode, but not in the AE mode.
* At the "B" setting, pictures cannot be taken with the self-timer.
1) Set the Shutter speed dial (24) to B. (13--A}
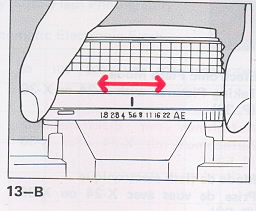
2) Switch the lens aperture from the AE mode to the manual mode and set the desired aperture. (13--B]
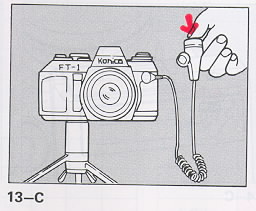
3) Depress the shutter and hold it down until desired exposure time has elapsed. (13--C)
* In taking pictures at the "B" setting, it is advisable to use a tripod and the Cable Switch (separately sold) to prevent a jarring of the camera.
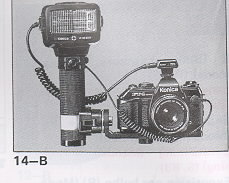
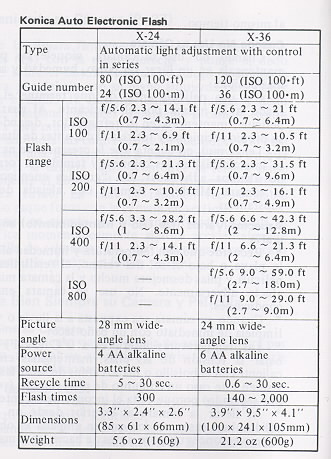
Electronic Flash Mode
Taking Pictures with X-24 or X-36 (P. 22)
When pictures are to be taken at night or in a dimly lit room, take pictures in the electronic flash ode with the Konica X-24 automatic electronic flash
light or the more powerful X-36. Both electronic flashes are so designed that lens aperture shutter speed, ISO/ASA film speed and all other data are
controlled by a central processing unit (CPU) of the camera.
* It is not necessary to remove the flash unit from the camera when it is not in use. However the flash must be turned off and the lens set to
AE.
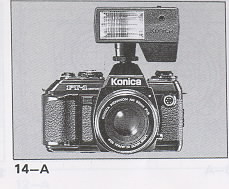
The Konica X-24 Automatic Electronic l lash is a compact, energy-saving electronic flash with a guide number of 80 (with ISO/ASA
l00.ft.). (14--A}
The Konica X-36 Automatic Electronic Flash is a powerful handle mount electronic flash, with a guide number of 120 (with ISO/ASA
l00 ft.).
(14--B)
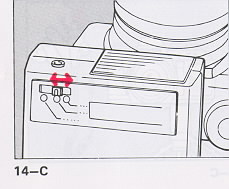
Using the Automatic Mode
1) Set the power switch to the ON position. (14--C)
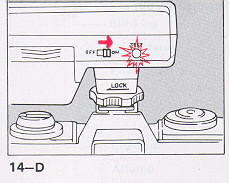
2) Set the shutter speed dial of your Konica FT-1 to any speed except B.
3) Set the Auto/Manual Selector switch of the X-24 flash to the green mark (f/5.6) or to the red mark
4) While depressing the shutter release button on the Konica FT-1, the f/5.6 or f/11 LED in the viewfinder will pulsate advising you that the flash unit is
at full charge.
5) Take your flash picture.
NOTE: In the automatic mode positions you are given the option of using either f/5.6 or f/11.
* The f/5.6 position will give you the greatest flash distance The f/11 position will give you the greatest depth of field. Depth of field is the acceptable
sharp focus in front of and behind your subject.
* The "f" stop you have selected win remain fixed regardless of what ISO film speed you are using. Films with higher ISO speeds will give you longer
flash working distances, lower ISO speeds, shorter flash distances. The flash distances for ISO film speeds 100 and 400 are provided on the scale
located at the top of the Konica X-24 Auto flash.
Flash Distance Range X-24
| f/5.6 |
ISO/ASA100 |
2.3'-14.1' (0.7-4.3m) |
| f/5.6 |
ISO/ASA200 |
2.3' - 21.3' (O.7-6.4m) |
| f/5.6 |
ISO/ASA400 |
3.3'-28.2' (1.0-8.6m) |
| f/11 |
ISO/ASA100 |
2.3'-6.9' (O. 7-2 lm) |
| f/11 |
ISO/ASA200 |
2.3'-10 6' (0 7-3 2m) |
| f/11 |
ISO/ASA400 |
2.3'-14.1' (0.7-4.3m) |
Flash Distance Range X-36
| f/5.6 |
ISO/ASA100 |
2.3'-21.0' (O. 7-6.4m) |
| f/5.6 |
ISO/ASA200 |
2.3'-31.5' (0 7-9.6m) |
| f/5.6 |
ISO/ASA400 |
6.6'-42.3' (2.0-12.8m) |
| f/5.6 |
ISO/ASA800 |
9.0'-59.0' (2.7-18.0m) |
| f/11 |
ISO/ASA100 |
2.3'-10.5' (O.7-3.2m) |
| f/11 |
ISO/ASA200 |
2.3'-16.1' (O. 7-4.9m) |
| f/11 |
ISO/ASA400 |
6.6'-21.3' (2 0-6.4m) |
| f/11 |
ISO/ASA800 |
9.0'-29.0' (2.7-9.0m) |
* The shutter speed dial can be set at any speed except B. The shutter speed win automatically be
changed to 1/100th second when the Konica X-24 or X-36 flash is fully charged. The lens will automatically
close down to either f/5.6 or f/11 depending on which "f" stop you have selected. The correct exposure
will be determined by the built-in light sensor of the flash unit.
* While your Konica X-24 flash is recycling, your Konica FT-1 win automatically be returned to the shutter speed and f stop you had
previously
selected for automatic non-flash pictures. There is no need to constantly change your shutter speed and f stop.
* The flash unit is automatically set for the ISO speed of the film in your
camera, by means of the camera's Central Processing Unit and "Hot Shoe"
* If the picture is taken before the flash is ready, the picture win be exposed in AE mode. Be sure to observe the under/over exposure warning signals.
Fill-in Flash (Daylight Synchro)
Subject in Back Light or near a Window
When pictures are to be taken of a subject on a cloudy day or in the evening, it is advisable to do so in the
daylight synchro mode with the electronic
flash used as an auxiliary light.
Picture-Taking Using the Fill-in Flash Mode
In case the Konica X-24 or X-36 is used for fibrin flash, note the camera-to-subject distances given in the following table and use the appropriate f stop:
| |
Subject in back light or near a window |
subject on a cloudy day or in the evening |
| X-24 |
f/5.6 |
-- |
0.7 - 4.3 m |
| f/11 |
0.7 - 2.1 m |
-- |
| X-36 |
f/5.6 |
-- |
0.7 - 6.4 m |
| f/11 |
0.7 - 3.2 m |
-- |
Picture-Taking with Non-Dedicated Electronic Flash
* An electronic flash with a hot shoe may be electrically connected simply by fitting it to the hot shoe clip. With an electronic flash without a hot shoe
connector, insert the plug of its cord into the X Flash Contact Terminal (7) of the camera body.
1) set the shutter speed to 1/60 sec. for all types electronic flash.
2) set the lens aperture manually per the instructions of the electronic flash unit.
3) when using automatic flash units set the lens aperture as indicated by the auto flash.
4) for manual flash units, determine the correct aperture to be set by dividing the guide number by the camera to subject distance.
15. Warning of Drop in the Power Source's Voltage (P. 24)
* When the voltage of the Konica FT-l's power source has dropped, a warning signal will appear in the finder when the shutter release is slightly
depressed. When this warning appears, replace the batteries the next time a new roll of film is loaded.
* If batteries are left for a long time, the voltage
will drop due even if the camera is not used. Make sure you check the voltage if you have not used the camera for a long time.
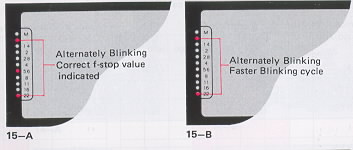
With Correct Exposure
The f/22 LED will alternately blink to warn of a drop in the power voltage. In addition to the alternate
blinking of the warning LEDs, another LED will light up to indicate the correct aperture value. (15--A)
With Warning for Under- or Over- Exposure
When the warning LED is blink to indicate over or under exposure when the voltage is too low, then the flashing intervals between f/1.0 the LED
(intermediate point between M and f/1.4) and that of f/22 will become shorter to warn against under or over exposure. (15--B)
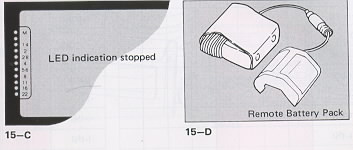
With Extreme Drop in Voltage
With a further drop in voltage the LEDs will stop blinking, and the camera will not operate until the batteries are changed. (15--C}
* When the low power warning signal appears, replace the batteries after finishing the roll of film in your camera.
Note: Even when the voltage has dropped too low for the LED's to light up, the auto-load mechanism may operate. If auto-load works but LED's do not
light up, please change the batteries.
Taking Picture at Less Than 32° F
At low temperatures, batteries provide less voltage than at normal temperatures. Take the batteries out of the battery case and keep them warm. Load
them in the chamber only when pictures are to be taken.
Another way to keep batteries functioning is to carry a spare battery case (separately sold), using and warming the two battery cases on an alternate
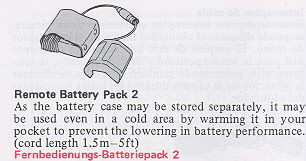
basis. If a Konica Remote Battery Pack (15--D) is used, pictures may be taken with the battery case kept warm in the pocket. This method is best suited for taking pictures for long hours at cold temperature.
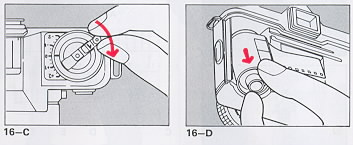
16. Removing the Film (P. 25)
* When all the frames in a roll of film have been exposed, make sure that the film is rewound and taken out of the camera. The film will be ruined if the
back cover IS opened before rewinding
* When the film has been completely exposed, the end of Film indicator LED (32) lights up on the back of the camera body.
* Depress the Film rewind button (42) to switch off the Film indicator LED (32). This LED will remain on as a reminder even if the power switch is
turned off. If it is not turned off by pressing the rewind button battery drain will result.
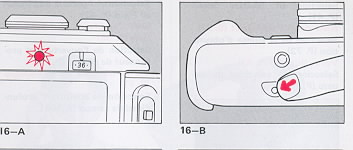
1) When the entire roll of film has been exposed and the film can no longer be wound the end of film indicator LED will go on. Turn OFF the Main
switch (20). (This is to prevent the shutter from being accidentally released during the film rewind). (16--A}
2) Push down the Film rewind button (42)
on the bottom of the camera body. Once it is pushed down it win remain so. You may hear a slight motor sound at this point. This means the position of
the take-up spool IS being adjusted. (16--B)
3) Flip up the Film rewind crank (8) turn it in the direction of the arrow (clockwise), and the film will be rewound in to the
film magazine. (16--C)
* When the film rewind crank is turned, the Film advance indicator window (48) will turn, showing that the film is properly rewound.
4) Rewind the film all the way into the magazine You will know the film is completely rewound be cause the needle in the film advance indicator will
stop turning and the rewind crank win turn freely. (16--D}
* It is advisable to have the exposed film processed as soon as possible.
Selection of Shutter Speed (P. 26)
Selection According to Brightness
It is usual to select a fast shutter speed for a bright subjects and a slow shutter
speedy-lit for dim subject. One simple guide for the AL mode is to use a
speed of 1/125 - 1/250 second outdoors and 1/60 second or so indoors, with ISO/ASA 100.
Reducing Camera Shake
When your camera is held in your hands, vibration from the hands may cause blurred pictures at slow shutter speeds. For hand-held shooting, shutter
speeds of 1/30 sec. or faster are usually advisable. With telephoto lenses, the effects of camera vibration are greater, so faster shutter speeds are required
to prevent blurring.
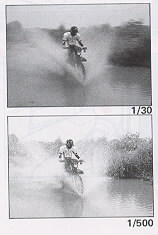
Photographing Moving Subject
When a fast moving subject is to be photographed, select a fast shutter speed between 1/250 and 1/1000 second within the correct exposure range, and
you will be able to "freeze" the subject's action.
If you want to photograph a moving subject blurred in a finished picture or to snap the subject while following the action through the finder, select a
slow shutter speed between 1/30 and 1/60 second within the correct exposure range.
Selection of Aperture and Depth of Field (P. 26)
What is Depth of Field
* With a subject in focus, there is a certain distance in front of and behind the subject which will be in sharp focus in the finished picture. This range is
known as the depth of field. It has the following features.
(1) The greater the aperture value (the smaller the aperture), the greater the depth of field. The smaller the aperture value (the greater the aperture), the
smaller the depth of field.
(2) The farther the subject is away from the camera the greater the depth of field. The nearer the subject is to the camera, the smaller the depth of field
(3) The shorter the focal length of the lens, the greater the depth of field. The longer the focal length, the
smaller the depth of field.
(4) The area which is in sharp focus in front of the subject is narrower than the sharp focus area behind the subject.
Use the depth-of-field scale as a yardstick to calculate the depth of field. An effective use of this scale will make it possible to sharply focus the
foreground of a scene or to blur the background of a subject.
Depth-of-field scale
The f-stop values calibrated on the lens' distance and the aperture index mark represent the
depth of-field scale. This scale will indicate the depth-of-field range for each aperture and a given focus point.
Infrared compensation mark
When using infrared film and lighting the real focal point will shift slightly closer to the camera. After the lens is focused, turn the distance scale and set
it to the infrared compensation mark (red numeral or line) for infrared photography.
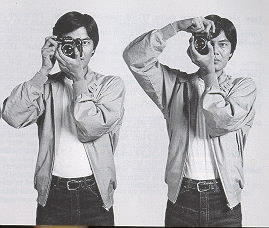
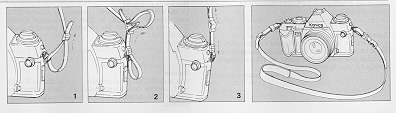
Holding the Camera (P. 27)
To take sharp, clear pictures, it is importer t to accustom yourself to the proper grip of your camera so that it will not shake when a picture is taken.
Hold your camera as illustrated pressing it firmly against your face. Keep the elbow of the arm which is supporting the camera tightly against your
body.
* When shooting vertical pictures, be sure that you do not depress the film rewind button.
Precautions for Use Checking the Camera
* Before you go on a trip or when your camera has not been used for a long time, it is advisable to check your camera to be certain that it is working
properly.
Before Taking Pictures
* For a protracted journey, carry spare batteries as a precaution.
* When the voltage of the batteries has dropped replace them an with four new similar batteries.
Taking Care of Camera
* If you leave your camera on a beach in summer, in a car exposed to direct sunlight, or in any hot and humid location for a long period of time, the
performance of the film and batteries will deteriorate, and the camera's operation may be adversely affected.
* If your camera gets wet, take it as soon as possible to the nearest Konica camera service station. If water has dripped onto the camera or if the camera
has been exposed to a sea breeze, wipe it wed with a dry cloth. Avoid moisture in your camera at an costs
* At a temperature of less than 0°C (32°F), there win be a drop in the battery performance keep the batteries warm by placing them in your clothing and
put them in your camera just prior to picture taking you can also use the Konica remote battery pack (sold separately).
* Do not touch or otherwise dirty the lenses. If the lenses get dirty, use a blower or brush to remove the dirt and then wipe lightly with a soft cloth. When you do not intent to use the lenses, attach the lens
cap.
* Use a sort brush or a blower to clean away dirt on the surface of the mirror of inside the film compartment, and take care not to touch the mirror or
shutter directly.
* A UV or skylight filter may be attached to the front of the lens and left on to protect the lens from damage.
When Your Camera is not in Use
* When your camera is not in use, take out the batteries and keep it at a place free from dust, moisture and air flow when the camera is not in use, make
sure that the lens cap is put on the lens.
* Use film before its term of serviceability expires. For Its storage, keep film in a refrigerator and take it out on the day before use.
* Naphthalene (mothballs) and formalin used in adhesives are harmful to cameras. Keep these
chemicals away from your camera.
ACCESSORIES
Cable Switch
|
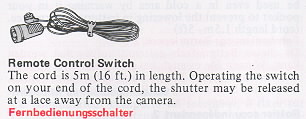
Remote Control Switch
 |
Remote Battery Pack 2
 |
Left Hand Release Switch
 |
Power Grip Battery Case
 |
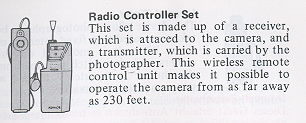
Radio Controller Set
 |
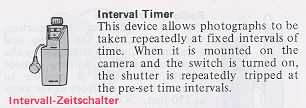
Interval Timer
 |
Bracket For Radio Controller or Interval Timer

|
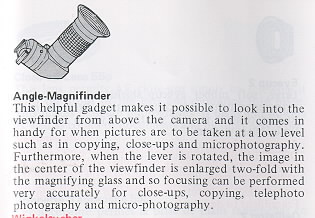
Angle-Magnifinder
|
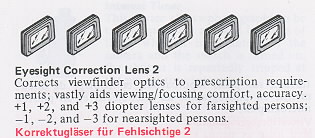
Eyesight Correction Lens 2
 |
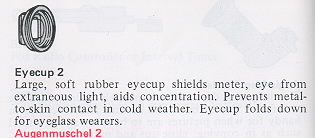
Eyecup 2
 |
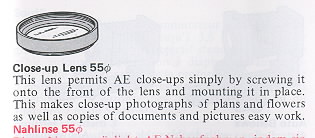
Close-up Lene55mm
 |
Extension Ring 3

|
Auto Ring 2, Double Cable Switch

|
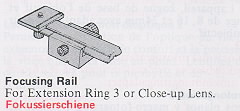
Focusing Rail
|
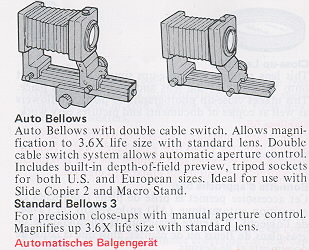
Auto Bellows
|
Slide Copier 2

|
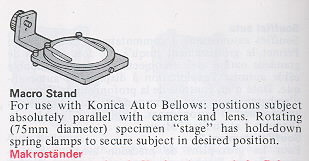
Macro Stand
|
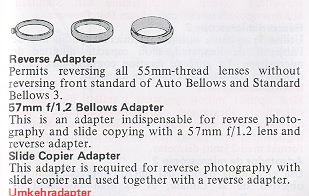
Reverse Adapter
|
Focusing Rail Assembly
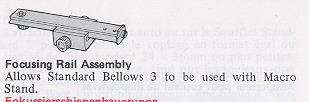
|
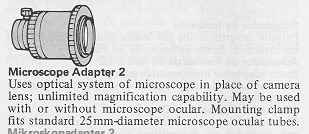
Microscope Adapter
|
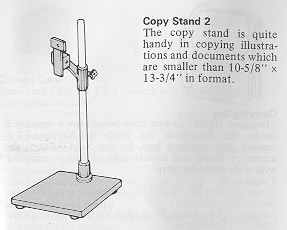
Copy Stand
|
|
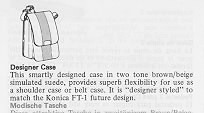
Designer Case
|
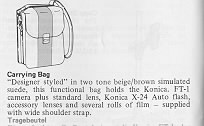
Carrying Bag
|
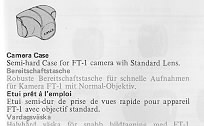
Camera Case
|
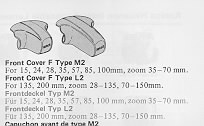
Front Cover F Type M2 and L2
 |
|
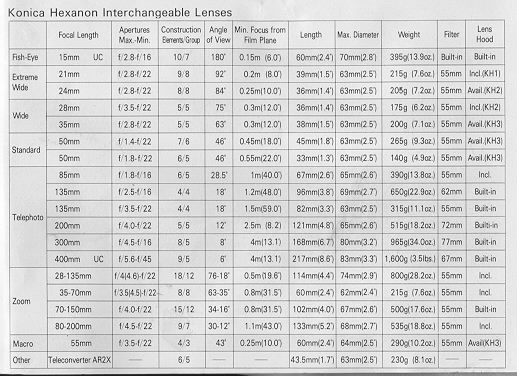
Complete selection of Hexanon Interchangeable Lenses
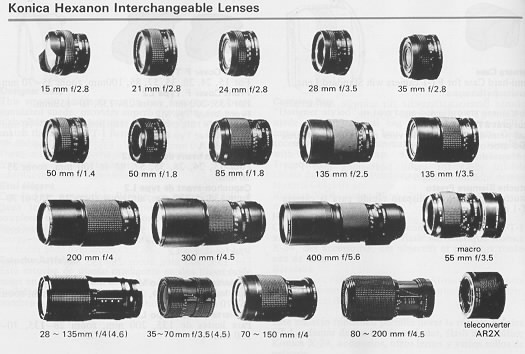
specifications of the Hexanon Interchangeable Lenses