and historical purposes, all rights reserved.
This page is copyright© by
This page may not be sold or distributed without
the expressed permission of the producer.
I have no connection with any camera company.
This camera manual library is for reference
and historical purposes,
all rights reserved.
This page is copyright© by ![]() , M. Butkus,
NJ.
, M. Butkus,
NJ.
This page may not be sold or distributed without
the
expressed permission of the producer.
I have no connection with any camera company.
On-line camera manual library
If you find this manual useful,
how about a donation of
$3 to:
M. Butkus, 29 Lake Ave.,
High Bridge, NJ 08829-1701
and send your e-mail
address
so I can thank you.
Most other places would charge
you $7.50 for
a electronic copy
or $18.00 for a hard to read Xerox copy.
This will help me to continue to host this site,
buy new manuals, and pay their shipping costs.
It'll make you feel better, won't it ?
If you use Pay Pal, use the link below.
Use the above address for a check, M.O. or cash.
Back to main camera manual page
Click
here for PDF version made from this file
CLICK HERE FOR AUTOGRAPHIC 3A - F6.3
direct scan to Kodak No. 3A Autographic PDF
To print the two page scan as single pages
click
here on a how-to with Adobe Acrobat
"Kodak"
TRADE MARK
1888
EASTMAN KODAK COMPANY.
Rochester, N. Y.
Manufacturers of
Kodak Cameras, Brownie Cameras, Eastman Film, Kodak Film Tanks, Velox Paper, Solio Paper,
Kodak Dry Mounting Tissue, Eastman Velvet Bromide Paper, Eastman Royal Bromide Paper, . Eastman Standard Bromide Paper, Eastman Enameled
Bromide Paper, Eastman Matte-Enamel Bromide: Paper, Eastman Tested Chemicals, Tripods and Other Specialties.
Trade Marks Reg. V. S. Pat. Office - January, 1 920
Velox Transparent Water Color Stamp Outfit
NO EXPERIENCE NECESSARY
The outfit consists of an Artist's Mixing Palette, three special Camel's Hair
Brushes, and one book of Velox Transparent Water Color Stamps ( 12 Colors).
Price, $ .85 Price subject to change without notice
EASTMAN KODAK COMPANY, Rochester, N. Y.
 |
Prints do not curl when mounted with
.. Kodak Dry Mounting Tissue
Just the Tissue and a Flatiron Dry Mounting Tissue is incomparable for album work. The leaves lie flat with perfect adhesion. |
EASTMAN KODAK COMPANY, ROCHESTER, N. Y.
Picture taking with the
No. 3A Autographic
Kodak
(Rapid Rectilinear and f.7.7 Anastigmat Lens)
Published by
EASTMAN KODAK COMPANY
ROCHESTER, N. Y.
Order Film by Number
All Eastman Films may be distinguished by the numbers on the ends of the cartons.
A-122 is the number of film for this camera ( No. 3A Autographic Kodak) . The
number appears on the carton, on the cartridge, and on the Autographic door which is
located on the back of the Kodak.
Autographic film can be used in old style Kodaks, old style film can be used in
Autographic Kodaks, but to get autographic results, Autographic film must be used in an
Autographic Kodak.
IMPORTANT
When Autographing film, bear down with the stylus as heavily as the paper will
stand without tearing.
Before Loading
BEFORE taking any pictures with the No. 3A Autographic Kodak read the following
instructions carefully. Make yourself perfectly familiar with the instrument, taking especial
care to learn how to operate the shutter. Work it for both time and instantaneous exposures
several times before threading up the film.
The first and most important thing for the amateur to bear in mind is that the light
which serves to impress the photographic image upon the sensitive film in a small fraction
of a second when it comes through the lens, can destroy the film as quickly as it makes the
picture. Throughout all the operations of loading and unloading, be extremely careful to
keep the red paper wound tightly around the film to prevent the admission of light.
EASTMAN KODAK COMPANY, ROCHESTER, N. Y.
CONTENTS
PART I.
Loading the Camera . . . . 3
Loading with Film . . . . 3
Loading with Plates . . . 7
PART II.
Making the Exposures ...9
Operating the Shutter . . 10
Instantaneous Exposures . . 12
Time Exposures . . 24
Flash-Light Pictures . . . 30
The Rising and Sliding Front . . 33
PART III.
Removing the Film . . . . 37
Finishing the Pictures . . . . 42
PART I
Loading with Film
 |
The film for the No 3A Autographic l. Kodak is furnished in light proof carriages and the instrument can therefore be loaded in daylight. The operation should, however, be performed in a subdued light, not in the glare of the bright sunlight. It should also be borne in mind that after the seal is broken care must be taken to keep the red paper taut on the spool, otherwise it may A-122 slip and loosen sufficiently to fog the film. |
 |
- The Autographic Film Cartridge is made with a thin red instead of the familiar thick red and black (duplex) paper.
The thin red paper is not light proof in itself. Between it and the film is inserted a strip of tissue. The tissue serves two purposes: To supplement the red paper
in light proofing the cartridge, and to permit the recording, by light, of the writing upon the film.
1. To load the Kodak, take a position where the daylight is somewhat subdued, and grasping the
instrument with the left hand remove the back by pressing in simultaneously with the thumb and
second finger of the right hand as indicated in Fig. I.
 |
2. The Kodak having been opened, an empty spool having a slit in it will be seen in the winding end of the camera. This forms the reel on which tile film is wound after exposure. The full spool is to be placed in the recess at the opposite end of the Kodak. To accomplish this pull out spool pins as shown in Fig. II. |
 |
3. Drop the film cartridge into this recess. as shown in Fig. III Be careful to get the top of the spool at the top of the camera. The top is the winding side of the camera. Each cartridge is marked with the word "Top" on the red paper near the top of the spool. |
Note - If the cartridge is inserted wrong end up, the red paper instead of the film will be brought next to the lens, resulting,
of course, in the absolute loss of the pictures
|
4. Push spool pins into place so that spool revolves upon them.
5. Remove the gummed slip that holds the end of the red paper, pass the paper over the two aluminum rollers and thread into the slit in reel, as shown in Fig. IV. Be careful in so doing that the paper draws straight and true. |
 |
|
To secure a tight grip on the red paper, do not unfold the end, but thread it into the slit in
reel with the paper creased. By doing this the red paper will not be liable to slip.
6. Give the key one or two slight turns - just enough to bind the paper on the reel - and no more. See Fig. V. |
 |
 |
The paper should now be in position indicated in Fig. (VI)7.
Replace the back on Kodak, being careful to put it on right side up (the wide catch at the top), and snapping the springs at the top and bottom fully into place. Care should always be taken to handle the back of Kodak carefully, especially when it is detached from camera, as even a slight bend would make it fit badly, resulting very probably in a leakage of light and consequent loss of film. |
Throughout the foregoing operation, from the time the gummed slip is cut on the fresh roll of film until the back
is once more in place, keep the red paper wound tightly on the roll. If it is allowed to loosen, light will be admitted
and the film fogged.
| 8. The roll of film in the camera is covered with red paper and this must be partly reeled off before a picture can be taken. Turn the key slowly to the left and watch the little red celluloid window at the back of the camera. When 15 to 18 turns have been given, a hand pointing toward the first number will appear, then turn slowly until the figure 1 is exactly in the center of the red window. Fig. VII. |  |
The film is now in position for taking the first picture. Press in slightly when turning the winding key, so as to make sure that
the web on the key stays
within the slot in the top of spool.
Loading with Plates
1. If using glass plates the plate holders must be loaded in a dark-room--that is, a room from
which all white light has been excluded. The only light permissible is a dark ruby light, such as can
be obtained from a properly constructed dark-room lamp.
2. Provide also:
No. 3A F. P. Kodak Combination Back.
No. 3A F. P. Plate Holders.
1 dozen Seed Dry Plates,
3 1/4 x 5 1/4. Kodak Dark-room Lamp.
A
shelf or table on which to work.
3. Light the lamp and place it upon the table.
4. Remove the dark slides from the plate holders.
5. Open the box of plates by running a thin knife blade around the edge of the box.
6. Take out one of the plates and place it in the holder face up. (The face is the dull side.) Brush
gently over the face of the plate with a camel's hair brush to remove dust.
7. Replace the dark slide in the holder.
8. Repeat the operation until all the plate holders have been filled, then close up the remaining
plates in the box, wrap up securely and put them away in a dark drawer.
The remaining operations may be performed in daylight.
9. Remove the back from the camera as before described. (See page 4.)
NOTE - There must, of course, be no film in the Kodak when opening it for use with plates.
10. Remove the back of the adapter by pressing down on the inside spring catch and sliding same
out. Then insert ground glass panel for focusing, being sure that side marked front faces the lens.
Snap the combination back into place, taking care that the springs at each side engage with the
catches and that the back is right side up, i. e., the plate holder should draw from the end towards the
Kodak handle.
11. Focus carefully with the largest stop before the lens, and when the lines show sharp and true,
close the shutter, remove the ground glass, pressing down on catch at the bottom to remove it, and insert one
of the plate holders.
 |
12. Pull out the dark slide. The plate is now in position for making the first picture, and the exposure should be made the same as for films. After making the exposure re-insert the dark slide in plate holder. Remove the plate holder from the camera by means of leather lug, pressing back slightly on same to start it. |
Focusing with Scale When Using Combination Back
As it may sometimes be desirable to focus by scale when using plates, the Kodak may be focused
in the same manner as for films, the slight variation in focal plane being provided for by a
supplementary focusing scale situated directly under the film scale. Merely lift up the scale used for
film, and the plate scale will appear.
PART II
The general instructions in this No. 3A Autographic Kodak manual apply equally well to the
camera, whether fitted with Rapid Rectilinear or f. 7.7 Anastigmat Lens.
Making the Exposures
Before making an exposure with the No. 3A Autographic Kodak, either time or instantaneous, be
sure of four things:
FIRST- That the shutter is adjusted properly. (For instantaneous, time or bulb exposure.)
SECOND - That the diaphragm lever is placed at the proper stop opening.
THIRD - That the camera is focused.
FOURTH - That an unexposed section of the film is turned into position. (Or a fresh plate is ready for exposure.)
 |
This illustration shows the shutter on the Kodak when it is equipped with the Rapid Rectilinear Lens. Note - Exposures are made by pressing push-pin at end of cable release D or pushing down on release C.
The shutter is self-setting.
Avoid making too sharp a bend in the cable release, as by doing so it will be liable to kink.
|
Operating the Shutter
Perfect familiarity with the shutter is essential to successful picture taking with any camera. The following directions should, therefore, be carefully read and the shutter operated several times before threading the film up for use.
Instantaneous Exposures
FIRST- Set the lever A at 25, 50 or 100 (representing the speeds of the shutter), according to the
time of instantaneous exposure desired.
|
Note - The lever A should be used at 100, only when taking moving objects in bright sunshine, and lever B must always be placed at No.
4 or f. 7.7 when taking this kind of a picture.
Second - Set the lever B at No. 8 or f. 11. Lever B controls the Iris diaphragm and No. 8 or f. 11 is the proper opening for ordinary instantaneous exposures in bright sunlight, using speed 25.
|
 |
NOTE - For instantaneous exposures when the sunlight is unusually strong and there are no heavy shadows such as in views on the
seashore or on the water use diaphragm No. 16 and speed 50. With light clouds or slightly smoky atmosphere use No. 4 or f. 7.7 and
speed 25. With heavy clouds do not attempt instantaneous exposures.
Third - Press push-pin or push down on release C. This makes the exposure.
Note - Press push pin with a firm, quick movement. At the same time be sure to hold the Kodak rigid, as a slight jarring will cause a blurred negative.
Time Exposures
FIRST - Set the lever A at the point T (time). This adjusts the shutter for time exposures.
Second - Set the lever B at No. 4, 8, 16, 32, 64 or 128. If the Kodak is equipped with the f. 7.7
Anastigmat lens, set the lever at f. 7..7, 11, 16, 22, 32 or 45. See instructions for the use of the
stops for Interior Exposures as given in table on page 26, also the table for Time Exposures in
the Open Air, page 28.
Third - Press the push-pin. This opens the shutter. Time the exposure by a watch. Again press the
push-pin. This closes the shutter. Shutter may be opened by pressing release C and closed by a
second pressure if desired.
Bulb Exposures
When it is desirable to make a very short time exposure this is best accomplished by making a "bulb exposure."
First - Set the lever A at the point "B" (bulb). This adjusts the shutter for "bulb" exposures.
Second - Set the lever B at No. 4, 8, 16, 32, 64 or 128. If the Kodak is equipped with the f. 7.7
Anastigmat lens set the lever at f. 7.7, 11, 16, 22, 32 or 45. See instructions for the use of the
stops for Interior Exposures as given in table on page 26; also the table for Time Exposures in
the Open Air, page 28.
Third Press push-pin or release C to open the shutter and release it to close the shutter. This makes
the exposure. The shutter will remain open as long as the push-pin or release C is under
pressure.
Important
Do not oil any part of the shutter.
In case of accident return shutter to your dealer or to us for repairs. As a general rule, make exposures
with the cable release instead of with the release
C, as the cable release is less likely to jar the camera.
Instantaneous Exposures
 |
1. Press the concealed button as shown in Fig. I and push down the bed of camera to the limit of motion. |
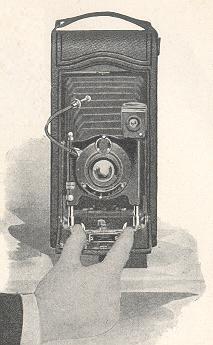 |
2. Set the locking device on the index plate for the distance desired, grasp the springs at the
bottom of the front board and pull out the front to the limit of motion. Fig. II.
NOTE - The index plate is scaled both _ for feet and meters and care should be taken not to confound them.
|
Except when photographing at_ a distance of 15 feet or less, it is not necessary to estimate the
distance with any more than approximate accuracy; for instance if the focus is
set at 25 feet (the usual distance for ordinary street work) the sharpest part of the picture will be the
objects at that distance from the camera, but everything from 15 to 35 feet will
be in good focus. For general street work the focus may be kept at 25 feet, but where the
principal object is nearer or farther away, the focus should be changed accordingly. Everything beyond 100 feet is in the 100
feet focus. Nothing nearer than 6 feet can be focused without using the Portrait Attachment. See page
27.
Automatic Locking Device
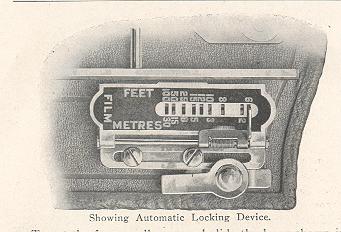 |
The automatic locking device which is on the right side of camera bed will be found a great
convenience in focusing.
By means of this device the front locks automatically at 6, 8, 10, 12, 15, 25, 50 or 100 feet focus. |
To set the focus, pull over and slide the lever shown in diagram, and set catch in the slot marked
for the distance desired. Then pull out front of camera lo limit of motion and the camera will be in
focus for the distance at which you have set the catch.
With Plates
When using plates with the combination back, the ground glass or the supplementary scale (see
page 8) can be used for focusing, as the Automatic Locking Device in this case cannot be employed.
Use Stop No. 8, or f. 11
For all ordinary out-door work when the sun is bright, use stop No. 8 or f. 11 and use speed 25. If
a smaller stop is used for ordinary snapshots, the light will be so much reduced that it will not
sufficiently impress the image on the film and failure will result.
When making portraits out of doors, when the sun is shining bright, place the subject in the shade
of a building or large tree, but with clear and unobstructed sky overhead,--then use stop No. 4 or f.
7.7 and use speed 25. By following this rule unpleasant and distorting shadows on the face will be
avoided.
In views on the water when the sunlight is unusually strong and there are no heavy shadows,
diaphragm No. 16 and speed 50 may be used.
If a smaller stop opening than No. 16 is used for snapshots absolute failure will result, except that
No. 32 or f. 22 may be used for extremely distant views, marine or snow scenes or clouds, in bright
sunshine using speed 25.
Locate the Image
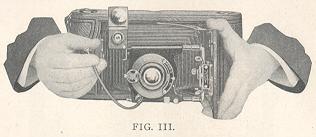 |
Aim the camera at the object to be photographed and locate the image in the finder. For a horizontal picture hold the camera as shown in Fig. III, reversing the finder, as indicated. Always look into the finder from directly over it, not at an angle. (Of course, when using plates and the focusing glass is employed, the image will be located on that instead of in the finder.) |
|
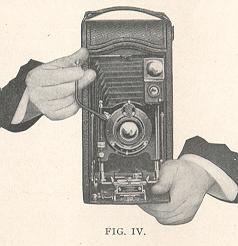
For a vertical exposure the camera must be held as shown in Fig. IV. The finder gives the scope
of view and shows a facsimile of the picture as it will appear, but on a reduced scale.
Any object that does not show in the finder will not show in the picture.
|
 |
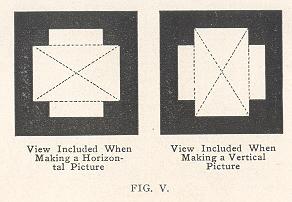 |
It will be noticed that the top of the finder is notched as shown in Fig. V. This is done so that one finder will correctly show the view included when the Kodak is held in either horizontal or vertical position. As the picture taken with the No. 3A Autographic Kodak is oblong it will readily be seen that unless the finder was made in this manner it could not correctly show the exact view intended when held in either position. |
Remember that only the view indicated in the dotted lines will show in the picture.
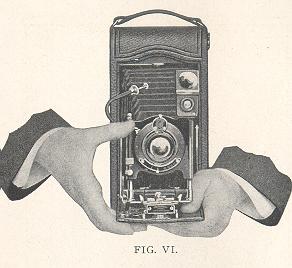 |
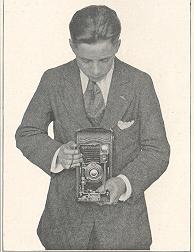
Fig. VI shows how to hold the camera when making an exposure without the use of the cable release. Grasp the bed of Kodak firmly with the left hand, steady it with the right, and with the thumb of the right hand lightly touch the exposure lever. |
Hold It Level
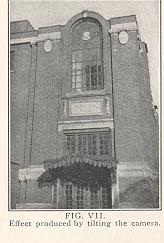
The Kodak must be held level.
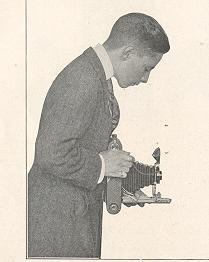
If the operator attempts to photograph a tall building while standing near it, by pointing the
camera upward (thinking thereby to center it) the result will be similar to Fig. VII, page 20.
When making this picture the camera was pointed too high. This building should have been taken
from the building opposite and at a level corresponding with the middle of the subject.
 |
IMPORTANT
The operator should hold the camera level, after withdrawing to a proper distance, as indicated by the image shown in the finder on the front of the camera. |
 |
 |
Note - The rising front may be used in helping to center high objects on the plate. See page 33.
If the object is down low, like a small child or a dog, the Kodak should be held down level with the center of the object. When making the exposure: --hold the Kodak steady, --hold it level, --press push-pin on cable release. |
The Autographic Feature
The Autographic Kodak has a spring door on the back, covering a narrow slot through which the
writing is done upon the red paper. The slot is provided with an automatic safety spring border which
operates when the door is open to press the papers into contact with back of the film, thus securing
the sharp printing of the image of the writing and preventing the diffusion of light around the edges of the slot. This slot is located so that normally
the writing comes between the exposures.
The Autographic Record as a Guide
Many amateurs have distinctly improved the quality of their work by making notes, at the time of
exposure, of the prevailing conditions. As. Bright light, 1/25 sec., stop No. 8, which, by the way, can
be easily abbreviated to: B. 1/25, 8. By keeping such records the amateur can quickly find the cause
of failure, if any. By comparing negatives and records he will soon get a line on his errors and when he
knows what his errors are, he can easily rectify them. It is obvious that the best way to make these
records is autographically - on the film, at the time.
The Operation
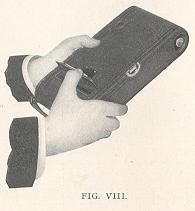 |
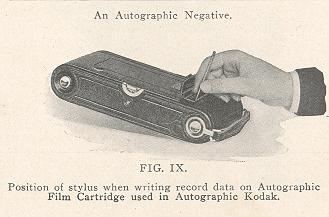
After the picture is taken, lift up the spring door with thumb (Fig. VIII). Use the stylus, held in as
upright a position as is convenient, and write on the strip of exposed red paper any memorandum desired, such as the title of the picture, the date, or details in regard
to the exposure, light, stops, etc. (Fig. IX).
|
|
The "Autographic Negative" printed below is merely to suggest a few of the thousand and one ways in which autographic records may be used to add value to your negatives. To get a clear impression, press firmly on both up and down strokes. While writing or afterwards the sun should not be allowed to shine upon the paper. The action of the stylus so affects the tissue as to permit the light to record the writing upon the film. After finishing the writing, the door should be left open for the printing, in accordance with the following table:
|
 |
(Expose to the sky, but not to the sun.)
| OUT OF DOORS | INDOORS CLOSE TO WINDOW | |
| BRILLIANT LIGHT | 2 to 5 Seconds | 5 to 7 Seconds |
| DULL LIGHT | 5 to 10 Seconds | 10 to 15 Seconds |
INCANDESCENT LIGHT, distance 2 inches, 30 to 60 sec.
Welsbach Light, distance 6 inches, 30 to 60 sec.
Close the door before winding a new film into place.
Caution. In order to locate the writing accurately in the space between the negatives it is
important that the film should be turned so that the exposure number centers perfectly in the red
window of the Kodak.
TURN A NEW SECTION OF FILM INTO POSITION: Press in slightly and turn the key in top of camera slowly to the left, until the next number appears before the window. Three or four turns will be sufficient to accomplish this. Fig. X. The warning hand appears before No. 1. Repeat the foregoing operations for each picture.
Important. When you have used the last exposure on your roll of film and have made the autographic record of it in accordance with the foregoing
directions, turn the winding key of the Kodak until a letter (A) appears in the center of the window in the back of the Kodak. Raise the spring-door and write
your name on the red paper, expose it to the sky the same as was done when making the exposure
records, then close the spring-door and finish winding film and red paper for removal from the
Kodak. Your film is now ready to send to your finisher and when developed will be readily identified
by the autographic copy of - your name which you wrote on the red paper.
Time Exposures
INTERIORS
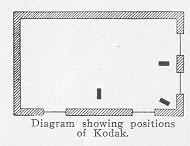 |
Set camera in such a position that the finder will embrace the view desired. The diagram shows the p rope r positions for the Kodak. It should not be pointed directly at a window as the glare of light will blur the picture. If all the windows cannot be avoided, pull down the shades of such as come within the range of the Kodak. |
To make a time exposure place the Kodak on some firm support,
like a chair or table, and focus as before described. Be sure, however, to place the Kodak not more
than two or three inches from the edge so as to avoid including part of the chair or table in the
picture.
|
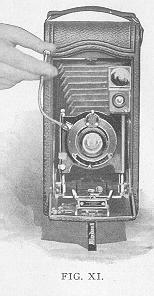
Fig. XI shows the Kodak in position for a vertical exposure. The Kodak is also provided with
tripod sockets and may be used on a tripod.
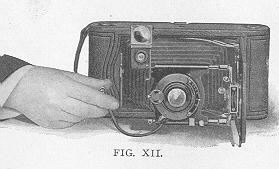
When it is desired to make a horizontal time exposure without the use of a tripod, pull down lever at side of focusing scale and place Kodak in position, as shown in Fig. XII (page 25). Adjust the shutter for a time exposure as described on page 11. All being in readiness, press the push-pin or once to open, close the shutter. Time the exposure by a watch. |
 |
TURN THE KEY.
After making the autographic record, turn a new film into position as described before, (see page 23)
 |
THE KODAK IS NOW READY FOR THE NEXT INTERIOR EXPOSURE.
Follow the directions given heretofore for each successive exposure. When the last Interior Exposure is made, adjust the shutter for Instantaneous Exposures as before directed. |
Time Needed for Interior Exposures
The following table gives the time of the exposure required under varying conditions of light for the Kodak
equipped with either the Rapid Rectilinear or Anastigmat Lens. The time given in the table is with the stop No. 16 in
the lens. If the stop No. 8 or f. 11 is used, give only one-half the time, with No. 4 or f. 7.7 give one-fourth the time, and
if the stop No. 128 or f. 45 is used, give 8 times the time of the table. The smaller the stop the sharper the picture. The
No. 16 gives the best results for interiors:
White walls and more than one window:
bright sun outside 4 seconds;
hazy sun, 10 seconds;
cloudy bright 20 seconds;
cloudy dull, 40 seconds.
White walls and only one window:
bright sun outside, 6 seconds;
hazy sun, 15 seconds;
cloudy bright,
30 seconds;
cloudy duly 60 seconds;
Medium colored walls and hangings anti more than one window:
bright sun outside, 8 seconds;
hazy sun, 20 seconds;
cloudy bright, 40 seconds;
cloudy dull, 80 seconds.
Medium colored walls and hangings and only one window:
bright sun outside, 12 seconds;
hazy sun, 30 seconds;
cloudy bright 60 seconds; - .
cloudy dull, 120 seconds.
Dark colored walls and hangings and more than one window:
bright sun outside, 20 seconds;
hazy sun, 40 seconds
cloudy bright, 80 seconds;
cloudy dull, 2 minutes, 40 seconds.
Dark colored walls and hangings and only one window:
bright sun outside, 40 seconds;
hazy sun, 80 seconds;
cloudy bright, 2 minutes, 40 seconds;
cloudy dull, 5 minutes, 20 seconds.
The foregoing is calculated for rooms whose windows get the direct light from the sky, and for hours from three
hours after sunrise until three hours before sunset. If earlier or later, the time required will be longer.
To Make a Portrait
Place the subject in a chair partly facing the Kodak (which should be located slightly higher than an ordinary table)
and turn the face slightly toward the instrument, having the eyes centered on an object at the same level with the lens.
Center the image in the finder. For a three quarter figure the Kodak should be from 6 to 8 feet from the subject; and for
a full figure from 8 to 10 feet. The background should form a contrast with the subject.
Kodak Portrait Attachment
The Attachment is simply an extra lens slipped on over the regular lens and in no way affects its operation except to
change the focus.
Use the Kodak Portrait Attachment No. 5, with the No. 3A Autographic Kodak when it is equipped with the Rapid
Rectilinear Lens.
Use the Kodak Portrait Attachment No. 7 when Kodak is fitted with the f. 7.7 Anastigmat Lens.
By means of the Portrait Attachment, large head and shoulder portraits of various sizes may be obtained. With the
Attachment in position and the Kodak set:
At 6 feet focus, the subject should be placed exactly 2 feet, 8 inches from the lens.
At 8 feet focus, place the subject 3 feet from the lens.
At 15 feet focus, place the subject 3 1/2 feet from the lens.
At 25 feet focus, place the subject 4 feet from the lens.
At 100 feet focus, place subject 4 1/2 feet from the lens.
Time Exposures in the Open Air
When the stop No. 128 or f.45 is in the lens the light admitted is so much reduced that time
exposures out of doors may be made the same as interiors, but the exposure must be much shorter.
With Sunshine - 1/5 second.
With Light Clouds - From 1/2 to 1 second will be sufficient.
With Heavy Clouds - From 2 to 5 seconds will be required.
The above is calculated for the same hours as mentioned for Interiors, page 27, but for objects in
the open air For other hours or for objects in the shadow, under porches or under trees, no accurate
directions can be given; experience only can teach the proper exposures to give.
Time exposures cannot be made while the Kodak is held in the hand. Always place it upon
some firm support such as a tripod, chair or table.
For exceedingly short time exposures as above described use the "bulb exposure." See page 11.
"f." and "U. S." Systems
A lens is said to work at a certain "speed," this means that the lens will cut sharp to the corners,
with an opening a certain proportion of its focal length. It should be borne clearly in mind that
this speed depends not upon the size of the opening, but upon the size of the opening in
proportion to the focal length of the lens (distance from lens to plate when focused on infinity). The lens that will cut sharp with the largest opening is said to possess
the greatest speed.
Such openings are termed stop or diaphragm openings and for convenience in estimating
exposures, are arranged according to two systems, the f. system and the Uniform System or U. S.
system, as commonly abbreviated.
In the f. system, the proportional size or "value" of the stop opening is designated by "f." and is the quotient obtained by dividing the focal length of the
lens by the diameter of the stop.
Taking, for instance, a lens of 8 inch focus with a stop 1 inch in diameter, we find that 8 . 1 = 8;
hence, 8 is the f. value of the stop and would be designated f. 8. Suppose the stop is 1/4 inch in
diameter, we would then have 8 . 1/4 = f. 32.
For convenience, the uniform system of marking stop openings has been adopted by nearly all
manufacturers of Iris diaphragms. Such convenience is at once apparent when we understand that
each higher number stands for an opening having half the area of the preceding opening, each
smaller stop (or higher number) requiring double the time of the one next larger.
With the f. system, each stop is a certain proportion of the focal length and not arranged with
reference to the other openings.
Diaphragms
As a number of exposure meters and similar devices for determining the proper exposure are
based upon the "if' system, we give the following table showing the "f" value for each of the Uniform
System openings:
| U. S. 4 = f.8 | U. S. 16 = f.16 | U. S. 64 =f.32 |
| U. S. 8 = f.11 | U. S. 32 = f.22 | U. S. 128 = f.45 |
NOTE - U. S. 4 equals f. 8, but the speeds of f. 8 and f. 7.7 are so nearly identical that the same exposure would be given in either
case.
U. S. 4 = f. 8 f. 7.7 - For instantaneous exposures on slightly cloudy days, using speed 25.
U. S. 8 = f. 11 - For an ordinary instantaneous exposures when the sun shines and use speed 25.
U. S. 16 = f. 16 - For instantaneous exposures when the sunlight is unusually strong and there are no heavy shadows, such as in
views on the seashore or on the water, using speed 50; also, for interior "Time" exposures, the time for which is given in the table on
page 26.
U. S. 32 = f. 22 - For instantaneous exposures of extremely distant views, marine or snow scenes or clouds, in bright sunshine
using speed 25; also for "Time" exposures.
U. S. 64 and 128 =f. 32 and 45 - For interiors. Never for instantaneous exposures. For or "Time" exposures outdoors in cloudy
weather. The time required for "Time' exposures on cloudy days with smallest stop will range from 1/2 second to 5 seconds, according to
the light. The smaller the stop the sharper the picture.
Absolute failure will be the result if you use the smallest stop for instantaneous exposures.
Flash-Light Pictures
By the introduction of Eastman Flash Sheets, picture taking at night has been wonderfully simplified. A package of flash sheets, a piece of cardboard, a pin and a match complete the list of
essential extras, although a Kodak Flash Sheet Holder is a great convenience. With flash sheets, no lamp is necessary, there is a minimum of smoke, and they are far safer than
any other self burning flash medium, besides giving a softer light that is less trying to the eyes.
Many interiors can be taken with the flash sheets that are impracticable by daylight, either by reason of a lack of illumination or because there are windows in a direct line of view which cannot
be darkened sufficiently to prevent the blurring of the picture.
Evening parties, groups around a dinner or card table or single portraits may be readily made by the use of our flash sheets, thus enabling the amateur lo obtain souvenirs of many occasions which,
but for the flashlight, would be quite beyond the range of the art.
Preparation for the Flash - The camera should be prepared for time exposures as directed on
page 11 of this manual (except that the No. 8 or f. 11 stop must be used) and placed on some level support where it will take in the view desired.
Pin a flash sheet by one corner to a piece of cardboard which has previously been fixed in a perpendicular position. If the cardboard is white it will act as a reflector and increase the strength of
the flash.
The flash sheet should always be placed two feet behind and two or three feet to one side of the camera. If placed in front, or on a line with front of Kodak, the flash would strike the lens and blur
the picture. It should be placed at one side as well as behind, so as to throw a shadow and give a little relief in the lighting. The flash should be at the same height or a little higher than the camera.
The support upon which the flash is to be made should not project far enough in front of it to cast a shadow in front of the Kodak. An extra piece of cardboard a foot square placed under the flash sheet
will prevent any sparks from the flash doing damage. However, by using the Kodak Flash Sheet Holder, all these contingencies are taken
care of, and we strongly advise its use.
The Kodak Flash Sheet
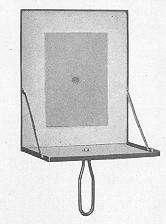 |
This holder may be held in the hand, always between you and the flash sheet, or it may be used on any tripod, being provided with a socket for this purpose. The sheet is placed in position in the center of the larger pan over the round opening which has a raised saw tooth edge extending half way around it. Press with the thumb on the sheet, so slight break is made and a portion of the sheet projects partially through the opening. Then to insure the sheet being more securely fastened, press around the notched edge, forcing this portion of flash sheet firmly into position on the pan. To set off the flash, merely insert a lighted match, from behind through the round opening. |
NOTE - If you are not using the Kodak Flash Sheet Holder, place the match in a split stick at least two feet long.
Taking the Picture
Having the Kodak and the flash sheet both in position, and all being in readiness, open the camera shutter, stand at arm's length and touch a match from behind through the round opening in
the center.
There will be a bright flash which will impress the picture on the sensitive film. Then close the shutter, make the autographic record by following the table as given on page 23,
and turn a fresh film into place with the key, ready for another picture.
The Flash Sheet
The size of the sheet required to light a room varies with the distance of the object farthest from the camera, and the
color of the walls and hangings.
TABLE
For ten feet distance and light walls and hangings use one No. I sheet.
For ten feet distance and dark walls and hangings use one No. 2 sheet.
For fifteen feet distance and light walls and hangings use one No. 2 sheet
For fifteen feet distance and dark walls and hangings use one No. 3 sheet.
To Make a Portrait - Place the subject in a chair partly facing the Kodak (which should be located slightly higher
than an ordinary table) and turn the face slightly towards the instrument, having the eyes centered on an object at the
same level with the lens. The proper distance from the camera to the subject can be ascertained by looking at the image
in the finder. For a three-quarter figure this will be from 6 to 8 feet, and for a full figure from 8 to 10 feet.
The flash should be on the side of the Kodak away from the face, that is, the subject should not face it. The flash should not be higher than the head of the subject.
For using Portrait Attachment, see page 27.
To Make a Group - Arrange the chairs in the form of an arc, facing the Kodak, so that each chair will be exactly
the same distance from the camera. Half the persons composing the group should be seated and the rest should stand
behind the chairs. If the group is large any number of chairs may be used, but none of the subjects should be seated on
the floor, as sometimes seen in large pictures, because the perspective will be too violent.
Backgrounds - In making single portraits or groups, care should be taken to have a suitable background against
which the figures will show in relief; a light background is better than a dark one, and often a single figure or two will show up well against a lace curtain. For larger groups a
medium light wall will be suitable.
The finder on the camera will aid the operator in composing the groups so as to get the best effect. In order to make
the image visible in the finder the room will have to be well lighted with ordinary lamplight, which may be left on while
the picture is being made, provided none of the lights are placed so that they show in the finder.
Eastman Flash Sheets burn more slowly than flash powders, producing a much softer light and are, therefore, far
preferable in portrait work. The subject, however, should be warned not to move, as the picture is not taken
instantaneously, about one second being required to burn one sheet.
Eastman Flash Cartridges
Eastman Flash Cartridges may be substituted for the sheets if desired. We recommend the sheets, however, as more
convenient, cheaper and capable of producing the best results. The cartridges are superior only where absolutely
instantaneous work s essential.
Rising and Sliding Front
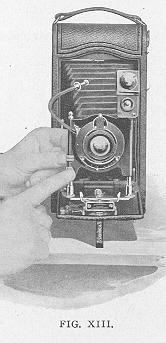 |
The No. 3A Autographic Kodak is provided with a rising front, which may be utilized in cutting out an
undesirable foreground or to assist in taking in the top of a high building, etc. The front will also slide to either the
right or left (up and down when used for horizontal pictures ).
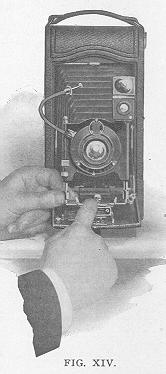
Fig. XIII shows how to raise and lower the front when making vertical exposures. The front may be raised or lowered by pressing in on eccentric catch just below milled screw, and at the same time turning screw to right or left. When through using, center lens by moving the front up or down as the case may be, until the eccentric catch locates itself in notch in standard. The front can be moved to the right or left (up and down when Kodak is placed on its side for a horizontal exposure) by first releasing lever and then pressing down on spring catch directly under the lever as shown in Fig. XIV, and at the same time sliding front in either direction to the desired position. Lock in position by pushing over lever. When through using, reverse the operation shown in Fig. XIV, and slide back to the center when the spring catch will hold front in position. Then turn lever to hold front rigid. |
| In order to make a sharp picture when using the rising front it will be better to use a small stop
(No. 32 or f. 22) and as this in turn necessitates a time exposure, a tripod or other firm support must
be provided. Experience alone can teach the many ways in which the rising and sliding front may be
used for composing artistic pictures.
N. B. - Do not fail to center front before closing camera, as otherwise there is danger of ruining bellows when folding. |
 |
Closing the Kodak
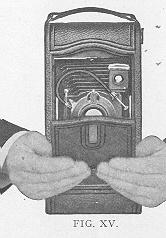 |
When through using the Kodak fold the bellows by reversing the operation shown in Fig. II, page 13, and press down on arm locks on each side of bed, as shown below (Fig. XV). The bed will now close readily. |
CAUTION
Before closing the bed of the camera, be careful to note that the finder is in the upright position with the hood down, and that the .
front board has been pushed back to the limit of motion.
If they are in proper position they will not interfere with the bed in closing.
Avoid making too sharp a bend in the cable release, when closing the camera. as by doing so it will be liable to kink,
PART III
Removing the Film
 |
No dark-room is required for changing the spools in the No. 3A Autographic Kodak. The
operations should, however, be performed in a subdued light, not in the direct sunlight.
2. Provide an extra spool of film to fit this camera, and take a position where the daylight is somewhat subdued. |
 |
3. Remove the back from the Kodak as before described, page 4.
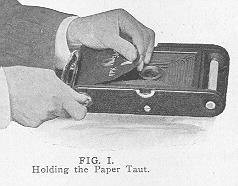
4. Holding the red paper taut, so as to wind tightly, turn the key until the paper is all on the reel. Fig. I. 5. Hold ends of red paper and sticker together to prevent paper from loosening on reel. NOTE - If the sticker folds under roll, raise it up with the point of a lead pencil. |
 |
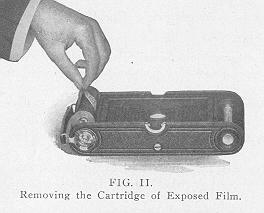
6. Pull out spool pin and winding key, and lift out roll of film as shown in Fig. II.
7. Fold over half-inch at end of red paper (so as to make subsequent breaking of the seal easy), and then seal with sticker. 8. Wrap up exposed film immediately to prevent the possibility of light being admitted. The roll of film is now ready for developing and printing. |
 |
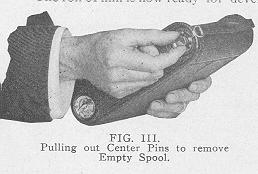
9. Now take out the empty spool by drawing out the center pins which hold it in place, Fig III. 10.
Slip the spool into place at the winding end of camera (this will form the new
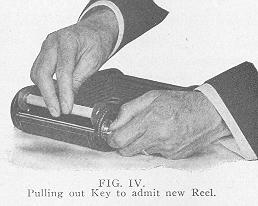
reel) pulling out the key in so doing as shown in Fig. IV and fitting
the web which is attached to key into the slot in the end of spool. Now push the axis pin in the
opposite end of spool, until it is fixed in position by the embossed stop.
|
Important. - Film should be developed as promptly as possible after exposure.
The quality of the image on all sensitized products is retained by immediate development after exposure.
Load your Kodak with Eastman Film. Look for this Trade Mark on the box:
"Cinch Marks"
If the film and paper loosen up a trifle when taken from the camera, many amateurs are likely to
take the cartridge in the hand and wind it as closely as possible, "cinching" it tightly with a twisting
motion. There's nothing more likely to injure the negative than this tight drawing of the film as it
abrades the surface, making fine parallel scratches running lengthwise of the film, which in some
cases, will ruin the negative. Do not "cinch" the cartridge. It simply needs to be wound tightly enough so
that the red paper keeps inside the flanges.
Dimmed Finders and How To Make Them Bright Again
For some cause which is not thoroughly understood, glass will sometimes "sweat" to such an
extent as to cover it with a sort of film, which, of course, makes it very dull whether it be used as
lens or mirror.
Whatever the cause, the result is the occasional dimming of finders and lenses. With
finders the trouble is sometimes in the mirror, which necessitates opening the finder and wiping the mirror by
means of a soft cotton cloth.
The brilliant finder on the No. 3A Autographic Kodak can readily be cleaned by lifting up the top
from the front and swinging it backwards. After cleaning with soft cotton cloth, close by simply
snapping it back into position.
Clean Lenses
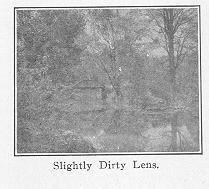 |
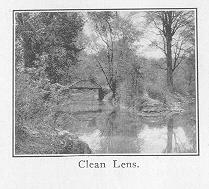
Dirty or dusty lenses are frequently the cause of photographic failures. These pictures illustrate
this point clearly. The sharp, full-timed picture at the top of page 41
was taken with the lens clean
and in good order. To produce the effect shown in the lower picture, the operator lightly touched the
face of the lens with his thumb, which was slightly damp with perspiration.
|
 |
Lenses should be frequently examined by looking through them, and if found to be dirty,
should be wiped, both front and back, with a clean, soft linen handkerchief. Large spots of dust or
dirt on the
lens will cause defects in the picture, while if the lens is evenly covered with a film of dust, dirt or moisture, the effect will
be to cut off a great deal of light and make the picture under timed.
|
Keep Dust Out of the Camera
Defective negatives are often caused by particles of dust which have collected on the inside of the
camera and settle upon the film in particles that produce small dark spots upon the prints.
It is therefore well to wipe out the inside of camera and bellows occasionally, with a slightly
damp cloth. In summer weather or after the camera has remained idle for any length of time, this
needs special attention.
Finishing the Pictures
THERE are two distinct steps in the making of photographs the picture taking and the picture finishing
In order to free our instruction books from all unnecessary details, which might be confusing, we
furnish with the camera the directions for picture taking only.
The instructions in this little book are ample for the manipulation of the camera under every
condition that the amateur is likely to encounter. Similarly, those who wish to do their own
developing and printing will find equally full instructions accompanying the Kodak Film Tanks (for
developing in daylight), or our Outfits for dark-room use.
For use with the No. 3A Autographic Kodak Film (No. A-122) provide a 3 1/2 inch Kodak Film
Tank. (This film can be developed in the larger tanks but not so economically. )
If the dark-room method of development is preferred an Eastman 3A Developing and Printing Outfit should be provided.
In keeping with our plan and purpose to provide the users of our cameras with every help in the
production of good pictures, we will be glad to furnish such developing and printing instructions, at
any time, whether a tank or outfit is purchased or not.
With the Kodak Film Tank and Velox paper many amateurs find as great pleasure in the finishing
of the pictures as in the taking of them, and are able to produce, by the simple methods we have
perfected, work of the highest order.
We never lose interest in the purchaser of a Kodak. We are not only willing but are anxious at all
times to help solve any problems that he may encounter, either by sending on the necessary printed
instructions or by individual correspondence. Such customer, in availing himself of the knowledge of
our experts, puts himself under no obligations to us. He is simply availing himself of one of the
things that he is entitled to when he buys a Kodak - and that is, Kodak service.
EASTMAN KODAK CO., Rochester, N. Y.
PRICE LIST
No. 3A Autographic Kodak, fitted with Rapid Rectilinear lens and Kodak Ball Bearing Shutter, for pictures 3 1/4 x 5 1/2 (not loaded), $29.36
No. 3A Autographic Kodak, fitted with
f. 7.7 Kodak Anastigmat Lens and Kodak Ball Bearing Shutter, for pictures 3 1/4 x 5 1/5 (not
loaded), . . . . . . . 35.34
Black Sole Leather Carrying Case, with strap, 5.25
Leatherette Carrying Case, . . . .3.25
Combination Back for Film or Double Plate Holders,
.. . . . . . . 3.50
Double Glass Plate Holders, 3 1/4 x 5 1/2 each, 1.25
Kodak Portrait Attachment, No. 5, for use with No. 3A Autographic Kodak with R. R. lens, .75
Do., No. 7, for use with No. 3A Autographic Kodak, with f. 7.7 Anastigmat Lens, . ..75
Kodak Color Filter No. 5, for use with No. 3A Autographic Kodak, with R. R. Lens, . .1.50
Do., No. 7, for use with No. 3A Autographic Kodak, with f. 7.7 Anastigmat Lens, . . 1.50
Kodak Sky Filter No. 5, for use with No. 3A Autographic Kodak, with R. R. Lens, . . 1.50
Do., No. 7, for use with No. 3A Autographic Kodak, with f. 7 Anastigmat Lens, . . 1.50
Autographic Film Cartridge, A-122, 10 exposures, 3 1/4 x 5 1/2 . . . . . . . .72
Do., 6 exposures, . . . . . ..41
Do., 2 exposures, . . . . . . .21
Seed Dry Plates, single coated, 3 1/4 x 5 1/2 per dozen, . . . . . . . . .75
Kodak Film Tank, 3 1/2-inch, . . . . 6.00
Duplicating Outfit for same, . . . . 3.00
Kodak Tank Developer Powders, for 3 1/2-inch Tank, per pkg. 1/2 doz., . . . . .20
Flexible Rubber Tray, which is used for fixing and washing films; fits over the "3 1/2-inch" Kodak Film Tank Box, . . . . 2.00
Eastman 3A Developing and Printing Outfit, for dark-room development (for 3 1/4 x 5 1/2
negatives or smaller), complete, . . . 1.65
Kodak Acid Fixing Powder, per lb., . . . .25
Do., per 1/2 lb., . . . . . . . .15
Do., per 1/4 lb., . . . . . . . .10
Eastman Hydrochinon Developer Powders (do not stain the fingers), per dozen pairs, . .70
Do., per I/2 dozen pairs, . . . . . .35
Eastman Pyro Developer Powders (for dark room development), per dozen pairs, . . .50
Do., per 1/2 dozen pairs, . . . . . .25
Eastman Hydrochinon Developer Powders in sealed tubes, per box of 5 tubes, . . . .35
Eastman Pyro or Special Developer Powders in sealed tubes, per box of 5 tubes, . . . .25
Eastman Printing Masks, No. 8, for use with 3A Kodak Negatives, each, . . . . .10
Velox Paper, per dozen sheets, 3 1/4 x 5 1/2 . . .20
Nepera Solution (for developing Velox), 4 oz. bottle, . . . . . . . . :28
Velox Transparent Water Color Stamps, complete booklet of 12 colors, . . . . .35
Velox Transparent Water Color Stamp Outfit consisting of Artist's Mixing Palette, three special Camel's Hair Brushes, and one book of Velox Transparent Water Color Stamps (12 colors), . . . . . . . .85
Solio Paper, 2 dozen sheets, 3 1/4 x 5 1/2 . . .30
Combined Toning and Fixing Solution for Solio, per 8-oz. bottle, . . . . . . .50
Do., 4-oz. bottle (in mailing case, including postage, 50 cents), . . . . . . .30
Eastman Reducer, per box, 5 tubes, . . . .50
Royal Re-developer, per package, 6 tubes, . . .75
Eastman Flash Sheets No. 1, per pkg. /2 doz., . .35
Do., No. 2, . . . . . . . . .56
Do., No. 3, . . . . . . . . .84
Kodak Flash Sheet Holder, . . . . 1.00
Kodak Dry Mounting Tissue, 2 dozen sheets, 3/4 x 5 1/2 . . .10
Eastman Film Developing Clips (nickeled), 3 1/2 inch, per pair, . . . . . .25
Kodak Junior Film Clips No. 1, each, . . . .12
Do., No. 2, 3 inches wide, each, . . . . .25
Kodak Print Roller, double, 6-inch, . . . .90
Flexo Print Roller, single, 4-inch, . . . .25
Kodak Metal Tripod, No. 0, . . . . 3.50
Do., No. 1, . . . . . . . . 5.25
Do., No. 2, . . . . . . . . 6.00
Leather Carrying Case for No. 0, 1 or 2, . . 3.75
Leatherette Carrying Case for No. O and No. 1, . 1.35
Bull's-Eye Tripod, . . . . . . 2.00
Kodak Dark-Room Lamp, No. 2, 5/8-inch wick, . 1.00
Eastman Film Negative Album, to hold 100 3 1/4 x 5 1/2 negatives, . . . . . . 1.00
Eastman Photo Blotter Book, for blotting and drying prints, . . . ,. . . .40
Kodak Trimming Board No. 2, capacity 7 x 7 inches, . . . . . . : . . .85
Baltic Mounts, 3 1/4 x 5 1/2 per 100, . . . 2.60
Do., per 50, . . . . . . . 1.30
Agrippa Album, flexible cloth cover, loose leaf, 50 black linen finish leaves, 7 x 11, ' . . 1.70
Do., leather cover, . . . . . . 3.25
Developing Film only, 3 1/4 x 5 1/2 per roll of 10 exposures, . . . . . . . .40
Do., per roll of 6 exposures, . . . . .25
Printing and mounting only, on Velox, each, . .12
Printing on Velox, unmounted, each, . . . .09
All prints furnished unmounted unless otherwise specified.
NOTE - If mailing us film for development do not fail to mark the package plainly with your name and address, and write us a letter
of advice, with remittance.
11 x 14 Bromide Enlargement, mounted on card, $ 1.25
14X17 Bromide Enlargement, mounted on
card, 1.50
On enlargement orders, if, in our opinion, the print will be improved by double mounting, we will
do so at an additional charge of ten cents, triple mounted at fifteen cents.
All prices subject to change without notice.
EASTMAN KODAK CO., ROCHESTER, N. Y.
Be Sure to Use Pure Chemicals
To get the best negatives from your films - to
get the best prints from your negatives - it is imperative that the chemicals which you use be absolutely pure.
For all our films and papers we furnish powders and solutions mixed in just the proper proportions and compounded from the purest
chemicals, rigidly tested in our own laboratories.
But we go even further than this. For those who prefer to mix their own solutions by formula, we have prepared a line of carefully
tested standard photographic chemicals.
Don't mar good films and plates and good paper with inferior chemicals.
This seal stands for the highest purity. Be sure it's on the package before purchasing.
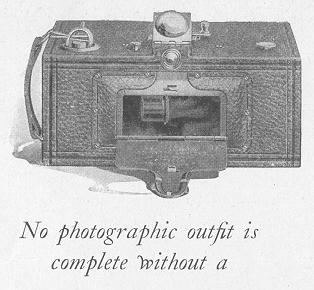 |
Panoram Kodak
because no other type of camera can even attempt the work it so simply and satisfactorily performs. Horizontal pictures of landscapes, buildings, out-door groups; and vertical pictures of
high water falls, mountains, and subjects of like nature may be photographed in their
entirety with a single exposure.
|
THE PRICE
No. I Panoram Kodak for rectangular pictures 2 1/4 x 7 inches . . . . . . $19.47
No. 4 Panoram Kodak for rectangular pictures 3 1/2 x 12 inches . . . . . . 32.35
Prices subject to change without notice
EASTMAN KODAK COMPANY, Rochester, N. Y.
Pin to a Card and Touch with a Match. That's all there is to using
Eastman Flash Sheets
They burn more slowly than ordinary flash powders, giving a softer light and
consequently a more natural expression to the eyes. Clean; convenient-- a minimum of
smoke.
Price per package of 1/2 dozen sheets:
No. 1, . . . . $.35
No. 2, . - . . . .56
No. 3, . . . . .84
Kodak Flash Sheet Holder, 1.00
Prices subject to change without notice
EASTMAN KODAK. COMPANY, ; ROCHESTER, N. Y.
Kodak : Metal Tripod
An ideal hand camera tripod, combining rigidity A with light weight and compactness.
The Nos. 1 and 2 have revolving head with milled edges, making it easy to attach or
tighten camera while the tripod is set up. The No. 6 has an improved folding head,
permitting the legs to fold flat. Legs made of brass tubing, each section telescoping into the
section above it. Lower sections nickeled; upper section black enameled. Any section may
be removed for the replacing of a spring. should one become inoperative through wear or accident.
No. 0, 3 Sections, $3.50
No. 1, 4 Sections, 5.25
No. 2, 5 Sections, 6.00
No. 6, 6 Sections, 7.50
Leatherette Carrying Case for No. O. or 1, . $1.35
Leather Carrying Case for the No. O. I or 2, . 3.75
Leather Carrying Case for the No. 6, . . 4.50.
Prices subject to change without notice
EASTMAN KODAK COMPANY, Rochester, N. Y.
