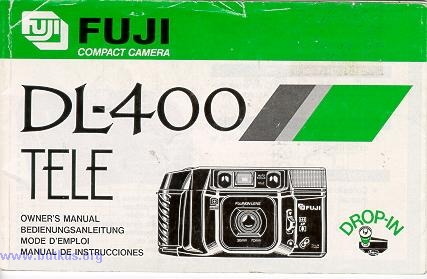
Fuji DL-400
Point and shoot
On-line camera manual
This camera manual library is for reference
and historical
purposes, all rights reserved.
This page is © 2024 by  ,
M. Butkus, NJ.
,
M. Butkus, NJ.
This page may not be sold or distributed without
the expressed
permission of the producer
On-line camera manual library
If you find this manual useful,
how about a donation of
$3 to:
M. Butkus, 29 Lake Ave.,
High Bridge, NJ 08829-1701
and send your e-mail
address
so I can thank you.
Most other places would charge
you $7.50 for
a electronic copy
or $18.00 for a hard to read Xerox copy.
This will help me to continue to host this site,
buy new manuals, and pay their shipping costs.
It'll make you feel better, won't it ?
If you use Pay Pal, use the link below.
Use the above address for a check, M.O. or cash.
<<<
IF YOU WOULD LIKE THIS OR ANY PDF FILE
PRINTED, BOUND AND MAILED TO YOU,
SEE THIS OUTSIDE COMPANY'S OFFER >>>
Back to my main Camera
Manual page
CLICK
HERE FOR English PDF MANUAL
MADE FROM THIS PAGE
CLICK HERE FOR OTHER LANGUAGES
Fujica DL-400 Bedienungsanleitung
Fujica
DL-400 Mode D'Emploi
Fujica DL-400 Manual De Instrucciones
Your Fuji Compact Camera DL 400 Tele is a fully
automatic bi-focal-lens camera that lets you switch automatically between wide
angle and 2X telephoto and also allows you to take close range shots. Anyone can
take perfectly exposed pictures with it any time, anywhere because it is
provided not only with completely automatic functions but with signals that warn
against shooting from too close to your subject or too far away in the case of
flash pictures. It also has a landscape button that lets you take sharply
focused sceneries - even through a window pane.
SPECIAL FEATURES
1. Motorized 2X - tele/wide switch over.
2. 50-cm nearest focusing distance; provided with warning against shooting
from too close to or too far away from your subject.
3. Equipped with a landscape button for taking sharply focused sceneries -
even through a window pane.
4. Simple, drop-in film loading plus efficient and safe film pre-wind system.
5. Automatic film speed setting from ISO 50 to 1600.
6. Automatic flash firing; provision for daylight flash and flash off; signal
alerts you against shooting beyond the flash range.
7. Large size liquid-crystal display provides centralized, easy-to-read
information. Exposure counter tells you at a glance the number of exposures you
have left.
8. Powered by high performance lithium batteries.
9. Equipped with electronically controlled self-timer.
NAMES OF PARTS
(1) Shutter Release
(2) Liquid Crystal Display
(3) Flash Off Button
(4) Self-timer
(5) Mid-roll Rewind Button
(6)A Viewfinder Window
(7) Flash Lamp head (automatically pops up when
lens is switched to telephoto)
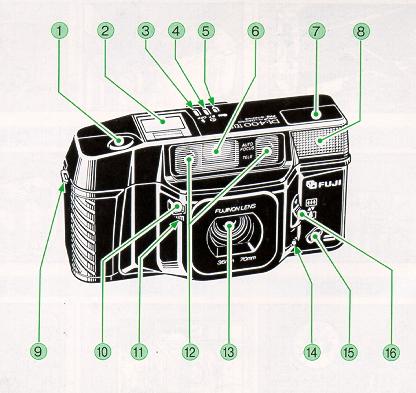
(8) Flash Diffuser (used with the lens on wide angle)
(9) Strap Lug
(10) AE Light Sensor
(11) Self-timer Lamp
(12) Auto-focus Windows
(13) Lens
(14) Landscape Button
(15) Daylight Flash Button
(16) Tele/Wide Switch over Button
(17) Auto-focus Lamp (green)
(18) Viewfinder Eyepiece
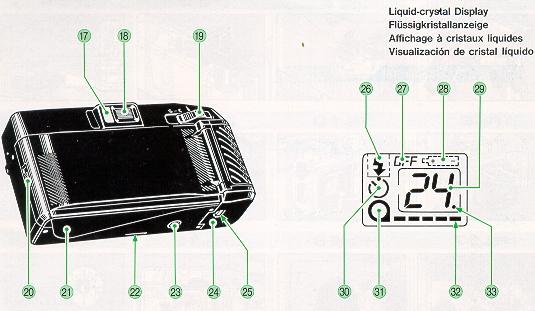
(19) Lens Cover Button (Power Switch)
(20) Camera Back Lock
(21) Camera Back
(22) Accessory Slot
(23) Tripod Socket
(24) Battery Compartment Cover
(25) Battery Compartment Lock
(26) Flash Charging Mark
(27) Flash Off Sign
(28) Battery Check Mark
(29) Exposure Counter
(30) Self-timer Mark
(31) Cartridge Loaded/Unloaded Mark
(32) Film Loaded/Transport Mark
(33) Charging Completed Mark
ATTACHING THE STRAP
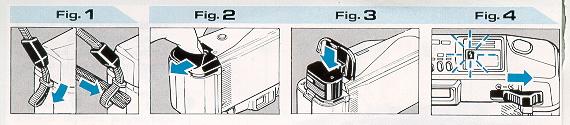
* Pass the doubled end of the strap through the camera's
Strap Lug. (Fig. 1)
* Next, pass the other end of the strap through the loop
formed by the doubled end of the
strap and pull it. (Fig. 1)
LOADING THE BATTERY PACK
* Be sure to use one of the following lithium battery
packs.
Panasonic CR-P2P : 6V
Panasonic BR-P 2DP : 6V
National BR-P2N : 6V
Duracell DL 223A : 6V
1. Open the battery compartment cover (Fig. 2)
With your finger, push the Battery Compartment Lock
lightly toward the arrow and open the Battery Compartment Cover.
2. Load the battery pack (Fig. 3)
Hold the Battery Pack with the contact side down and drop it into the Battery
Compartment. Next, close the Battery Compartment Cover by pressing it down then
sliding it back into place.
3. Check the battery pack (Fig. 4)
Open the Lens Cover. If the Flash Charging Lamp blinks on two or three times
when the cover is opened and the Charging Completed Mark turns on, the Battery
Pack is in good condition.
* If you take half of all your pictures with flash, one battery pack will
expose about 1,000 frames (according to Fuji's battery testing conditions).
* Be sure to load the battery pack before loading film in the camera.
* Once you load the battery pack, do not unload it unless you are changing it
with a new battery pack.
Unloading and reloading a partly used battery pack can cause the camera to be
have erratically.
* If the battery power is low, the liquid crystal display will show the (3
mark temporarily and you won't be able to release the shutter. As soon as you
see this mark, change the battery pack with a new set.
* Never dismantle the battery pack, throw it
into a fire, recharge it, heat it, or cause it to short circuit.
LOADING THE FILM
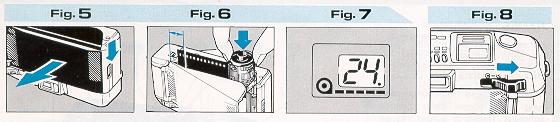
1. Open the camera back (Fig. 5)
To open, push the Camera Back Lock up toward the camera top.
2. Load the film (Fig. 6) Just drop the film gently into the Film
Chamber.
* If the length of film protruding from the cartridge is too long or too
short, adjust it so that the film tip lies within the Film Tip Mark.
3. Close the camera back (Fig. 7)
As soon as you close the Camera Back, the Film Transport Mark will turn on
and move, the film will wind itself up to the very end in about 16 seconds (in
the case of a pre exposure roll), and the Exposure Counter will show the number
of frames that you can take.
TAKING PICTURES
.
Focusing, exposure control, film transport, and flash firing are all
automatic.
1. Open the tens cover (Fig. 8)
To open, push the Lens Cover Button all the way to the right.
* If you are not taking pictures, close the Lens Cover to prevent tripping
the shutter inadvertently.
* The shutter won't trip unless the Lens Cover is fully open.
2. Set the Lens to telephoto or wide angle (Fig. 9, 10)
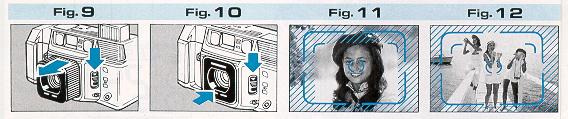
Just push the Tele/Wide Switch over Button down toward the camera bottom.
* When switching to telephoto, keep your hand away from the lens front.
* The size of the viewfinder image will change as you shin from one focal
length to the other. At the same time, the Flash Lamp head will move up or down.
3. Look through the viewfinder and compose your picture (Fig.
11)
If your subject is close (0.5 m away with the lens on telephoto or 0.8 m away
on wide-angle), frame your picture within the Parallax Correction Mark; and if
it is 1.3 m or more away from the camera, you'll get in your picture all that
you see within the outer bright frame.
* In close-range shots (within 0.8 m), parallax is automatically corrected in
the viewfinder when the Shutter Release is pressed about halfway down Before
composing your picture, always press the Shutter Release about halfway down.
* Hold the camera still
Hold the camera still with both hands.
If you are shooting with the camera held vertically always position the flash
side up.
4. Aim the auto-focus spot at your subject (Fig. 12)
Aim the Auto-focus Spot (located in the center of the Viewfinder) at your
subject. The Lens will automatically focus itself on the object at which the
Auto focus Spot is aimed.
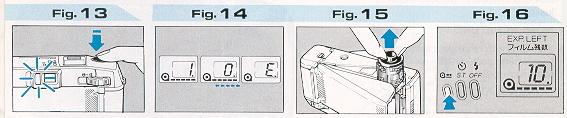
5. Press the shutter release about halfway down (Fig. 13)
If the Auto-focus Lamp (green) turns on when the Shutter Release is pressed
about halfway down, the lens has completed focusing. But if the Auto-focus Lamp
blinds and an audible electronic signal beeps you are too close to your subject.
* On telephoto, shoot from 0.5 m or more away from your subject, and on
wide-angle, shoot from at least 0.8 m away.
* Though rarely, the lens may not be able to focus itself properly in the
following situations:
6) If the subject is illuminated directly from the back; if it is illuminated
by a very bright light source; if it is illuminated by strong reflected light
such as light reflected from the front glass of a car.
(a) If your subject is a tub of black human hair or any other black object
that cannot reflect enough light.
(a) If you are shooting your subject through a glass window.
(A If the Auto-focus Spot is aimed at a strongly reflecting object such as a
mirror or metal surface.
* To handle the situations just mentioned, use the Auto-focus Memory or the
Landscape Button to take your picture.
6. Take your picture
To take your picture, just press the Shutter Release all the way down. As
soon as the shutter trips, the film
will automatically advance into position for the next shot.
END OF FILM
* Your camera will expose the film frames in descending order, starting from
the highest-numbered frame, and rewind each frame into the cartridge as soon as
it is exposed.
* You can unload the film as soon as the last frame (frame No. 1 ) is exposed
and the motor stops because there is no need to rewind it.
* If the Camera Back is accidentally opened in mid roll, close it quickly.
The film will automatically wind back into its cartridge as soon as the Camera
Back is closed.
* If the Camera Back is accidentally opened in mid roll, all of the exposed
frames, except the last, will be safe from light.
1. Exposing the last frame (Fig. 14)
As soon as the last frame (frame No. 1) is exposed, the
Film Transport Mark will move to the led and the Exposure Counter will return to
"0" then switch to "E' and the camera motor will come to a halt.
2. Unloading the exposed film (Fig. 15)
Make sure the Exposure Counter is showing the "En sign then open the Camera
Back and take the film out.
* If the film is unloaded before the "E" sign appears in the Liquid Crystal
Display, the next roll of film will not pre wind when it is loaded but will
immediately return back into its cartridge.
× Unloading the film in mid-roll (Fig. 16)
To unload the film in mid-roll, press in the Mid-roll Rewind Button, wait
until the film has wound back into its cartridge then unload it.
USING THE AUTO-FOCUS MEMORY
1. If the center of your subject is an empty space ...(Fig. 17)
If the Auto-focus Spot is aimed at an empty space in your subject, the lens
will not focus on your subject.

2. Move the camera slightly (Fig. 18)
Move the camera slightly to aim the Auto-focus Spot at something near the
center of your subject, press the Shutter Release about halfway down and check
to make sure the Auto-focus Lamp (green lamp) has turned on.
* You can use the Auto-focus Memory as many times as necessary before
tripping the shutter.
3. Take your picture
While keeping the Shutter Release depressed about halfway down, move the
camera back to recompose your picture then take it by pressing the Shutter
Release all the way down.
* Using the landscape button (Fig. 19)
To take distant scenes or through-a-window-pane scenes, press down the
Shutter Release while pressing in the Landscape Button. The flash will not
discharge and your picture will be exposed by natural light.
* If you are taking near-range shots, take care not to press the Landscape
Button inadvertently.
TAKING FLASH PICTURES
1. Automatic flash firing (Fig. 20)
In low light, the flash will discharge automatically to take your picture. As
soon as the Flash Charging Mark ( hi, ) stops blinking and the Charging
Completed Mark (lighting bolt ) appears in the Liquid Crystal Display, you are
ready to take another flash picture.
* The shooting range of the flash differs with the speed of the film that is
used, the faster the film the longer the shooting range.
* Flash shooting range
* If your subject is beyond the flash shooting range, the Auto-focus Lamp
(green lamp) will blink when
the Shutter Release is pressed about halfway down. If it blinks, check the
subject distance and move up closer to your subject so that it is within the
flash shooting range (see above table).
2. Shooting without flash (Fig. 21)

To take pictures in natural light, press in the Flash Off
Button so that the Flash Off Sign appears in the Liquid Crystal Display. To
turn on the flash again, press in the
Flash Off Button once more or close the Lens
Cover. I
* To take stage scenes, indoor sports and other subjects that are beyond the
range of the flash, just shoot with the flash switched off.
3. Using fire flash as fill-in light (Fig. 22)
Pictures of people standing in front of a window or in the shade of a tree
will usually turn out dark if they are taken without fill-in light. But the same
pictures will turn out beautifully if they are taken with flash.
* To use the flash as fill-in light, just take your picture while pressing in
the Daylight Flash Button.
USING THE SELF-TIMER
1. Set the self-timer (Fig. 23)
To set it, press in the Self-timer Button so that the Self-timer Mark appears
in the Liquid Crystal Display.
2. Start the self-timer (Fig. 24)
To start it, just press down the Shutter Release. This will cause the lens to
focus automatically on the object at which the Auto-focus Spot is aimed.
* To stop the Self-timer in mid-run, press in the Self-timer Button once
again.
3. The shutter will trip In 10 seconds
As soon as the Self-timer starts, the red Self-timer Lamp will turn on for
seven seconds then start blinking f or 3 seconds,
immediately after which the shutter will trip to take your picture.
* If the Self-timer Button is depressed for two seconds or more when there
isn't any film in the camera and the Lens Cover is open, all the marks and signs
in the Liquid Crystal Display will turn on simultaneously.
To turn off the marks and signs, just press in the Self-timer Button again or
close the Lens Cover.
CAMERA FAULTS' POSSIBLE CAUSES: AND REMEDIES
| Faults |
Possible Causes |
Remedies |
| 1. The shutter won't trip. |
(1) The batteries are nearly spent and the (empty
battery) mark is showing in the Liquid Crystal Display.
(2) The Lens Cover is not fully open. |
(1) Change the battery pack with a new one.
(2) Push the Lens Cover Button all the way to the
right. |
| 2. The Exposure Counter blink; the shutter won't
trip or the loaded film returns to it's cartridge. |
You unloaded a partly used roll of film without
winding it back into its cartridge.
(2) You loaded the film before loading the battery
pack. |
(1) Close the Camera Back then press in the
Mid-roll Rewind Button (the camera motor will run for five seconds). Repeat
until all the marks and signs in the Liquid Crystal Display show up
simultaneously then close the Lens Cover. That's all.
(2) Always load the battery pack before loading
the film. |
| 3. The film wound back into its cartridge in the
middle of the roll. |
(1) You either opened and closed the Camera Back
or moved the Camera Back Lock while taking pictures or while the film was pre
winding.
(2) You removed the battery pack then
loaded it again when there was film in the camera. |
(1) Do not open the Camera Back or move the
Camera Back Lock when there is film in the camera.
(2) If there is film in the camera, do not
take out the battery pack for more than 10 minutes.
Always change the battery pack as fast as you can. |
4. The camera is loaded with film and the Camera
Back is loose but the Film
Transport Mark does not move. |
* You did not load the film correctly. |
* Reload the film correctly. |
| 1. The picture looks fuzzy. |
(1) You didn't aim the Auto-focus Spot correctly.
(2) The lens is not clean.
(3) You shook the camera when you pressed down
the Shutter Release. |
(1) Aim the Auto-focus Spot correctly or use the
Auto-focus Memory.
(2) Keep the lens clean at all times.
(3) Hold the camera still when you trip the
shutter. |
| 2. The picture looks dark. |
(1) You took your picture against the light.
(2) Your subject was beyond reach of the camera's
flash. |
(1) Use the Daylight Flash Button to provide
fill-in light.
(2) Take your flash pictures within the specified
distances. |
CAMERA CARE, ETC.
1. Your camera is a precision instrument which requires careful handling.
Avoid shock and do not wet it or drop it on the floor.
2. It you are not using your camera for a long interval, keep it where it
will be safe from heat, dust, and moisture.
3. Remove soil and dust from the lens glass, auto focus windows, and
viewfinder window with an air blower and by wiping lightly with a piece of soft,
lint-free cloth. If that is not enough, wipe off gently with Fuji Lens Cleaning
Paper moistened slightly with Fuji Lens Cleaning Fluid.
4. In hot weather, do not leave your camera in a closed car or on an ocean
beach, and do not leave it in moist places except temporarily for a very short
time.
5. In case of malfunction, do not try to repair the camera yourself because
it is equipped with high tension circuits.
6. Always use your film before the expiration date printed on the film box.
7. Take your exposed film to your photofinisher for processing and printing
as soon as possible.
SPECIFICATIONS
Film
135mm roll film.
Picture Size
24X36mm.
Lens
Fujinon Bifocal Lens, motorized tele/wide
Switch over.
Wide-angle (normal): f=35mm, 1:3.5,
3 components, 3 elements.
Telephoto (2X) : f = 70 mm, 1: 6.7,
6 components, 7 elements.
Viewfinder
Albada (bright frame), parallax correction marks, 0.4X magnification
(wide-angle), 0.72X magnification (telephoto),
82 % field of view; automatic viewfinder switch over for wide-angle,
telephoto and close range shooting;
auto-focus lamp (green lamp next to viewfinder eyepiece).
Focusing
Active type auto-focus, auto-focus memory, 0.8 m~ x (wide-angle), 0.5 m~=
(telephoto), automatic close-range shooting,
auto-focus lamp (turns on when focusing is completed), lamp blinks and
audible electronic signal alerts you when the
camera is too close to the subject, landscape button (lens to long
distance).
Shutter
Programmed electronic shutter. (~/,0 ~1/250 sec.)
Exposure Control
Automatic, EV 7~16 (wide-angle) and EV 8.9~17.9 (telephoto) coupling ranges
with ISO100 film.
Film Speed Setting
Automatic with ISO 50—1600 DX films.
Film Loading
Drop-in (automatic threading). Film advance Automatic (motorized), film
pre-wind system, rewinding unnecessary, provision for mid-roll rewinding.
Liquid Crystal Display
LCD shows exposure counter (number of exposures left), cartridge loaded
mark, film loaded/film advance mark, self-timer mark,
flash charging signal, flash off mark, battery checker, flash ready mark.
Built-In Flash
Flash automatically fires in dim light; flash lamp head automatically pops
up when lens is switched to telephoto, automatic light-distribution switch over
for wide-angle and telephoto.
Flash Range
Wide-angle ISO 100 :0.8 - 4m
ISO 400 : 0.8 - 8 m
ISO 1600: 0.8 - 10 m
Telephoto ISO 100 : 0.5 - 3 m
ISO 400 : 0.5 - 6 m
ISO 1600: 0.5 -12m
* Electronically controlled flashmatic operation, green warning lamp blinks
when subject is too
far for shooting with flash, about 3 sec. recycle time.
* Self-timer
Electronically controlled. about 10 sec. interval, can be stopped in
mid-run, provided with Self-timer on" indicator lamp.
Battery
Lithium battery pack (Panasonic CR-P2P 6V, BRP2DP 6V, National BR-P2N 6V, or
Duracell DL 223A 6V) provides power for exposing about 1000 frames if half of
that number is taken with flash.
Others
Built-in lens cover (lens cover also serves as shutter safety lock), tripod
socket.
Dimensions & Weight
139.5x73.5x55.5mm, 323g
Notice: Specifications are subject to change without notice.