and historical purposes, all rights reserved.
This page is copyright© by
This page may not be sold or distributed without
the expressed permission of the producer
I have no connection with any camera company
This camera manual library is for reference
and historical purposes, all rights reserved.
This page is copyright© by ![]() ,
M. Butkus, NJ.
,
M. Butkus, NJ.
This page may not be sold or distributed without
the expressed
permission of the producer
I have no connection with any camera company
On-line camera manual library
If you find this manual useful,
how about a donation of
$3 to:
M. Butkus, 29 Lake Ave.,
High Bridge, NJ 08829-1701
and send your e-mail
address
so I can thank you.
Most other places would charge
you $7.50 for
a electronic copy
or $18.00 for a hard to read Xerox copy.
This will help me to continue to host this site,
buy new manuals, and pay their shipping costs.
It'll make you feel better, won't it ?
If you use Pay Pal, use the link below.
Use the above address for a check, M.O. or cash.
Click
here for camera manual page
CLICK HERE TO CONTINUE TO
COSINA CT-7 PDF MANUAL
CLICK HERE TO CONTINUE TO
PDF
Cosina CT-7 MANUAL MADE FROM HTML FILE
Specification
Camera Type: Automatic 35mm SLR with aperture preferred TTL digital metering system.
Film Format: 24mm x 36mm
Film size and capacity: 35mm perforated film in 12,20,24 and 36 exposure cassettes.
Lena Mount: Quick release K-type bayonet mount.
Shutter: Electromagnetically controlled metal focal plane shutter-vertical travel.
Speeds from 8 seconds to 1/1000 second in automatic mode and 2 seconds to 1/1000
second + "B" in manual mode.
"B (Bulb), LT (Long Time) and X (1 /100 second)" are provided.
Electromagnetic shutter release with release lock has cable release provision.
Self-Timer: Electronic control with blinking LED lamp) and emitting an electronic tone. Apprx.10 seconds delay. LED pulsations increase approx.2 seconds before shutter operates.
Exposure Measurement System: TTL open aperture, Center-weighted measurement.
Automatic Mode: Aperture priority system-LED lights against corresponding shutter speed on viewfinder scale.
Operating exposure range - EV--2 to EV +19(ASA 100 at F1.4 - F22)
Manual Mode: Match LED system with 16 LED viewfinder display.
Flickering LED indicates correct shutter speed, steady LED indicates manual shutter speed.
Both LED's should coincide for correct exposure.
Exposure Memory (Lock) System: Exposure information can be locked in memory using memory lock button.
Film Speed Range: ASA 25 to ASA 1600
Viewfinder: Fixed pentaprism type, 1 :0.9X magnification at infinity with 50mm lens.93% view of actual picture field for both horizontal and vertical.
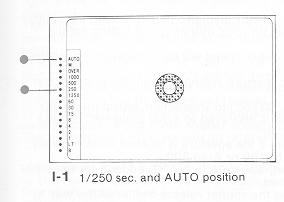
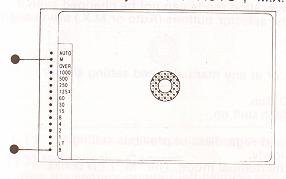
Viewfinder Display Information: Shutter speed information scale with 11 LED indication from 1 second to 1/1000 second, plus B. LT, OVER, M (Manual) and Auto.
"B": Bulb
"LT": Long Time. Speed from 8 second to 2 second in automatic mode and 2 second only in manual mode.
"OVER": Over exposure warning, but even in this case shutter speed is limited at 1/1000 second.
"M": Manual mode.
"AUTO": Automatic mode.
Film Loading: Easy-load system. Six-slotted take-up spool.
Film Advance: 135 Single stroke rapid film advance lever with built-in double exposure prevention. Standoff angle 30.
Exposure Counter: Progressive type - "S" (start) to "36". Counter automatically resets by opening back cover. Contrasting (orange) indications at "S", "12", "20", "24" and "36" exposures.
Film Rewind: By rewind crank and button.
Battery Check: By LED metering indicators in viewfinder.
Power Supply: Two 1.5 volt SR44 Type Silver Oxide batteries (G-13, EpX76, S-76) or LR44
Type Alkaline Manganese Dioxide batteries (A-76)
Dimensions: (Body only): 133mm (5.32") x 85mm (3.40") x 48mm (1.92")
Weight: (Approx. Body only): 450 g
Adaptable accessories: Cosina Auto-Winder and Exclusive Speed light Auto-160
(Specifications subject to change without notice)

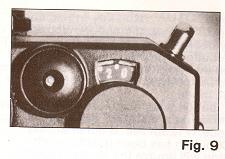
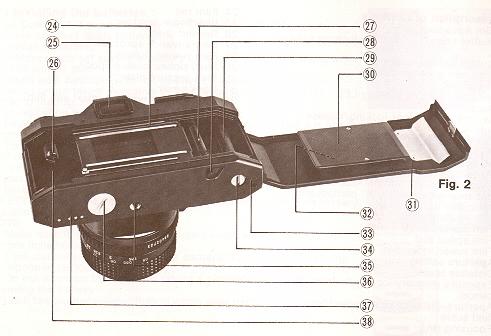
(1) Description of Controls
| 1. Film Advance Lever
2. Shutter release lock/Safety lock on symbol "L" 3. Shutter release button 4. Exposure counter window 5. Strap lugs 6. Self-timer switch/blinking LED 7. Buzzer
11. Up button |
12. Manual mode and "X" button (M.X. button) 13 Automatic mode button (Auto button) 14. Hot shoe with built-in "X" contact and dedicated flash contact 15. Film rewind crank 16. Film rewind knob 17. Film speed dial 18. Film speed index dot 19. Aperture setting ring 20. Distance scale 21. Exposure memory lock button/self-timer cancel 22. Aperture/distance scale index/depth of field scale 23. Focusing ring |
|
|
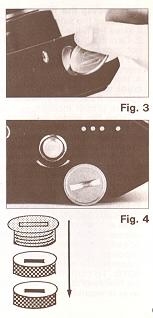
(2) Installing the batteries
|
Your Cosine CT-7 is powered by two 1.5 volt Alkaline Manganese Dioxide or Silver oxide batteries. To install batteries: 1. Unscrew and set aside the battery compartment cover, using a coin or similar item. 2. Insert both batteries with the positive (+) sides facing into the battery compartment (Negative ( - ) sides must be facing you). Refer to the Fig.3 - 4. This indication must be watched very carefully. 3. Replace the battery compartment cover, making certain it is firmly Tightened.
|
 |
4. To check the battery wind on the film advance lever, then unlock and depress the (two-stage) shutter release button halfway down.
This will light either two or three LED's (depending on whether the camera is in "AUTO" or "MANUAL" mode) and confirm that the batteries are correctly installed and functional.
If LED ('s) fail to light, recheck for correct installation and, if necessary replace with fresh batteries.
NOTE:
1) Make sure that the batteries are wiped clean with a dry cloth before installation.
2) Take the batteries out when your camera is not in use for a long or indefinite period.
3) Do not advance the film after taking a picture in order to avoid draining the battery.
4) Lock the shutter release button when your camera is not in use.
(3) Loading the film
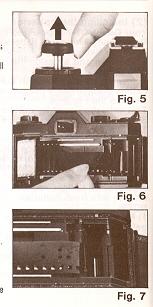 |
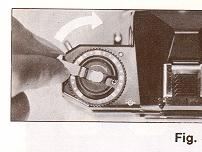
1. Release the safety lock on the shutter release button by turning it away from the locked "L" symbol. 2. Depress the shutter release button to ensure shutter mechanism is not wound. 3. Fold out and pull up on film rewind crank and knob assembly until camera back snaps open. 4. Insert film cassette into the film chamber and push the knob and crank assembly down until the forked shaft locates with the cassette spindle. If necessary, rotate the knob back and forth slightly to ensure proper location. 5. Draw film leader across the film aperture and insert in one of the slots in the film take up spool. Wind film advance lever to secure film on the take-up spool, making certain that the film sprocket holes are properly engaged with the film advance sprockets. |
6. With the film rewind crank still extended, rewind the film very slightly to take up any slack between cassette and take up spool.
After checking that the film is securely attached and tracking accurately, fold down rewind crank and snap camera back firmly closed.
7. Look in the exposure counter window which will show the letter "S" (Start) centered against the index mark Wind on the film advance lever as then release the shutter, by pressing down on the shutter release button. Repeat this procedure "O" will appear in the window.
Advance the lever once more and you are ready to make your first exposure. The exposure counter returns to the "S" position automatically when the camera back is opened.
NOTE: To confirm that film is being correctly transported check the film rewind knob, which should rotate each time the film advance lever is wound.
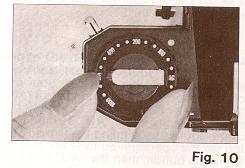
(4) Setting the film speed
|
For correctly exposed pictures it is important to set the CT-7's electronic digital metering system to coincide with the ASA or DIN rating of the film you have loaded in your camera. To set the film speed: the correct rating. 1. Rotate the Film speed dial in either direction until aligns with the film speed index 2. Insert tab from end of film carton in film rewinder pocket. |
 |
|
|
|
(5) Selector buttons
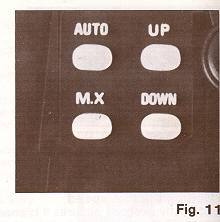 |
3. operation button (AUTO, M.X, UP. and DOWN) are provided on the key board. When operating the buttons you need to look through the viewfinder to see the functions. Auto: Push the Auto button when your camera is in use in the Automatic mode. M.X.: Push the M.X. button when your camera is in use in the Manual mode and "B (Bulb)" mode. 4. In the manual mode 1/1 25th sec. is automatically set UP when the MX button has been pushed, each touch of the up button will double the shutter speed i.e. 1/125th sec. UP 250 sec. UP 500 sec. UP 1/1000th sec. UP "B". |
Down each touch of the down button will half the shutter speed i. e. 1/1 25th sec. Down 60 sec., 30 sec.,
15 sec. right through to "B".
(6) Automatic (Aperture-Preferred) exposure
In the "Auto" mode, your CT-7's electronic exposure control system automatically computes and set the correct shutter speed for your pre-selected aperture setting, assuring consistently balanced exposures from 8 seconds to 1/1 000th second and indicating "OVER" exposure condition when available light is too bright.
To take photographs in the "AUTO" mode:
1. Wind the shutter by winding the film advance lever as far as it will go in a counter-clockwise direction (all the operation buttons are non-fun~4'onal until the shutter is
wound). Push the "AUTO" mode button, then the "AUTO" LED in the viewfinder lights while the Auto button is pushed.
|
|
|
NOTE: If your camera has been set in "M.X" mode before you push "AUTO" button, the buzzer indicates that the mode is changed into "AUTO" mode when you push the "AUTO" button.
If your camera has already been set in "AUTO" mode, the buzzer does not sound even if you push the AUTO mode button.
2. Focus the lens as previously described and set the aperture (f-stop) most favorable to the subject by rotating the aperture setting ring until selected aperture number aligns with the index line on the lens barrel.
3. When you push the Auto button, one more LED besides "AUTO" LED will light against the appropriate number on the shutter speed scale to the left of the viewfinder to indicate:
a) Correct relative shutter speed.
b) Over-exposure condition. .
c) Under-exposure condition.
 I-3 AUTO position, 1/4sec. ... open up lens aperture. |
NOTE: 1 ) The shutter speed relative to your aperture setting is indicated also by depressing the shutter release button half-way down. So, you can confirm again your shutter speed setting before releasing the shutter. 2) When the "LT" LED lights in "AUTO" mode, the shutter speed will be at between 2 seconds and 8 seconds. 4. If the "OVER" LED light, adjust (close-down) your aperture setting until an adequate shutter speed is controlled at 1/1000 second. (1-2) |
5. If the indicated shutter speed is too slow (under 1/30 sec.) to stop action, adjust (open up) your aperture setting until an adequate shutter speed is displayed to avoid unwanted camera
movement, although correct exposure is obtained (1-3)
In case the indicate shutter speed is still too slow even if the aperture is opened up completely it is recommended to use Cosina exclusive Flash Auto-160 or Auto 220.
6. If the "AUTO" mode button is once pushed, photographing with AUTO mode is continuously made as Long as the "M.X" mode button is not pushed.
7. Recheck composition and focus before depressing the shutter release button all the way to complete the exposure.
(7) General exposure information
The aperture and shutter speed control the amount of light reaching the film's surface during exposure. At a given shutter speed, turning the aperture setting ring from the smallest number (largest aperture) to the largest
number (smallest aperture) reduces the amount of light reaching the film by one-half at each f-stop setting.
(8) Manual exposure
For maximum creative freedom including special effect photography, your CT-7's electronic exposure system is designed for manual as well as automatic operation.
To use your camera in the manual mode:
1 ) Wind the shutter by winding the film advance lever as far as it will go in a counter-clockwise direction (shutter speed readout is non-functional until the shutter is wound)
Push the M.X. mode button for manual operation, then the LED of "125 X" as well as "M" will light. While the "M.X. button" is pushed, a third LED besides "125 X" and "M" will be flashing (blinking).
The steady LED (125 X) indicates the manual shutter speed. The intermittent LED indicates the correct shutter speed relative to the present aperture setting.
NOTE:
a) It is possible that only "M" and "125 X" will light and no flashing LED will light. This means that the shutter speed already set will give correct exposure.
b) The manual shutter speed will remain unchanged at 1/125 second as long as any other buttons (Auto, Up, Down) are not pushed.
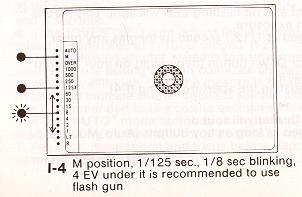
2) The steady LED is reset by pushing either Up or Down button (depending on your desired shutter speed), if any other shutter speeds are desired.
The intermittent LED is moved up or down by adjusting the aperture setting (1-4).
a) Whenever the M.X mode button is pushed the buzzer will sound.
b) The manual shatter speed will remain unchanged as long as any buttons (Auto, M.X, Up, Down) are not touched.
c) Whenever either Up or Down button is pushed, the steady LED in the finder remains on for about 10 seconds.
d) In "M.X" mode each time the UP or DOWN button is touched the shutter is adjusted to the next speed and the buzzer also sounds.
e) When the "LT" is set the shutter speed is limited at 2 seconds.
f) When any slower shutter speeds than 1/30 second are set, it is suggested to use tripod, cable release etc. to avoid unwanted camera movement.
|
|
|
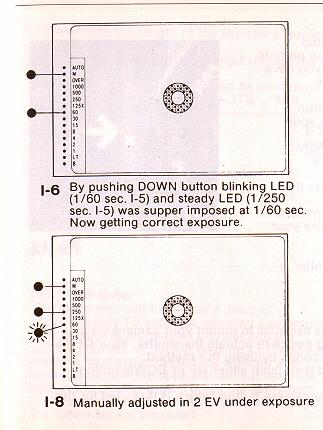
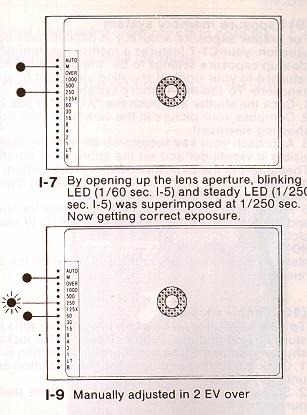
3) For correctly balanced exposures, both LED's should be matched (super-imposed) by manual adjustment of the shutter speed setting (controlled by pushing either Up or Down button) or the aperture setting or both settings.(l-6/7)
4) Recheck composition and focus before depressing the shutter release button all the way to complete the exposure.
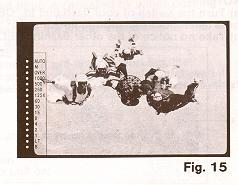
5) Special Effects Photography. (1-8/9)
The two-LED shutter speed display is particularly useful for special effects photography. The differential between actual shutter speed ("steady" LED) and correct shutter speed ("intermittent"
LED) can be manually predetermined and preset by manipulating the aperture setting ring and/or UP/DOWN buttons, providing an instant
readout in the viewfinder. Each shutter speed increment equals one f-stop, so the amount of under/over exposure can be quickly determined
and adjusted if necessary.
|
|
|
(9) Exposure memory system
|
For greater exposure accuracy in difficult back-lighted situation, your CT-7 features a memory system which permits close up exposure settings to be "memorized" until you have returned to your original shooting viewpoint to your exposure. To use the memory system: 1. Wind the shutter and push the "AUTO" mode button. Then depress the Exposure memory lock button. |
 |
4. Return to your original viewpoint keeping depress the memory lock button.
5. Recompose the picture as before, check for sharp focus and depress the shutter release button fully to capture your picture.
NOTE: Memory is automatically cancelled out when the shutter is released.
(10) Time exposures
|
|
|
|
1. Wind the shutter and push the "M.X." button and then push either UP or DOWN button until "B" LED light. |
|
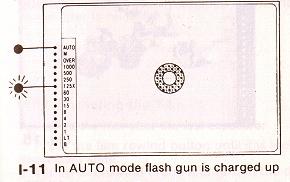
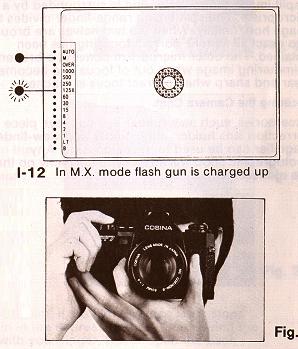
(12) Flash Photography
Your camera is "X" synchronized at 1/125th second, or at any manual speed setting slower than 1/125 the second, for flash photography.
A) To take flash pictures with the Cosina flash Auto 160 Gun.
1. Kit the flash unit into the Hot-shoe, and switch the flash unit on.
2. When the flash unit is ready, the buzzer will sound.
3. The shutter speed is automatically set to 1/125 second regardless of previous setting.
4. The "1 25X" LED in the viewfinder will be blinking slowly.
In the auto mode, "AUTO" LED will also blink and in the manual mode. The "M" LED blinks.(1 -11/12)
5. After taking a flash picture, your Cosina CT-7 will be reset to the original setting until the flash gun is fully charged again.
6. When the flash unit is set on automatic mode, set the camera aperture to f4. (ASA 100)
7. Follow all the instructions/recommendations supplied with your flash unit.
B) To take flash pictures with any other make of flash.
1. Set the camera in the manual mode by pushing the "M.X." button after winding the shutter the shutter speed is set at 1/1 25th second automatically. This is the correct speed for flash photography.
2. Install your flash unit in the hot-shoe, which has built-in "X" contact.
3) Follow the instructions/recommendations supplied with your particular flash equipment for correct aperture settings and properly balanced flash exposures.
|
|
|
|
NOTE: a) Turn the switch of your flash unit to "OFF" position, when either the flash unit is installed or is taken out from your camera. b.) Take no notice of the other flashing LED in the viewfinder. |
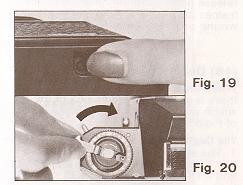
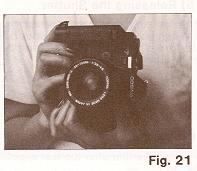
(13) Holding the Camera
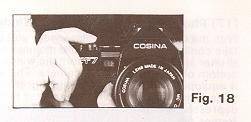
1. Rest the camera on your left palm so you can turn the lens focusing ring with your thumb and forefinger.
2. Use your right-hand to hold the camera lightly, with your right forefinger resting lightly on the shutter release button.
3. Press your left elbow lightly against your body and look into the view-finder, steadying the camera against
your face. The right arm should be relaxed while holding the camera.
Note: Use a tripod for long telephoto lenses or slower shutter speeds.
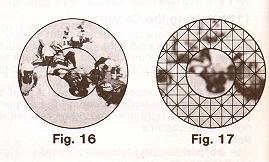
(14) Focusing the Camera
|
Focusing is taken from the small round area in the center of the view-finder screen. The inner circle is a split image range-finder and is surrounded by a microprism. The split-image range-finder divides the image horizontally. When the two halves are brought into exact alignment, correct focusing has been obtained. The outer microprism conveys a broken shimmering image when out of focus and becomes clear and sharp when correct focus is reached. Focusing the Camera Accessories, such as a rubber eye-cup, eye piece correction lens holder, angle-finder and view-finder, magnifier can be used to assist focusing Any photographic shop will advise you correctly on the use of these items. |
|
|
|
(15) Releasing the Shutter
 |
1 ) Unlock the shutter release lock. |
(16) Rewinding the Film
|
To rewind the film after the last exposure: 1. Press the film rewind button until it is locked in the depressed state. |
 |
Note
Avoid direct sunlight when unloading or loading the film. If the film advance lever stops midway and the film rewind button will not remain in the depressed state, then rewind the
film while keeping the rewind button depressed with your finger. Never open the back cover until the film is completely rewound.
(17) Photography with the Auto-Winder
 |
With the Cosine automatic film-winder you are able to take continuous or single frame pictures at any shutter speed. Attach the automatic winder to the bottom of your Cosina CT-7 camera. The auto-winder is equipped with a very convenient grip and angled release button. By keeping the release button depressed a sequence of pictures, at a rate of two frames per second can be shot. By depressing the release button and immediately releasing it, a single frames may be taken, the film being automatically wound on to prepared for the next picture. (18) Depth-of-Field When the camera is focused at a certain distance there is an area on either side of the set distance which will also be in focus. This is called the "Depth of Field". |
 |
The Depth of Field is affected by the following:
1. The smaller the aperture (as the aperture decreases the "f" number increases e.g.. f/2 is a wide aperture and f/16 is a small aperture) the larger the depth of field.
2. The longer the focused distance the larger the depth of field. The area in focus beyond the set distance will always be larger than the area in front of the focus distance.
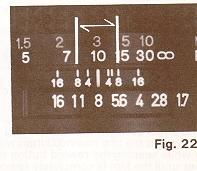
How To Know The Depth of Field Range
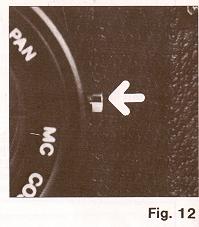
A depth of field scale is engraved on every lens when the camera is, for example, focused on the subject at a distance of three metros, with the aperture set at f/8, the subject located
within "8 marks" on both sides of the datum line (approximately 2 meters and 5 metros) is the depth of field area. Subjects within this distance will be in focus.
(19) Infrared Ray Mark
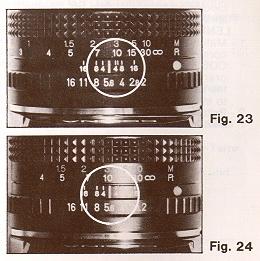 |
The short red line on one side of the distance mark is the infrared ray mark which is used to correct the focusing when using
infrared film and filters The infrared ray has a longer wave length than the visible light range, therefore, the focusing is displaced being indicated by a short red line.
|
Infrared Photography
1. Attach an infrared filter to the camera.
2. Focus the lens using the red line. 3. Set the exposure according to the description on the film and release the shutter.
It is probably impossible to focus the camera with the infrared filter in position. Either focus with the filter removed and then replace it or use the distance scale.
(20) Mounting/lnterchanging Lenses
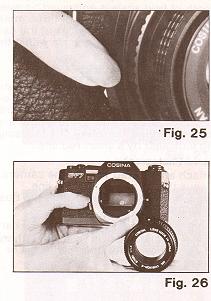 |
Your Cosina CT-7 accepts a wide selection of normal wide angle, telephoto and zoom lenses with bayonet type mount. To remove or mount a lens: * LENS REMOVAL (Facing camera front): 1. - Push the lens locking button 21 firmly inwards. LENS MOUNTING (Facing camera front): 1. - Match the red indexing dot on the lens with the corresponding red dot on the camera body.
COSINON lenses feature a raised "fluorescent orange" indexing knob which can be aligned with the lens locking button by "touch", making it easy to
interchange lenses in all lighting conditions. |