Beseler Topcon IC-1
posted 7-16-'03
This camera manual library is for reference
and historical
purposes, all rights reserved.
This page is copyright©
by

, M.
Butkus, NJ.
This page may not be sold or distributed without
the expressed
permission of the producer.
I have no connection with any camera company.
On-line camera manual library
Back to main on-line manual page
On-line camera manual library
If you find this manual useful,
how about a donation of $3 to:
M.
Butkus, 29 Lake Ave.,
High Bridge, NJ 08829-1701
and send your e-mail address
so I can thank you.
Most other places would charge
you $7.50 for a electronic copy
or $18.00 for a hard to read Xerox copy.
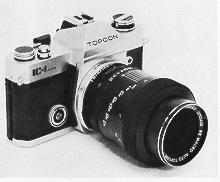
Congratulations on your choice of the TOPCON IC-1 single lens reflex camera.
This compact, lightweight camera incorporates a new, modern
electronically-controlled focal plane shutter system, with precision-made
integrated circuit (I.C.) controls, for giving you complete exposure automation,
based on the convenient and easy-to-use shutter-priority system and
Thru-The-Lens center weighted exposure readings.
While designed for
maximum simplicity of picture-taking actions, under all sorts of conditions and
with the many interchangeable lenses prepared for the camera, there is also
complete manual override of the automatic exposure setting system. The user is,
therefore, always free to revert-to manual exposure settings, with equal
simplicity of actions, for taking pictures with special moods or effects.
And, the TOPCON IC-1 is not limited in its capabilities, as a very wide range of
interchangeable lenses and accessories have been prepared for the user, some
even enlarging the field to include lenses and accessories available for the
top-class TOPCON RE Super/Super D/ Super DM system.
Although
operations are very simple, may we suggest that you read instructions through
once before you even touch the camera.
Thoroughly familiarize
yourself with the working parts (so that your fingers work the camera
automatically) before you even load your first roll of film, as your pleasure in
using the TOPCON IC-1 will even be greater if you know the camera well.
CONTENTS
|
IMPORTANT 1
Inserting the Batteries 1
NOMENCLATURE 2
SPECIFICATIONS 5
Quick Guide to the IC-1 7
Film Loading 9
Exposure Counter 11
Lens Speed Compensator 12
Film Speed Indicator 12
Film Winding Lever Action 12
Holding the Camera 13
View-Focusing 14
Automatic Exposure Settings 15
Shutter Action 17
|
Manual Exposure Settings 19
Shutter Speeds 21
Lens Openings 21
IMPORTANT 22
Depth of Field 23
Film Unloading 27
Infrared Index 28
Lens Exchange 29
Flash Photography 31
Accessories 33
Storage 41
Cleaning 41
Batteries 42
|
IMPORTANT
1. The batteries must be
inserted into the camera before the exposure system and the
electronically-controlled focal plane shutter will work.
2. Don't
touch the surfaces of the lens, mirror and eyepiece.
3. Always
stroke the film winding lever all the way--until it makes a full stop.
4. Wait until the shutter action is completed before stroking the film winding
lever (especially at slow shutter speeds).
5. Cover the lens when
not in use. (Cover the rear end of the lens, also, when it is detached from the
camera, as well as the body mount, when no lens is attached to
the camera.)
6. Don't force movements but reread instructions once
more.
7. Contact the nearest authorized dealer, if
repair is required. Don't do it yourself.
IMPORTANT
 |
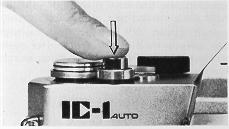
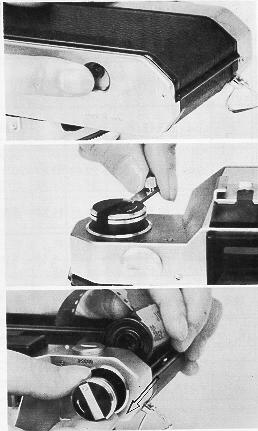
1. The batteries are taken out of the camera for shipment to you. They must,
therefore, be inserted into the battery compartment before the exposure system
and electronically-controlled focal plane shutter will work.
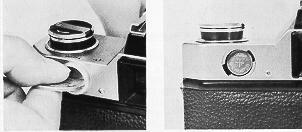
Open the battery compartment cover, with a coin or similar object, and insert
the batteries supplied with the camera.
|
2. The plus (+) sides of both batteries must be facing outwards, as
otherwise the shutter system will not work.
Replace the cover when
the batteries are correctly inserted.
NOMENCLATURE
 |
1. Film winding lever
2. Shutter
release button (with cable release socket)
3. Exposure counter
4.
Accessory shoe
5. Film plane indicator
6. Rewind knob (with rewind
crank)
7. Lens speed compensator dial
8. Shutter speed ring
9. Aperture ring (with AUTO setting)
10. Depth of field scale
11.
Distance focusing ring
12. Aperture ring release lever
13.Flash
socket |
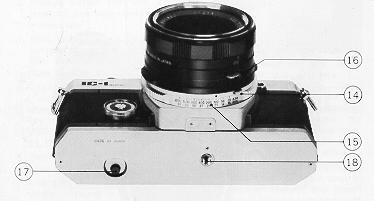 |
14. Film speed ring catch
15. ASA/DIN
film speed scale
16. Lens locking lever
17. Rewind button
18. Tripod socket |
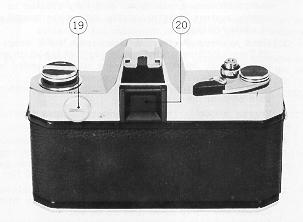 |
19. Battery compartment cover
20. Eyepiece |
SPECIFICATIONS
Standard Lens
: 50mm f/2 Hl Topcor 6 element lens. 47° field of view; f/2 to f/22;
minimumfocus60cm(2ft.); 49 mm screw in filter mount. t
Shutter : Electronically-controlled cloth focal plane
shutter, with shutter speed ring on lens mount. Ten shutter speed settings 1,
1/2, 1/4, 1/8, 1/15, 1/30, 1/60,1/125,1/250 and 1/500 second, plus Bulb.
Internally coupled to the built-in exposure setting system. Shutter release
button has female screw for attachment of cable release.
Finder : Fixed eye-level Pentaprism finder, with 0.8x image
(standard lens) and 33.5 mm x22.3 mm finder screen (93% of the width and length
of the actual picture area). Microprism focusing spot surrounded by fine focus
ring and full area groundglass, with fresnel lens plate. Aperture scale is
visible on left edge of finder area, with warning areas at both ends of the
scale.
Lens Mount : Topcon exclusive bayonet mount, compatible with
lenses available for the TOPCON UNI, Unirex and Unirex EE cameras.
Exposure Meter : Thru-The-Lens center weighted full aperture
measuring system, with two compound CdS cells on both sides of the finder
eyepiece measuring the reflected light for a center weighted average reading of
the full finder area. Exposure range is EV 5 to EV 18, with ASA 100 film and 50
mm f/2 lens.
Automatic Exposure : Shutter-priority exposure automation on
AUTO setting, with shutter speeds 1/8 to 1/500 sec., apertures f/2 to f/22 (with
ASA 100 film) and film speeds ASA 25 to 3200 (DIN 15 to 36). Complete freedom in
aperture/shutter speed settings with manual override, by simply taking the lens
off the AUTO setting.
Mirror Action : Quick-return mirror action.
Flash Synchronization: Single flash socket for flash bulbs and
electronic flash units. Electronic flash units synch at shutter speeds
red-colored 1/60 sec. and slower; Class M bulbs at 1!15 sec. and slower.
Film Winding Action : 120° single stroke advances film, as well as
exposure counter, and also charges shutter and the mirror raising and lens
diaphragm action.
Exposure Counter : Exposure
counter automatically returns to start-mark (S) upon opening camera back and
shows the number of exposures made. The 20th and 36th frames are indicated with
red-colored numerals.
Lens Speed Compensation: Lens
speed compensator dial is rotated for matching the exposure system to the
maximum aperture of the lens attached to the camera.
· Wheel can be set to six f/numbers or 2, 2.8, (3.5), 4, (4.7) and 5.6.
Film Speed Indication: Twenty-two ASA and DIN film speeds are available
on the lens barrel, with film speed ring adjusted to set index opposite the
required film speed.
ASA speeds are 25, (32), (40), 50, (64), (80), 100,
(125), (160), 200, (250), (320), 400, (500), (650), 800, (1000), (1250), 1600,
(2000), (2500) and 3200.
DIN speeds are 15, (16), (17), 18, (1g), (20),
21, (22), (23), 24, (25), (26), 27, (28), (29), 30, (31), (32), 33, (34), (35)
and 36.
Numbers in brackets ( ) are represented by dots.
Back Cover Opening : Hinged camera back locks tight when
closed strongly. Opens when rewind and Film Loading knob is pulled up strongly.
Multi-slot take-up spool for easy loading action.
Quick Guide to the IC-1
Taking pictures with the TOPCON IC-1 is
very simple, especially if you already have had some experience with cameras.
If this is your first camera, however, detailed explanations on how to handle
the IC-1 also follow.
Therefore, we would suggest that this manual be read through carefully before
making a practice run with the camera, in this case.
 |
1. Pull the rewind
knob up strongly and the back cover will spring open. Load the camera with a 35
mm film in daylight cartridge and push the back cover close.
2.
Advance the film to the first frame, as shown by the exposure counter. (Three
blank shots will place the exposure counter on the first frame.) |
 |
3. Set the lens speed compensator dial to the numeral or dot corresponding to
the maximum aperture of the lens on the camera.
4. Set the film speed index to the ASA/DIN film speed corresponding to the
sensitivity of the film loaded in the camera.
|
5. Set the shutter speed ring to one of the settings from 1/500 to 1/8 second
and the aperture ring to AUTO.
6. Compose and focus the picture in
the finder. At the same time, check the aperture scale in the finder. The
exposure needle should not be in the warning areas.
7. Press the
shutter release button softly if everything is satisfactory.
8.
Upon exposing all frames, rewind the film back into the original cartridge with
the rewind crank, after pushing the rewind button in.
9. Open the
back cover and unload the film, by pulling the rewind knob up strongly.
Film Loading
Use 35 mm film in daylight cartridges and load and
unload film away from direct sunlight or strong artificial illumination. Black
and-white films are available in both 20 and 36 exposure lengths while color
films are available in 12, 20 and 36 exposure lengths. Frame size is 24 mm x36
mm.
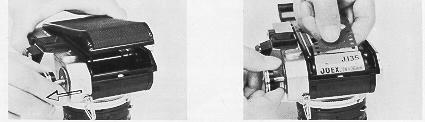 |
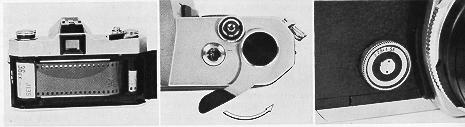
1. Pull the rewind knob up strongly and the back cover will
spring open. Open the cover all the way to expose the film chamber. |
2. Pull the rewind knob up and insert the film cartridge in the film
chamber; then release the spring-loaded rewind knob to engage the film
cartridge. If they do not engage, revolve the rewind knob slightly until the
shaft engages the cartridge.
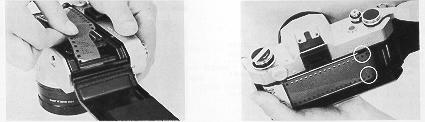 |
3. Insert the leading end of the film into one of the slots on the multi-slot
take-up spool as illustrated.
4. Advance the film winding lever slowly un. the film perforations engage the
film transport sprocket teeth, at the top and bottom.
Close the back cover
strongly so that it snaps shut with a clicking sound.
|
 |
5. Rotate the rewind knob in the arrow-indicated direction to tension the
film inside the cartridge. Film winding action thereafter will rotate the knob
in the opposite direction, showing that the film is actually being advanced.
|
6. Stroke the film winding lever with the right thumb 120° or until it makes
a full stop. There is a play of 20° in the lever action for inserting the right
thumb to permit immediate winding action after shutter release.
Exposure Counter
7. After stroking the film winding lever,
press the shutter release button. Repeat two times more and the exposure counter
will be on "1" for taking the first shot. The counter shows the number of frames
exposed and automatically returns to "S" when the back cover is opened.
Lens Speed Compensator
 |
8. Revolve the lens speed compensator dial and set its index to
one of the lens speeds on the scale, or 2, 2.8, 3.5 (represented by a dot), 4
and 5.6, which corresponds to the maximum aperture of the lens attached to the
camera. (This action is also necessary when the lens is exchanged if the maximum
aperture differs from the previous lens.)
Film Speed Indicator
9. Depress the catch on the ring and then revolve the film speed ring to set
its index to one of the ASA/ DIN film speeds on the film speed scale,
corresponding to the sensitivity of the film loaded in the camera. See that the
catch clicks into the exact position.
|
Film Winding Lever Action
Each time the film
winding lever is stroked fully--
(1) The film is advanced one frame,
(2) The exposure counter is also
advanced one frame,
(3) The shutter mechanism is fully charged, and
(4) The automatic lens diaphragm and reflex mirror mechanisms are also fully
charged.
Holding the Camera
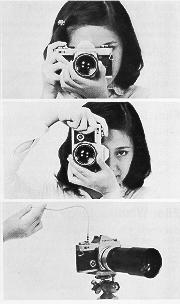 |
1. The basic method of holding the camera is used for taking pictures in the
horizontal format.
Grip the focusing ring with the left thumb and index finger and support the
camera on the left palm. Place the right thumb against the film winding lever
and wrap the other fingers around the body so that the index finger is on the
shutter release button. Use the right eye for view-focusing.
2. For taking pictures in the vertical format, turn the camera around,
without any change in the basic holding position, until the film winding lever
is on top.
In both cases, press the camera against the face and both elbows (when
possible) against the body, to steady the camera as much as possible.
|
3. For slow shutter speeds or with a telephoto lens, use a sturdy tripod,
whenever possible.
Screw a cable release into the socket of the
shutter release button to release the shutter, as it will help eliminate camera
vibration.
Or, use props, like desk, chair, tree, etc., to support
or steady the camera, as well as a bean bag (bag filled with beans) to absorb
vibrations.
View-Focusing
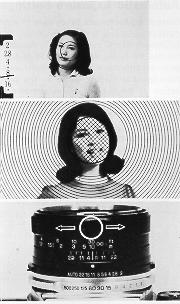 |
1. The Pentaprism finder shows an erect image moving in the same direction as
the subject and thus is ideal for action shots in the horizontal format. The
area covered in the finder is also nearly the same as that of color slides.
The central microprism focusing spot is surrounded by a fine focus ring and
ground glass over the balance of the field.
2. When the subject is not focused, the image will be seen indistinctly and
blurred in all three focusing areas.
When properly focused, however, the subject will be seen distinctly
throughout the finder area, with the focusing spot providing specially fast
focusing action for most types of subject matter.
3. The subject is focused by rotating the distance focusing ring in either
direction until the image is seen distinctly and sharply in the finder.
|
The distance focused can be found opposite the distance index
(orange-colored line in the center of the depth of field scale).
Automatic Exposure Settings
Correct exposures are taken care of automatically when the TOPCON IC-1 is set
on AUTO.
Correct exposure is the relationship between shutter speed and lens opening,
as decided by the brightness of the subject and is dependent on the film
sensitivity. It is one of the most important factors for taking better pictures
and also one of the most difficult adjustments to make, without prior
experience, in a non-automatic exposure camera.
Film speed is predetermined by the film loaded and the shutter speed is,
usually, determined by the action of the subject or the overall brightness.
Therefore, the most important remaining factor will be the ability to judge the
brightness of the subject and set correct exposures based on such judgments,
both of which are automatically taken care of when the camera is set on AUTO.
 |
1. Revolve the shutter speed ring and set
one of the shutter speeds from 1/500 to 1/8 sec. to the index. Choose a shutter
speed for the overall brightness or the action of the subject. Generally, if the
camera is set to 1/125 sec., the user will be prepared for most outdoor
situations, when using ASA 100 film |
 |
2. Set the aperture ring to AUTO, and the
ring will be locked from revolving. (To move the aperture ring off AUTO, the
ring must be rotated while simultaneously pushing in on the release lever at the
same time.) |
 |
3. Check the aperture scale in the finder
field.
The exposure needle should not be in the red warning areas
(or set to a f/number exceeding the maximum aperture of the lens being used).
Always check because the shutter can be released in spite of the needle position
(for getting special effects). |
 |
4. Press the shutter release button smoothly
and gently. Do not jerk or press too strongly, as there will be camera shake.
Wait until the shutter action is completed before advancing the film. As can be
seen, the shutter-priority automatic exposure system is very simple and speedy. |
Shutter Action
 |
All interchangeable lenses prepared for the IC-1 have fully automatic lens
diaphragm mechanisms which means that you can view-focus at full aperture and
the lens diaphragm will automatically close down to the required aperture, upon
shutter release, and then reopen back to the maximum opening, after the picture
is taken.
In other words, pressing the shutter release button means that the following
actions take place--
(1) Lens diaphragm starts to close down.
(2) Reflex mirror swings up.
(3) Lens diaphragm is stopped down to the required aperture.
|
(4) The
shutter curtains run across, taking the picture
(5) Reflex mirror swings down into viewing position, as the lens diaphragm
opens up fully for view-focusing at the full aperture.
Integrated-
circuit (IC) electronically controlled shutter speeds means that the shutter
system is precisely controlled for meeting exacting exposure conditions.
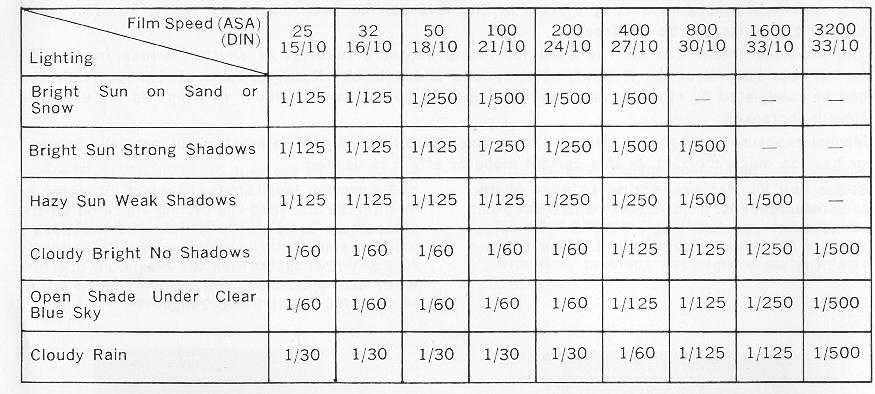
SHUTTER SPEED GUIDE
Manual Exposure Settings
The automatic exposure setting
system of the IC. 1 can be overridden very easily, in which case, exposure
settings can be set freely.
The exposure meter can still be used for
taking exposure readings at shutter speeds from 1/500 to 1/8 sec. but not at the
slower shutter speeds, and B (bulb). Readings taken at 1/8 sec., however, can be
readjusted by stopping down the lens opening by the same number of steps as the
exposure time is increased.
Manual exposure settings are effective when
the subject or point of interest is not centrally located, or has too much
contrast, or if a certain mood or effect is desired.
 |
1. Set the shutter speed ring to one of the
shutter speeds from 1/500 to 1/8 sec., but move the aperture ring off AUTO. (To
do so, press the release lever in and rotate the ring at the same time.) |
2. Point the lens at the subject or point of interest and
read the setting indicated on the aperture scale in the finder. If the exposure
needle is in the warning area, or pointing to a f/number faster than the maximum
aperture of the lens, shift the shutter speed within the 1/500 to 1/8 sec.
range.
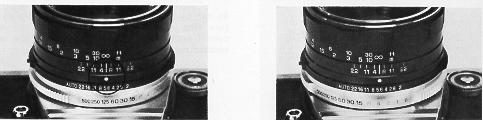 |
3. Transfer the indicated aperture setting to
the aperture ring, so that it is opposite the aperture index (orange-colored
dot). The setting can be modified, at this time, if some special effect is
desired. Or, the lens opening can be stopped down for greater depth of field
effect, in which case, the exposure time must be increased by the same number of
steps. |
4. Or, set any shutter speed that you consider
appropriate for the subject, including slow shutter speeds from 1/4 to 1 sec.,
or even B. and a suitable f/number, with the exposure determined from the
exposure chart included with film, previous experience, or by experimentation.
Shutter Speeds
Full numbers are engraved on the shutter speed
ring, from 1 to 500, as well as B. The numbers represent the shutter speeds, or,
in other words, 500 is 1/500 sec. and 1 is 1 sec. B is for bulb and the shutter
stays open as long as the release button is depressed, in this case. Larger
numbers are, therefore, faster than smaller numbers and each larger number keeps
the shutter open for 1/2 as long as the next number.
Shutter speeds
are electronically-controlled with a precision integrated circuit (IC) control
system, for obtaining precisely controlled shutter speeds required in exacting
exposure conditions.
Choice of shutter speed is not only dependent
on lighting conditions but also on the need for stopping action, or--
(1) A faster speed is required for a speedier object.
(2) A faster speed
is needed for movement nearer the camera.
(3) A faster speed is required
for a subject moving parallel to the camera, while a slower speed may be used
for movement towards or away from the camera.
(4) The degree of stopping,
or "freezing", the action will also determine the speed to be used.
Lens Openings
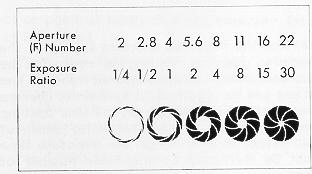 |
The lens opening controls the amount of
light that passes through the lens to the film plane, while the shutter is
opened. The apertures or lens openings, called f/numbers, also, have exposure
ratios as noted following:-
As can be seen, the larger numbers on the aperture
ring are the smaller lens openings and permit only 1/2 the amount of light of
the next smaller number. |
IMPORTANT
 |
1. Although the exposure meter cannot be used for readings at shutter speeds
1/4 to 1 second, and B (bulb), or the green-colored shutter speeds, the aperture
reading obtained with the meter for 1/8 second can be readjusted for these
speeds. In other words, readjust the aperture reading by stopping down the lens
opening by the same number of steps as the exposure time is increased, or--
Shutter speed: 1/8--1/4--1/2-- 1 Aperture : 5.6--8 --11--22
|
2. The exposure reading can be unsuitable even when the exposure needle
is not in the warning areas. This is so when a fast film is used at a slow
shutter speed or a slow film is used at a fast shutter speed.
Specifically, the following combinations should not be used:--
f/2
and 1/125 sec. for ASA 3200 film
f/2 and 1/60 sec. for ASA 1600 film
f/2 and 1/30 sec. for ASA 800 film
f/2 and 1/15 sec. for ASA 400 film
f/2 and 1/8 sec. for ASA 200 film
f/2 and 1/4 sec. for ASA 100 film
f/2 and 1/2 sec. for ASA 50 film
f/22 and 1/500 sec
f/2 and 1/1
sec.
f/22 and 1/250 see for ASA 25 film
Depth of Field
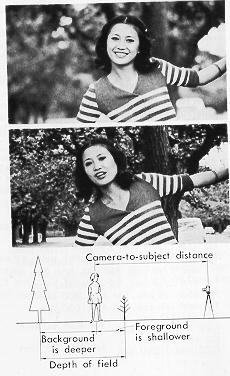 |
1. When the maximum aperture is used for taking the picture,
it will be seen that objects before and behind the main subject (or focused
plane) will not be seen as sharply focused as the main subject.
2. When a smaller lens opening is used, however, for taking
the same picture, it will be seen that some objects before and behind the main
point of interest are also seen sharply. This zone of "apparent" sharpness is
the depth of field.
3. The depth of field is greater behind the focused subject
and shallower before but grows progressively equal as the focusing distance
grows shorter. The depth of field also grows greater as the focused distance is
increased and less as the camera-to-subject distance is decreased.
The depth of field also increases when the wide angle lens is used and
decreases when the telephoto lens is used.
|
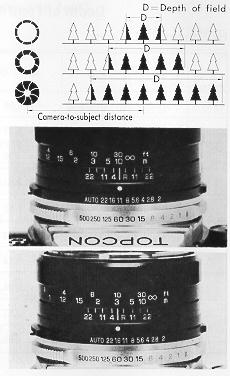 |
4. The depth of field is greater as the aperture is closed
down and less as the lens diaphragm is opened up. In other words, the wide-open
aperture of the fully automatic lens always shows the least depth of field
(besides being very bright) and is valuable for precise, fast focusing.
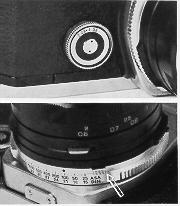
5. The depth of field scale is used for a quick check of the
depth of field.
For example, if the lens opening is f/11 with a focused distance of 10m (30
ft.), the distances opposite f/11 on both sides of the scale will show that the
depth of field is from about 4m (13ft.) to infinity. Should an aperture of f/16
be used, however, the zone will be seen to extend from about 3m (10.5 ft.) to
infinity.
6. Or, the scale may also be used for covering two subjects
at different distances. If the near subject is 2m (7 ft.) and the farther 8m
(27ft.), revolve the distance focusing ring until these distances are opposite
identical apertures (about f/16, in this case) and use this lens opening.
|
The actual distance to the subject is measured from the film plane indicator
position on the camera's top deck.
Depth of Field (Table)
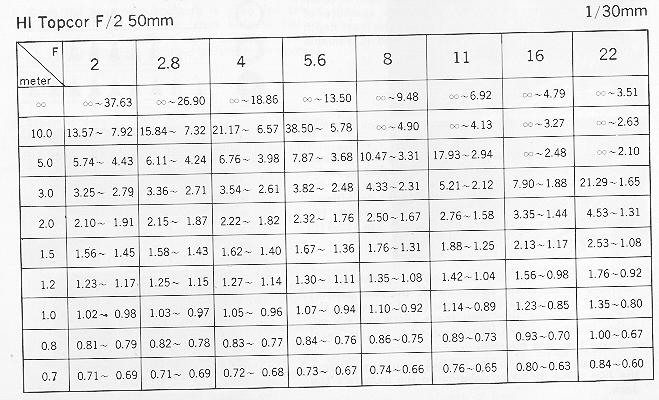 |
Depth of Field Table (Feet)
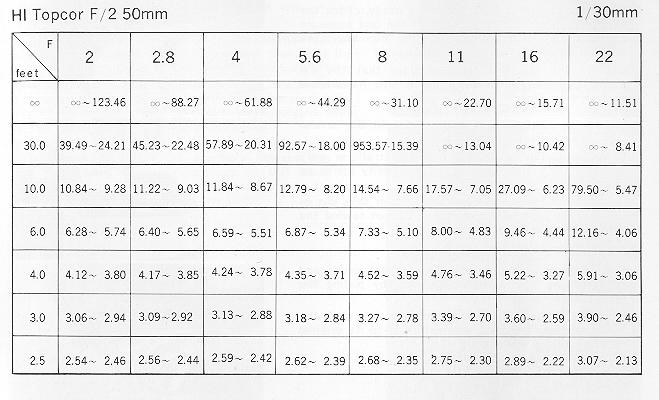 |
Film Unloading
 |
1. If the winding lever does not move
easily, check the exposure counter. If it shows that the last exposure has been
taken, do not advance the film any more or you will tear it out of its
cartridge.
Depress the rewind button, in order that the exposed film can
be rewound back into its original cartridge.
2. Unfold the rewind
crank and revolve in the arrow indicated direction.
Rewind smoothly and
evenly because erratic or very fast rewinding may cause static electricity marks
on the film.
Rewind until tension lessens, as the film slips out of the
take-up spool, and then stop. Do not rewind the leading end back into the
cartridge.
3. Pull up the rewind knob to open the back cover and
then let the film cartridge fall out, by pulling the rewind knob up once more.
Bend the leading end of the film, as a sign that the film has been exposed, and
return it to its original package until development. |
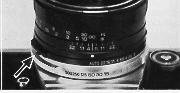
Infrared Index -
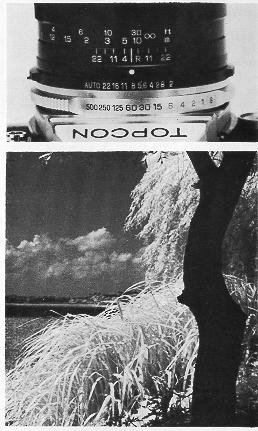 |
The infrared index is the orange-colored line on the
depth of field scale, with an orange "R".
When using infrared film, focus
in the normal manner (say, the distance is 10m (30 ft.)), and then shift the
distance thus obtained to the infrared index, as shown.
Such
adjustments are required to retain sharpness on the infrared film because the
invisible infrared wave lengths are longer than the visible wave lengths seen by
the naked eye (and used for focusing).
The ratio of infrared wave
length in the visible light is variable and, therefore, no exposure indexes can
be given for taking exposure readings, in this case. In any case, shots should
be made, according to the instruction sheet furnished with the film. |
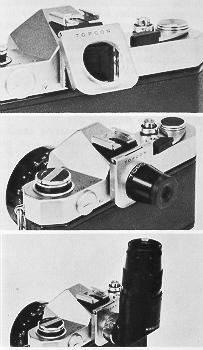
Lens Exchange
 |
Seven Topcor lenses, consisting of one standard lens and six
interchangeable lenses, including a 87 ~205mm zoom lens, are available for the
TOPCON IC 1 and may be used interchanged, with a common bayonet mount permitting
simple, accurate and speedy exchanges of the complete lens. |
The Topcor interchangeable lenses have a special coating for cutting
ultra-violet (UV) rays and thus give breath-taking true-to-life color renditions
of outdoor scenes and eliminate the need for a UV filter outdoors in
black-and-white work.
All interchangeable Topcor lenses have fully
automatic instant reopening lens diaphragm action and are coupled for complete
automatic exposure (AK) settings and quick-as-a-wink mirror action, when
attached to the camera.
Use the front lens cap to protect the front lens element and the rear lens
cap, for protecting the rear lens element, when the lens is detached from the
camera.
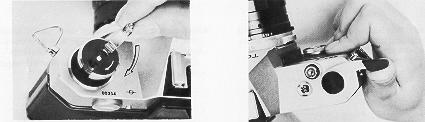
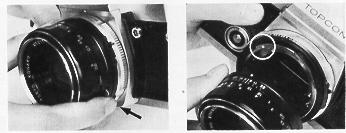
1. To remove the lens from the camera body, press the lens
locking lever, which will disengage the lens locking system. Rotate the lens
counter-clockwise until it stops and lift it out gently.
2. To
attach the lens to the camera body, line up the orange aperture index dot with
the orange dot on the rim of the body mount and insert the lens carefully.
When well-seated, revolve clock-wise until it stops and clicks into position.
VARIETY OF TOPCOR LENSES
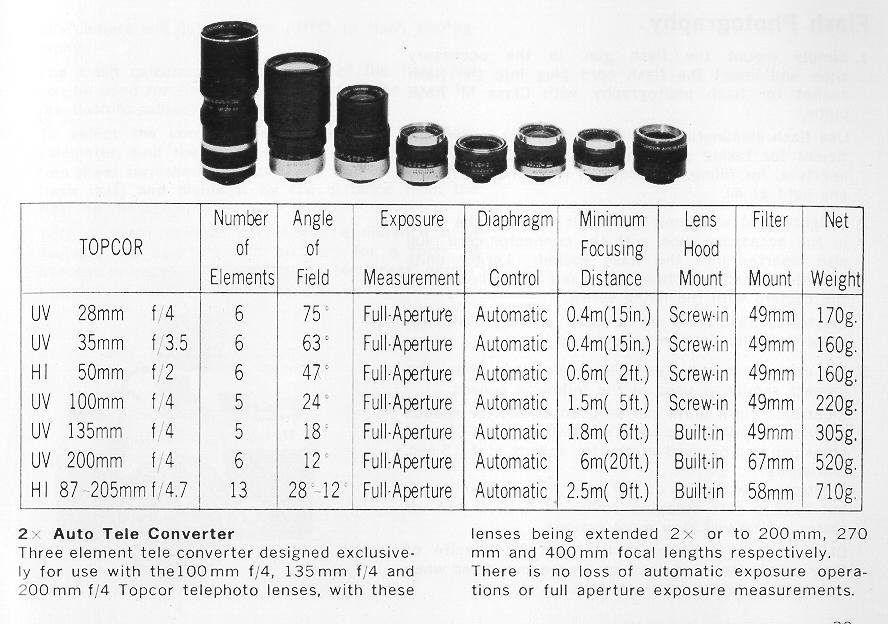
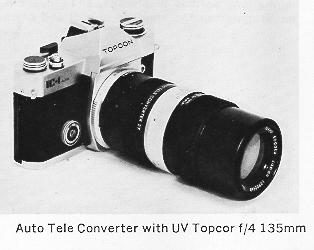
2x Auto Tele Converter Three element tele converter designed
exclusively for use with the 100mm f/4, 135mm f/4 and 200 mm f/4 Topcor
telephoto lenses, with these lenses being extended 2 x or to 200 mm, 270 mm and
400 mm focal lengths respectively. There is no loss of automatic exposure
operations or full aperture exposure measurements.
Flash Photography
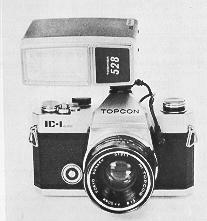 |
1. Simply mount the flash gun, in the accessory shoe and insert the flash
cord plug into the flash socket for flash photography with Class M flash bulbs.
Use flash illumination when available light is not sufficient for taking
pictures at the desired speed or aperture, for filling in shadows or when there
is hardly any light at all.
2. A lightweight electronic flash unit can also be used in the accessory
shoe, with the connector cord plug also inserted into the flash socket. Larger
units should be used with brackets, fixed to the bottom of the camera with the
fixing screw.
|
Electronic flash units are suitable for those who require flash illumination
quite often.
3. For using flash bulbs and electronic flash units,
the camera should be used at the following speeds.
Electronic flash
units can be used at shutter speeds 1/60 sec. (red-colored index) and slower,
and Class M bulbs can also be used at shutter speeds at 1/15 sec. and slower.
Electronic flash units do not have great light intensity but have a fast
stopping action of 1/1000 sec. or faster, which will stop most actions.
Class M bulbs have great light output in spite of their small sizes and, thus
can be recommended when maximum light output is needed.
4. The
camera will not work on AUTO, in flash photography.
The flash
calculator on the back of the flash gun can be used for finding the aperture to
be used for the flash-to-subject distance.
To select the correct
aperture, without the flash calculator, find the guide number (from the
instruction sheet furnished with the flash bulb or electronic flash unit) and
divide it by the distance from the flash to the subject.
With a
guide number of 50 and a distance of 3 meters, the aperture will be f/16 for a
room of average brightness or size. Adjust for larger, darker, brighter or
smaller rooms.
Accessories
1. Lens Hoods
 |
Used for eliminating stray light which might effect the
brilliance and clarity of the picture, as well as protecting the lens surface
from rain or snow, which could cause distortion. Always use the proper lens hood
for the lens. The 135 mm and 200 mm lenses have built-in lens hoods which are
simply pulled out for use. |
2. Close-Up Attachment Lenses
 |
Used on the filter mount of the lens for shooting at closer
subject-to-camera distances than possible with the unassisted lens. Available in
49 mm and 67 mm mounts. Two close-up lenses may be used in combination, for
closer focusing. The smallest possible aperture must be used to increase the
depth of field and to improve reproduction around the edges. |
Focusing Distances with Close-up Lenses Unit: Meter Unit: Feet
|
No. O Close-UP Lens
UV Topcor f/4 28mm1.8~0.28 5.91~0.91
UV Topcor f/3.5 35mm1.5~0.31 4.92~1.02
H 1 Toncor f/2 50mm1.5~0.47 4.92~1.54
UV Topcor f/4lOOmm1.5~0.8 4.92~2.62
UV Topcor f/4 135mm1.56~0.91 5.09~3.0
No. 1 Close-Up Lens
UV Toncor f/4 28mm0.71~0.22 2.35~0.72
UV Toncor f/3.5 35mm0.74~0.28 2.43~0.92
H 1 Topcor f/2 50mm 0.73~0.38 2.39~1.25
UV Toncor f/4 100mm 0.75~0.54 2.46~1.77
UV Topcor f/4 135mm 0.79~0.61 2.66~2.0
UV Topcor f/4 200mm 6.4~4.3 21 ~14.1
|
No. 2 Close-Up Lens
UV Topcor f/4 28mm
0.37~0.17 1.21~0.56
UV Toncor f,'3.5 35mm 0.44~0.24 1.44~0.79
H 1 Topcor f/2 50mm 0.43~0.3 1.41~0.98
UV Topcor f/4 100mm 0.45~0.38 1.48~1.25
UV Topcor f/4 200mm 4.4~2.3 14.4~7.55
No. l+No. 2 Close-Up Lenses
UV Topcor f/4 28mm
0.27~0.13 0.90~0.44
UV Topcor f/3.5 35mm 0.32~0.22 1.05~0.72
H 1 Topcor f/2 50mm 0.32~0.25 1.05~0.82
UV Toncor f/4 lOOmm 0.34~0.3 1.12~0.98
UV Topcor f/4 200mm
2.26~1.76 7.41~5.77
|
 |
3. Eyepiece Adaptor
Is
slipped into the attachment groves on both sides of the finder eyepiece frame,
for using Magnifier and Angle View Finder. Permits these accessories to be
flipped up, for normal viewing. |
4. Magnifier
Is
screwed into the eyepiece adapter and used for 2.5x enlargement of a 12mm spot
in the center of the field of view, for precise focusing in close-up shooting
and photomicrography. Has an adjustable eyepiece for making +3 to --3 diopter
adjust meets, for increasing accuracy. |
|
5. Angle View Finder
Also screwed into eyepiece adapter and used for view-focusing at right angle
to the optical axis, in low shooting positions, close-ups and photomicrography.
Also has +3 to--3 diopter adjustments of the eyepiece.
|
 |
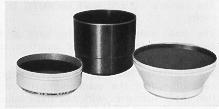
6. Microscope Attachment, Model
For connection of
camera body to microscope in photomicrography, up to 400 x magnification.
Suit. able for focusing stage microscopes, with drawtube of 25 mm outer
diameter and 10x ocular. Sepal rates into two, for changing oculars or for
continuing observation.
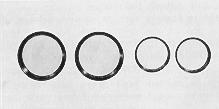
7. Telescope Adapter Set
Three ring set for connecting
camera body to telescope in astrophotography. Can be connected to telescopes
with drawtubes of 30.2 mm and 36.2 mm outer diameters or with T mount adapter.
|
 |
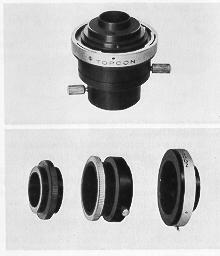
8. RE Mount Adapter
The accessory has a TOPCON IC-1 male bayonet mount on the rear end and a
TOPCON Super DO female bayonet mount on the front end. Thus, the user may attach
interchangeable lenses and accessories, prepared for the TOPCON RE Super, Super
D and Super DM, to the IC-1, with this accessory
|
 |
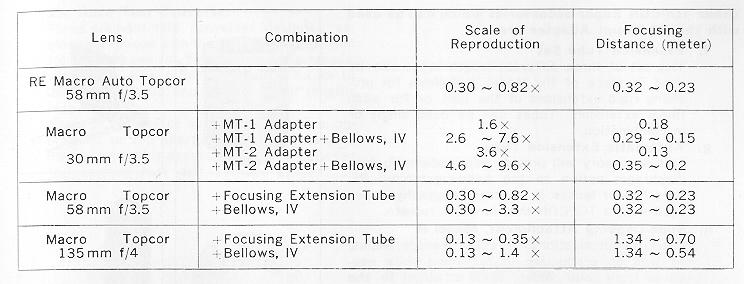
a. RE Macro Auto Topcor 58mm f/3.5 Lens
Macrophotography from 0.3x to 0.8x is possible when this lens is attached to
the IC- I, via the adapter.
b. Macro Topcor 30 mm f/3.5 Lens - MT-1 Adapter! Bellows, Model IV
When this special lens is attached to the IC-1, via the 5.8 mm thickness
bayonet mount adapter and Model IV Bellows, macrophotography from 2.6 x to 7.6 x
is possible.
|
|
 |
 |
c. Macro Topcor 30mm f/3 5 Lens+MT-2
Adapter+ Bellows, Model IV
When the 65 mm thickness MT-2
adapter is used in place of the 5.8 mm thickness adapter, in the preceding
combination, macrophotography from 4.6 x to 9.6 x becomes possible. |
d. Macro Topcor 58 mm f/3.5 Lens + Focusing Extension Tube
This combination on the IC-1 via the adapter also makes macrophotography in
the range 0.3 x to 0.8 x possible, as in the case of the RE Macro Auto Topcor 58
mm lens.
|
e. Macro Topcor 135 mm f/4 Lens + Focusing Extension Tube
This combination on the IC-1 is used for macrophotography from 0.13x to 0.37
x, when the camera must be used at some distance from the subject.
|
SPECIFICATIONS OF MACRO LENSES
Other TOPCON Super accessories which can be used with the
RE Mount Adapter are--
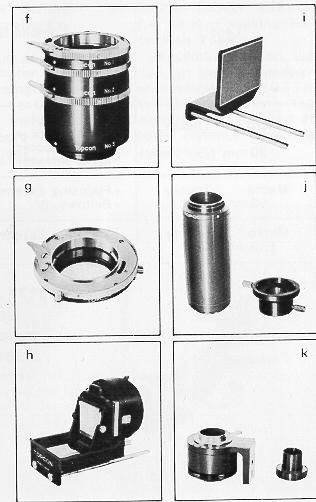 |
f. Extension Tube Set
This set of three different
length tubes can be used in place of the Model IV Bellows for providing rigid
extensions of the lens or for additional extension. Tubes can be used singly or
in combination.
g. Automatic Extension Tube
This accessory will provide
semi-automatic lens diaphragm action to the bellow-extended RE. Auto-Topcor
lenses in macro photography, when used with a TOPCON double cable release.
h. Slide-Copying Attachment, Model II
Used for
duplications of color transparencies, as well as production of black-and-white
negatives from color slides; used attached to the Model IV Bellows.
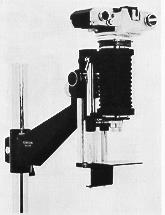
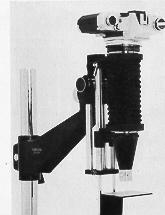
i. Macro-Stand Attachment
Provides a fixed stage for
placing small objects to be photographed at predetermined scales of
reproduction; used attached to the Model IV Bellows, in a vertical set-up.
j Microscope Attachment, Model III
Two-piece, rigid and
non-adjustable attachment for use in low magnification photomicrography.
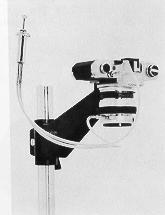
k.Microscope Bellow Attachment
Non-rigid bellows used
for high magnification photomicrography, with the camera supported on the TOPCON
copying stand.
|
9. 2x Auto Tele Converter
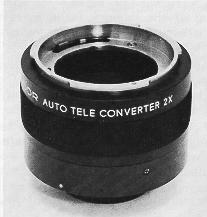 |
Three element tele converter designed exclusively for use with the 100 mm
f/4, 135 mm f/4 and 200mm f/4 Topcor telephoto lenses, with these lenses being
extended 2x or to 200 mm, 270 mm and 400 mm focal lengths respectively.
There is no loss of automatic exposure operations or full aperture exposure
measurements, when this accessory is used between the camera lens and camera
body.
|
 |
1. Store your equipment in a cool, dry and well ventilated place, away from
humidity, salty air, dust, extremely high or low temperatures - and corrosive
fumes.
2. When storing the camera, take it out of its leather case, release the
shutter, revolve the focusing ring to infinity, wrap the camera in a dry and
soft lint-free cotton cloth and pack in a tin-lined container, with lots of
desiccant, such as silica gel. Store other equipment in similar manner.
3. Take the equipment out once in a while, during long periods of storage,
and give them an airing, when the weather is cool and dry.
|
Cleaning
1. Use a rubber-ball blower or a soft hair
brush to eliminate dust from the equipment and then wipe clean
with a soft lint-free cotton cloth.
2. Do not clean the lens too
often. Wipe gently with a lens tissue, after first getting rid of the dust, as
noted. If further cleaning is required, lightly dip the tip of a lint-free cloth
into plain water, or pure grain alcohol, or a mixture of alcohol and ether (4: 1
ratio) and wipe gently with a circular motion. Do not rub but wipe gently as
many times as required.
3. Use a rubber-ball blower for cleaning
the inside of the camera, including reflex mirror and pressure plate. Never wipe
with lens tissue or cloth.
4. Do not use silicone cloth or
silicone-treated eyeglass cleaning tissue paper for cleaning the lens surface
because they might leave a coating.
5. Use clean brushes, too. If
you touch them with your fingers, clean them before use, as you will simply
transfer oil from your fingers to the brush and then to the lens surface.
Batteries
1. Exchange the batteries in the manner noted
initially when inserting new batteries.
2. The batteries can be
used for about a year with normal usage. or for taking about 100 rolls of 36
exposure films. To be on the safe side, therefore, exchange them annually or
check the camera if it has not been used for a long period and/or before going
on important shooting trips.
Since the camera has an electronically
controlled focal plane shutter, the shutter will not function properly (and the
exposure meter will also not work) if the batteries are exhausted. Therefore,
set the shutter speed ring to B (bulb) and depress the shutter release button.
If the shutter is functioning properly, the sound of the first shutter curtain
speeding across will be heard initially, with the sound of the second curtain
movement only being heard when pressure is lifted from the shutter button.
If no sound is heard when the finger is lifted from the button, therefore, the
shutter is not functioning properly and the batteries should be replaced.
3. When storing equipment, take the batteries out of the camera and store them
in a dry location, too.
4. Do not take the batteries apart, play
with them, hit them or throw them into the fire as they may explode.
5. Use round mercury batteries of 1.3 volts each, such as H-C (Toshiba), PX-675
or EPX-675 (Eveready), PX-675 (Mallory) and RPX-675 (Ray-o-Vac). (Webmaster:
See this link on a Wein Air replacement battery.)
6.
Do not use 1.5 volt silver oxide batteries which can, also, be inserted into the
battery compartment, as readings will be under-exposed.